編輯:關於Android編程
1 Argument 'a' might be null less... (Ctrl+F1)
2 This inspection analyzes method control and data flow to report possible conditions that are always true or false, expressions whose value is statically proven to be constant, and situations that can lead to nullability contract violations.
3 Variables, method parameters and return values marked as @Nullable or @NotNull are treated as nullable (or not-null, respectively) and used during the analysis to check nullability contracts, e.g. report possible NullPointerException errors.
4 More complex contracts can be defined using @Contract annotation, for example:
5 @Contract("_, null -> null") — method returns null if its second argument is null @Contract("_, null -> null; _, !null -> !null") — method returns null if its second argument is null and not-null otherwise @Contract("true -> fail") — a typical assertFalse method which throws an exception if true is passed to it
6 The inspection can be configured to use custom @Nullable
7 @NotNull annotations (by default the ones from annotations.jar will be used)
再介紹一下 Resource Type Annotations 定義一個方法 1 private String sayHello(@StringRes int resId) { 2 return ""; 3 } 然後調用 1 sayHello(R.layout.activity_main); 這個地方這個注解的意思是你只能傳string 類型的id進去 而我們傳了layout類型的,如果你不加那個注解的話 ide和編譯器是沒有反應的,到運行期才會有錯誤。 但是你加了以後就會發現 IDE也是直接報錯的! 再比如這樣一段代碼
 1  class TestAnoataion {
 2
 3         public void testAnoation() {
 4             Log.v("main", "test anoation");
 5         }
 6     }
 7
 8     class TestAnoataion2 extends TestAnoataion
 9     {
10         public void testAnoation()
11         {
12
13         }
14     }
假使我們父類的設計的時候本意是 如果你要重寫testAnoation這個方法一定得調用父類的testAnation這個方法。就跟我們activity的oncreate方法一樣。 哪如果子類沒有寫super.testAnoation的話 你根本就不知道 就很容易報錯。但是如果你加了注解。那麼ide就會很明確的提示你錯誤 是不是很強大?當你調用了super語句以後 一切就和諧了! 那這個support庫 就暫時介紹到這裡,個人建議大家有時間一定要自己過一遍一個官方文檔。 這裡定義的注解 對提高大家的代碼質量 會非常非常有幫助。一定要掌握學會。 最後再上一個小例子吧,很多android 開發者都喜歡依賴注入的一些開源庫,來綁定你的控件id。 這樣寫法不但優雅而且好用。 Butterknife 這個開源庫大家一定很多人都用過,我就寫一個小demo 來演示一下這些庫的原理,其實還蠻簡單的。 需要注意的是 要理解這個小demo 需要你除了知道注解的基礎知識以外還需要有反射的基礎知識。 關於反射我很久之前也寫過一個教程 http://www.cnblogs.com/punkisnotdead/p/3384464.html 不會的可以趕緊補一下。 首先定義一個InjectView注解
 1 package com.example.administrator.testfab;
 2
 3 import java.lang.annotation.ElementType;
 4 import java.lang.annotation.Retention;
 5 import java.lang.annotation.RetentionPolicy;
 6 import java.lang.annotation.Target;
 7
 8 /**
 9  * Created by Administrator on 2015/8/5.
10  */
11
12 @Target(ElementType.FIELD)
13 @Retention(RetentionPolicy.RUNTIME)
14 public @interface InjectView {
15     //id就表示哪些控件,-1就表示取不到時候的默認值
16     int id() default -1;
17 }
然後定義一個解釋器
 1 package com.example.administrator.testfab;
 2
 3 import android.app.Activity;
 4 import android.view.View;
 5
 6 import java.lang.reflect.Field;
 7
 8 /**
 9  * Created by Administrator on 2015/8/5.
10  */
11 public class InjectViewParser {
12
13     public static void inject(Object object) {
14
15         try {
16             parse(object);
17         } catch (Exception e) {
18             e.printStackTrace();
19         }
20     }
21
22     public static void parse(Object object) throws Exception {
23         final Class<?> clazz = object.getClass();
24         View view = null;
25         Field[] fields = clazz.getDeclaredFields();
26         for (Field field : fields) {
27             if (field.isAnnotationPresent(InjectView.class)) {
28                 InjectView injectView = field.getAnnotation(InjectView.class);
29                 int id = injectView.id();
30                 if (id < 0) {
31                     throw new Exception("id must not be null");
32                 } else {
33                     field.setAccessible(true);
34                     if (object instanceof View) {
35                         view = ((View) object).findViewById(id);
36                     } else if (object instanceof Activity) {
37                         view = ((Activity) object).findViewById(id);
38                     }
39                     field.set(object, view);
40                 }
41
42             }
43
44         }
45
46     }
47 }
最後在actity裡使用即可
 1 package com.example.administrator.testfab;
 2
 3 import android.os.AsyncTask;
 4 import android.os.Bundle;
 5 import android.support.annotation.CallSuper;
 6 import android.support.annotation.NonNull;
 7 import android.support.annotation.Nullable;
 8 import android.support.annotation.StringRes;
 9 import android.support.v7.app.AppCompatActivity;
10 import android.util.Log;
11 import android.view.Menu;
12 import android.view.MenuItem;
13 import android.widget.Button;
14
15 public class MainActivity extends AppCompatActivity {
16
17     @InjectView(id = R.id.bt)
18     private Button bt;
19
20
21     @Override
22     protected void onCreate(Bundle savedInstanceState) {
23         super.onCreate(savedInstanceState);
24         setContentView(R.layout.activity_main);
25         //開始注入
26         InjectViewParser.inject(this);
27         //這個主要是測試注入id 成功沒有 成功了就不會報錯~
28         bt.setText("inject done");
29
30
31     }
32
33
34     @Override
35     public boolean onCreateOptionsMenu(Menu menu) {
36         // Inflate the menu; this adds items to the action bar if it is present.
37         getMenuInflater().inflate(R.menu.menu_main, menu);
38         return true;
39     }
40
41     @Override
42     public boolean onOptionsItemSelected(MenuItem item) {
43         // Handle action bar item clicks here. The action bar will
44         // automatically handle clicks on the Home/Up button, so long
45         // as you specify a parent activity in AndroidManifest.xml.
46         int id = item.getItemId();
47
48         //noinspection SimplifiableIfStatement
49         if (id == R.id.action_settings) {
50             return true;
51         }
52
53         return super.onOptionsItemSelected(item);
54     }
55
56
57
58 }
 打造浪漫的Android表白程序
幾年前,看到過有個牛人用HTML5繪制了浪漫的愛心表白動畫。發現原來程序員也是可以很浪……漫…..的(PS:剛過520,被妹子罵
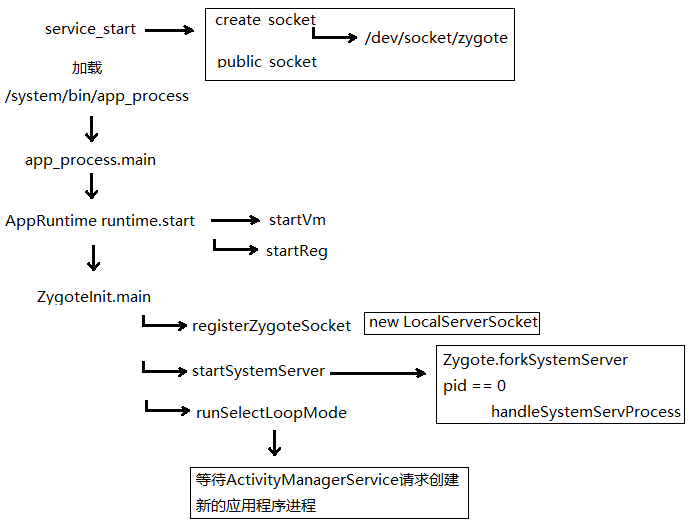 Dalvik學習筆記——Zygote啟動
這張圖簡單說明了Zygote的啟動過程下面重點解析這些函數,從app_process.main開始 int main(int argc, char* const
 Android仿淘寶商品拖動查看詳情及標題欄漸變功能
緒論最近一直比較忙,也沒抽出時間來寫博客,也不得不說是自己犯了懶癌,人要是一懶就什麼事都不想做了,如果不能堅持下來的話,那麼估計就廢了,��。
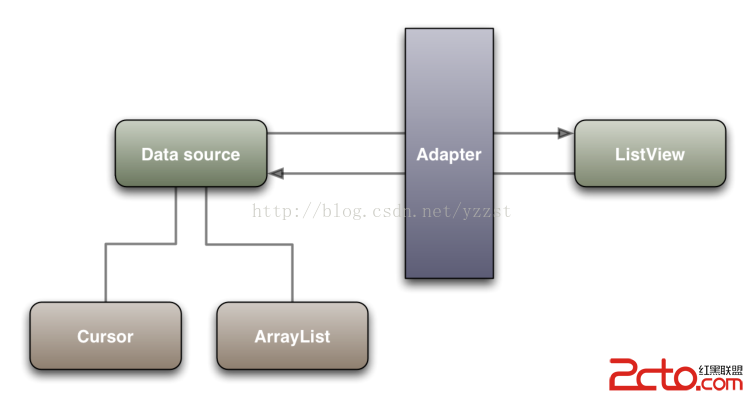 Android高手進階——Adapter深入理解與優化
Android高手進階——Adapter深入理解與優化 一般是針對包含多個元素的View,如ListView,GridView,ExpandableList