編輯:關於Android編程
本教程為大家分享了Android微博個人信息界面設計代碼,供大家參考,具體內容如下
根據用戶ID獲取用戶信息接口:
http://open.weibo.com/wiki/2/users/show
如果你已經實現前面的功能那個這個人信息界面便是小菜一碟,此處不作敘述。

補充
1.時間處理類:
處理微博發出時間距現在時刻的時間。應該是比較容易理解的。
/**
 * 時間處理類
 */
public class DateUtils {

  public String getInterval(String createtime) { //傳入的時間格式必須類似於2012-8-21 17:53:20這樣的格式
    String interval = null;

    SimpleDateFormat sd = new SimpleDateFormat("yyyy-MM-dd HH:mm:ss");
    ParsePosition pos = new ParsePosition(0);
    Date d1 = sd.parse(createtime, pos);

    //用現在距離1970年的時間間隔new Date().getTime()減去以前的時間距離1970年的時間間隔d1.getTime()得出的就是以前的時間與現在時間的時間間隔
    long time = new Date().getTime() - d1.getTime();// 得出的時間間隔是毫秒
    int day = 24 * 3600000;
    int week = day * 7;
    if (time / 1000 < 10 && time / 1000 >= 0) {
      //如果時間間隔小於10秒則顯示“剛剛”time/10得出的時間間隔的單位是秒
      interval = "剛剛";

    } else if (time / 3600000 < 24 && time / 3600000 > 0) {
      //如果時間間隔小於24小時則顯示多少小時前
      int h = (int) (time / 3600000);//得出的時間間隔的單位是小時
      interval = h + "小時前";

    } else if (time / 60000 < 60 && time / 60000 > 0) {
      //如果時間間隔小於60分鐘則顯示多少分鐘前
      int m = (int) ((time % 3600000) / 60000);//得出的時間間隔的單位是分鐘
      interval = m + "分鐘前";

    } else if (time / 1000 < 60 && time / 1000 > 0) {
      //如果時間間隔小於60秒則顯示多少秒前
      int se = (int) ((time % 60000) / 1000);
      interval = se + "秒前";

    } else if (time / day < 7 && time / day > 0) {
      int d = (int) (time / day);
      interval = d + "天前";
    } else if (time / week < 5 && time / week > 0) {
      int w = (int) (time / week);
      interval = w + "周前";
    } else {
      //大於一個月的,則顯示正常的時間,但是不顯示秒
      SimpleDateFormat sdf = new SimpleDateFormat("yyyy-MM-dd HH:mm");

      ParsePosition pos2 = new ParsePosition(0);
      Date d2 = (Date) sdf.parse(createtime, pos2);

      interval = sdf.format(d2);
    }
    return interval;
  }
}
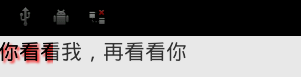
2.字符串中表情處理類:
正則表達式匹配相應表情字段,若匹配則使用SpannableString將該字段的文字用表情圖片代替。
public class StringUtils {

  public static SpannableString getEmotionContent(final Context context, final TextView tv, String source) {
    SpannableString spannableString = new SpannableString(source);
    Resources res = context.getResources();

    String regexEmotion = "\\[([\u4e00-\u9fa5\\w])+\\]";
    Pattern patternEmotion = Pattern.compile(regexEmotion);
    Matcher matcherEmotion = patternEmotion.matcher(spannableString);
    Bitmap scaleBitmap;
    int size = (int) tv.getTextSize();
    while (matcherEmotion.find()) {
      // 獲取匹配到的具體字符
      String key = matcherEmotion.group();
      // 匹配字符串的開始位置
      int start = matcherEmotion.start();
      // 利用表情名字獲取到對應的圖片
      Integer imgRes = EmotionUtils.getImgByName(key);
      if (imgRes != null && size > 0) {
        // 壓縮表情圖片

        Bitmap bitmap = BitmapFactory.decodeResource(res, imgRes);
        if (bitmap != null) {
          scaleBitmap = Bitmap.createScaledBitmap(bitmap, size, size, true);

          ImageSpan span = new ImageSpan(context, scaleBitmap);
          spannableString.setSpan(span, start, start + key.length(), Spannable.SPAN_EXCLUSIVE_EXCLUSIVE);
        }
      }
    }
    return spannableString;
  }
}
3.manifest文件:
由於該應用涉及諸多權限,故需要聲明權限。此處由於上次多張圖片會使內存溢出,故需申請額外內存
<?xml version="1.0" encoding="utf-8"?>
<manifest xmlns:android="http://schemas.android.com/apk/res/android"
     package="study.sinatest">
 <!-- 訪問網絡的權限 -->
  <uses-permission android:name="android.permission.ACCESS_NETWORK_STATE"/>
  <uses-permission android:name="android.permission.INTERNET"/>
  <!-- 在SDCard中創建與刪除文件權限 -->
  <uses-permission android:name="android.permission.MOUNT_UNMOUNT_FILESYSTEMS"/>
  <!-- 往SDCard寫入數據權限 -->
  <uses-permission android:name="android.permission.WRITE_EXTERNAL_STORAGE"/>
  <application
  <!-- 此處由於上次多張圖片會使內存溢出,故需申請額外內存 -->
    android:largeHeap="true"
    android:allowBackup="true"
    android:hardwareAccelerated="false"
    android:icon="@mipmap/weibologo"
    android:label="@string/app_name"
    android:supportsRtl="true"
    android:theme="@style/AppTheme">
    <activity
      android:name=".SplashActivity"
      android:configChanges="keyboardHidden"
      android:launchMode="singleTask"
      android:screenOrientation="portrait">
      <intent-filter>
        <action android:name="android.intent.action.MAIN"/>

        <category android:name="android.intent.category.LAUNCHER"/>
      </intent-filter>
    </activity>
    <activity android:name=".LoginActivity"/>
    <activity android:name=".MainActivity"/>
    <activity android:name=".HomeActivity"/>
    <activity android:name=".WriteActivity"/>
    <activity android:name=".CommentActivity"/>
    <activity android:name=".MeActivity"/>
    <activity android:name=".MoreActivity"/>
    <!-- 授權頁面 -->
    <activity
      android:name=".OAuthActivity"
      android:launchMode="singleTask">
      <intent-filter>
        <action android:name="android.intent.action.VIEW"/>

        <category android:name="android.intent.category.DEFAULT"/>
        <category android:name="android.intent.category.BROWSABLE"/>

        <data android:scheme="philn"/>
      </intent-filter>
    </activity>
    <!-- 谷歌服務權限 -->
    <meta-data
      android:name="com.google.android.gms.version"
      android:value="@integer/google_play_services_version"/>
  </application>

  <supports-screens
    android:anyDensity="true"
    android:largeScreens="true"
    android:normalScreens="true"/>

</manifest>
以上就是本文的全部內容,希望對大家的學習有所幫助,也希望大家多多支持本站。
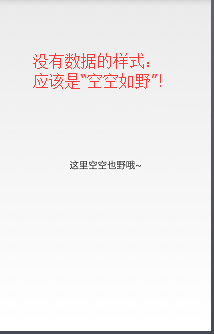 解決Android ListView數據為空及加載錯誤的方法
在項目中,都會用到ListView或GridView等列表控件。一般會用來展示從網絡請求的數據 。如果請求的數據為空或者在請求的時候正好無沒有網絡了,我們的界面應該如何展
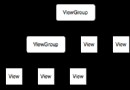
 android 初識ViewPager
1.准備工作每一個view,只是img不一樣,其他都是一樣的<framelayout android:layout_height=match_parent andr
 基於Android自定義控件實現刮刮樂效果
只是簡單的實現了效果,界面沒怎麼做優化,不過那都是次要的啦!!相信大家都迫不及待的想看效果圖了吧,其中主要的彩票視圖類和橡皮擦類都是通過代碼的方式構建視圖,布
 Android——IPC機制(一)IPC概念以及Binder機制
由於IPC機制牽扯的東西比較多,所以這裡將分為一個系列進行總結主要介紹內如如下:IPC簡介 Android中的多進程模式開啟多進程模式 多進程模式的運行機制 IPC基礎概