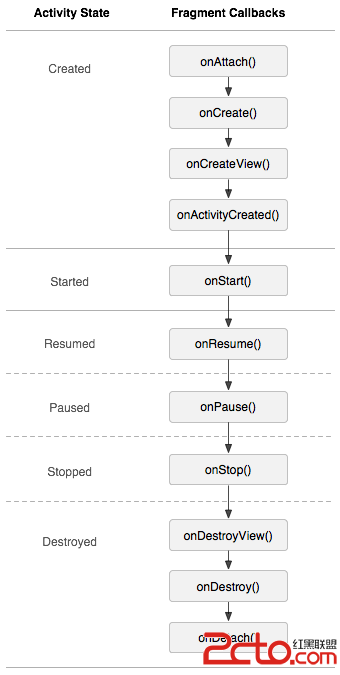
Fragment是安卓v4包的新東西,名為碎片化布局,該布局的目的就是為了取代過時的tabhost.使操作更加方便,大大增加了開發者的高效開發。在使用好Fragment的同時一定要先掌握它的生命周期。廢話不多說。看下圖。

1.如何實現像QQ一樣的底部菜單呢?
首先如果你用V4包,
1.首先父類一定要繼承FragmentActivity.
2.進行初始化操作
也對於新手不是太明白。
我先大概說下流程,
(1 開啟碎片化布局管理區,首要做的事,如果在fragment中,就要先getActivity)
FragmentManager mFragmentManager= getFragmentManager();
(2通過碎片化布局管理器開啟事務,這是執行fragment很關鍵的一步
FragmentTransaction transaction = mFragmentManager.beginTransaction();
(3然後把碎片化布局fragment添加到事務中,這是最關鍵的一步了
transaction.add(R.id.content, messageFragment);
(4最後一定不能忘了提交事務,不然你所做的一切都會白費。
transaction.commit();
3 有人說這個是干嘛的?onRestoreInstanceState如果你看完完整的fragment生命周期你就會明白,這個會在fragment不正常關閉,又打開時起到回復數據的作用,如果不這樣做,可能會使數據重疊,當然解決數據重疊的方法有很多種,這兒就不再做介紹了。要源碼的留言。
package com.fragment.bottom;
import android.app.Activity;
import android.app.FragmentManager;
import android.app.FragmentTransaction;
import android.graphics.Color;
import android.os.Bundle;
import android.view.View;
import android.view.View.OnClickListener;
import android.view.Window;
import android.widget.ImageView;
import android.widget.TextView;
import com.example.networks.R;
/**
* 項目的主Activity,所有的Fragment都嵌入在這裡。
*/
public class MainActivity extends Activity implements OnClickListener {
/**
* 用於展示消息的Fragment
*/
private MessageFragment mMessageFragment;
/**
* 用於展示聯系人的Fragment
*/
private ContactsFragment mContactsFragment;
/**
* 用於展示動態的Fragment
*/
private NewsFragment mMewsFragment;
/**
* 用於展示設置的Fragment
*/
private SettingFragment mSettingFragment;
/**
* 消息界面布局
*/
private View mMessageLayout;
/**
* 聯系人界面布局
*/
private View contactsLayout;
/**
* 動態界面布局
*/
private View mNewsLayout;
/**
* 設置界面布局
*/
private View mSettingLayout;
/**
* 在Tab布局上顯示消息圖標的控件
*/
private ImageView messageImage;
/**
* 在Tab布局上顯示聯系人圖標的控件
*/
private ImageView contactsImage;
/**
* 在Tab布局上顯示動態圖標的控件
*/
private ImageView newsImage;
/**
* 在Tab布局上顯示設置圖標的控件
*/
private ImageView settingImage;
/**
* 在Tab布局上顯示消息標題的控件
*/
private TextView mMessageText;
/**
* 在Tab布局上顯示聯系人標題的控件
*/
private TextView mContactsText;
/**
* 在Tab布局上顯示動態標題的控件
*/
private TextView newsText;
/**
* 在Tab布局上顯示設置標題的控件
*/
private TextView settingText;
/**
* 用於對Fragment進行管理
*/
private FragmentManager mFragmentManager;
//記錄Fragment的位置
private int position = 0;
@Override
protected void onCreate(Bundle savedInstanceState) {
super.onCreate(savedInstanceState);
requestWindowFeature(Window.FEATURE_NO_TITLE);
setContentView(R.layout.activity_main_fragment);
// 初始化布局元素
initViews();
mFragmentManager = getFragmentManager();
// 第一次啟動時選中第0個tab
setTabSelection(position);
}
@Override
protected void onRestoreInstanceState(Bundle savedInstanceState) {
position = savedInstanceState.getInt("position");
setTabSelection(position);
super.onRestoreInstanceState(savedInstanceState);
}
@Override
protected void onSaveInstanceState(Bundle outState) {
//記錄當前的position
outState.putInt("position", position);
}
/**
* 在這裡獲取到每個需要用到的控件的實例,並給它們設置好必要的點擊事件。
*/
private void initViews() {
mMessageLayout = findViewById(R.id.message_layout);
contactsLayout = findViewById(R.id.contacts_layout);
mNewsLayout = findViewById(R.id.news_layout);
mSettingLayout = findViewById(R.id.setting_layout);
messageImage = (ImageView) findViewById(R.id.message_image);
contactsImage = (ImageView) findViewById(R.id.contacts_image);
newsImage = (ImageView) findViewById(R.id.news_image);
settingImage = (ImageView) findViewById(R.id.setting_image);
mMessageText = (TextView) findViewById(R.id.message_text);
mContactsText = (TextView) findViewById(R.id.contacts_text);
newsText = (TextView) findViewById(R.id.news_text);
settingText = (TextView) findViewById(R.id.setting_text);
mMessageLayout.setOnClickListener(this);
contactsLayout.setOnClickListener(this);
mNewsLayout.setOnClickListener(this);
mSettingLayout.setOnClickListener(this);
}
@Override
public void onClick(View v) {
switch (v.getId()) {
case R.id.message_layout:
// 當點擊了消息tab時,選中第1個tab
position=0;
setTabSelection(position);
break;
case R.id.contacts_layout:
// 當點擊了聯系人tab時,選中第2個tab
position=1;
setTabSelection(position);
break;
case R.id.news_layout:
// 當點擊了動態tab時,選中第3個tab
position=2;
setTabSelection(position);
break;
case R.id.setting_layout:
// 當點擊了設置tab時,選中第4個tab
position=3;
setTabSelection(position);
break;
default:
break;
}
}
/**
* 根據傳入的index參數來設置選中的tab頁。
*
* @param index
* 每個tab頁對應的下標。0表示消息,1表示聯系人,2表示動態,3表示設置。
*/
private void setTabSelection(int index) {
// 每次選中之前先清楚掉上次的選中狀態
clearSelection();
// 開啟一個Fragment事務
FragmentTransaction transaction = mFragmentManager.beginTransaction();
// 先隱藏掉所有的Fragment,以防止有多個Fragment顯示在界面上的情況
hideFragments(transaction);
switch (index) {
case 0:
// 當點擊了消息tab時,改變控件的圖片和文字顏色
messageImage.setImageResource(R.drawable.message_selected);
mMessageText.setTextColor(Color.WHITE);
if (mMessageFragment == null) {
// 如果MessageFragment為空,則創建一個並添加到界面上
mMessageFragment = new MessageFragment();
transaction.add(R.id.content, mMessageFragment);
} else {
// 如果MessageFragment不為空,則直接將它顯示出來
transaction.show(mMessageFragment);
}
break;
case 1:
// 當點擊了聯系人tab時,改變控件的圖片和文字顏色
contactsImage.setImageResource(R.drawable.contacts_selected);
mContactsText.setTextColor(Color.WHITE);
if (mContactsFragment == null) {
// 如果ContactsFragment為空,則創建一個並添加到界面上
mContactsFragment = new ContactsFragment();
transaction.add(R.id.content, mContactsFragment);
} else {
// 如果ContactsFragment不為空,則直接將它顯示出來
transaction.show(mContactsFragment);
}
break;
case 2:
// 當點擊了動態tab時,改變控件的圖片和文字顏色
newsImage.setImageResource(R.drawable.news_selected);
newsText.setTextColor(Color.WHITE);
if (mMewsFragment == null) {
// 如果NewsFragment為空,則創建一個並添加到界面上
mMewsFragment = new NewsFragment();
transaction.add(R.id.content, mMewsFragment);
} else {
// 如果NewsFragment不為空,則直接將它顯示出來
transaction.show(mMewsFragment);
}
break;
case 3:
default:
// 當點擊了設置tab時,改變控件的圖片和文字顏色
settingImage.setImageResource(R.drawable.setting_selected);
settingText.setTextColor(Color.WHITE);
if (mSettingFragment == null) {
// 如果SettingFragment為空,則創建一個並添加到界面上
mSettingFragment = new SettingFragment();
transaction.add(R.id.content, mSettingFragment);
} else {
// 如果SettingFragment不為空,則直接將它顯示出來
transaction.show(mSettingFragment);
}
break;
}
transaction.commit();
}
/**
* 清除掉所有的選中狀態。
*/
private void clearSelection() {
messageImage.setImageResource(R.drawable.message_unselected);
mMessageText.setTextColor(Color.parseColor("#82858b"));
contactsImage.setImageResource(R.drawable.contacts_unselected);
mContactsText.setTextColor(Color.parseColor("#82858b"));
newsImage.setImageResource(R.drawable.news_unselected);
newsText.setTextColor(Color.parseColor("#82858b"));
settingImage.setImageResource(R.drawable.setting_unselected);
settingText.setTextColor(Color.parseColor("#82858b"));
}
/**
* 將所有的Fragment都置為隱藏狀態。
*
* @param transaction
* 用於對Fragment執行操作的事務
*/
private void hideFragments(FragmentTransaction transaction) {
if (mMessageFragment != null) {
transaction.hide(mMessageFragment);
}
if (mContactsFragment != null) {
transaction.hide(mContactsFragment);
}
if (mMewsFragment != null) {
transaction.hide(mMewsFragment);
}
if (mSettingFragment != null) {
transaction.hide(mSettingFragment);
}
}
}
 Android利用懸浮按鈕實現翻頁效果
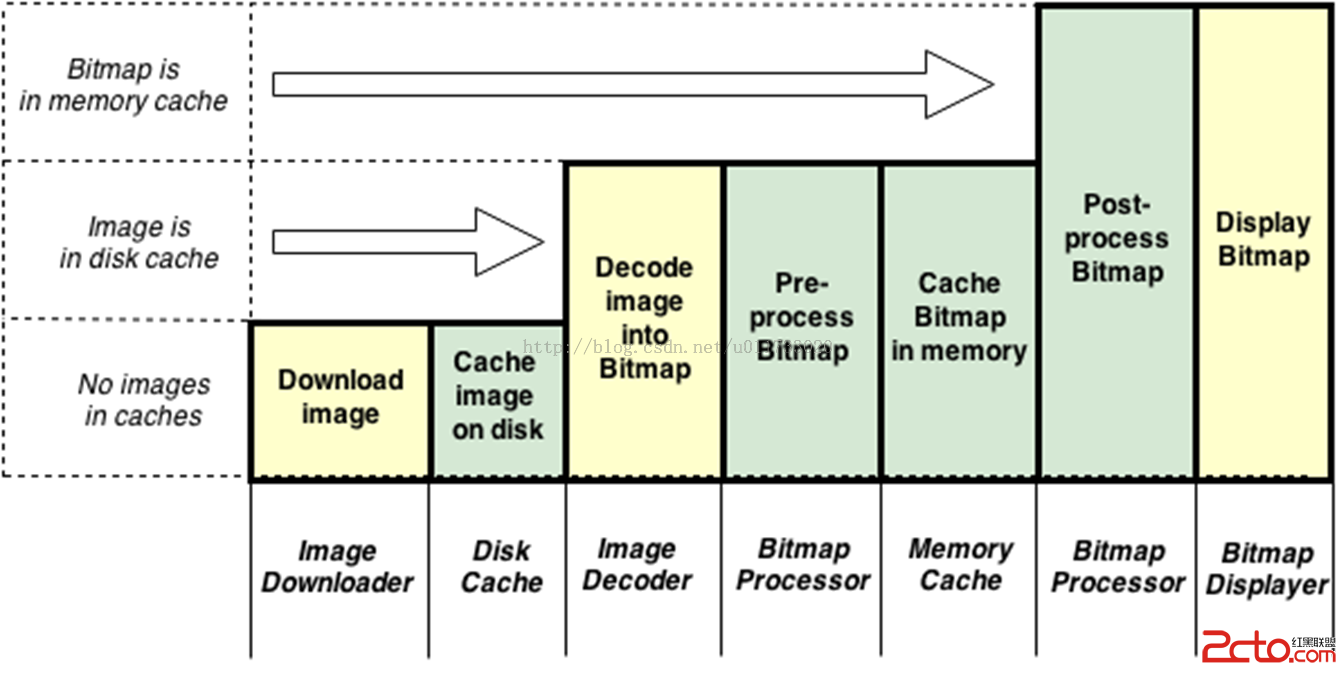 Android-Universal-Image-Loader (圖片異步加載緩存庫)的源碼解讀
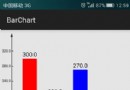 Android編程實現canvas繪制柱狀統計圖功能【自動計算寬高及分度值、可左右滑動】
 Android Service生命周期及用法