編輯:關於Android編程
flow layout, 流式布局, 這個概念在移動端或者前端開發中很常見,特別是在多標簽的展示中, 往往起到了關鍵的作用。然而Android 官方, 並沒有為開發者提供這樣一個布局, 於是有很多開發者自己做了這樣的工作,github上也出現了很多自定義FlowLayout。 最近, 我也實現了這樣一個FlowLayout,自己感覺可能是當前最好用的FlowLayout了(捂臉),在這裡做一下分享。
項目地址:https://github.com/lankton/android-flowlayout
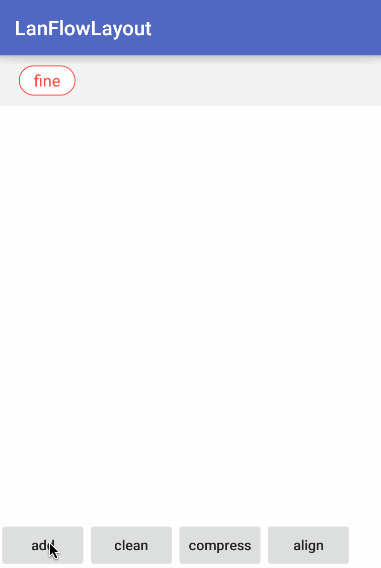
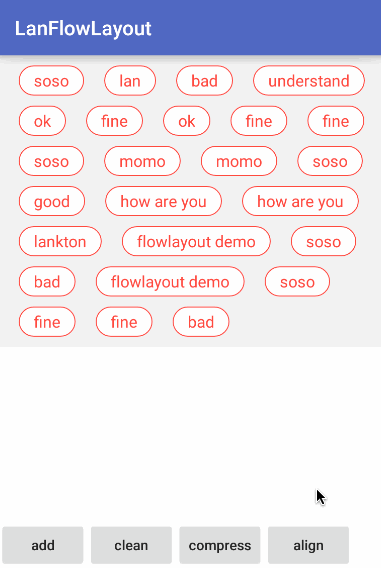
第一張圖, 展示向FlowLayout中不斷添加子View
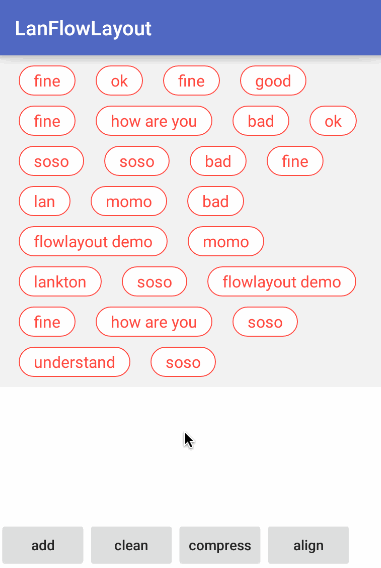
第二張圖, 展示壓縮子View, 使他們盡可能充分利用空間
第三張圖, 展示調整子View之間間隔, 使各行左右對齊
在布局文件中使用FlowLayout即可:
可以看到, 提供了一個自定義參數lineSpacing, 來控制行與行之間的間距。
flowLayout.relayoutToCompress();壓縮的方式, 是通過對子View重新排序, 使得它們能夠更合理的擠占空間, 後面會做詳細說明。
flowLayout.relayoutToAlign();對齊, 不會改變子View的布局, 也不會達到壓縮的作用。
@Override
   protected LayoutParams generateLayoutParams(LayoutParams p) {
       return new MarginLayoutParams(p);
   }

   @Override
   public LayoutParams generateLayoutParams(AttributeSet attrs)
   {
       return new MarginLayoutParams(getContext(), attrs);
   }
重寫該方法的2種重載是有必要的。這樣子元素的LayoutParams就是MarginLayoutParam, 包含了margin 屬性, 正是我們需要的。
主要有2個目的, 第一是測量每個子元素的寬高, 第二是根據子元素的測量值, 設置的FlowLayout的測量值。
@Override
    protected void onMeasure(int widthMeasureSpec, int heightMeasureSpec) {
        int mPaddingLeft = getPaddingLeft();
        int mPaddingRight = getPaddingRight();
        int mPaddingTop = getPaddingTop();
        int mPaddingBottom = getPaddingBottom();

        int widthSize = MeasureSpec.getSize(widthMeasureSpec);
        int heightMode = MeasureSpec.getMode(heightMeasureSpec);
        int heightSize = MeasureSpec.getSize(heightMeasureSpec);
        int lineUsed = mPaddingLeft + mPaddingRight;
        int lineY = mPaddingTop;
        int lineHeight = 0;
        for (int i = 0; i < this.getChildCount(); i++) {
            View child = this.getChildAt(i);
            if (child.getVisibility() == GONE) {
                continue;
            }
            measureChildWithMargins(child, widthMeasureSpec, 0, heightMeasureSpec, lineY);
            MarginLayoutParams mlp = (MarginLayoutParams) child.getLayoutParams();
            int childWidth = child.getMeasuredWidth();
            int childHeight = child.getMeasuredHeight();
            int spaceWidth = mlp.leftMargin + childWidth + mlp.rightMargin;
            int spaceHeight = mlp.topMargin + childHeight + mlp.bottomMargin;
            if (lineUsed + spaceWidth > widthSize) {
                //approach the limit of width and move to next line
                lineY += lineHeight + lineSpacing;
                lineUsed = mPaddingLeft + mPaddingRight;
                lineHeight = 0;
            }
            if (spaceHeight > lineHeight) {
                lineHeight = spaceHeight;
            }
            lineUsed += spaceWidth;
        }
        setMeasuredDimension(
                widthSize,
                heightMode == MeasureSpec.EXACTLY ? heightSize : lineY + lineHeight + mPaddingBottom
        );
    }
代碼邏輯很簡單, 就是遍歷子元素, 計算累計長度, 超過一行可容納寬度, 就將累計長度清0,同時假設繼續向下一行放置子元素。為什麼是假設呢, 因為真正在FlowLayout中放置子元素的過程, 是在onLayout方法中的。
重點在最後的setMeasuredDimension方法。在日常使用FlowLayout中, 我們的寬度往往是固定值, 或者match_parent, 不需要根據內容而改變, 所以寬度值直接用widthSize, 即從傳進來的測量值獲得的寬度。
高度則根據MeasureSpec的mode來判斷, EXACTLY意味著和寬度一樣, 直接用測量值的寬度即可, 否則,則是wrap_content, 需要用子元素排布出來的高度進行判斷。
@Override
 protected void onLayout(boolean changed, int l, int t, int r, int b) {
     int mPaddingLeft = getPaddingLeft();
     int mPaddingRight = getPaddingRight();
     int mPaddingTop = getPaddingTop();

     int lineX = mPaddingLeft;
     int lineY = mPaddingTop;
     int lineWidth = r - l;
     usefulWidth = lineWidth - mPaddingLeft - mPaddingRight;
     int lineUsed = mPaddingLeft + mPaddingRight;
     int lineHeight = 0;
     for (int i = 0; i < this.getChildCount(); i++) {
         View child = this.getChildAt(i);
         if (child.getVisibility() == GONE) {
             continue;
         }
         MarginLayoutParams mlp = (MarginLayoutParams) child.getLayoutParams();
         int childWidth = child.getMeasuredWidth();
         int childHeight = child.getMeasuredHeight();
         int spaceWidth = mlp.leftMargin + childWidth + mlp.rightMargin;
         int spaceHeight = mlp.topMargin + childHeight + mlp.bottomMargin;
         if (lineUsed + spaceWidth > lineWidth) {
             //approach the limit of width and move to next line
             lineY += lineHeight + lineSpacing;
             lineUsed = mPaddingLeft + mPaddingRight;
             lineX = mPaddingLeft;
             lineHeight = 0;
         }
         child.layout(lineX + mlp.leftMargin, lineY + mlp.topMargin, lineX + mlp.leftMargin + childWidth, lineY + mlp.topMargin + childHeight);
         if (spaceHeight > lineHeight) {
             lineHeight = spaceHeight;
         }
         lineUsed += spaceWidth;
         lineX += spaceWidth;

     }
 }
這段代碼也很好理解, 逐個判斷子元素,是繼續在本行放置, 還是需要換行放置。這一步和onMeasure一樣, 基本上所有的FlowLayout都會進行重寫, 我的自然也沒什麼特別的新意, 這兩塊就不重點介紹了。下面重點介紹一下2種布局優化的實現。
關於如何實現壓縮, 這個問題開始的確很讓我頭疼。因為我的腦子裡只有大致的概念,那就是壓縮應該是一個什麼樣的效果, 而這個模糊的概念很難轉換成具體的數學模型。沒有數學模型, 就無法用代碼解決這個問題,簡直恨不得回到大學重學算法。。但有一個想法是明確的, 那就是解決這個問題, 實際上就是對子元素的重新排序。
後來決定簡化思路, 用類似貪心算法的思維解決問題,那就是:逐行解決, 每一行都爭取最大程度的占滿。
1. 從第一行開始, 從子元素集合中,選出一部分, 使得這一部分子元素可以最大程度的占據這一行;
2. 將這部分已經選出的從集合中拿出, 繼續對下一行執行第一步操作。
這個思路確立了, 那我們如何從集合中選出子集, 對某一行進行最大程度的占據呢?
我們已知的條件:
1. 子元素集合
2. 每行可容納寬度
3. 每個子元素的寬度
這個時候, 腦子裡就想到了01背包問題:
已知
1. 物品集合
2. 背包總容量
3. 每個物品的價值
4. 每個物品的體積
求背包包含物品的最大價值(及其方案
有朋友可能有疑問, 二者確實很像, 但不是還差著一個條件嗎?嗯 ,是的。。但是在當前狀況下,因為我們要盡可能的占滿某一行, 那麼每個子元素的寬度就不僅僅是限制了, 也是價值所在。
這樣, 該狀況就完全和01背包問題一致了。之後就可以用動態規劃解決問題了。 關於如何用動態規劃解決01背包問題, 其實我也忘的差不多了, 也是在網上查著資料, 一邊回顧,一邊實現的。所以這裡我自己就不展開介紹了, 也不貼自己的代碼了(感興趣的可以去github查看), 放一個鏈接。我感覺這個鏈接裡的講解對我回顧相關知識點幫助很大,有興趣的也可以看看~
背包問題——“01背包”詳解及實現(包含背包中具體物品的求解)
這個功能,我最早是在bilibili的ipad客戶端上看到的,如下。
當時覺得挺好看的,還想過一陣怎麼做, 但一時沒想出來。。。這次實現FlowLayout, 就順手將這種對齊樣式用自己的想法實現了一下。
public void relayoutToAlign() {
    int childCount = this.getChildCount();
    if (0 == childCount) {
        //no need to sort if flowlayout has no child view
        return;
    }
    int count = 0;
    for (int i = 0; i < childCount; i++) {
        View v = getChildAt(i);
        if (v instanceof BlankView) {
            //BlankView is just to make childs look in alignment, we should ignore them when we relayout
            continue;
        }
        count++;
    }
    View[] childs = new View[count];
    int[] spaces = new int[count];
    int n = 0;
    for (int i = 0; i < childCount; i++) {
        View v = getChildAt(i);
        if (v instanceof BlankView) {
            //BlankView is just to make childs look in alignment, we should ignore them when we relayout
            continue;
        }
        childs[n] = v;
        MarginLayoutParams mlp = (MarginLayoutParams) v.getLayoutParams();
        int childWidth = v.getMeasuredWidth();
        spaces[n] = mlp.leftMargin + childWidth + mlp.rightMargin;
        n++;
    }
    int lineTotal = 0;
    int start = 0;
    this.removeAllViews();
    for (int i = 0; i < count; i++) {
        if (lineTotal + spaces[i] > usefulWidth) {
            int blankWidth = usefulWidth - lineTotal;
            int end = i - 1;
            int blankCount = end - start;
            if (blankCount > 0) {
                int eachBlankWidth = blankWidth / blankCount;
                MarginLayoutParams lp = new MarginLayoutParams(eachBlankWidth, 0);
                for (int j = start; j < end; j++) {
                    this.addView(childs[j]);
                    BlankView blank = new BlankView(mContext);
                    this.addView(blank, lp);
                }
                this.addView(childs[end]);
                start = i;
                i --;
                lineTotal = 0;
            }
        } else {
            lineTotal += spaces[i];
        }
    }
    for (int i = start; i < count; i++) {
        this.addView(childs[i]);
    }
}
代碼很長, 但說起來很簡單。獲得子元素列表,從頭開始, 逐一判斷哪些子元素在同一行。即每一次的start 到 end。 然後計算這些子元素裝滿一行的話, 還差多少, 設為d。則每兩個子元素之間需要補上的間距為 d / (end - start)。 如果設置間距呢, 首先我們肯定不能去更改子元素本身的性質。那麼, 就只能在兩個子元素中間補上一個寬度為d / (end - start) 的BlankView了。
至於這個BlankView是個什麼鬼, 定義如下:
class BlankView extends View {

    public BlankView(Context context) {
        super(context);
    }
}
你看, 根本什麼也沒做。 那我新寫一個類繼承View的意義是什麼呢? 其實從上邊對齊的代碼裡也能看到,這樣我們在遍歷FlowLayout的子元素時, 就可以通過 instance of BlankView 來判斷是真正需要處理、計算的子元素,還是我們後來加上的補位View了。
代碼沒有全部貼出, 因為所有的代碼都在github上了~這裡再貼一下項目地址:
https://github.com/lankton/android-flowlayout
這個項目, 肯定還是有很多需要優化的地方, 歡迎各位提出各種意見或者建議,也期待能夠被大家使用。
謝謝。
 Android中用RxJava和ViewPager實現輪播圖
前言很多人要實現輪播圖都會想到使用ViewPager + Handler來完成輪播圖的效果。但是在RxJava快速發展的情況下,已經可以使用RxJava來代替Handle
 Android網絡圖片異步加載
前言 其實很幸運,入職一周之後就能跟著兩個師兄做android開發,師兄都是大神,身為小白的我只能多多學習,多多努力。最近一段時間都忙的沒機會總結,今天剛完成了andro
 使用android.support.v8.renderscript制作的特效
https://github.com/daimajia/AndroidViewHover import android.support.v8.renderscrip
 幾個比較好用的Androidstudio插件
Android Studio是一個功能全面的開發環境,裝備了為各種設備——從智能手表到汽車——開發Android應用程序所