編輯:關於Android編程
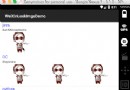
界面如下:(做這個目的僅僅是為了學習一點小知識,因為自己才剛開始)
實現的方法比較簡單,就是定義一個ListView,然後設置監聽,ListView對每個條目的監聽是setOnItemClickListener。
onItemClick(AdapterView parent, View view, int position, long id)這段代碼中,
parent 發生點擊動作的AdapterView。
view 在AdapterView中被點擊的視圖(它是由adapter提供的一個視圖)。
position 視圖在adapter中的位置。
id 被點擊元素的行id。
接下來給大家看看XML裡面的代碼吧,
1.activity_main.xml
<linearlayout xmlns:android="http://schemas.android.com/apk/res/android" xmlns:tools="http://schemas.android.com/tools" android:layout_width="match_parent" android:layout_height="match_parent" tools:context=".MainActivity">

    <listview android:id="@+id/Lv" android:layout_width="fill_parent" android:layout_height="wrap_content">

</listview></linearlayout>
2.item.xml
<linearlayout xmlns:android="http://schemas.android.com/apk/res/android" android:layout_width="match_parent" android:layout_height="wrap_content" android:orientation="horizontal">

    <imageview android:id="@+id/iv" android:layout_width="80dp" android:layout_height="80dp" android:src="@drawable/p1">

    <textview android:id="@+id/tv_name" android:layout_width="fill_parent" android:layout_height="wrap_content" android:layout_gravity="center_vertical" android:textsize="30sp" android:text="@string/name">

</textview></imageview></linearlayout>
3.model.xml
<linearlayout xmlns:android="http://schemas.android.com/apk/res/android" android:layout_width="match_parent" android:layout_height="match_parent" android:orientation="vertical">

    <imageview android:id="@+id/Iv" android:layout_width="wrap_content" android:layout_height="wrap_content" android:layout_gravity="center" android:src="@drawable/p1">

    <textview android:id="@+id/tv_message" android:layout_width="wrap_content" android:layout_height="wrap_content" android:text="哈哈哈啊哈哈">

</textview></imageview></linearlayout>
下面是MainActivity.java,這個類的功能是顯示ListView,然後用戶一點擊其中一個item,我們就可以得到用戶歌手信息,然後通過Bundle方法,將信息發送至跳轉界面,然後跳轉界面再進行相應展示
package com.example.test;

import java.util.ArrayList;
import java.util.HashMap;
import java.util.List;
import java.util.Map;

import android.app.Activity;
import android.content.Intent;
import android.os.Bundle;
import android.util.Log;
import android.view.View;
import android.widget.AdapterView;
import android.widget.AdapterView.OnItemClickListener;
import android.widget.ListView;
import android.widget.SimpleAdapter;

public class MainActivity extends Activity {
	private ListView Lv = null;

	@Override
	protected void onCreate(Bundle savedInstanceState) {
		super.onCreate(savedInstanceState);
		setContentView(R.layout.activity_main);

		Lv = (ListView) findViewById(R.id.Lv);

		final String[] name = new String[] { "張國榮", "張學友", "譚詠麟" };
		final String[] message = new String[] {
				"張國榮[1],1956年9月12日生於香港,歌手、演員、音樂人;影視歌多棲發展的代表之一。1977年正式出道。1983年以《風繼續吹》成名。1984年演唱的《Monica》是香港歌壇第一支同獲十大中文金曲、十大勁歌金曲的舞曲 。 1986年、1987年獲勁歌金曲金獎",
				"張學友,歌手、演員,1961年7月10日出生於香港,1984年獲得香港首屆十八區業余歌唱大賽冠軍,正式出道,1993年發行的國語唱片《吻別》年度銷量超過400萬張,1995年、1996年連續兩年獲得世界音樂大獎全球銷量最高亞洲流行樂歌手獎",
				"譚詠麟,1950年8月23日出生於香港,籍貫廣東新會,中國香港男歌手、音樂人、演員。[1]20世紀60年代末為Loosers樂隊成員。1973年任溫拿樂隊主音歌手。1975年參演首部電影《大家樂》。1978年溫拿樂隊宣布解散,譚詠麟以個人身份發展。1979年赴台灣發展事業,推出首張個人專輯《反斗星》" };
		final int[] photo = new int[] { R.drawable.p1, R.drawable.p2, R.drawable.p3 };
		List> data = new ArrayList>();

		Map map1 = new HashMap();
		map1.put("photo", R.drawable.p1);
		map1.put("name", name[0]);
		data.add(map1);

		Map map2 = new HashMap();
		map2.put("photo", R.drawable.p2);
		map2.put("name", name[1]);
		data.add(map2);

		Map map3 = new HashMap();
		map3.put("photo", R.drawable.p3);
		map3.put("name", name[2]);
		data.add(map3);

		Lv.setAdapter(new SimpleAdapter(this, data, R.layout.item,new String[] { "photo", "name" }, new int[] { R.id.iv,R.id.tv_name }));
		Lv.setOnItemClickListener(new OnItemClickListener() {
			@Override
			public void onItemClick(AdapterView arg0, View arg1, int arg2,long arg3) {

				Bundle bundle = new Bundle();
				bundle.putInt("photo", photo[arg2]);
				bundle.putString("message", message[arg2]);
				Intent intent = new Intent();
				intent.putExtras(bundle);
				intent.setClass(MainActivity.this, MoveList.class);
				Log.i("message", message[arg2]);
				startActivity(intent);
			}
		});
	}

}
這是用戶點擊後的界面,如下
package com.example.test;

import android.app.Activity;
import android.os.Bundle;
import android.widget.ImageView;
import android.widget.TextView;

public class MoveList extends Activity {

	protected void onCreate(Bundle savedInstanceState) {
		super.onCreate(savedInstanceState);
		setContentView(R.layout.model);

		Bundle bundle=getIntent().getExtras();
		int id=bundle.getInt("photo");
		String message=bundle.getString("message");
		ImageView Iv=(ImageView) findViewById(R.id.Iv);
		Iv.setImageResource(id);
		TextView tv=(TextView) findViewById(R.id.tv_message);
		tv.setText(message);


	}

}
最後大家一定不要忘了在AndroidManifest.xml裡面注冊界面,這一點要小心。
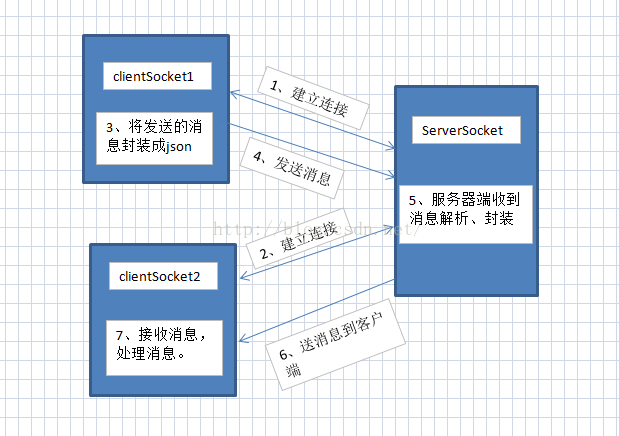 Android開發之實現兩個手機之間的通訊
Hello,大家好,今天又來寫博客了,項目終於搞完了最近又有時間寫寫博客了。在上上篇博客中我們學習了Android中網絡通訊,並用Socket實現了Android客戶端與
 Android-手勢識別(普通手勢識別:上 下 左 右 ;自定義手勢識別:對號,錯號 等)
1.回顧上篇學習了 Android 系統服務的 10個實例 ,當然 還有更多的系統服務沒有使用;留下來的遺憾就是,昨晚沒有將demo下載地址分享出去; &nbs
 Android報警功能,報警鈴音,手機開始震動
公司項目需求,需要給軟件加入報警功能, 點擊手繪的報警圖標,開始震動,並且發出報警鈴音, 使用了layerlist,drawable,Vibrator,soundpool
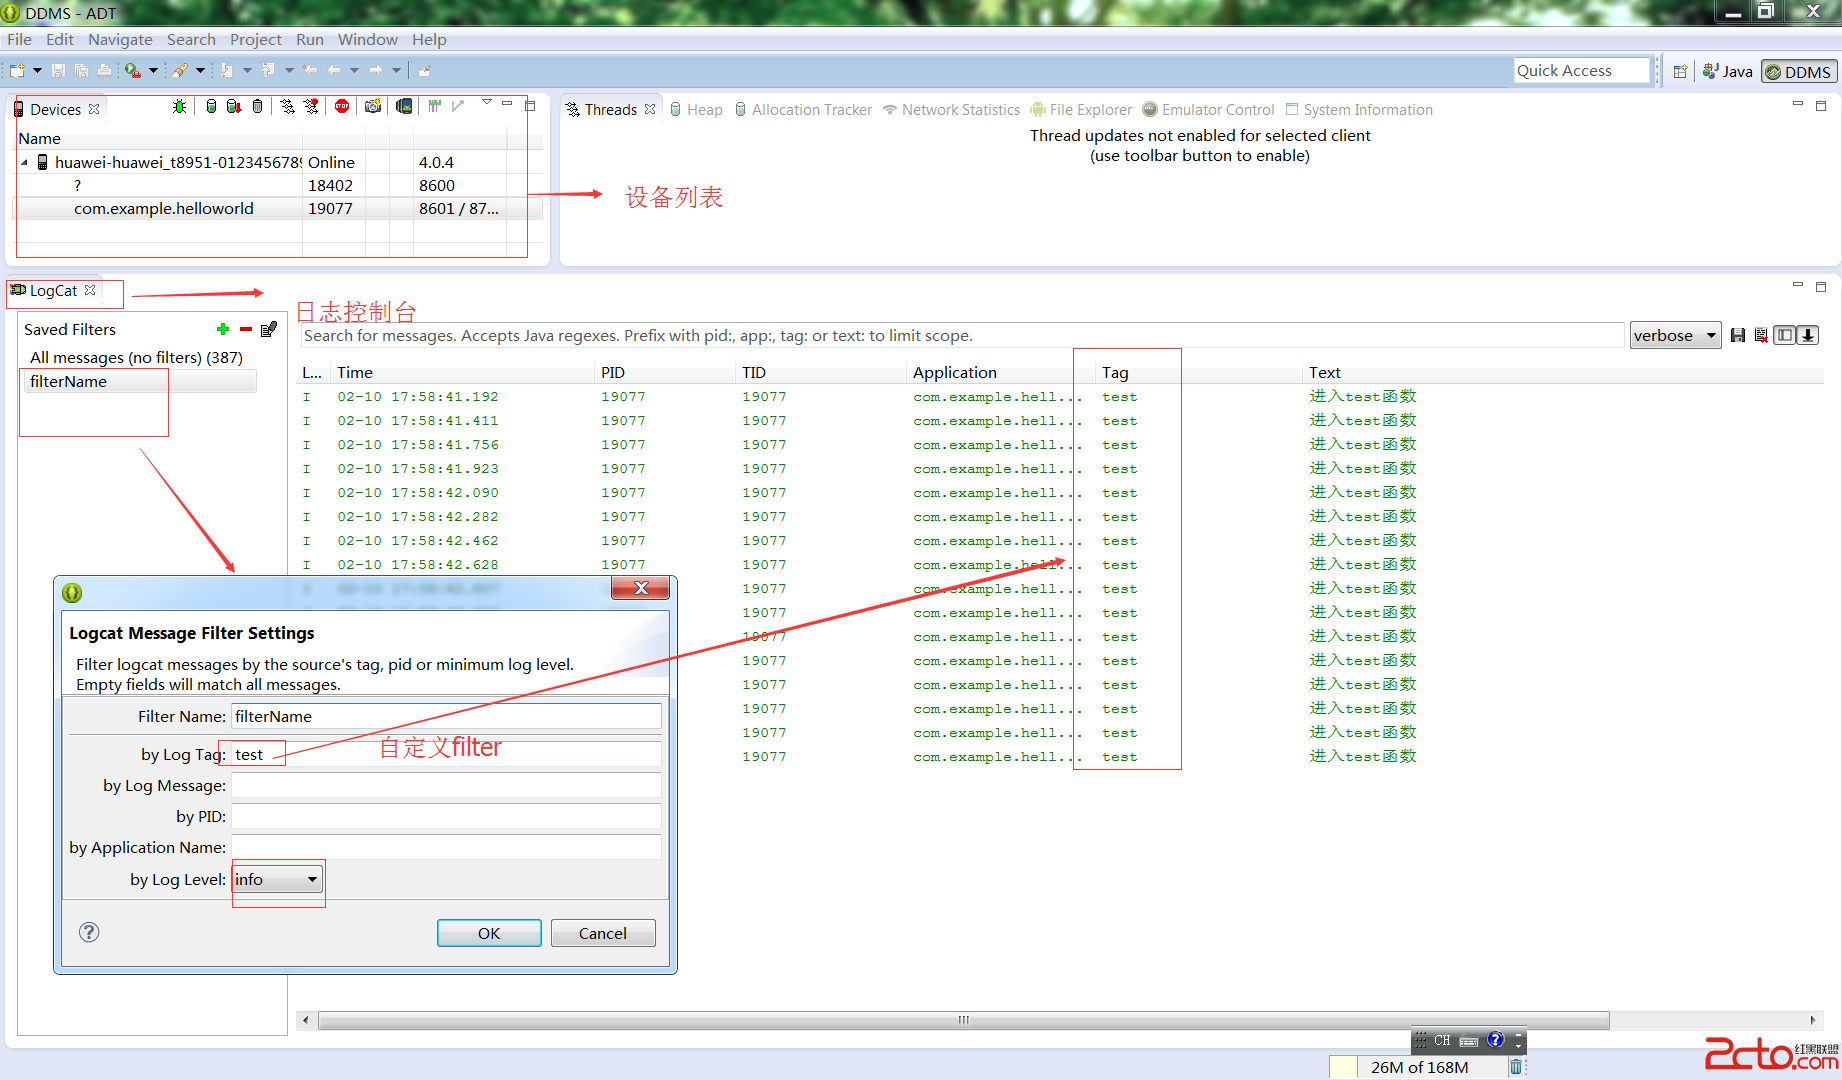 Android學習:LogCat日志查詢
一:Log日志工具類 一個android應用程序運行後 並不會在 ide的控制台內輸出任何信息. 不能在控制台輸出。但是android提供的Log類。 在程序中輸出日志