編輯:關於Android編程
從startActivity/startActivityForResult開始,不管是哪種方式,最終調到的都是下面的startActivityForResult。
// Activity
public void startActivityForResult(Intent intent, int requestCode, @Nullable Bundle options) {
    // mParent一般都是null,這個變量是ActivityGroup,用來在一個頁面
    // 嵌入多個子頁面,在API13中廢棄,推薦使用Fragment代替。
    if (mParent == null) {
        Instrumentation.ActivityResult ar =
            mInstrumentation.execStartActivity(
                this, mMainThread.getApplicationThread(), mToken, this,
                intent, requestCode, options);
        if (ar != null) {
            mMainThread.sendActivityResult(
                mToken, mEmbeddedID, requestCode, ar.getResultCode(),
                ar.getResultData());
        }
        if (requestCode >= 0) {
            // If this start is requesting a result, we can avoid making
            // the activity visible until the result is received.  Setting
            // this code during onCreate(Bundle savedInstanceState) or onResume() will keep the
            // activity hidden during this time, to avoid flickering.
            // This can only be done when a result is requested because
            // that guarantees we will get information back when the
            // activity is finished, no matter what happens to it.
            mStartedActivity = true;
        }

        cancelInputsAndStartExitTransition(options);
        // TODO Consider clearing/flushing other event sources and events for child windows.
    } else {
        if (options != null) {
            mParent.startActivityFromChild(this, intent, requestCode, options);
        } else {
            // Note we want to go through this method for compatibility with
            // existing applications that may have overridden it.
            mParent.startActivityFromChild(this, intent, requestCode);
        }
    }
}
只考慮mParent == null的情況。主要過程很簡單,首先啟動Activity並且得到結果,然後返回執行結果。
// Instrumentation
public ActivityResult execStartActivity(
        Context who, IBinder contextThread, IBinder token, Activity target,
        Intent intent, int requestCode, Bundle options) {
    IApplicationThread whoThread = (IApplicationThread) contextThread;
    ...
    try {
        ...
        int result = ActivityManagerNative.getDefault()
            .startActivity(whoThread, who.getBasePackageName(), intent,
                    intent.resolveTypeIfNeeded(who.getContentResolver()),
                    token, target != null ? target.mEmbeddedID : null,
                    requestCode, 0, null, options);
        checkStartActivityResult(result, intent);
    } catch (RemoteException e) {
        throw new RuntimeException("Failure from system", e);
    }
    return null;
}
實際的startActivity通過ActivityManagerNative.getDefault()返回的東西來完成。看看這個返回的是什麼。
// ActivityManagerNative
static public IActivityManager getDefault() {
    return gDefault.get();
}

private static final Singleton gDefault = new Singleton() {
    protected IActivityManager create() {
        IBinder b = ServiceManager.getService("activity");
        if (false) {
            Log.v("ActivityManager", "default service binder = " + b);
        }
        IActivityManager am = asInterface(b);
        if (false) {
            Log.v("ActivityManager", "default service = " + am);
        }
        return am;
    }
};
public abstract class Singleton {
    private T mInstance;

    protected abstract T create();

    public final T get() {
        synchronized (this) {
            if (mInstance == null) {
                mInstance = create();
            }
            return mInstance;
        }
    }
}
通過上面兩段代碼可以發現,ActivityManagerNative.getDefault()得到的實際上是一個單例的IActivityManager,更准確地說,是一個ActivityManagerService實例。在看AMS的startActivity之前,先來看看,checkStartActivityResult(result, intent);是干嘛的。
// Instrumentation
public static void checkStartActivityResult(int res, Object intent) {
    if (res >= ActivityManager.START_SUCCESS) {
        return;
    }

    switch (res) {
        case ActivityManager.START_INTENT_NOT_RESOLVED:
        case ActivityManager.START_CLASS_NOT_FOUND:
            if (intent instanceof Intent && ((Intent)intent).getComponent() != null)
                throw new ActivityNotFoundException(
                        "Unable to find explicit activity class "
                        + ((Intent)intent).getComponent().toShortString()
                        + "; have you declared this activity in your AndroidManifest.xml?");
            throw new ActivityNotFoundException(
                    "No Activity found to handle " + intent);
        case ActivityManager.START_PERMISSION_DENIED:
            throw new SecurityException("Not allowed to start activity "
                    + intent);
        case ActivityManager.START_FORWARD_AND_REQUEST_CONFLICT:
            throw new AndroidRuntimeException(
                    "FORWARD_RESULT_FLAG used while also requesting a result");
        case ActivityManager.START_NOT_ACTIVITY:
            throw new IllegalArgumentException(
                    "PendingIntent is not an activity");
        case ActivityManager.START_NOT_VOICE_COMPATIBLE:
            throw new SecurityException(
                    "Starting under voice control not allowed for: " + intent);
        case ActivityManager.START_NOT_CURRENT_USER_ACTIVITY:
            // Fail silently for this case so we don't break current apps.
            // TODO(b/22929608): Instead of failing silently or throwing an exception,
            // we should properly position the activity in the stack (i.e. behind all current
            // user activity/task) and not change the positioning of stacks.
            Log.e(TAG,
                    "Not allowed to start background user activity that shouldn't be displayed"
                    + " for all users. Failing silently...");
            break;
        default:
            throw new AndroidRuntimeException("Unknown error code "
                    + res + " when starting " + intent);
    }
}
這段代碼非常清楚,就是為了檢測AMS中startActicity的結果,如果沒有成功啟動,就會拋出相應的異常信息。
再看AMS的startActivity。
// ActivityManagerService
@Override
public final int startActivity(IApplicationThread caller, String callingPackage,
        Intent intent, String resolvedType, IBinder resultTo, String resultWho, int requestCode,
        int startFlags, ProfilerInfo profilerInfo, Bundle options) {
    return startActivityAsUser(caller, callingPackage, intent, resolvedType, resultTo,
        resultWho, requestCode, startFlags, profilerInfo, options,
        UserHandle.getCallingUserId());
}

@Override
public final int startActivityAsUser(IApplicationThread caller, String callingPackage,
        Intent intent, String resolvedType, IBinder resultTo, String resultWho, int requestCode,
        int startFlags, ProfilerInfo profilerInfo, Bundle options, int userId) {
    enforceNotIsolatedCaller("startActivity");
    userId = handleIncomingUser(Binder.getCallingPid(), Binder.getCallingUid(), userId,
            false, ALLOW_FULL_ONLY, "startActivity", null);
    // TODO: Switch to user app stacks here.
    return mStackSupervisor.startActivityMayWait(caller, -1, callingPackage, intent,
            resolvedType, null, null, resultTo, resultWho, requestCode, startFlags,
            profilerInfo, null, null, options, false, userId, null, null);
}
現在啟動Activity的過程來到了ActivityStackSupervisor類。簡單看看startActivityMayWait方法。
// ActivityStackSupervisor
final int startActivityMayWait(IApplicationThread caller, int callingUid,
        String callingPackage, Intent intent, String resolvedType,
        IVoiceInteractionSession voiceSession, IVoiceInteractor voiceInteractor,
        IBinder resultTo, String resultWho, int requestCode, int startFlags,
        ProfilerInfo profilerInfo, WaitResult outResult, Configuration config,
        Bundle options, boolean ignoreTargetSecurity, int userId,
        IActivityContainer iContainer, TaskRecord inTask) {
    ...
    // resolveActivity解析intent,找到intent對應Activity的
    // ActivityInfo信息,實際是由PackageManagerService完成的。
    ActivityInfo aInfo =
            resolveActivity(intent, resolvedType, startFlags, profilerInfo, userId);
    ...
    final ActivityStack stack;
    // container為null,獲取到當前正在前台的棧
    if (container == null || container.mStack.isOnHomeDisplay()) {
        stack = mFocusedStack;
    } else {
        stack = container.mStack;
    }
    ...
    // 盡管aInfo不為null,但是該屬性一般沒設置,所以不會走進這個邏輯
    if (aInfo != null &&
            (aInfo.applicationInfo.privateFlags
                    &ApplicationInfo.PRIVATE_FLAG_CANT_SAVE_STATE) != 0) {
       ...
   }
   // 啟動Activity流程走到這個方法裡
   int res = startActivityLocked(caller, intent, resolvedType, aInfo,
            voiceSession, voiceInteractor, resultTo, resultWho,
            requestCode, callingPid, callingUid, callingPackage,
            realCallingPid, realCallingUid, startFlags, options, ignoreTargetSecurity,
            componentSpecified, null, container, inTask);
    ...
}
來看startActivityLocked方法。
// ActivityStackSupervisor
final int startActivityLocked(IApplicationThread caller,
        Intent intent, String resolvedType, ActivityInfo aInfo,
        IVoiceInteractionSession voiceSession, IVoiceInteractor voiceInteractor,
        IBinder resultTo, String resultWho, int requestCode,
        int callingPid, int callingUid, String callingPackage,
        int realCallingPid, int realCallingUid, int startFlags, Bundle options,
        boolean ignoreTargetSecurity, boolean componentSpecified, ActivityRecord[] outActivity,
        ActivityContainer container, TaskRecord inTask) {
    ...
    err = startActivityUncheckedLocked(r, sourceRecord, voiceSession, voiceInteractor,
            startFlags, true, options, inTask);
    ...
}
再簡單看看startActivityUncheckedLocked,singleTask等啟動模式就是在這個方法裡處理的,這裡不對其進行分析,之後另開一篇專門分析這個。
// ActivityStackSupervisor
final int startActivityUncheckedLocked(final ActivityRecord r, ActivityRecord sourceRecord,
        IVoiceInteractionSession voiceSession, IVoiceInteractor voiceInteractor, int startFlags,
        boolean doResume, Bundle options, TaskRecord inTask) {
    ...
    // 啟動模式相關,這裡不深入分析
    final boolean launchSingleTop = r.launchMode == ActivityInfo.LAUNCH_SINGLE_TOP;
    final boolean launchSingleInstance = r.launchMode == ActivityInfo.LAUNCH_SINGLE_INSTANCE;
    final boolean launchSingleTask = r.launchMode == ActivityInfo.LAUNCH_SINGLE_TASK;
    ...
    // 該屬性表示非用戶操作,一般不設置,所以mUserLeaving為true,
    // 這樣Activity暫停之前就會調用onUserLeaveHint方法
    mUserLeaving = (launchFlags & Intent.FLAG_ACTIVITY_NO_USER_ACTION) == 0;
    ...
    targetStack.startActivityLocked(r, newTask, doResume, keepCurTransition, options);
    ...
}
現在又跳到了ActivityStack的startActivityLocked方法。
// ActivityStack
final void startActivityLocked(ActivityRecord r, boolean newTask,
        boolean doResume, boolean keepCurTransition, Bundle options) {
    ...
    if (doResume) {
        mStackSupervisor.resumeTopActivitiesLocked(this, r, options);
    }
}
ActivityStackSupervisor.resumeTopActivitiesLocked==>ActivityStack.resumeTopActivityLocked==>ActivityStack.resumeTopActivityInnerLocked。
下面來簡單看看resumeTopActivityInnerLocked方法。
// ActivityStack
private boolean resumeTopActivityInnerLocked(ActivityRecord prev, Bundle options) {
    ...
    // Find the first activity that is not finishing.
    // 找到棧頂正在運行的ActivityRecord
    final ActivityRecord next = topRunningActivityLocked(null);
    ...
    // 在真正啟動新的Activity之前,這裡先暫停以前的Activity。
    boolean dontWaitForPause = (next.info.flags&ActivityInfo.FLAG_RESUME_WHILE_PAUSING) != 0;
    boolean pausing = mStackSupervisor.pauseBackStacks(userLeaving, true, dontWaitForPause);
    // 第一次進這個方法時,因為老的Activity還沒有被暫停,所以這裡的
    // mResumedActivity不為null,調用startPausingLocked暫停老
    // 的Activity。在暫停Activity後,會通知AMS暫停完成,這個時候
    // 又會重新調到resumeTopActivityInnerLocked,再次進入這個方法。
    if (mResumedActivity != null) {
        if (DEBUG_STATES) Slog.d(TAG_STATES,
                "resumeTopActivityLocked: Pausing " + mResumedActivity);
        pausing |= startPausingLocked(userLeaving, false, true, dontWaitForPause);
    }
    ...
    // 之前暫停Activity後已經return了,這是暫停完成後再次進入這個方法,
    // 才會走到這裡,next就是被啟動的Activity。
    if (next.app != null && next.app.thread != null) {
        // 已有相應進程,不需要創建進程,直接開始創建Activity
        ...
        mStackSupervisor.startSpecificActivityLocked(next, true, false);
        ...
    } else {
        // 被啟動的Activity還沒有創建相應進程,一般是從Launcher啟動應用,
        // 或者是從外部調用Activity啟動這個應用。這個時候需要創建一個進程,
        // 實際由zygote進程fork一個新的進程。
        ...
        mStackSupervisor.startSpecificActivityLocked(next, true, true);
        ...
    }
}
在startSpecificActivityLocked中,就可以看到是否創建新的進程。
// ActivityStackSupervisor
void startSpecificActivityLocked(ActivityRecord r,
        boolean andResume, boolean checkConfig) {
    ProcessRecord app = mService.getProcessRecordLocked(r.processName,
            r.info.applicationInfo.uid, true);

    r.task.stack.setLaunchTime(r);

    if (app != null && app.thread != null) {
        ...
        realStartActivityLocked(r, app, andResume, checkConfig);
        return;
        ...
    }

    mService.startProcessLocked(r.processName, r.info.applicationInfo, true, 0,
            "activity", r.intent.getComponent(), false, false, true);
}
如果有相應進程,直接調realStartActivityLocked,如果沒有,就會調startProcessLocked來創建新的進程。
來看看創建新進程的過程。
// ActivityManagerService
final ProcessRecord startProcessLocked(String processName,
        ApplicationInfo info, boolean knownToBeDead, int intentFlags,
        String hostingType, ComponentName hostingName, boolean allowWhileBooting,
        boolean isolated, boolean keepIfLarge) {
    return startProcessLocked(processName, info, knownToBeDead, intentFlags, hostingType,
            hostingName, allowWhileBooting, isolated, 0 /* isolatedUid */, keepIfLarge,
            null /* ABI override */, null /* entryPoint */, null /* entryPointArgs */,
            null /* crashHandler */);
}

final ProcessRecord startProcessLocked(String processName, ApplicationInfo info,
        boolean knownToBeDead, int intentFlags, String hostingType, ComponentName hostingName,
        boolean allowWhileBooting, boolean isolated, int isolatedUid, boolean keepIfLarge,
        String abiOverride, String entryPoint, String[] entryPointArgs, Runnable crashHandler) {
    long startTime = SystemClock.elapsedRealtime();
    ProcessRecord app;
    ...
    if (app == null) {
        ...
        // 在這裡新建了一個ProcessRecord
        app = newProcessRecordLocked(info, processName, isolated, isolatedUid);
        ...
    }
    ...
    startProcessLocked(
            app, hostingType, hostingNameStr, abiOverride, entryPoint, entryPointArgs);
    ...
}

private final void startProcessLocked(ProcessRecord app, String hostingType,
        String hostingNameStr, String abiOverride, String entryPoint, String[] entryPointArgs) {
    ...
    // 從前面的代碼可以看到傳入的entryPoint為null,所以在啟動新的進程時,
    // 傳入的entryPoint為"android.app.ActivityThread",這個實際上就
    // 是作為新進程main方法入口的類。
    boolean isActivityProcess = (entryPoint == null);
    if (entryPoint == null) entryPoint = "android.app.ActivityThread";
    ...
    // 這裡就是創建新進程了,實際是由zygote進程fork出一個新進程
    Process.ProcessStartResult startResult = Process.start(entryPoint,
            app.processName, uid, uid, gids, debugFlags, mountExternal,
            app.info.targetSdkVersion, app.info.seinfo, requiredAbi, instructionSet,
            app.info.dataDir, entryPointArgs);
    ...
}
來看看Process的start是怎麼處理的。
// Process
public static final ProcessStartResult start(final String processClass,
                              final String niceName,
                              int uid, int gid, int[] gids,
                              int debugFlags, int mountExternal,
                              int targetSdkVersion,
                              String seInfo,
                              String abi,
                              String instructionSet,
                              String appDataDir,
                              String[] zygoteArgs) {
    try {
        return startViaZygote(processClass, niceName, uid, gid, gids,
                debugFlags, mountExternal, targetSdkVersion, seInfo,
                abi, instructionSet, appDataDir, zygoteArgs);
    } catch (ZygoteStartFailedEx ex) {
        Log.e(LOG_TAG,
                "Starting VM process through Zygote failed");
        throw new RuntimeException(
                "Starting VM process through Zygote failed", ex);
    }
}

private static ProcessStartResult startViaZygote(final String processClass,
                              final String niceName,
                              final int uid, final int gid,
                              final int[] gids,
                              int debugFlags, int mountExternal,
                              int targetSdkVersion,
                              String seInfo,
                              String abi,
                              String instructionSet,
                              String appDataDir,
                              String[] extraArgs)
                              throws ZygoteStartFailedEx {
    synchronized(Process.class) {
        ArrayList argsForZygote = new ArrayList();
        ...
        // 接下來全都是設置zygote的參數,添加到argsForZygote這個列表中去
        ...
        return zygoteSendArgsAndGetResult(openZygoteSocketIfNeeded(abi), argsForZygote);
    }
}

// 顧名思義,這個方法就是打開用來與Zygote進程通信的Socket,如果已經打開,
// 就什麼都不用做。在這個方法裡可以能看到,有兩個可選的Socket:"zygote"
// 和"zygote_secondary",如果首選的"zygote"可以打開,就用"zygote",
// 打不開就再看次選的"zygote_secondary",如果"zygote_secondary"也打
// 不開就會拋異常。
private static ZygoteState openZygoteSocketIfNeeded(String abi) throws ZygoteStartFailedEx {
    if (primaryZygoteState == null || primaryZygoteState.isClosed()) {
        try {
            primaryZygoteState = ZygoteState.connect(ZYGOTE_SOCKET);
        } catch (IOException ioe) {
            throw new ZygoteStartFailedEx("Error connecting to primary zygote", ioe);
        }
    }

    if (primaryZygoteState.matches(abi)) {
        return primaryZygoteState;
    }

    // The primary zygote didn't match. Try the secondary.
    if (secondaryZygoteState == null || secondaryZygoteState.isClosed()) {
        try {
            secondaryZygoteState = ZygoteState.connect(SECONDARY_ZYGOTE_SOCKET);
        } catch (IOException ioe) {
            throw new ZygoteStartFailedEx("Error connecting to secondary zygote", ioe);
        }
    }

    if (secondaryZygoteState.matches(abi)) {
        return secondaryZygoteState;
    }

    throw new ZygoteStartFailedEx("Unsupported zygote ABI: " + abi);
}

private static ProcessStartResult zygoteSendArgsAndGetResult(
            ZygoteState zygoteState, ArrayList args)
            throws ZygoteStartFailedEx {
    try {
        // 按格式通過Socket來向zygote進程傳輸參數,然後收到fork的進程id
        final BufferedWriter writer = zygoteState.writer;
        final DataInputStream inputStream = zygoteState.inputStream;

        writer.write(Integer.toString(args.size()));
        writer.newLine();

        int sz = args.size();
        for (int i = 0; i < sz; i++) {
            String arg = args.get(i);
            if (arg.indexOf('\n') >= 0) {
                throw new ZygoteStartFailedEx(
                        "embedded newlines not allowed");
            }
            writer.write(arg);
            writer.newLine();
        }

        writer.flush();

        // Should there be a timeout on this?
        ProcessStartResult result = new ProcessStartResult();
        result.pid = inputStream.readInt();
        if (result.pid < 0) {
            throw new ZygoteStartFailedEx("fork() failed");
        }
        result.usingWrapper = inputStream.readBoolean();
        return result;
    } catch (IOException ex) {
        zygoteState.close();
        throw new ZygoteStartFailedEx(ex);
    }
}
於是,zygote進程就fork出了一個新的進程。
前面說過,在fork新進程時,會傳入一個入口類”android.app.ActivityThread”,等fork出新進程後,就會執行這個類的main()方法。所以下面接著來看ActivityThread類的main。
// ActivityThread
public static void main(String[] args) {
    ...
    Looper.prepareMainLooper();

    ActivityThread thread = new ActivityThread();
    thread.attach(false);

    if (sMainThreadHandler == null) {
        sMainThreadHandler = thread.getHandler();
    }
    ...
    Looper.loop();

    throw new RuntimeException("Main thread loop unexpectedly exited");
}
這裡實際上就是初始化Looper和ActivityThread,然後用Looper來開始循環分發MessageQueue中的消息。關於Looper、MessageQueue和Handler,這裡不做深入探討,之後另開一貼。接下來看怎麼去啟動Activity。
// ActivityThread
private void attach(boolean system) {
    ...
    final IActivityManager mgr = ActivityManagerNative.getDefault();
    try {
        mgr.attachApplication(mAppThread);
    } catch (RemoteException ex) {
        // Ignore
    }
    ...
}
// ActivityManagerService
@Override
public final void attachApplication(IApplicationThread thread) {
    synchronized (this) {
        int callingPid = Binder.getCallingPid();
        final long origId = Binder.clearCallingIdentity();
        attachApplicationLocked(thread, callingPid);
        Binder.restoreCallingIdentity(origId);
    }
}

private final boolean attachApplicationLocked(IApplicationThread thread,
        int pid) {
    ...
    // See if the top visible activity is waiting to run in this process...
    if (normalMode) {
        try {
            if (mStackSupervisor.attachApplicationLocked(app)) {
                didSomething = true;
            }
        } catch (Exception e) {
            Slog.wtf(TAG, "Exception thrown launching activities in " + app, e);
            badApp = true;
        }
    }
    ...
}
在這段代碼後面還有Service和廣播的相關處理,這裡不做關注。
// ActivityStackSupervisor
boolean attachApplicationLocked(ProcessRecord app) throws RemoteException {
    ...
    ActivityRecord hr = stack.topRunningActivityLocked(null);
    if (hr != null) {
        if (hr.app == null && app.uid == hr.info.applicationInfo.uid
                && processName.equals(hr.processName)) {
            try {
                if (realStartActivityLocked(hr, app, true, true)) {
                    didSomething = true;
                }
            } catch (RemoteException e) {
                Slog.w(TAG, "Exception in new application when starting activity "
                      + hr.intent.getComponent().flattenToShortString(), e);
                throw e;
            }
        }
    }
    ...
}
這裡就調到了realStartActivityLocked方法,跟已有進程中啟動Activity是一樣的。下面直接看這個方法。
不管是已有進程中啟動新的Activity還是先fork新的進程再啟動Activity,最終調到的都是realStartActivityLocked這個方法。
// ActivityStackSupervisor
final boolean realStartActivityLocked(ActivityRecord r,
        ProcessRecord app, boolean andResume, boolean checkConfig)
        throws RemoteException {
    ...
    app.thread.scheduleLaunchActivity(new Intent(r.intent), r.appToken,
            System.identityHashCode(r), r.info, new Configuration(mService.mConfiguration),
            new Configuration(stack.mOverrideConfig), r.compat, r.launchedFromPackage,
            task.voiceInteractor, app.repProcState, r.icicle, r.persistentState, results,
            newIntents, !andResume, mService.isNextTransitionForward(), profilerInfo);
    ...
}
實際上這裡的app.thread就是之前新建進程後attachApplication時賦值的,這是一個ApplicationThread實例。
// ActivityThread$ApplicationThread
@Override
public final void scheduleLaunchActivity(Intent intent, IBinder token, int ident,
        ActivityInfo info, Configuration curConfig, Configuration overrideConfig,
        CompatibilityInfo compatInfo, String referrer, IVoiceInteractor voiceInteractor,
        int procState, Bundle state, PersistableBundle persistentState,
        List pendingResults, List pendingNewIntents,
        boolean notResumed, boolean isForward, ProfilerInfo profilerInfo) {

    updateProcessState(procState, false);

    ActivityClientRecord r = new ActivityClientRecord();

    r.token = token;
    r.ident = ident;
    r.intent = intent;
    r.referrer = referrer;
    r.voiceInteractor = voiceInteractor;
    r.activityInfo = info;
    r.compatInfo = compatInfo;
    r.state = state;
    r.persistentState = persistentState;

    r.pendingResults = pendingResults;
    r.pendingIntents = pendingNewIntents;

    r.startsNotResumed = notResumed;
    r.isForward = isForward;

    r.profilerInfo = profilerInfo;

    r.overrideConfig = overrideConfig;
    updatePendingConfiguration(curConfig);

    sendMessage(H.LAUNCH_ACTIVITY, r);
}
sendMessage是發到哪個Handler去處理了呢?看看sendMessage代碼。
// ActivityThread
private void sendMessage(int what, Object obj) {
    sendMessage(what, obj, 0, 0, false);
}

private void sendMessage(int what, Object obj, int arg1) {
    sendMessage(what, obj, arg1, 0, false);
}

private void sendMessage(int what, Object obj, int arg1, int arg2) {
    sendMessage(what, obj, arg1, arg2, false);
}

private void sendMessage(int what, Object obj, int arg1, int arg2, boolean async) {
    if (DEBUG_MESSAGES) Slog.v(
        TAG, "SCHEDULE " + what + " " + mH.codeToString(what)
        + ": " + arg1 + " / " + obj);
    Message msg = Message.obtain();
    msg.what = what;
    msg.obj = obj;
    msg.arg1 = arg1;
    msg.arg2 = arg2;
    if (async) {
        msg.setAsynchronous(true);
    }
    mH.sendMessage(msg);
}
可以看到是發給了mH去處理,而mH是一個H實例,H實際上是一個Handler,在裡面統一管理著Activity的生命周期等。
case LAUNCH_ACTIVITY: {
    Trace.traceBegin(Trace.TRACE_TAG_ACTIVITY_MANAGER, "activityStart");
    final ActivityClientRecord r = (ActivityClientRecord) msg.obj;

    r.packageInfo = getPackageInfoNoCheck(
            r.activityInfo.applicationInfo, r.compatInfo);
    handleLaunchActivity(r, null);
    Trace.traceEnd(Trace.TRACE_TAG_ACTIVITY_MANAGER);
} break;
// ActivityThread
private void handleLaunchActivity(ActivityClientRecord r, Intent customIntent) {
    ...
    Activity a = performLaunchActivity(r, customIntent);
    if (a != null) {
        ...
        handleResumeActivity(r.token, false, r.isForward,
                !r.activity.mFinished && !r.startsNotResumed);
        if (!r.activity.mFinished && r.startsNotResumed) {
            try {
                r.activity.mCalled = false;
                mInstrumentation.callActivityOnPause(r.activity);
            }
            ...
        }
        ...
    }
    ...
}
這裡主要有兩個步驟:performLaunchActivity和handleResumeActivity。分別會調到onCreate/onStart和onResume方法。而如果Activity沒有finish而且是startsNotResumed(這個值實際上是在startSpecificActivityLocked或者realStartActivityLocked時被傳進來的,通常可以認為該值為false)的,那麼在調完onResume之後,又會立即調用onPause。
// ActivityThread
private Activity performLaunchActivity(ActivityClientRecord r, Intent customIntent) {
    ...
    // ClassLoader加載指定的Activity類,用newInstance反射的方式創建
    // Activity實例,此時僅僅創建了實例,不會調用onCreate等生命周期方法
    java.lang.ClassLoader cl = r.packageInfo.getClassLoader();
    activity = mInstrumentation.newActivity(
            cl, component.getClassName(), r.intent);
    StrictMode.incrementExpectedActivityCount(activity.getClass());
    r.intent.setExtrasClassLoader(cl);
    r.intent.prepareToEnterProcess();
    if (r.state != null) {
        r.state.setClassLoader(cl);
    }
    ...
    // makeApplication中會同樣以反射的方式創建Application實例,
    // 並調用Application的onCreate方法
    Application app = r.packageInfo.makeApplication(false, mInstrumentation);
    ...
    // 在callActivityOnCreate方法中,會調用Activity的onCreate方法
    if (r.isPersistable()) {
        mInstrumentation.callActivityOnCreate(activity, r.state, r.persistentState);
    } else {
        mInstrumentation.callActivityOnCreate(activity, r.state);
    }
    ...
    // performStart會調到onStart方法
    if (!r.activity.mFinished) {
        activity.performStart();
        r.stopped = false;
    }
    // 如果有之前保存過的狀態需要恢復,就會調onRestoreInstanceState
    if (!r.activity.mFinished) {
        if (r.isPersistable()) {
            if (r.state != null || r.persistentState != null) {
                mInstrumentation.callActivityOnRestoreInstanceState(activity, r.state,
                        r.persistentState);
            }
        } else if (r.state != null) {
            mInstrumentation.callActivityOnRestoreInstanceState(activity, r.state);
        }
    }
    // 調用onPostCreate方法,這個方法平時涉及不會太多
    if (!r.activity.mFinished) {
        activity.mCalled = false;
        if (r.isPersistable()) {
            mInstrumentation.callActivityOnPostCreate(activity, r.state,
                    r.persistentState);
        } else {
            mInstrumentation.callActivityOnPostCreate(activity, r.state);
        }
        if (!activity.mCalled) {
            throw new SuperNotCalledException(
                "Activity " + r.intent.getComponent().toShortString() +
                " did not call through to super.onPostCreate()");
        }
    }
    ...
}
可以看到,這段代碼裡面主要流程如下:
反射創建Activity實例–>反射創建Application實例–>Application.onCreate–>Activity.onCreate–>Activity.onStart–>Activity.onRestoreInstanceState(如果需要)–>Activity.onPostCreate(不需要關注)。
// ActivityThread
final void handleResumeActivity(IBinder token,
        boolean clearHide, boolean isForward, boolean reallyResume) {
    ...
    ActivityClientRecord r = performResumeActivity(token, clearHide);
    ...
    // 下面這段代碼實際就是將mDecorView添加到Window中並進行繪制的過程。
    // 當然,如果之前已經添加過,就不需要再走這些過程
    // If the window hasn't yet been added to the window manager,
    // and this guy didn't finish itself or start another activity,
    // then go ahead and add the window.
    boolean willBeVisible = !a.mStartedActivity;
    if (!willBeVisible) {
        try {
            willBeVisible = ActivityManagerNative.getDefault().willActivityBeVisible(
                    a.getActivityToken());
        } catch (RemoteException e) {
        }
    }
    if (r.window == null && !a.mFinished && willBeVisible) {
        r.window = r.activity.getWindow();
        View decor = r.window.getDecorView();
        decor.setVisibility(View.INVISIBLE);
        ViewManager wm = a.getWindowManager();
        WindowManager.LayoutParams l = r.window.getAttributes();
        a.mDecor = decor;
        l.type = WindowManager.LayoutParams.TYPE_BASE_APPLICATION;
        l.softInputMode |= forwardBit;
        if (a.mVisibleFromClient) {
            a.mWindowAdded = true;
            wm.addView(decor, l);
        }

    // If the window has already been added, but during resume
    // we started another activity, then don't yet make the
    // window visible.
    } else if (!willBeVisible) {
        if (localLOGV) Slog.v(
            TAG, "Launch " + r + " mStartedActivity set");
        r.hideForNow = true;
   }
    ...
}

public final ActivityClientRecord performResumeActivity(IBinder token,
        boolean clearHide) {
    ...
    r.activity.performResume();
    ...
}
// Activity
final void performResume() {
    // 這個方法與onRestart相關,如果Activity是stop狀態,那麼在這個
    // 方法裡會依次調到onRestart和onStart
    performRestart();
    ...
    // onResume會在這個方法裡被調到
    mInstrumentation.callActivityOnResume(this);
    ...
}
上面的代碼可以很明顯看出來,在Activity首次創建執行完onResume時,頁面實際上還沒有顯示出來。onResume之後還需要將之前就創建好的mDecorView添加到Window中,然後完成onMeasure、onLayout、onDraw的繪制過程,只有在onDraw完成後,頁面才會真正顯示出來。Android的官方文檔中說,onStart/onStop看成是Activity的可見期,onResume/onPause看成是Activity的可交互期,而從上面的代碼就可以看出,這種說法不太准確,在Activity首次創建時,這樣的說法是不適用的,當然,拋開首次創建不談,以後的生命周期確實可以這麼簡單概括。
 Android網絡編程之使用HttpClient批量上傳文件(二)AsyncTask+HttpClient並實現上傳進度監聽
請尊重他人的勞動成果,轉載請注明出處: Android網絡編程之使用HttpClient批量上傳文件(二)AsyncTask+HttpClient並實現上傳進
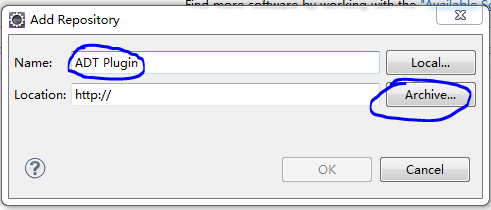
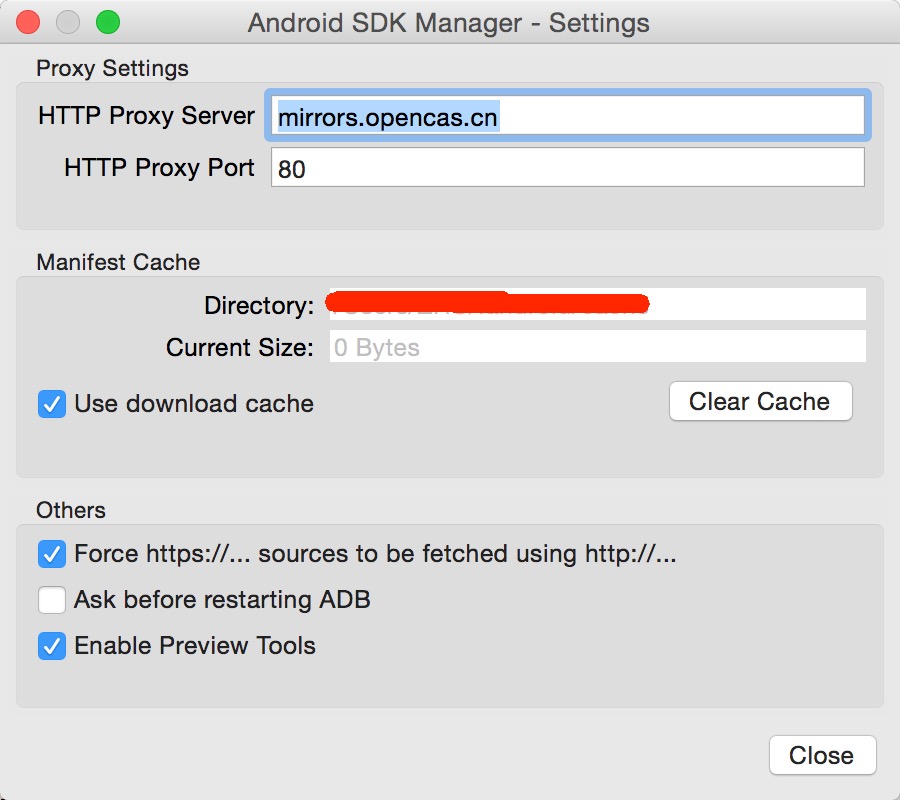 Android SDK在線更新鏡像服務器大全
中國科學院開源協會鏡像站地址:IPV4/IPV6: http://mirrors.opencas.cn 端口:80IPV4/IPV6: http://mirrors.op
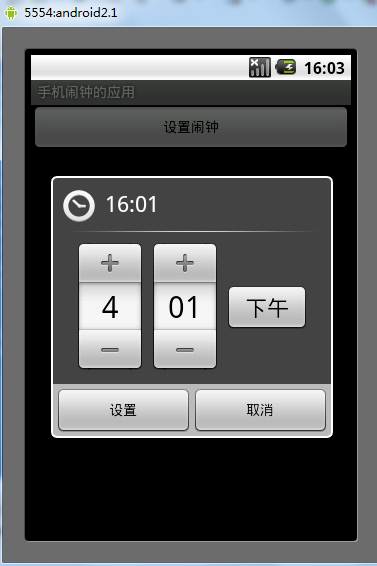 Android手機鬧鐘用法實例
本文實例講述了Android手機鬧鐘用法。分享給大家供大家參考。具體如下:一、開發手機鬧鐘主要用到了AlarmManager類,AlarmManager類提供了訪問系統定
 TaintDroid深入剖析之啟動篇
?1背景知識1.1Android平台軟件動態分析現狀眾所周知,在計算機領域中所有的軟件分析方法都可以歸為靜態分析和動態分析兩大類,在Android平台也不例外。而隨著軟件