編輯:關於Android編程
效果如下:

布局文件activity_main.xml如下:
MainActivity.java代碼如下:
import android.app.ActionBar.LayoutParams;
import android.app.Activity;
import android.os.Bundle;
import android.view.View;
import android.view.animation.AnimationUtils;
import android.widget.AdapterView;
import android.widget.AdapterView.OnItemSelectedListener;
import android.widget.Gallery;
import android.widget.ImageSwitcher;
import android.widget.ImageView;
import android.widget.ViewSwitcher.ViewFactory;

public class MainActivity extends Activity {

    private int imageId[] = new int[] { R.drawable.a, R.drawable.b,
            R.drawable.c, R.drawable.d, R.drawable.e, R.drawable.f,
            R.drawable.g, R.drawable.h, R.drawable.i, R.drawable.j,
            R.drawable.k };

    private ImageSwitcher imageSwitcher;
    private Gallery gallery;

    @Override
    protected void onCreate(Bundle savedInstanceState) {
        super.onCreate(savedInstanceState);
        setContentView(R.layout.activity_main);
        imageSwitcher = (ImageSwitcher) this.findViewById(R.id.imageSwitcher);
        gallery = (Gallery) this.findViewById(R.id.gallery1);

        // 設置動畫效果
        imageSwitcher.setInAnimation(AnimationUtils.loadAnimation(this,
                android.R.anim.fade_in));
        imageSwitcher.setOutAnimation(AnimationUtils.loadAnimation(this,
                android.R.anim.fade_out));

        imageSwitcher.setFactory(new ViewFactory() {

            @Override
            public View makeView() {
                ImageView imageView = new ImageView(MainActivity.this);
                imageView.setScaleType(ImageView.ScaleType.FIT_CENTER); // 設置保持縱橫比居中
                imageView.setLayoutParams(new ImageSwitcher.LayoutParams(
                        LayoutParams.WRAP_CONTENT, LayoutParams.WRAP_CONTENT));

                return imageView;
            }
        });

        GalleryAdapter adapter = new GalleryAdapter(MainActivity.this,imageId);
        gallery.setAdapter(adapter);
        gallery.setSelection(imageId.length / 2);
        gallery.setOnItemSelectedListener(new OnItemSelectedListener() {

            @Override
            public void onItemSelected(AdapterView parent, View view,int position, long id) {
                imageSwitcher.setImageResource(imageId[position]);
            }

            @Override
            public void onNothingSelected(AdapterView arg0) {

            }
        });
    }
}
其中需要的一個適配器:
import android.content.Context;
import android.content.res.TypedArray;
import android.view.View;
import android.view.ViewGroup;
import android.widget.BaseAdapter;
import android.widget.Gallery;
import android.widget.ImageView;

public class GalleryAdapter extends BaseAdapter {

    private int[] imageId;

    private Context mContext;

    /**
     * 穿入上下文和圖片資源數組
     * @param mContext
     * @param imageId
     */
    public GalleryAdapter(Context mContext, int[] imageId) {
        this.mContext = mContext;
        this.imageId = imageId;
    }

    @Override
    public int getCount() {
        return imageId.length;
    }

    @Override
    public Object getItem(int position) {
        return imageId[position];
    }

    @Override
    public long getItemId(int position) {
        return position;
    }

    @Override
    public View getView(int position, View convertView, ViewGroup parent) {
        ImageView imageView1;
        if (convertView == null) {
            imageView1 = new ImageView(mContext);
            imageView1.setScaleType(ImageView.ScaleType.FIT_XY);
            imageView1.setLayoutParams(new Gallery.LayoutParams(180, 135));
            TypedArray typedArray = mContext
                    .obtainStyledAttributes(R.styleable.Gallery);
            imageView1.setBackgroundResource(typedArray.getResourceId(
                    R.styleable.Gallery_android_galleryItemBackground, 0));
            imageView1.setPadding(5, 0, 5, 0); // 設置ImageView的內邊距
        } else {
            imageView1 = (ImageView) convertView;
        }
        imageView1.setImageResource(imageId[position]); // 為ImageView設置要顯示的圖片
        return imageView1; // 返回ImageView
    }

}
到此 OK!
 Android 動畫(anim)詳解
Android 動畫(anim)詳解 就我所知,簡單闡述一下: Android的animation由四種類型組成:alpha(透明度)、scale(縮放)、transl
 Android Studio使用小技巧:自定義Logcat
我們都知道Logcat是我們Android開發調試最常用的一個工具,但是Android Studio默認的Logcat調試的顏色是一樣的,我們不好區分verbose、de
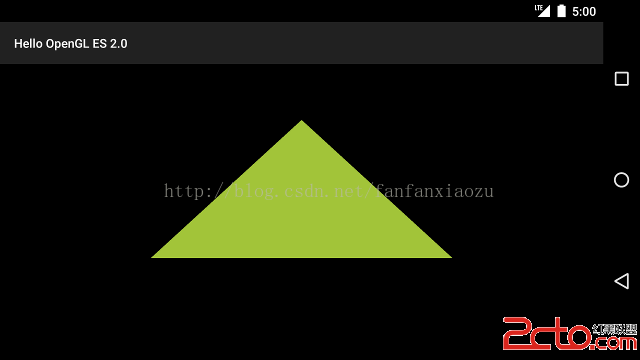 Android OpenGL ES繪圖教程之三 : 繪制圖形
在定義了將要被OpenGL繪制的形狀之後,你當然想要繪制它們。使用OpenGL ES 2.0繪制圖形需要的代碼可能比你想象的要多,因為API提供了大量的圖形渲染管道控制接
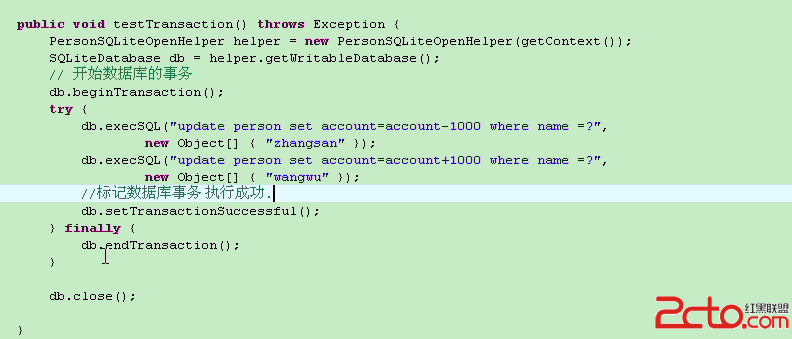 android 數據庫事務
1、事務2、命令行操作數據庫