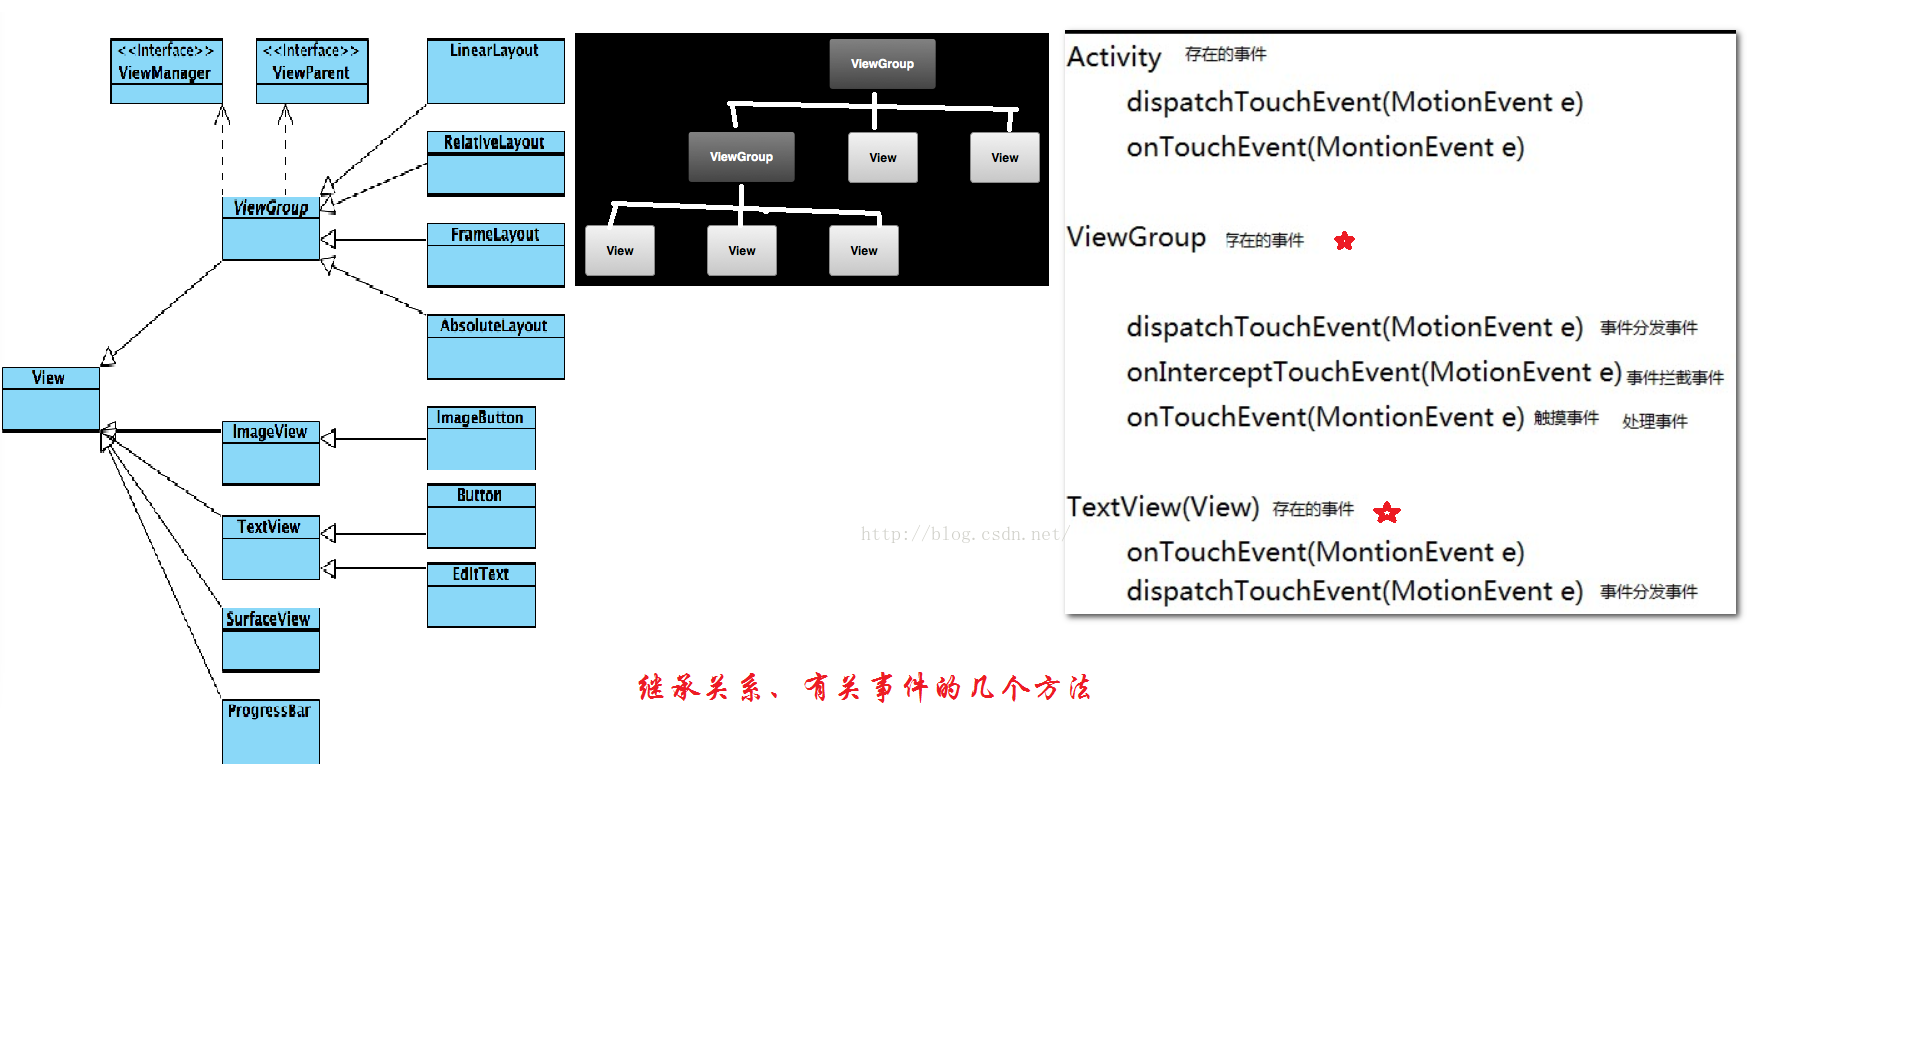
編輯:關於Android編程
mainActivity如下:
  package cn.testcamera;
  import java.io.File;
  import java.text.SimpleDateFormat;
  import java.util.Date;
  import android.app.Activity;
  import android.content.ContentResolver;
  import android.content.ContentUris;
  import android.content.Intent;
  import android.database.Cursor;
  import android.graphics.Bitmap;
  import android.graphics.BitmapFactory;
  import android.net.Uri;
  import android.os.Bundle;
  import android.provider.MediaStore;
  import android.view.View;
  import android.widget.Button;
  import android.widget.ImageView;
  public class MainActivity extends Activity {
  private Button mButton;
  private ImageView mImageView;
  private File mPhotoFile;
  private String mPhotoPath;
  private Uri mPhotoOnSDCardUri;
  public final static int CAMERA_RESULT=777;
  public final static int CAMERA_RESULT_CUT=888;
  public final static int CAMERA_RESULT_CUT_OVER=999;
  public final static String TAG="xx";
  @Override
  public void onCreate(Bundle savedInstanceState) {
  super.onCreate(savedInstanceState);
  setContentView(R.layout.main);
  mButton = (Button) findViewById(R.id.button);
  mButton.setOnClickListener(new ButtonOnClickListener());
  mImageView = (ImageView) findViewById(R.id.imageView);
  }
  private class ButtonOnClickListener implements View.OnClickListener {
  public void onClick(View v) {
  try {
  Intent intent = new Intent("android.media.action.IMAGE_CAPTURE");
  mPhotoPath="mnt/sdcard/DCIM/Camera/"+getPhotoFileName();
  mPhotoFile = new File(mPhotoPath);
  if (!mPhotoFile.exists()) {
  mPhotoFile.createNewFile();
  }
  mPhotoOnSDCardUri=Uri.fromFile(mPhotoFile);
  intent.putExtra(MediaStore.EXTRA_OUTPUT, mPhotoOnSDCardUri);
  //拍照後顯示此圖片
  //startActivityForResult(intent,CAMERA_RESULT);
  //拍照後先修改再顯示此圖片
  startActivityForResult(intent,CAMERA_RESULT_CUT);
  } catch (Exception e) {
  }
  }
  }
  @Override
  protected void onActivityResult(int requestCode, int resultCode, Intent data) {
  super.onActivityResult(requestCode, resultCode, data);
  //1 拍照後顯示照片
  if (requestCode==CAMERA_RESULT) {
  Bitmap bitmap = BitmapFactory.decodeFile(mPhotoPath, null);
  mImageView.setImageBitmap(bitmap);
  }
  //2 拍照後剪切照片,然後顯示
  //2.1拍照且剪裁
  if (requestCode == CAMERA_RESULT_CUT) {
  Intent intent = new Intent(Intent.ACTION_MEDIA_SCANNER_SCAN_FILE,mPhotoOnSDCardUri);
  sendBroadcast(intent);
  try {
  Thread.sleep(2000);
  } catch (InterruptedException e) {
  e.printStackTrace();
  }
  Uri systemImageUri = MediaStore.Images.Media.EXTERNAL_CONTENT_URI;
  ContentResolver contentResolver = getContentResolver();
  Cursor cursor = contentResolver.query(systemImageUri, null,
  MediaStore.Images.Media.DISPLAY_NAME + "='"
  + mPhotoFile.getName() + "'", null, null);
  Uri photoUriInMedia = null;
  if (cursor != null && cursor.getCount() > 0) {
  cursor.moveToLast();
  long id = cursor.getLong(0);
  photoUriInMedia = ContentUris.withAppendedId(systemImageUri, id);
  }
  cursor.close();
  Intent in = new Intent("com.android.camera.action.CROP");
  //需要裁減的圖片格式
  in.setDataAndType(photoUriInMedia, "image/*");
  //允許裁減
  in.putExtra("crop", "true");
  //剪裁後ImageView顯時圖片的寬
  in.putExtra("outputX", 250);
  //剪裁後ImageView顯時圖片的高
  in.putExtra("outputY", 250);
  //設置剪裁框的寬高比例
  in.putExtra("aspectX", 1);
  in.putExtra("aspectY", 1);
  in.putExtra("return-data", true);
  startActivityForResult(in, CAMERA_RESULT_CUT_OVER);
  }
  //2.2顯示
  if (requestCode==CAMERA_RESULT_CUT_OVER) {
  //剪切圖片的時候,若"放棄"則回答的data為null
  if (data!=null) {
  Bitmap bitmap = (Bitmap) data.getExtras().get("data");
  mImageView.setImageBitmap(bitmap);
  }
  }
  }
  private String getPhotoFileName() {
  Date date = new Date(System.currentTimeMillis());
  SimpleDateFormat dateFormat = new SimpleDateFormat("'IMG'_yyyyMMdd_HHmmss");
  return dateFormat.format(date) + ".jpg";
  }
  }
main.xml如下:
<RelativeLayout xmlns:android="http://schemas.android.com/apk/res/android"
    xmlns:tools="http://schemas.android.com/tools"
    android:layout_width="match_parent"
    android:layout_height="match_parent" >

    <Button
        android:id="@+id/button"
        android:layout_width="fill_parent"
        android:layout_height="wrap_content"
        android:text="點擊按鈕拍照"
     />
    <ImageView
        android:id="@+id/imageView"
        android:layout_below="@id/button"
        android:layout_width="fill_parent"
        android:layout_height="wrap_content"
     />

</RelativeLayout>
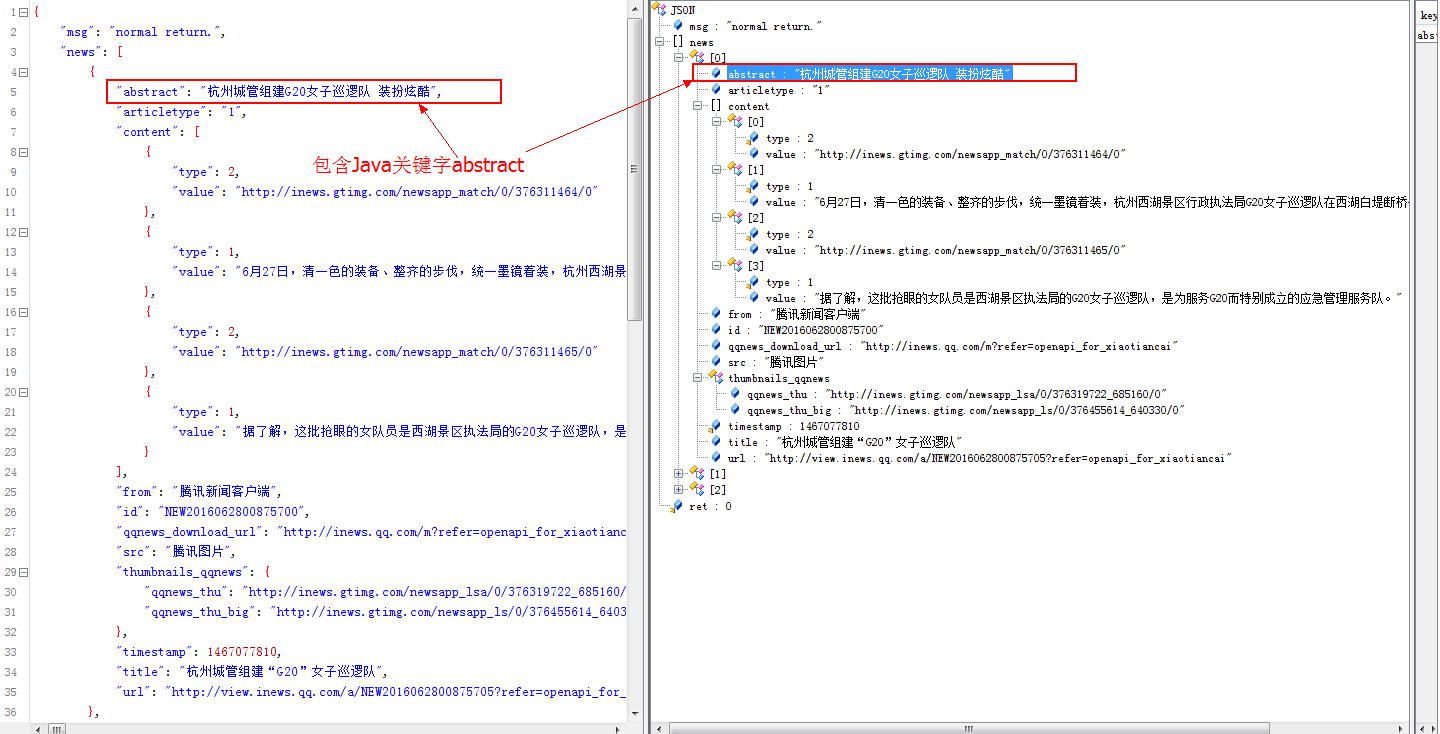 Android進階之旅------)解決Jackson、Gson解析Json數據時,Json數據中的Key為Java關鍵字時解析為null的問題
1、問題描述首先,需要解析的Json數據類似於下面的格式,但是包含了Java關鍵字abstract:{ ret: 0, msg: "
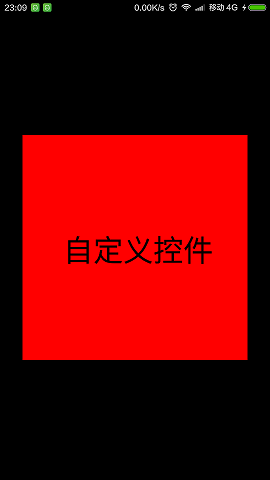 Android重寫View並自定義屬性實例分析
本文實例分析了Android重寫View並自定義屬性的方法。分享給大家供大家參考,具體如下:這裡通過自定義屬性 實現如下圖所示效果:第一步:在res\values的目錄下
 微信說說怎麼發 微信朋友圈怎麼轉發
微信的朋友圈就像qq空間一樣,你可以在那裡發表你的心情,讓朋友們能與你一起分享喜怒哀樂,微信怎麼發說說,微信朋友圈怎麼轉發別人的說說,下面我們一起來看看吧!
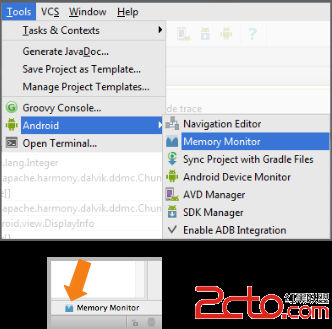 Android Developer:Memory Monitor演示
這個演示展示了在Android Studio中Memory Monitor工具基本的用法和流程。Memory Monitors實時報告了你的app分配的內存。它的優勢:在