編輯:關於Android編程
一、基本知識
1:ViewRoot
ViewRoot是連接WindowManager與DecorView的紐帶,View的整個繪制流程的三大步(measure、layout、draw)都是通過ViewRoot完成的。當Activity對象被創建完畢後,會將DecorView添加到Window中(Window是對窗口的抽象,DecorView是一個窗口的頂級容器View,其本質是一個FrameLayout),同時會創建ViewRootImpl(ViewRoot的實現類)對象,並將ViewRootImpl與DecorView建立關聯。關於ViewRoot,我們只需要知道它是聯系GUI管理系統和GUI呈現系統的紐帶。View的繪制流程從ViewRoot的performTraversals方法開始,經過measure、layout、draw三大過程完成對一個View的繪制工作。peformTraversal方法內部會調用measure、layout、draw這三個方法,這三個方法內部又分別調用onMeasure、onLayout、onDraw方法。
2:MeasureSpec
MeasureSpec為一個32位的int值,高2位代表SpecMode,低30位代表SpecSize,前者指測量模式,後者指某種測量模式下的規格大小。在一個View的measure過程中,系統會將該View的LayoutParams結合父容器的“要求”生成一個MeasureSpec,這個MeasureSpec說明了應該怎樣測量這個View。
(1)三種 SpecMode:
UNSPECIFIED:父容器不對View作任何要求,通常用於系統內部,表示一種測量的狀態。
EXACTLY:父容器已經檢測出View所需要的精確大小,這種測量模式下View的測量值就是SpecSize的值。這個SpecMode對應於LayoutParams中的match_parent和給出具體大小這兩種模式。
AT_MOST:父容器指定了一個可用大小即SpecSize,View的大小不能大於此值,可用大小取決於不同View的具體實現。這個SpecMode對應於LayoutParams中的wrap_content。
(2)對於DecorView,它的MeasureSpec由窗口尺寸和其自身的LayoutParams共同確定;對於普通View,他的MeasureSpec由父容器的MeasureSpec和其自身的LayoutParams共
同確定。
二、View的繪制流程及源碼分析
整個View樹的繪圖流程是在ViewRootImpl類的performTraversals()方法開始的,該函數做的執行過程主要是根據之前設置的狀態,判斷是否重新計算視圖大小(measure)、是否重新放置視圖的位置(layout)、以及是否重繪 (draw),其核心也就是通過判斷來選擇順序執行這三個方法中的哪個,如下:
private void performTraversals() {
        ......
        //最外層的根視圖的widthMeasureSpec和heightMeasureSpec由來
        //lp.width和lp.height在創建ViewGroup實例時等於MATCH_PARENT
        int childWidthMeasureSpec = getRootMeasureSpec(mWidth, lp.width);
        int childHeightMeasureSpec = getRootMeasureSpec(mHeight, lp.height);
        ......
        mView.measure(childWidthMeasureSpec, childHeightMeasureSpec);
        ......
        mView.layout(0, 0, mView.getMeasuredWidth(), mView.getMeasuredHeight());
        ......
        mView.draw(canvas);
        ......
    }
private int getRootMeasureSpec(int windowSize, int rootDimension) { int measureSpec; switch (rootDimension) { case ViewGroup.LayoutParams.MATCH_PARENT: measureSpec = MeasureSpec.makeMeasureSpec(windowSize, MeasureSpec.EXACTLY); break; case ViewGroup.LayoutParams.WRAP_CONTENT: measureSpec = MeasureSpec.makeMeasureSpec(windowSize, MeasureSpec.AT_MOST); break; default: measureSpec = MeasureSpec.makeMeasureSpec(rootDimension, MeasureSpec.EXACTLY); break; } return measureSpec; }
1:Measure源碼分析
 public final void measure(int widthMeasureSpec, int heightMeasureSpec) {
        ......
        //回調onMeasure()方法
        onMeasure(widthMeasureSpec, heightMeasureSpec);
        ......
    }
(1):普通View的Measure過程
普通View的measure方法是由ViewGroup在measureChild方法中調用的(即完成了measure過程從ViewGroup到子View的傳遞),ViewGroup調用其子View的measure時即傳入了該子View的widthMeasureSpec和heightMeasureSpec。注意到measure是一個final方法,因此要實現自定義的measure過程,需要重寫onMeasure方法,onMeasure方法源碼如下
 protected void onMeasure(int widthMeasureSpec, int heightMeasureSpec) {
     setMeasuredDimension(getDefaultSize(getSuggestedMinimumWidth(), widthMeasureSpec),
             getDefaultSize(getSuggestedMinimumHeight(), heightMeasureSpec));
 }
 public static int getDefaultSize(int size, int measureSpec) {
        int result = size;
        //通過MeasureSpec解析獲取mode與size
        int specMode = MeasureSpec.getMode(measureSpec);
        int specSize = MeasureSpec.getSize(measureSpec);

        switch (specMode) {
        case MeasureSpec.UNSPECIFIED:
            result = size;
            break;
        case MeasureSpec.AT_MOST:
        case MeasureSpec.EXACTLY:
            result = specSize;
            break;
        }
        return result;
    }
正常情況下(SpecMode為AT_MOST或EXACTLY),getDefaultSize獲取的尺寸大小即為specSize。由以上代碼還可知道,直接繼承View的自定義控件需要重寫onMeasure方法並設置wrap_content時的自身大小,否則在布局中使用wrap_content就相當於使用match_parent的效果。
(2):ViewGroup的繪制過程
ViewGroup中的onMeasure()方法主要是遍歷子View,先測量所有子View的之後設置自身的大小值
protected void onMeasure(int widthMeasureSpec, int heightMeasureSpec) {
     if (mOriention == VERTICAL) {
         measureVertical(widthMeasureSpec, heightMeasureSpec);
     } else {
         measureHorizontal(widthMeasureSpec, heightMeasureSpec);
     }
 }
以MeasureVertical為例:
 for (int i = 0; i < count; ++i) {
      final View child = getVirtualChildAt(i);
      . . .
      //Determine how big this child would like to be. If this or previous children have given a weight,

       //then we allow it to use all available space (and we will shrink things later if needed).
     measureChildBeforeLayout(child, i, widthMeasureSpec, 0, heightMeasureSpec, totalHeight == 0 ? mTotalLength : 0);

      if (oldHeight != Integer.MIN_VALUE) {
          lp.height = oldHeight;
     }

     final int childLength = child.getMeasuredHeight();
     final int totalLength = mTotalLength;
     mTotalLength = Math.max(totalLength, totalLength+childHeight+lp.topMargin+lp.bottomMargin+getNextLocationOffset(child));
 }
在measureChildBeforeLayout方法內部會調用子元素的measure方法,這樣會依次讓每個子元素進入measure過程。mTotalLength表示LinearLayout在豎直方向上的尺寸,每完成一個子元素的measure過程,它的值也會相應增加。測量完子元素後,LinearLayout會測量自身的大小。
對於一般的ViewGroup主要通過其measureChildren方法完成其子View的measure過程,上面垂直LinearLayout中調用的measureChildBeforeLayout可以看做是measureChildren的一個“變種”,measureChildren方法代碼如下:
protected void measureChildren(int widthMeasureSpec, int heightMeasureSpec) {
      final int size = mChildrenCount;
      final View[] children = mChildren;
      for (int i = 0; i < size; ++i) {
              final View child = children[i];
              if ((child.mViewFlags & VISIBILITY_MASK) != GONE) {
                  measureChild(child, widthMeasureSpec, heightMeasureSpec);
              }
      }
 }
通過measureChild()完成對子View的Measure();
protected void measureChild(View child, int parentWidthMeasureSpec, int parentHeightMeasureSpec) {
     final LayoutParams lp = child.getLayoutParams();
     final int childWidthMeasureSpec = getChildMeasureSpec(parentWidthMeasureSpec,
         mPaddingLeft + mPaddingRight, lp.width);
     final int childHeightMeasureSpec = getChildMeasureSpec(parentHeightMeasureSpec,
         mPaddingTop + mPaddingBottom, lp.height);
     child.measure(childWidthMeasureSpec, childHeightMeasureSpec);
 }
a. 當childLayoutParams指定為為具體的大小時:若parentSpecMode為EXACTLY,則childSpecMode為EXACTLY,childSpecSize為childSize(layout_width和layout_height中指定的具體大小);若parentSpecMode為AT_MOST,則childSpecMode和childSpecSize分別為EXACTLY和childSize。
b. 當childLayoutParams為match_parent時:若parentSpecMode為EXACTLY,則childSpecMode和childSpecSize分別為EXACTLY和parentSize(父容器中可用的大小);若parentSpecMode為AT_MOST,則childSpecMode和childSpecSize分別為AT_MOST和parentSize。
c. 當childLayoutParams為wrap_content時:若parentSpecMode為EXACTLY,則childSpecMode和childSpecSize分別為AT_MOST和parentSize;若parentSpecMode為
AT_MOST,則childSpecMode和childSpecSize分別為AT_MOST和parentSize。
2:layout()源碼分析
layout過程用來確定View在父容器中的位置,因而是由父容器獲取子View的位置參數後,調用child.layout方法並傳入已獲取的位置參數,從而完成對子View的layout。當ViewGroup的位置被確定後,它在onLayout中會遍歷所有子元素並調用其layout方法,在layout方法中子元素的onLayout又會被調用。layout方法確定先View本身的位置,再調用onLayout方法確定所有子元素的位置。
以LinearLayout為例:
protected void onLayout(boolean changed, int l, int t, int r, int b) {
     if (mOriention == VERTIVAL) {
         layoutVertical(l, t, r, b);
     } else {
         layoutHorizontal(l, t, r, b);
     }
 }
void layoutVertical(int left, int top, int right, int bottom) {
      . . .
      final int count = getVirtualChildCount();
      for (int i = 0; i < count; i++) {
          final View child = getVirtualChildAt(i);
          if (child == null) {
              childTop += measureNullChild(i);
          } else if (child.getVisibility() != GONE) {
              final int childWidth = child.getMeasuredWidth();
             final int childHeight = child.getMeasuredHeight();

             final int LinearLayout.LayoutParams lp = (LinearLayout.LayoutParams) child.getLayoutParams();
             . . .
             if (hasDividerBeforeChildAt(i)) {
                 childTop += mDividerHeight;
             }

             childTop += lp.topMargin;
             setChildFrame(child, childLeft, childTop + getLocationOffset(child), childWidth, childHeight);
             childTop += childHeight + lp.bottomMargin + getNextLocationOffset(child);

             i += getChildrenSkipCount(child, i);
         }
     }
 }
通過 setChildFrame設置子View的位置。
3:draw()源碼分析
draw()的過程主要有以下幾部分
 public void draw(Canvas canvas) {
        // Step 1, draw the background, if needed
        ......
        if (!dirtyOpaque) {
            drawBackground(canvas);
        }

        // skip step 2 & 5 if possible (common case)
        ......

        // Step 2, save the canvas' layers
        ......
            if (drawTop) {
                canvas.saveLayer(left, top, right, top + length, null, flags);
            }
        ......

        // Step 3, draw the content
        if (!dirtyOpaque) onDraw(canvas);

        // Step 4, draw the children,對當前View的所有子View進行繪制,如果當前的View沒有子View就不需要進行繪制。
        dispatchDraw(canvas);

        // Step 5, draw the fade effect and restore layers
        ......
        if (drawTop) {
            matrix.setScale(1, fadeHeight * topFadeStrength);
            matrix.postTranslate(left, top);
            fade.setLocalMatrix(matrix);
            p.setShader(fade);
            canvas.drawRect(left, top, right, top + length, p);
        }
        ......

        // Step 6, draw decorations (scrollbars)  對view的滾動條進行繪制
        onDrawScrollBars(canvas);
        ......
    }
三、View的刷新機制的源碼分析
1:invalidate()
public void invalidate(Rect dirty) {
        final int scrollX = mScrollX;
        final int scrollY = mScrollY;
        //實質還是調運invalidateInternal方法
        invalidateInternal(dirty.left - scrollX, dirty.top - scrollY,
                dirty.right - scrollX, dirty.bottom - scrollY, true, false);
    }
View的invalidate(invalidateInternal)方法實質是將要刷新區域直接傳遞給了父ViewGroup的invalidateChild方法,在invalidate中,調用父View的invalidateChild,這是一個從當前向上級父View回溯的過程,每一層的父View都將自己的顯示區域與傳入的刷新Rect做交集 。所以我們看下ViewGroup的invalidateChild方法,源碼如下:
public final void invalidateChild(View child, final Rect dirty) {
        ViewParent parent = this;
        final AttachInfo attachInfo = mAttachInfo;
        ......
        do {
            ......
            //循環層層上級調運,直到ViewRootImpl會返回null
            parent = parent.invalidateChildInParent(location, dirty);
            ......
        } while (parent != null);
    }
public ViewParent invalidateChildInParent(int[] location, Rect dirty) {
......
//View調運invalidate最終層層上傳到ViewRootImpl後最終觸發了該方法
scheduleTraversals();
......
return null;
}
看見沒有?這個ViewRootImpl類的invalidateChildInParent方法直接返回了null,也就是上面ViewGroup中說的,層層上級傳遞到ViewRootImpl的invalidateChildInParent方法結束了那個do while循環。看見這裡調運的scheduleTraversals這個方法嗎?scheduleTraversals會通過Handler的Runnable發送一個異步消息,調運doTraversal方法,然後最終調用performTraversals()執行重繪。開頭背景知識介紹說過的,performTraversals就是整個View數開始繪制的起始調運地方,所以說View調運invalidate方法的實質是層層上傳到父級,直到傳遞到ViewRootImpl後觸發了scheduleTraversals方法,然後整個View樹開始重新按照上面分析的View繪制流程進行重繪任務。
2:postInvalidate源碼分析
 public void postInvalidate() {
        postInvalidateDelayed(0);
    }
 public void postInvalidateDelayed(long delayMilliseconds) {
        // We try only with the AttachInfo because there's no point in invalidating
        // if we are not attached to our window
        final AttachInfo attachInfo = mAttachInfo;
        //核心,實質就是調運了ViewRootImpl.dispatchInvalidateDelayed方法
        if (attachInfo != null) {
            attachInfo.mViewRootImpl.dispatchInvalidateDelayed(this, delayMilliseconds);
        }
    }
 public void dispatchInvalidateDelayed(View view, long delayMilliseconds) {
        Message msg = mHandler.obtainMessage(MSG_INVALIDATE, view);
        mHandler.sendMessageDelayed(msg, delayMilliseconds);
    }
public void handleMessage(Message msg) {
    ......
    switch (msg.what) {
    case MSG_INVALIDATE:
        ((View) msg.obj).invalidate();
        break;
    ......
    }
    ......
}
直接調用invalidate方法.請求重新draw,但只會繪制調用者本身。
觸發setSelection方法。請求重新draw,但只會繪制調用者本身。
觸發setVisibility方法。 當View可視狀態在INVISIBLE轉換VISIBLE時會間接調用invalidate方法,繼而繪制該View。當View的可視狀態在INVISIBLE\VISIBLE 轉換為GONE狀態時會間接調用requestLayout和invalidate方法,同時由於View樹大小發生了變化,所以會請求measure過程以及draw過程,同樣只繪制需要“重新繪制”的視圖。
觸發setEnabled方法。請求重新draw,但不會重新繪制任何View包括該調用者本身。
觸發requestFocus方法。請求View樹的draw過程,只繪制“需要重繪”的View。
3:程序在第一次是通過什麼繪制View的呢?
 @Override
    public void setContentView(View view, ViewGroup.LayoutParams params) {
        ......
        //如果mContentParent為空進行一些初始化,實質mContentParent是通過findViewById(ID_ANDROID_CONTENT);獲取的id為content的FrameLayout的布局(不清楚的請先看《Android應用setContentView與LayoutInflater加載解析機制源碼分析》文章)
        if (mContentParent == null) {
            installDecor();
        }
        ......
        //把我們的view追加到mContentParent
        mContentParent.addView(view, params);
        ......
    }
public void addView(View child, int index, LayoutParams params) { ...... //該方法稍後後面會詳細分析 requestLayout(); //重點關注!!! invalidate(true); ...... }
對於requestLayout()的分析
public void requestLayout() {
        ......
        if (mParent != null && !mParent.isLayoutRequested()) {
            //由此向ViewParent請求布局
            //從這個View開始向上一直requestLayout,最終到達ViewRootImpl的requestLayout
            mParent.requestLayout();
        }
        ......
    }

看見沒有,當我們觸發View的requestLayout時其實質就是層層向上傳遞,直到ViewRootImpl為止,然後觸發ViewRootImpl的requestLayout方法,如下就是ViewRootImpl的requestLayout方法:

    @Override
    public void requestLayout() {
        if (!mHandlingLayoutInLayoutRequest) {
            checkThread();
            mLayoutRequested = true;
            //View調運requestLayout最終層層上傳到ViewRootImpl後最終觸發了該方法
            scheduleTraversals();
        }
    }
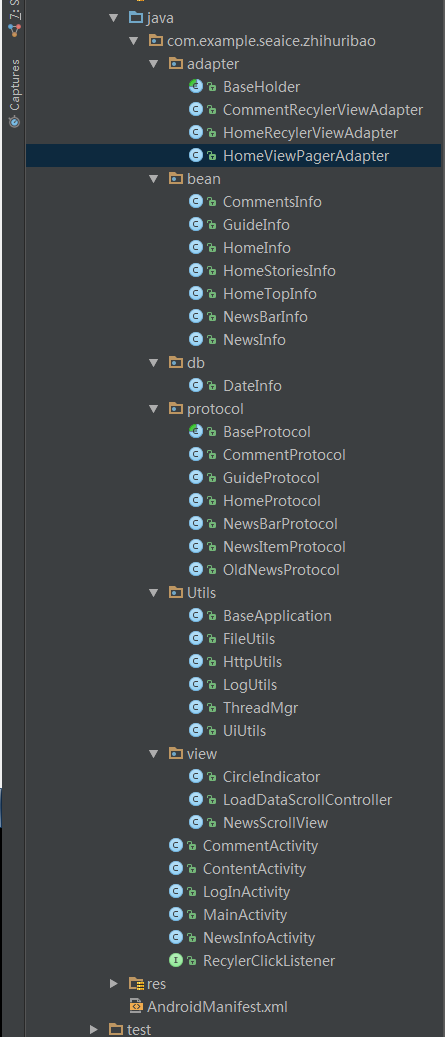 高仿知乎日報(四)[主頁面條目顯示]
這篇繼續解決上一篇遺留下來的問題:點擊條目顯示具體的知乎日報信息怎麼實現?很簡單,讓ContentActivity的recylerView響應點擊事件便可。先來看看我的代
 Android文本框搜索和清空效果實現代碼及簡要概述
前言 本文實現的效果:文本框輸入為空時顯示輸入的圖標;不為空時顯示清空的圖標,此時點擊清空圖標能清空文本框內輸入文字。正文 一、實現效果 二、實現代碼 綁定事件 復
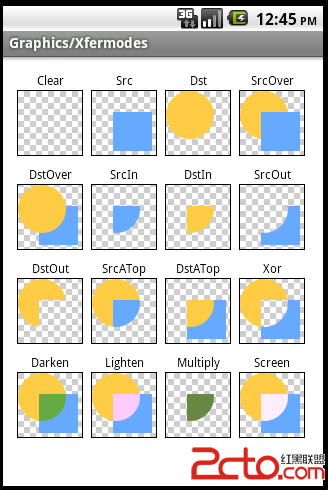 在android中畫圓形圖片的幾種辦法
在開發中經常會有一些需求,比如顯示頭像,顯示一些特殊的需求,將圖片顯示成圓角或者圓形或者其他的一些形狀。但是往往我們手上的圖片或者從服務器獲取到的圖片都是方形的。這時候就
 Android greenDAO數據庫配置教程
一、環境配置1、在Android Studio中,在.src/main目錄下新建一個java-gen文件夾,和java文件夾同級。用於存放greenDAO生成的DaoMa