編輯:關於Android編程
第一篇講了對Ui線程更新的方法和見解,然後接著講了線程檢查機制,這裡來詳細分析下更新Ui的核心——Android中消息系統模型。當然,這裡要講的其實也已經不再簡簡單單地是更新Ui的范疇了。不過還是很值得學習和分析一下。另外,其實網上關於這方面的講解也有很多了,本篇也是綜合整理並用自己的理解加以描述和概括。同時也感謝有更高造詣的大大能予以批評指正。
Android中的消息機制主要有如下幾個要點,這裡也著重圍繞這些內容來講解:
1. Handler 調度消息和runnable對象在不同線程中執行相應動作。
2. Looper消息泵,用來為一個線程開啟一個消息循環
3. MessageQueue 遵循FIFO先進先出規則的消息隊列,以鏈表形式存取Message,供looper提取
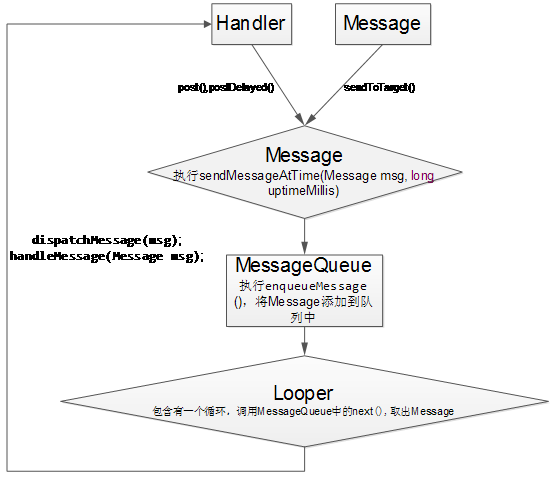
為了方便分析,借用一下找到的模型圖綜合看一下:

首先在一個線程中初始化一個looper並prepare(准備),然後創建該loZ喎?/kf/ware/vc/" target="_blank" class="keylink">vcGVyttTP87XEtKbA7bbUz/NIYW5kbGVyo6y909fFtbHQ6NKqvbu7pbHkuPzKsaOsv8nS1NTaxuTL+8/fs8yjqLvy19TJ7c/fs8yjqdbQyrnTw2hhbmRsZXK3os/7z6LWwbjDz/vPorbTwdBNZXNzYWdlUXVldWWjrNfuuvNsb29wZXK74dfUtq/T0NDys+nIoc/7z6KjqMO709DP+8+i1PK50sbwo6mjrL27uPhoYW5kbGVy1rTQ0M/7z6K0psDtwt+8raGjPGJyIC8+DQqhoaGhT3J6LM7StcS4xcTuw+jK9ru5ysfSu8v6uv3Nv6Osu7nKx9eqtPrC68u1w/ewyaO6PGJyIC8+DQo8ZW0+scjI587Sw8fT0Lj2z9+zzNeow8W4utTw0rvA4LSmwO3C37ytLLKix9LWu9TK0O24w8/fs8zAtLSmwO3V4sDgwt+8rSzEx8O0ztLDx9T1w7TX9rW9xNijvzwvZW0+PGJyIC8+DQoxLiA8c3Ryb25nPtTa0ru49s/fs8zA77HftqjS5dK7uPZMb29wZXI8L3N0cm9uZz48L3A+DQo8cHJlIGNsYXNzPQ=="brush:java;">
Looper.prepare(); //稍微有點兒多,詳細見下文
2.定義一個處理消息的Handler
    handler = new Handler(){
            @Override
            public void handleMessage(Message msg) {
                super.handleMessage(msg);
                //處理邏輯
            }
    };
3.啟動looper,並開始工作,輪詢消息
    Looper.loop(); //詳細見下文
    //要停止的話,使用Looper.quit();
4.在其他線程將要處理的數據data或回調對象callback以消息Message模式通過Handler發至該消息隊列MessageQueue
handler.sendMessage(msg)
5.Looper的loop()方法會從消息隊列中取到該消息並喚醒處理邏輯
    //即loop()方法中的代碼
    for (;;) { //顯然這個死循環一直在等待消息到來並處理
            Message msg = queue.next(); // 取一條消息
            if (msg == null) {
                return;
            }
            msg.target.dispatchMessage(msg); //調用消息綁定的handler執行處理邏輯
            //other code....
    }
6.handler跳轉到執行處理邏輯的過程
    public void dispatchMessage(Message msg) {
        if (msg.callback != null) { //如果有回調,則調用
            handleCallback(msg);
        } else {
            if (mCallback != null) {
                if (mCallback.handleMessage(msg)) {
                    return;
                }
            }
            handleMessage(msg);
        }
    }

    //調用回調方法
     private static void handleCallback(Message message) {
        message.callback.run();
    }
以上便是整個消息系統的過程,後邊我們會逐個分析精講。
在ActivityManagerService為Android應用程序創建新的進程並啟動activity時候,主線程ActivityThread首先被創建。該進程 Process.java@start(“android.app.ActivityThread”,…)會加載執行ActivityThread的靜態成員函數main,打開該方法:
    public static void main(String[] args) {
    //other code.. 我們只看有用的部分,其他暫略過

    Looper.prepareMainLooper();  //准備looper,注,綁定的為當前主線程

    ActivityThread thread = new ActivityThread();//開啟一個新ActivityThread線程
    thread.attach(false);//最後執行到activity
    //other code..

    Looper.loop();  //啟動looper
這個靜態函數做了兩件事情,一是在主線程中創建了一個ActivityThread實例,二是通過Looper類使主線程進入消息循環。
然後,代碼經過一系列邏輯( ActivityThread.attach->IActivityManager. attachApplication -> attachApplicationApplicationThread.scheduleLaunchActivity ->… ->ActivityThread.performLaunchActivity ),最終會調用activity的attach方法。
我們打開activity類。可以看到,它定義了uiThread和Handler參數
    ActivityThread mMainThread;//對應上邊的ActivityThread線程

    private Thread mUiThread;//主Ui線程
    final Handler mHandler = new Handler();//這個handler就是activity用來處理Ui的了。我們自己定義的handler其實等於重新定義了這個mHandler;
我們來看activity的attach方法:
final void attach(Context context, ActivityThread aThread,
            Instrumentation instr, IBinder token, int ident,
            Application application, Intent intent, ActivityInfo info,
            CharSequence title, Activity parent, String id,
            NonConfigurationInstances lastNonConfigurationInstances,
            Configuration config, IVoiceInteractor voiceInteractor) {

        mUiThread = Thread.currentThread();//當前主線程Ui線程
        mMainThread = aThread;   //對應上邊的ActivityThread線程
}
所以,當我們要更新UI的時候,都會用到sendMessage,比如使用runOnUiThread,來看下這個方法
public final void runOnUiThread(Runnable action) {
        /**
        *如果當前線程不為Ui主線程則使用定義好的mHandler
        */
        if (Thread.currentThread() != mUiThread) {
            mHandler.post(action);
        } else {
            action.run();
        }
}
打開post方法:
    public final boolean post(Runnable r)
    {
       return  sendMessageDelayed(getPostMessage(r), 0);
    }
還是熟悉的配方,還是熟悉的味道。。封裝成消息,然後發送出去。好,我們再回頭看看最初第一篇文章裡的四種方法:
1.new 一個handler來 sendMessage();
2.利用new handler來post
不過是把上邊已經定義好Activity的mHandler重新定義了一遍,然後封裝成消息發送出去;
3.runOnUiThread
同樣不過是用了Activity的mHandler發送消息;
4.view.post
稍微看一下代碼:
    public boolean post(Runnable action) {
        final AttachInfo attachInfo = mAttachInfo;
        if (attachInfo != null) {
            return attachInfo.mHandler.post(action);
        }
        // Assume that post will succeed later
        ViewRootImpl.getRunQueue().post(action);
        return true;
    }
對於AttachInfo應該不算陌生吧,附加view到Activity的時候會把activity的一些屬性附加給AttachInfo,這裡同樣調用取得mHandler然後再post。。繞了一圈又回來了。
綜上看來,整個UI更新機制其實就是Android消息系統模型的一個簡單實現。至此,我們的更新UI部分也算講完了,那麼作為補充部分,還是從源碼上完整細致的過一下整個消息系統模型吧。
這裡通過剖析源碼來理解各部分的具體實現,再結合前面講的內容加以融會貫通,便於深入理解最終達到在不同場景的熟練使用。
我們將按照順序來逐個查看。
首先說說消息對象,畢竟其他類操作的最基本元素也都是它。
public final class Message implements Parcelable {
    //繼承Parcelable 用於數據傳遞

    /**幾種數據類型**/
    public int arg1;
    public int arg2;
    public Object obj;
    Bundle data;

    public int what;//供handler處理的消息識別標識身份
    long when;//什麼時候處理該消息

    Handler target;//處理該消息的目標handler
    Runnable callback;  //回調方法

    int flags;//標簽標識
    static final int FLAG_IN_USE = 1 << 0;//是否可用(回收利用)
    static final int FLAG_ASYNCHRONOUS = 1 << 1;
    static final int FLAGS_TO_CLEAR_ON_COPY_FROM = FLAG_IN_USE;

    public Messenger replyTo;//可選對象,可以用來記錄發送方或接收者

    Message next;//這條消息的下一條消息

    /**
    *開一個消息池,便於循環利用消息,避免生成新對象並分配內存
    */
    private static final Object sPoolSync = new Object();
    private static Message sPool;
    private static int sPoolSize = 0;
    private static final int MAX_POOL_SIZE = 50;
}
既然提到消息池又在前面講了利用obtain()節省內存資源,那麼我們就看下這個obtain()
    /**
     *從消息池中返回一個新的消息實例,避免我們通常情況下分配新對象。
     */
     public static Message obtain() {
        synchronized (sPoolSync) {
            if (sPool != null) {
                Message m = sPool;
                sPool = m.next;
                m.next = null;
                sPoolSize--;
                return m;
            }
        }
        return new Message();
    }
然後就是基於此方法的一系列運用:先調用obtain()方法,然後把獲取的Message實例的 各種參數賦值傳參。
    //取一個消息對象,把已存在的消息內容賦值過去
    public static Message obtain(Message orig) {
        Message m = obtain();
        m.what = orig.what;
        m.arg1 = orig.arg1;
        m.arg2 = orig.arg2;
        m.obj = orig.obj;
        m.replyTo = orig.replyTo;
        if (orig.data != null) {
            m.data = new Bundle(orig.data);
        }
        m.target = orig.target;
        m.callback = orig.callback;

        return m;
    }

    public static Message obtain(Handler h, int what,
            int arg1, int arg2, Object obj) {
        Message m = obtain();
        m.target = h;
        m.what = what;
        m.arg1 = arg1;
        m.arg2 = arg2;
        m.obj = obj;

        return m;
    }
    //調用obtain並賦值,不再一一列出
    public static Message obtain(Handler h) {//..}
    public static Message obtain(Handler h, Runnable callback) {//..}
    public static Message obtain(Handler h, int what) {//...}
    public static Message obtain(Handler h, int what, Object obj) {//...}
    public static Message obtain(Handler h, int what, int arg1, int arg2) {//...}
然後就是回收釋放recycle,它返回一個消息池實例。釋放之後將不能再使用此方法。
    public void recycle() {
        clearForRecycle();

        synchronized (sPoolSync) {
            if (sPoolSize < MAX_POOL_SIZE) {
                next = sPool;
                sPool = this;
                sPoolSize++;
            }
        }
    }

    //清空所有數據
    void clearForRecycle() {
        flags = 0;
        what = 0;
        arg1 = 0;
        arg2 = 0;
        obj = null;
        replyTo = null;
        when = 0;
        target = null;
        callback = null;
        data = null;
    }

    //拷貝消息內容
    public void copyFrom(Message o) {
        this.flags = o.flags & ~FLAGS_TO_CLEAR_ON_COPY_FROM;
        this.what = o.what;
        this.arg1 = o.arg1;
        this.arg2 = o.arg2;
        this.obj = o.obj;
        this.replyTo = o.replyTo;

        if (o.data != null) {
            this.data = (Bundle) o.data.clone();
        } else {
            this.data = null;
        }
    }
後邊就是get和set方法以及Parcelable 的讀寫。
先看他所定義的屬性:
public class Looper {
    private static final String TAG = Looper;

    static final ThreadLocal sThreadLocal = new ThreadLocal();

    private static Looper sMainLooper;//唯一對應一個主線程的looper靜態實例
    final MessageQueue mQueue;//消息隊列
    final Thread mThread; //當前綁定線程
    volatile boolean mRun; //是否允許退出

    private Printer mLogging;//日志打印

    //....各種方法體....
}
通常操作系統都為線程提供了內部存儲空間,一個線程對應一個內存空間,因此這裡很方便的為一個線程定義唯一對應的looper實例:ThreadLocal< Looper > 這個有點類似C中申請內存大小 *malloc(sizeof Looper),或者我們可以簡單理解為只作用於當前線程的new Looper.
而sMainLooper是當前應用程序的主線程looper,區別是適用於主線程。
我們再看他的構造方法:
    private Looper(boolean quitAllowed) {
        mQueue = new MessageQueue(quitAllowed);
        mRun = true;
        mThread = Thread.currentThread();
    }
此構造方法是私有的,即不允許在外部實例化,這樣通過單例模式保證外部從該線程取得looper唯一。另外它主要初始化了mQueue 、mRun 和 mThread 幾個屬性,並綁定了當前線程。找一下它調用實例化的部分:
    //重載,主要看下邊的prepare(boolean quitAllowed)方法
    public static void prepare() {
        prepare(true);
    }

    /**
    *初始化當前線程作為Looper並存為本地變量,
    *並由此來創建handler和處理程序
    *
    *@quitAllowed 是否允許退出(循環取消息)
    *通過調用loop()和quit()來開啟和結束循環
    */
    private static void prepare(boolean quitAllowed) {
        if (sThreadLocal.get() != null) { //保證一個線程唯一對應一個Looper
            throw new RuntimeException(Only one Looper may be created per thread);
        }
        sThreadLocal.set(new Looper(quitAllowed));//在線程中初始化一個實例
    }
sThreadLocal的get和set,負責在內存中存取與線程唯一對應的looper。
同時我們會注意到有兩個方法prepareMainLooper和getMainLooper:
    /**
    *初始化當前線程作為Looper並作為android應用的取消息邏輯,
    *是由當前運行環境來創建,不需要手動調用
    */
    public static void prepareMainLooper() {
        prepare(false);
        synchronized (Looper.class) {  //加鎖,保證實例化唯一一個looper
            if (sMainLooper != null) {
                throw new IllegalStateException(The main Looper has already been prepared.);
            }
            sMainLooper = myLooper();
        }
    }

    /**
    * 返回當前應用程序主線程的looper實例
    */
    public static Looper getMainLooper() {
        synchronized (Looper.class) {
            return sMainLooper;
        }
    }
這部分是共應用程序初始化的時候調用的,我們一般用不到,不過也可以看出只是初始化了主線程的looper。
好的,基本的初始化工作也已經完成了,來看該類中的核心部分,循環取消息的loop()
    /**
    * 啟動隊列的循環取消息操作,直到調用quit()退出
    */
    public static void loop() {
        final Looper me = myLooper();
        if (me == null) {
            throw new RuntimeException(No Looper; Looper.prepare() wasn't called on this thread.);
        }
        final MessageQueue queue = me.mQueue;

        // 確保當前線程是本地進程的唯一標示
        Binder.clearCallingIdentity();
        final long ident = Binder.clearCallingIdentity();

        //開始循環取消息操作
        for (;;) {
            Message msg = queue.next(); //取下一條消息
            if (msg == null) {
                // 如果消息隊列沒有消息則掛起
                return;
            }

            // 打印日志部分
            Printer logging = me.mLogging;
            if (logging != null) {
                logging.println(>>>>> Dispatching to  + msg.target +   +
                        msg.callback + :  + msg.what);
            }
            //調用消息處理邏輯(回調和執行handler處理)
            msg.target.dispatchMessage(msg);

            if (logging != null) {
                logging.println(<<<<< Finished to  + msg.target +   + msg.callback);
            }

            // 確保在處理消息邏輯時當前線程並沒有被打斷
            final long newIdent = Binder.clearCallingIdentity();
            if (ident != newIdent) {
                Log.wtf(TAG, Thread identity changed from 0x
                        + Long.toHexString(ident) +  to 0x
                        + Long.toHexString(newIdent) +  while dispatching to
                        + msg.target.getClass().getName() +
                        + msg.callback +  what= + msg.what);
            }
            //回收消息
            msg.recycle();
        }
    }
基本都有備注,不用過多解釋了。msg.target.dispatchMessage前面已經講過,後便可能會在拉出來遛遛。
其他再就是基本的get和打印和異常捕獲相關的了,有興趣的可以自己去看一下。
 android Setting中隱藏項實現原理與代碼
我們都知道做程序員有時會惡搞,就像android中,程序員在setting中就隱藏這樣一項:我們可以找到“關於手機這一項在裡面有“android版本”這一項,如圖:當我們
 Android開發仿掃一掃實現拍攝框內的照片功能
就是仿照現在掃一掃的形式,周圍是半透明的遮擋,然後中間是全透明的,拍攝後只截取框內的內容查了很多博客,實現起來真的太復雜了,本人比較怕麻煩所以在很多地方偷懶了先上效果圖:
 Android App在線程中創建handler的方法講解
相關概念1.Handler:可以看做是一個工具類,用來向消息隊列中插入消息的;2.Thread:所有與Handler相關的功能都是與Thread密不可分的,Handler
 Android高仿微信之mvp實現(三)
前面說到如何使用小米的推送來實現簡單的聊天系統,雖然簡單實現了,但是對於你們來說想要真正的體驗效果就只能跟我互動,為了解決這個缺點,我最近完善了下,增加了添加朋友的功能,