編輯:關於Android編程
在Android開發中,我們常用的布局方式主要有LinearLayout、RelativeLayout、FrameLayout等,通過這些布局我們可以實現各種各樣的界面。與此同時,如何正確、高效的使用這些布局方式來組織UI控件,是我們構建優秀Android App的主要前提之一。本篇內容就主要圍繞Android布局優化來討論在日常開發中我們使用常用布局需要注意的一些方面,同時介紹一款SDK自帶的UI性能檢測工具HierarchyViewer。
通過一些慣用、有效的布局原則,我們可以制作出加載效率高並且復用性高的UI。簡單來說,在Android UI布局過程中,需要遵守的原則包括如下幾點:
由於Android的碎片化程度很高,市面上存在的屏幕尺寸也是各式各樣,使用RelativeLayout能使我們構建的布局適應性更強,構建出來的UI布局對多屏幕的適配效果越好,通過指定UI控件間的相對位置,使在不同屏幕上布局的表現能基本保持一致。當然,也不是所有情況下都得使用相對布局,根據具體情況來選擇和其他布局方式的搭配來實現最優布局。
在實際開發中,我們經常會遇到一些共用的UI組件,比如帶返回按鈕的導航欄,如果為每一個xml文件都設置這部分布局,一是重復的工作量大,二是如果有變更,那麼每一個xml文件都得修改。還好,Android為我們提供了< include />標簽,顧名思義,通過它,我們可以將這些共用的組件抽取出來單獨放到一個xml文件中,然後使用< include />標簽導入共用布局,這樣,前面提到的兩個問題都解決了。例如上面提到的例子,新建一個xml布局文件作為頂部導航的共用布局。
xml common_navitationbar.xml

<relativelayout mlns:android="http://schemas.android.com/apk/res/android" xmlns:tools="http://schemas.android.com/tools" android:layout_width="match_parent" android:layout_height="wrap_content" android:background="@android:color/white" android:padding="10dip"><button android:layout_width="wrap_content" android:layout_height="wrap_content" android:layout_alignparentleft="true" android:text="Back" android:textcolor="@android:color/black">

    <textview android:layout_width="wrap_content" android:layout_height="wrap_content" android:layout_centerinparent="true" android:text="Title" android:textcolor="@android:color/black">

</textview></button></relativelayout>
然後我們在需要引入導航欄的布局xml中通過< include />導入這個共用布局。
通過這種方式,我們既能提高UI的制作和復用效率,也能保證制作的UI布局更加規整和易維護。布局完成後我們運行一下,可以看到如下布局效果,這就是我們剛才完成的帶導航欄的界面。xml main.xml
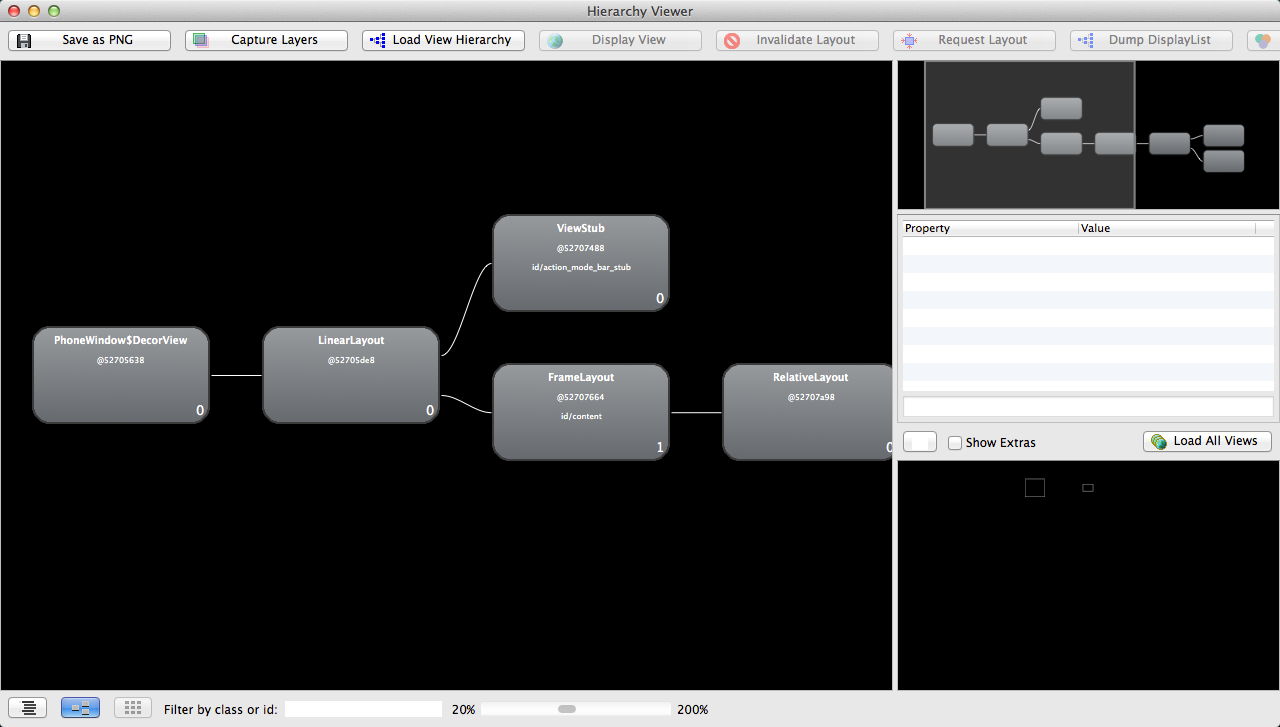
接著我們進入sdk目錄下的tools文件夾下,找到HierarchyViewer並運行(此時保持你的模擬器或真機正在運行需要進行分析的App),雙擊我們正在顯示的這個App所代表的進程。

接下來便會進入hierarchyviewer的界面,我們可以在這裡很清晰看到正在運行的UI的布局層次結構以及它們之間的關系。
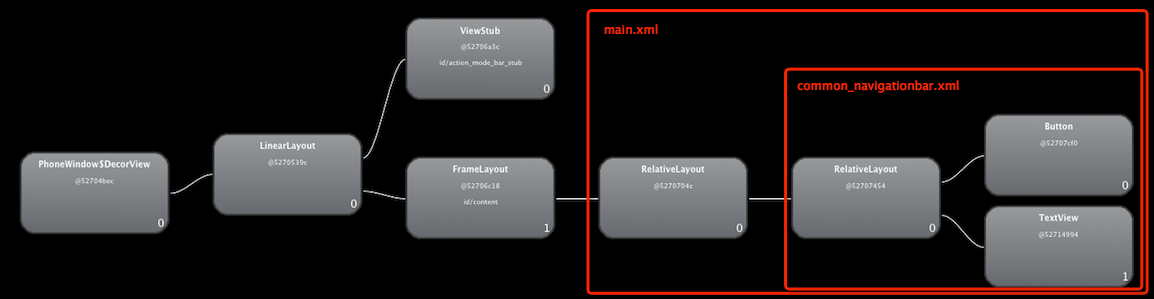
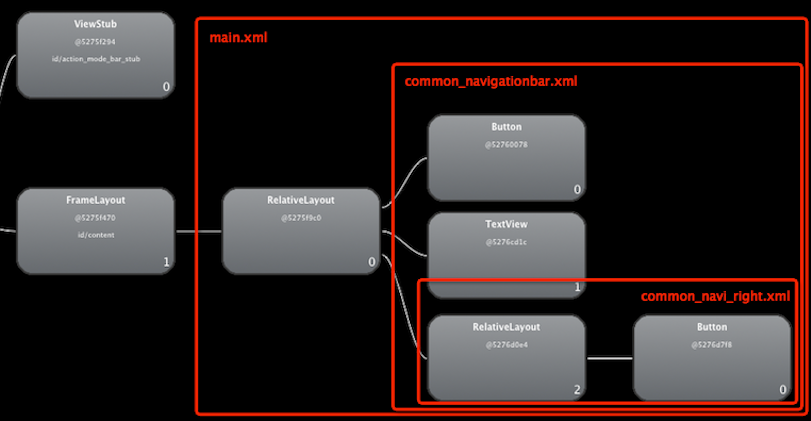
分析剛剛我們構建的導航欄布局,放大布局分析圖可以看到,被include進來的common_navitationbar.xml根節點是一個RelativeLayout,而包含它的主界面main.xml根節點也是一個RelativeLayout,它前面還有一個FrameLayout等幾個節點,FrameLayout就是Activity布局中默認的父布局節點,再往上是一個LinearLayout,這個LinearLayout就是包含Activity布局和狀態欄的整個屏幕顯示的布局父節點,這個LinearLayout還有一個子節點就是ViewStub,關於這個節點我們在後面會詳細介紹。
< merge />標簽的作用是合並UI布局,使用該標簽能降低UI布局的嵌套層次。該標簽的主要使用場景主要包括兩個,第一是當xml文件的根布局是FrameLayout時,可以用merge作為根節點。理由是因為Activity的內容布局中,默認就用了一個FrameLayout作為xml布局根節點的父節點,這一點可以從上圖中看到,main.xml的根節點是一個RelativeLayout,其父節點就是一個FrameLayout,如果我們在main.xml裡面使用FrameLayout作為根節點的話,這時就可以使用merge來合並成一個FrameLayout,這樣就降低了布局嵌套層次。
我們修改一下main.xml的內容,將根節點修改為merge標簽。
xml main.xml

<merge xmlns:android="http://schemas.android.com/apk/res/android" xmlns:tools="http://schemas.android.com/tools" android:layout_width="match_parent" android:background="@android:color/darker_gray" android:layout_height="match_parent">

    <include layout="@layout/common_navitationbar">

</include></merge>
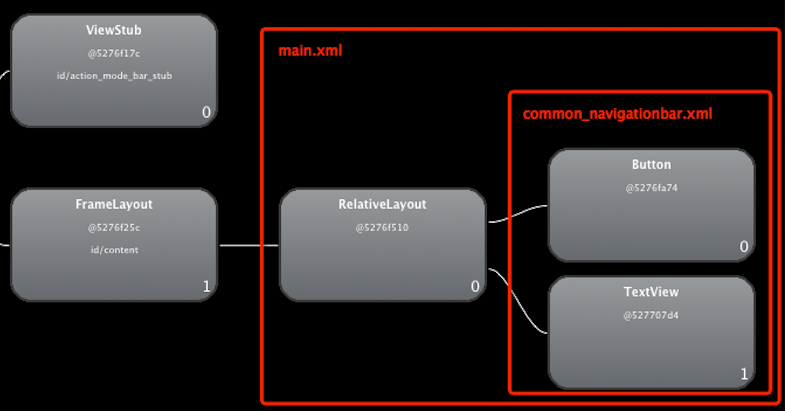
重新運行並打開HierarchyViewer查看此時的布局層次結構,發現之前多出來的一個RelativeLayout就沒有了,直接將common_navigationbar.xml裡面的內容合並到了main.xml裡面。
使用< merge />的第二種情況是當用include標簽導入一個共用布局時,如果父布局和子布局根節點為同一類型,可以使用merge將子節點布局的內容合並包含到父布局中,這樣就可以減少一級嵌套層次。首先我們看看不使用merge的情況。我們新建一個布局文件commonnaviright.xml用來構建一個在導航欄右邊的按鈕布局。
xml common_navi_right.xml

<relativelayout mlns:android="http://schemas.android.com/apk/res/android" xmlns:tools="http://schemas.android.com/tools" android:layout_width="wrap_content" android:layout_height="wrap_content"><button android:layout_width="wrap_content" android:layout_height="wrap_content" android:layout_alignparentright="true" android:text="Ok" android:textcolor="@android:color/black"></button></relativelayout>
然後修改common_navitationbar.xml的內容,添加一個include,將右側按鈕的布局導入:
xml common_navitationbar.xml

<relativelayout mlns:android="http://schemas.android.com/apk/res/android" xmlns:tools="http://schemas.android.com/tools" android:layout_width="match_parent" android:layout_height="wrap_content" android:background="@android:color/white" android:padding="10dip"><button android:layout_width="wrap_content" android:layout_height="wrap_content" android:layout_alignparentleft="true" android:text="Back" android:textcolor="@android:color/black">

    <textview android:layout_width="wrap_content" android:layout_height="wrap_content" android:layout_centerinparent="true" android:text="Title" android:textcolor="@android:color/black">

    <include layout="@layout/common_navi_right">

</include></textview></button></relativelayout>
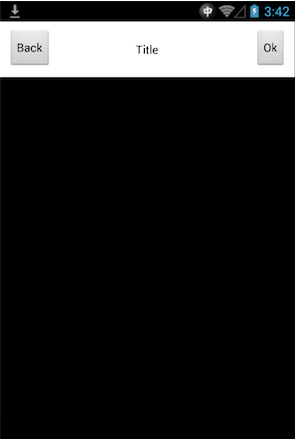
運行後的效果如下圖,在導航欄右側添加了一個按鈕“ok”
然後再運行HierarchyViewer看看現在的布局結構,發現commonnaviright.xml作為一個布局子節點嵌套在了common_navitationbar.xml下面。
這時我們再將commonnaviright.xml的根節點類型改為merge。
xml common_navi_right.xml
重新運行並打開HierarchyViewer查看布局結構,發現之前嵌套的一個RelativeLayout就沒有了,這就是使用merge的效果,能降低布局的嵌套層次。

也許有不少同學對ViewStub還比較陌生,首先來看看ViewStub在官方文檔裡是怎麼介紹的:
A ViewStub is an invisible, zero-sized View that can be used to lazily inflate layout resources at runtime. When a ViewStub is made visible, or when inflate() is invoked, the layout resource is inflated. The ViewStub then replaces itself in its parent with the inflated View or Views. Therefore, the ViewStub exists in the view hierarchy until setVisibility(int) or inflate() is invoked. The inflated View is added to the ViewStub's parent with the ViewStub's layout parameters.
大致意思是:ViewStub是一個不可見的,能在運行期間延遲加載的大小為0的View,它直接繼承於View。當對一個ViewStub調用inflate()方法或設置它可見時,系統會加載在ViewStub標簽中引入的我們自己定義的View,然後填充在父布局當中。也就是說,在對ViewStub調用inflate()方法或設置visible之前,它是不占用布局空間和系統資源的。它的使用場景可以是在我們需要加載並顯示一些不常用的View時,例如一些網絡異常的提示信息等。
我們新建一個xml文件用來顯示一個提示信息:
xml common_msg.xml

<relativelayout mlns:android="http://schemas.android.com/apk/res/android" xmlns:tools="http://schemas.android.com/tools" android:layout_width="wrap_content" android:layout_height="wrap_content">

   <textview android:layout_width="wrap_content" android:layout_height="wrap_content" android:layout_centerinparent="true" android:background="@android:color/white" android:padding="10dip" android:text="Message" android:textcolor="@android:color/black">

</textview></relativelayout>
然後在main.xml裡面加入ViewStub的標簽引入上面的布局:
xml main.xml

<merge xmlns:android="http://schemas.android.com/apk/res/android" xmlns:tools="http://schemas.android.com/tools" android:layout_width="match_parent" android:background="@android:color/darker_gray" android:layout_height="match_parent">

    <include layout="@layout/common_navitationbar">

    <viewstub android:id="@+id/msg_layout" android:layout_width="wrap_content" android:layout_height="wrap_content" android:layout_gravity="center" android:layout="@layout/common_msg">

</viewstub></include></merge>
修改MainActivity.java的代碼,我們這裡設置為點擊右上角按鈕的時候顯示自定義的common_msg.xml的內容。
java MainActivity.java

public class MainActivity extends Activity {

	private View msgView;
	private boolean flag = true;

    @Override
    protected void onCreate(Bundle savedInstanceState) {
        super.onCreate(savedInstanceState);
        setContentView(R.layout.activity_main);

        this.findViewById(R.id.rightButton).
setOnClickListener(new OnClickListener() {

			@Override
			public void onClick(View arg0) {
				System.out.print("111");
				if(flag){
					showMsgView();
				}else{
					closeMsgView();
				}
				flag = !flag;
			}
		});
    }

    private void showMsgView(){
    	if(msgView != null){
    		msgView.setVisibility(View.VISIBLE);
    		return;
    	}
    	ViewStub stub = (ViewStub)findViewById(R.id.msg_layout);
        msgView = stub.inflate();
    }

    private void closeMsgView(){
    	if(msgView != null){
    		msgView.setVisibility(View.GONE);
    	}
    }
}
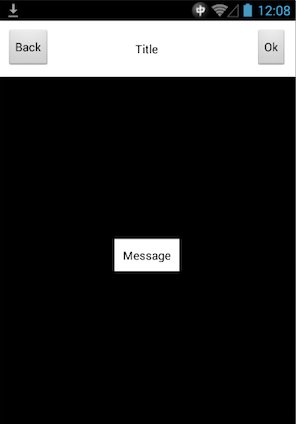
代碼中我們通過flag來切換顯示和隱藏common_msg.xml的內容,然後我們運行一下並點擊右上角按鈕來切換,效果如下:
好了,到目前為止,我們就介紹了Android中關於布局優化的一些內容以及工具HierarchyViewer的使用。將前文提及的布局原則再列一下,歡迎大家補充更多的關於Android布局優化的實用原則。
 Android Intent傳遞對象小結
效果: 想看實例的,感興趣的可以看之前的一篇文章 Android ViewPager Fragment實現選項卡 部分關鍵代碼: public class S
 實例詳解Android自定義ProgressDialog進度條對話框的實現
Android SDK已經提供有進度條組件ProgressDialog組件,但用的時候我們會發現可能風格與我們應用的整體風格不太搭配,而且ProgressDialog的可
 Android布局技巧之創建高效布局
Android UI工具包提供了一些布局管理器,它們使用起來相當容易,而且,大多數的時候,你只需要使用它們最基本的特征來實現UI。執著於基本特征的使用對於創建UI來說,往
 Android簡易實戰教程--第七話《在內存中存儲用戶名和密碼》
首先是配置文件: 活動中的代碼如下: package com.itydl.rwinrom;import jav