編輯:關於Android編程
2、通過url打開網絡連接(連接方式有http連接,ftp連接,https連接,rtsp連接) 此處獲取網絡連接用到的是http連接,所以使打開一個HttpURLConnection
   HttpURLConnection openConnection = (HttpConnection)url.openConnection();
   openConnection.setRequestMethod("GET");//設置請求方式
   openConnection.setConnectTimeout(5000);//設置請求超時時間
3、打開連接後就可以獲取網絡返回的數據(例)
 String contentType = openConnection.getContentType();//獲取返回的數據類型
 Object content = openConnection.getContent();//獲取放回的數據
 int code = openConnection.getResponseCode();//獲取響應碼,200--返回正確,404--資源沒找到,503--服務器內部錯誤
 ......
4、獲取輸入流,保存返回的數據
InputStream inputStream = openConnection.getInputStream();5、根據資源類型將網絡資源轉換成相應的資源,如是圖片資源,則如下轉換
Bitmap decodeStream = BitmapFactory.decodeStream(inputStream);6、訪問網絡需要添加網絡權限 7、一個常用的參數:User-Agent,我們可以通過這個參數來獲取這個資源的來源信息,如某個網站,iphone6 plus等 例:
openConnection.setRequestProperty("User-Agent", "Mozilla/4.0 (compatible; MSIE 8.0; Windows NT 6.1; WOW64;Trident/4.0;SLCC2; .NET CLR 2.0.50727; .NET CLR 3.5.30729; .NET CLR 3.0.30729; .NET4.0C; InfoPath.2");
8、網絡路徑中不能包含中文,如果在路徑中需要涉及到中文,需要使用將中文使用URLEncoder對中文進行編碼
URLEncoder.encode("中文",utf-8);
二、使用smartImageView加載網絡圖片
smartImageView繼承自ImageView,具有ImageView的所有功能,同時擴展了ImageVIew的功能,如常用的方法setImageUrl(URL url),這個方法可以通過直接傳遞圖片的URL地址來給smartImageView控件設置圖片。
smartIamgeView使用異步加載的方式從網絡獲取網絡圖片,加載過程在子線程中執行,在使用時只需要傳遞圖片的路徑即可,不需要在子線程訪問網絡和加載的問題。
public class MainActivity extends Activity {
    String path = "http://f.hiphotos.baidu.com/image/pic/item/a8014c086e061d9507500dd67ff40ad163d9cacd.jpg";
    private SmartImageView smiv;
    @Override
    protected void onCreate(Bundle savedInstanceState) {
        super.onCreate(savedInstanceState);
        setContentView(R.layout.activity_main);
        Button bt = (Button) findViewById(R.id.bt);
        smiv = (SmartImageView) findViewById(R.id.smiv);
    }

    public void click(View v){
        smiv.setImageUrl(path);
    }
}
三、使用Get請求方式請求網絡 模擬QQ登錄
 protected void doGet(HttpServletRequest request, HttpServletResponse response) throws ServletException, IOException {
    //01010101
    String qq = request.getParameter("qq");//采用的編碼是iso-8859-1
    String pwd = request.getParameter("pwd");
    System.out.println("qq:"+new String(qq.getBytes("iso-8859-1"),"utf-8"));
    System.out.println("pwd:"+new String(pwd.getBytes("iso-8859-1"),"utf-8"));
    //查詢數據庫 看qq和密碼是否存在
    if("10000".equals(qq)&&"abcde".equals(pwd)){
        //tomcat容器如果發現字符串不識別就默認采用本地碼表
        response.getOutputStream().write("登陸成功".getBytes("utf-8"));
    }else{
        response.getOutputStream().write("登陸失敗".getBytes("utf-8"));
    }
}
服務器端會通過HttpServletRequestrequestgetParameter()方法獲取到用戶請求網絡的參數,如用戶名和密碼。用戶發送請求時,輸入的請求參數都會展示在地址欄,即地址欄的所有的參數就是服務器端要獲取到的所有參數。在發送請求時,只需要在請求地址後面加上相應的參數就能發送get請求,如www.qq.com/web/LogingServlet?qq=10000&pwd=abcde
2、客戶端在發送get請求時,需要將請求的參數傳遞到URL中,然後在發送請求。如:
//獲取請求的參數
final String qq = et_qq.getText().toString().trim();
final String pwd = et_pwd.getText().toString().trim();
//將參數添加到請求地址中
String path = "http://192.168.1.103:8080/web/LoginServlet?qq="+URLEncoder.encode(qq, "utf-8")+"&pwd="+URLEncoder.encode(pwd, "utf-8");
3、get請求的優缺點
優點:使用方便,只需要的地址後面組拼請求參數即可發送請求
缺點:(1)請求參數在地址欄都能展示出來,不安全;
(2)數據的長度有限制
四、使用post請求方式發送網絡請求 1、post請求方式的優缺點 優點:安全,數據不是在url後面組拼,而是通過流的形式寫給服務器;數據的長度沒有限制 缺點:編寫麻煩 2、post請求和get請求的區別 (1)get請求需要在URL後面組拼提交的數據,post請求不需要組拼任何數據 (2)post請求必須要指定請求提交的數據長度(如下圖,post請求比get請求多了Content-Type請求頭)
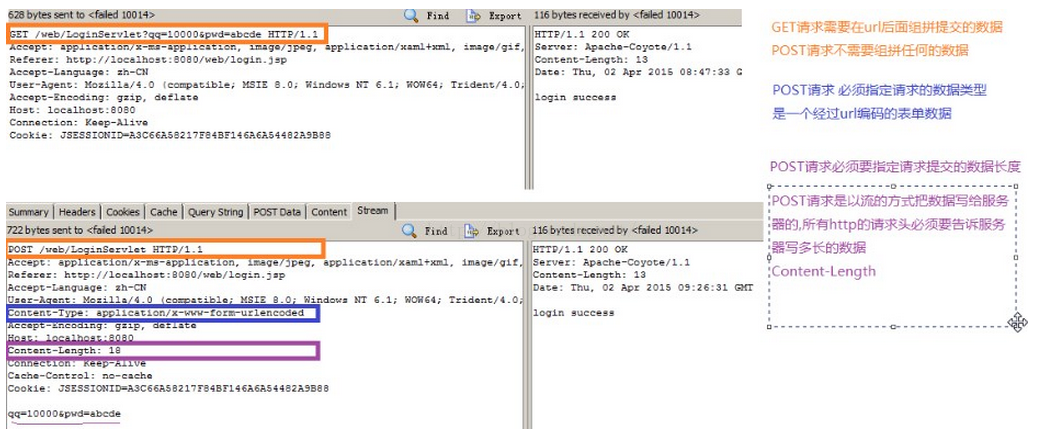 (3)post請求是以流的方式吧數據寫給服務器,所有的http請求頭必須要告訴服務器寫多長的數據(如下圖,post請求比get請求多了Content-Length請求頭)
3、服務端代碼示例
(3)post請求是以流的方式吧數據寫給服務器,所有的http請求頭必須要告訴服務器寫多長的數據(如下圖,post請求比get請求多了Content-Length請求頭)
3、服務端代碼示例
 @Override
protected void doPost(HttpServletRequest req, HttpServletResponse resp)
        throws ServletException, IOException {
    System.out.println("post過來的請求");
    doGet(req, resp);
}
4、示例代碼
五、使用HTTPClient發送網絡請求 1、發送get請求URL url = new URL(path); HttpURLConnection conn = (HttpURLConnection) url.openConnection(); //1.設置請求方式為POST conn.setRequestMethod("POST"); //注意單詞必須大寫. conn.setConnectTimeout(5000); //2.設置http請求數據的類型為表單類型 conn.setRequestProperty("Content-Type", "application/x-www-form-urlencoded"); //3.設置給服務器寫的數據的長度 //qq=10000&pwd=abcde String data = "qq="+URLEncoder.encode(qq, "utf-8")+"&pwd="+URLEncoder.encode(pwd, "utf-8"); conn.setRequestProperty("Content-Length", String.valueOf(data.length())); //4.記得指定要給服務器寫數據 conn.setDoOutput(true); //5.開始向服務器寫數據 conn.getOutputStream().write(data.getBytes());
String path = "http://192.168.1.103:8080/web/LoginServlet?qq="+URLEncoder.encode(qq, "utf-8")+"&pwd="+URLEncoder.encode(pwd, "utf-8");
HttpClient client = new DefaultHttpClient();
HttpGet httpGet = new HttpGet(path);
HttpResponse response = client.execute(httpGet);
//獲取狀態碼
int code = response.getStatusLine().getStatusCode();

if(code == 200){
    InputStream is = response.getEntity().getContent();
    String result = StreamTools.readStream(is);
    Message msg = Message.obtain();
    msg.what = SUCCESS;
    msg.obj = result;
    handler.sendMessage(msg);
}else{
    Message msg = Message.obtain();
    msg.what = ERROR;
    handler.sendMessage(msg);
}
String path = "http://192.168.1.103:8080/web/LoginServlet"; HttpClient client = new DefaultHttpClient(); HttpPost httpPost = new HttpPost(path); Listparameters = new ArrayList (); parameters.add(new BasicNameValuePair("qq", qq)); parameters.add(new BasicNameValuePair("pwd", pwd)); httpPost.setEntity(new UrlEncodedFormEntity(parameters, "utf-8")); HttpResponse response = client.execute(httpPost); //獲取狀態碼 int code = response.getStatusLine().getStatusCode(); if(code == 200){ InputStream is = response.getEntity().getContent(); String result = StreamTools.readStream(is); Message msg = Message.obtain(); msg.what = SUCCESS; msg.obj = result; handler.sendMessage(msg); }else{ Message msg = Message.obtain(); msg.what = ERROR; handler.sendMessage(msg); }
StreamTools.readStream()
public class StreamTools {
    /**
     * 工具方法
     * @param is 輸入流
     * @return 文本字符串
     * @throws Exception
     */
    public static String readStream(InputStream is) throws Exception{
        ByteArrayOutputStream baos = new ByteArrayOutputStream();
        byte[] buffer = new byte[1024];
        int len = -1;
        while((len = is.read(buffer))!=-1){
            baos.write(buffer, 0, len);
        }
        is.close();
        String temp =  baos.toString();
        return temp;
    }
}
六、使用過異步網絡加載框架AsyncHttpClient請求網絡
1、AsyncHttpClient進一步對HttpClient進行了封裝,這個框架考慮到了子線程問題,我們在使用時就不用再創建子線程,直接使用估計可,同時框架中還使用了線程池,使加載效率更高。
2、發送get請求
String path = "http://192.168.1.103:8080/web/LoginServlet?qq="+URLEncoder.encode(qq)+"&pwd="+URLEncoder.encode(pwd);
AsyncHttpClient client = new AsyncHttpClient();
client.get(path, new AsyncHttpResponseHandler() {
    @Override
    public void onSuccess(int statusCode, Header[] headers,
            byte[] responseBody) {
        tv_status.setText(new String(responseBody));
    }
    @Override
    public void onFailure(int statusCode, Header[] headers,
            byte[] responseBody, Throwable error) {
        tv_status.setText("http請求失敗"+new String(responseBody));
    }
 });
3、發送post請求
String path = "http://192.168.1.103:8080/web/LoginServlet";
AsyncHttpClient client = new AsyncHttpClient();
RequestParams params = new RequestParams();
params.put("qq", qq);
params.put("pwd", pwd);
client.post(path, params, new AsyncHttpResponseHandler(){
    @Override
    public void onSuccess(int statusCode, Header[] headers,
            byte[] responseBody) {
        tv_status.setText("登陸結果:"+new String(responseBody));
    }
    @Override
    public void onFailure(int statusCode, Header[] headers,
            byte[] responseBody, Throwable error) {
        tv_status.setText("請求失敗請檢查網絡");
    }
});
1.簡介
Android中網絡請求一般使用Apache HTTP Client或者采用HttpURLConnect,但是直接使用這兩個類庫需要寫大量的代碼才能完成網絡post和get請求,而使用android-async-http這個庫可以大大的簡化操作,它是基於Apache’s HttpClient ,所有的請求都是獨立在UI主線程之外,通過回調方法處理請求結果,采用android Handlermessage 機制傳遞信息。
public void upload(View view){
    String path = et_path.getText().toString().trim();
    File file = new File(path);
    if(file.exists()&&file.length()>0){
        //上傳
        AsyncHttpClient client = new AsyncHttpClient();
        RequestParams params = new RequestParams();
        try {
            params.put("file", file);
        } catch (FileNotFoundException e) {
            e.printStackTrace();
        }
        client.post("http://192.168.1.103:8080/web/UploadServlet", params, new AsyncHttpResponseHandler() {
            @Override
            public void onSuccess(int statusCode, Header[] headers, byte[] responseBody) {
                Toast.makeText(MainActivity.this, "上傳成功", 0).show();
            }

            @Override
            public void onFailure(int statusCode, Header[] headers,
                    byte[] responseBody, Throwable error) {
                Toast.makeText(MainActivity.this, "上傳失敗", 0).show();
            }
        });

    }else{
        Toast.makeText(this, "請檢查文件是否存在", 0).show();
    }
}
八、使用HttpUtils加載網絡 1、發送get請求
HttpUtils http = new HttpUtils();
        http.send(HttpRequest.HttpMethod.GET,
            "http://www.lidroid.com",
            new RequestCallBack(){
                @Override
                public void onLoading(long total, long current, boolean isUploading) {
                    testTextView.setText(current + "/" + total);
                }
                @Override
                public void onSuccess(ResponseInfo responseInfo) {
                    textView.setText(responseInfo.result);
                }
                @Override
                public void onStart() {
                }
                @Override
                public void onFailure(HttpException error, String msg) {
                }
        });
2、下載
支持斷點續傳,隨時停止下載任務,開始任務
 HttpUtils http = new HttpUtils();
    HttpHandler handler = http.download("http://apache.dataguru.cn/httpcomponents/httpclient/source/httpcomponents-client-4.2.5-src.zip",
        "/sdcard/httpcomponents-client-4.2.5-src.zip",
        true, // 如果目標文件存在,接著未完成的部分繼續下載。服務器不支持RANGE時將從新下載。
        true, // 如果從請求返回信息中獲取到文件名,下載完成後自動重命名。
        new RequestCallBack() {
            @Override
            public void onStart() {
                testTextView.setText("conn...");
            }
            @Override
            public void onLoading(long total, long current, boolean isUploading) {
                testTextView.setText(current + "/" + total);
            }
            @Override
            public void onSuccess(ResponseInfo responseInfo) {
                testTextView.setText("downloaded:" + responseInfo.result.getPath());
            }
            @Override
            public void onFailure(HttpException error, String msg) {
                testTextView.setText(msg);
            }
    });
Range表示范圍,後面的字符串為范圍值(8)使用隨機文件訪問流的seek(intindex)方法設置每個線程下載文件後在本地文件中寫入的起始位置
(9)將獲取到的數據寫入到本地文件中
public void download(View view) {
    path = et_path.getText().toString().trim();
    if (TextUtils.isEmpty(path) || (!path.startsWith("http://"))) {
        Toast.makeText(this, "對不起路徑不合法", 0).show();
        return;
    }
    new Thread(){
        public void run() {
            try {
                //1、連接網絡
                URL url = new URL(path);
                HttpURLConnection conn = (HttpURLConnection) url.openConnection();
                conn.setConnectTimeout(5000);
                conn.setRequestMethod("GET");
                int code = conn.getResponseCode();
                if (code == 200) {
                    //2、使用getContentLength()方法獲取網絡文件的大小
                    int length = conn.getContentLength();
                    System.out.println("服務器文件的長度為:" + length);
                    //3、使用RandomAccessFile在本地創建一個空文件
                    RandomAccessFile raf = new RandomAccessFile(Environment.getExternalStorageDirectory().getAbsolutePath()+"/"+getFileName(path), "rw");
                    //4、將空文件的大小設置為與網絡文件大小相同
                    raf.setLength(length);
                    raf.close();
                    //5、設置將文件劃分的塊數,threadCount--線程數
                    int blocksize = length / threadCount;
                    runningThreadCount = threadCount;
                    //6、設置每個線程下載的文件區域
                    for (int threadId = 0; threadId < threadCount; threadId++) {
                        int startIndex = threadId * blocksize;
                        int endIndex = (threadId + 1) * blocksize - 1;
                        if (threadId == (threadCount - 1)) {
                            endIndex = length - 1;
                        }
                        new DownloadThread(threadId, startIndex, endIndex).start();
                    }
                }
            } catch (Exception e) {
                e.printStackTrace();
            }
        };
    }.start();
}
//創建線程下載文件
private class DownloadThread extends Thread {
    /**
     * 線程id
     */
    private int threadId;
    /**
     * 線程下載的理論開始位置
     */
    private int startIndex;
    /**
     * 線程下載的結束位置
     */
    private int endIndex;
    /**
     * 當前線程下載到文件的那一個位置了.
     */
    private int currentPosition;
    public DownloadThread(int threadId, int startIndex, int endIndex) {
        this.threadId = threadId;
        this.startIndex = startIndex;
        this.endIndex = endIndex;
        System.out.println(threadId + "號線程下載的范圍為:" + startIndex
                + "   ~~   " + endIndex);
        currentPosition = startIndex;
    }
    @Override
    public void run() {
        try {
            URL url = new URL(path);
            HttpURLConnection conn = (HttpURLConnection) url.openConnection();
            //檢查當前線程是否已經下載過一部分的數據了
            File info = new File(Environment.getExternalStorageDirectory().getAbsolutePath()+"/"+threadId+".position");
            RandomAccessFile raf = new RandomAccessFile(Environment.getExternalStorageDirectory().getAbsolutePath()+"/"+getFileName(path), "rw");
            if(info.exists()&&info.length()>0){
                FileInputStream fis = new FileInputStream(info);
                BufferedReader br = new BufferedReader(new InputStreamReader(fis));
                currentPosition = Integer.valueOf(br.readLine());
                conn.setRequestProperty("Range", "bytes="+currentPosition+"-"+endIndex);
                System.out.println("原來有下載進度,從上一次終止的位置繼續下載"+"bytes="+currentPosition+"-"+endIndex);
                fis.close();
                raf.seek(currentPosition);//每個線程寫文件的開始位置都是不一樣的.
            }else{
            //告訴服務器 只想下載資源的一部分
                conn.setRequestProperty("Range", "bytes="+startIndex+"-"+endIndex);
                System.out.println("原來沒有有下載進度,新的下載"+ "bytes="+startIndex+"-"+endIndex);
                raf.seek(startIndex);//每個線程寫文件的開始位置都是不一樣的.
            }
            InputStream is = conn.getInputStream();
            byte[] buffer = new byte[1024];
            int len = -1;
            while((len = is.read(buffer))!=-1){
                //把每個線程下載的數據放在自己的空間裡面.
//                System.out.println("線程:"+threadId+"正在下載:"+new String(buffer));
                raf.write(buffer,0, len);
                currentPosition+=len;
                File file = new File(Environment.getExternalStorageDirectory().getAbsolutePath()+"/"+threadId+".position");
                RandomAccessFile fos = new RandomAccessFile(file,"rwd");
                //System.out.println("線程:"+threadId+"寫到了"+currentPosition);
                fos.write(String.valueOf(currentPosition).getBytes());
                fos.close();//fileoutstream數據是不一定被寫入到底層設備裡面的,有可能是存儲在緩存裡面.
                //raf 的 rwd模式,數據是立刻被存儲到底層硬盤設備裡面.
                int max = endIndex - startIndex;
                int progress = currentPosition - startIndex;
                if(threadId==0){
                    pb0.setMax(max);
                    pb0.setProgress(progress);
                }else if(threadId==1){
                    pb1.setMax(max);
                    pb1.setProgress(progress);
                }else if(threadId==2){
                    pb2.setMax(max);
                    pb2.setProgress(progress);
                }
            }
            raf.close();
            is.close();
            System.out.println("線程:"+threadId+"下載完畢了...");
            File f = new File(Environment.getExternalStorageDirectory().getAbsolutePath()+"/"+threadId+".position");
            f.renameTo(new File(Environment.getExternalStorageDirectory().getAbsolutePath()+"/"+threadId+".position.finish"));
            synchronized (MainActivity.class) {
                runningThreadCount--;
                if(runningThreadCount<=0){
                    for(int i=0;i/**
 * 獲取一個文件名稱
 * @param path
 * @return
 */
public String getFileName(String path){
    int start = path.lastIndexOf("/")+1;
    return path.substring(start);
}
 Android開發:ListView控件:給Item綁定了點擊事件,卻點擊無效
一.問題引入ListView控件:給Item綁定了點擊事件,卻點擊無效。二.解決方案ListView使用了自定義布局文件,在布局文件中有button等控件時,這些控件獲取
 Android中實現EditText密碼顯示隱藏的方法
在Google發布了support:design:23+以後我們發現有這麼一個東西TextInputLayout,先看下效果圖:<android.support.d
 Android打造不一樣的新手引導頁面(一)
本篇博客主要講解怎樣自定義一個circleIndicator控件?下一遍博客主要講解怎樣更改ViewPager切換的效果, 預計明天晚上之前更新。效果圖如下1)首先我們先
 Android開發之ProgressDialog的使用
ProgressDialog類似於ProgressBar類。用於顯示一個過程,通常用於耗時操作。 幾個方法介紹:1.setMax()設置對話框中進度條的最大值。