編輯:關於Android編程
很多開發者一聽說Android終端的屏幕尺寸五花八門,屏幕分辨率千奇百怪,就覺得Android開發在屏幕適配方面是必定是一件頭疼的事情。因為在Android問世之前,廣大開發者知道的UI解決方案大致分為兩類:
1、在Web開發中的CSS,一層一層的去層疊樣式。
2、在iOS開發中去計算每一個UIView的尺寸。
上面兩種方案,無論哪種方案面對碎片化嚴重的Android終端,那都是一場噩夢。好在Android提供了另一套解決方案來應對嚴重的終端碎片化,這就是布局和9-patch。
這裡想來說說布局,在Android SDK剛剛問世的時候,Android提供了AbsoluteLayout,FrameLayout,LinearLayout,RelativeLayout和Tablelayout五大布局來應對終端碎片化問題。
但很快Android發現AbsoluteLayout是一個愚蠢的方案,在Android 1.5系統中就不再支持此布局,剩下的四個布局中,Tablelayout雖然依然被支持,但是由於Fragment以及新的TabLayout的出現,博主在此斷言,Tablelayout也命不久矣,被移除支持只是遲早的事兒。
所以,Android的五大基本布局現在只剩下三個(這裡說的是基本布局,在Android support包裡引入的新的布局不計入內),下面分別介紹一下這三個基本布局。
一、FrameLayout
FrameLayout應該是Android系統中最簡單的布局了,在FrameLayout中的元素,默認都是以FrameLayout控件的坐上頂點作為基准點,一層一層的重疊起來,後加進來的元素覆蓋前面的元素。
下面先來一個演示,代碼如下:
<FrameLayout
  xmlns:android="http://schemas.android.com/apk/res/android"
  android:layout_width="match_parent"
  android:layout_height="match_parent">

  <View
    android:layout_width="200dp"
    android:layout_height="200dp"
    android:background="#ff0000"/>

  <View
    android:layout_width="200dp"
    android:layout_height="200dp"
    android:background="#000000"/>

  <View
    android:layout_width="200dp"
    android:layout_height="200dp"
    android:layout_margin="100dp"
    android:background="#00ff00"/>

</FrameLayout>
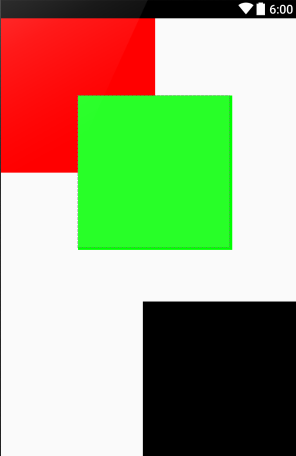
運行結果如下:
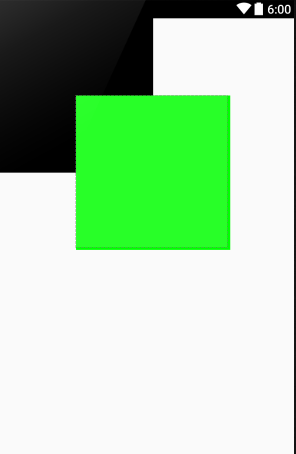
在代碼裡,有三個View,而在運行結果上只能看到兩個View,一個黑色和一個綠色。這是因為紅色的View被黑色的View蓋住了。
在FrameLayout中,通過android:layout_gravity屬性去指定子元素的位置,下面調整一下上訴例子中的黑色View的位置,讓紅色的View顯示出來,調整後的代碼如下:
<View
  android:layout_width="200dp"
  android:layout_height="200dp"
  android:layout_gravity="bottom|right"
  android:background="#000000"/>
可以看到上面代碼裡添加了android:layout_gravity屬性,並且指定了兩個值,一個為bottom,一個為right,表示這個View將被放到FrameLayout的右下角。運行結果如下圖所示:
二、LinearLayout
LinearLayout是線性布局,它可以讓它內部的元素按照指定方向依次排開。LinearLayout的方向是通過android:orientation屬性指定,並且可以通過android:gravity屬性指定對其方式。
還是直接上段代碼看看效果,代碼如下:
<LinearLayout
  xmlns:android="http://schemas.android.com/apk/res/android"
  android:layout_width="match_parent"
  android:layout_height="match_parent"
  android:orientation="vertical"
  android:gravity="center">

  <View
    android:layout_width="100dp"
    android:layout_height="100dp"
    android:background="#ff0000"/>

  <View
    android:layout_width="100dp"
    android:layout_height="100dp"
    android:background="#000000"/>

  <View
    android:layout_width="100dp"
    android:layout_height="100dp"
    android:background="#00ff00"/>
</LinearLayout>
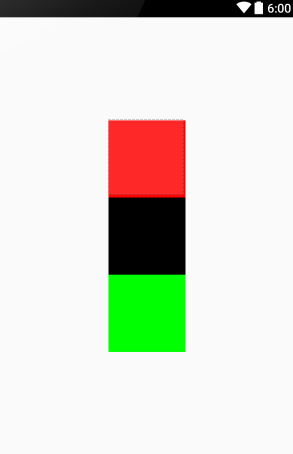
在代碼中,設置了LinearLayout的方向為縱向,並且對其方式居中對齊,於是運行結果如下圖所示:
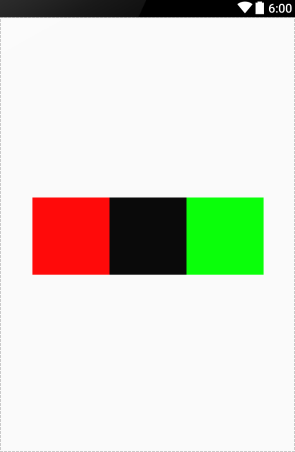
除了android:orientation將設為vertical外,也可以設為horizontal。讓LinearLayout內部的元素橫向排列,將上面例子中的android:orientation屬性值改為horizontal後的運行結果,如下圖所示:
三、RelativeLayout
RelativeLayout是基本布局裡面最靈活,也是最復雜的布局,它內部的元素可以通過設定彼此之間的相對關系來決定布局,使用RelativeLayout時,推薦為其內部每個元素都設定id,下面依然通過一個列子來演示此布局的使用方法。代碼如下:
<RelativeLayout
  xmlns:android="http://schemas.android.com/apk/res/android"
  android:layout_width="match_parent"
  android:layout_height="match_parent">

  <View android:id="@+id/red"
    android:layout_width="100dp"
    android:layout_height="100dp"
    android:background="#ff0000"/>

  <View android:id="@+id/black"
    android:layout_width="100dp"
    android:layout_height="100dp"
    android:layout_toRightOf="@id/red"
    android:layout_below="@id/red"
    android:background="#000000"/>

  <View android:id="@+id/green"
    android:layout_width="100dp"
    android:layout_height="100dp"
    android:layout_below="@id/black"
    android:layout_alignParentRight="true"
    android:background="#00ff00"/>

  <View android:id="@+id/gray"
    android:layout_width="100dp"
    android:layout_height="100dp"
    android:layout_centerInParent="true"
    android:background="#888888"/>

  <View android:id="@+id/orange"
    android:layout_width="100dp"
    android:layout_height="100dp"
    android:layout_toRightOf="@id/green"
    android:layout_below="@id/gray"
    android:background="#ff8800"/>
</RelativeLayout>
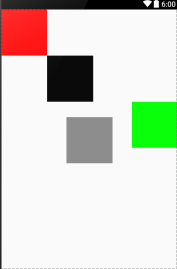
先分析代碼,可以看到每一個View都被設置了一個id值,分別為red,black,green,gray和orange。然後通過代碼,可以看出black位於red的右邊和下面,green位於black的下面並且右對齊其父元素(即RelativeLayout),gray居中對齊父元素(即RelativeLayout), orange位於green的右邊同時位於gray的下面,運行結果如圖所示:
在此在歸納一下RelativeLayout中,與布局相關的屬性:
android:layout_below:位於指定元素的下方
android:layout_above:位於指定元素的上方
android:layout_toLeftOf:位於指定元素的左側
android:layout_toRightOf:位於指定元素的右側
android:layout_centerVertical:垂直居中對齊父元素
android:layout_centerHorizontal:水平居中對齊父元素
android:layout_centerInParent:居中對齊父元素
android:layout_alignParentRight:與父元素右對齊
android:layout_alignParentLeft:與父元素左對齊
android:layout_alignParentTop:與父元素上對齊
android:layout_alignParentBottom:與父元素下對齊
android:layout_alignRight:與指定元素右對齊
android:layout_alignLeft:與指定元素左對齊
android:layout_alignTop:與指定元素上對齊
android:layout_alignBottom:與指定元素下對齊
從Android 4.2開始,也就是從API Level 17開始,Android增強了RelativeLayout,使其能夠更好的應對並本地化這一需求,比如在有的國家,文字是從右往左閱讀,這也就是所說的RTL。為了應對RTL,RelativeLayout又增加了以下屬性:
android:layout_alignStart:與指定元素的開始位置對齊
android:layout_toStartOf:位於指定元素的開始側
android:layout_alignParentStart:與父元素與開始側對齊
android:layout_alignEnd:與指定元素的結束始位置對齊
android:layout_toEndOf:位於指定元素的結束側
android:layout_alignParentEnd:與指定元素的結束位置對齊
這裡的開始和結束我們可以做如下理解:
開始:在從左到右閱讀習慣的國家,開始側等於左側,toStartOf的顯示效果就等於toLeftOf。但是在從右往左閱讀習慣的國家,那麼開始側就變成了右側,toStartOf的顯示效果就等於了toRightOf。
結束:同上面對開始的理解一樣,結束側在從左到右閱讀習慣的國家就是右側,反之則在左側。
原文鏈接:http://lyjbk.com/archives/158.html
以上就是本文的全部內容,希望對大家的學習有所幫助,也希望大家多多支持本站。
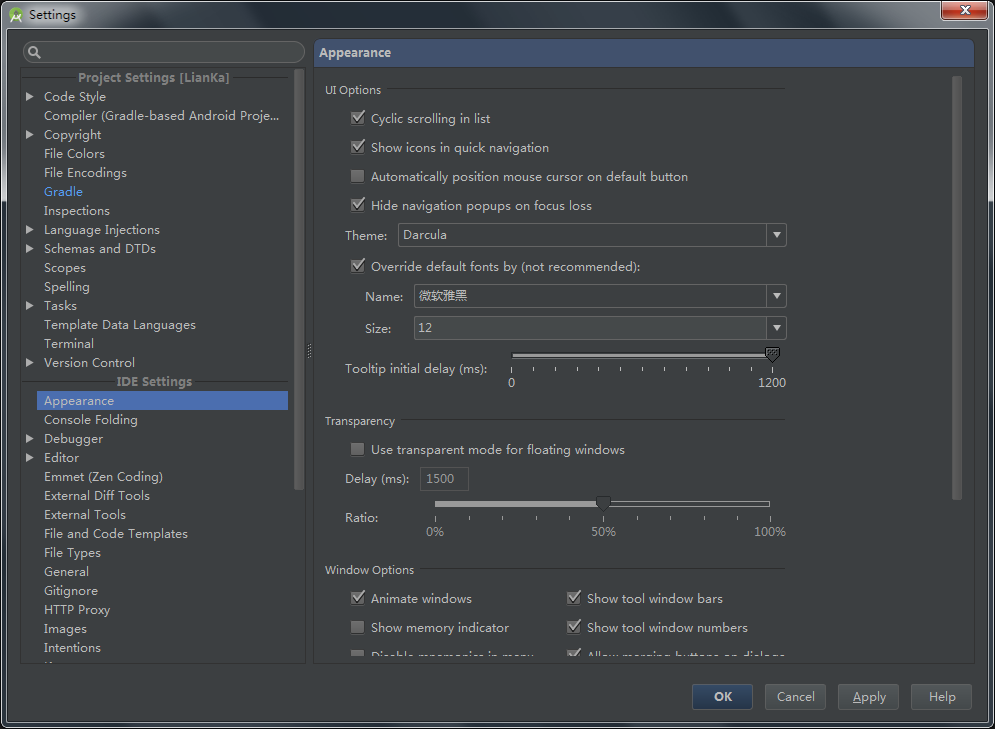 Android Studio 簡單設置
界面設置默認的 Android Studio 為灰色界面,可以選擇使用炫酷的黑色界面。Settings-->Appearance-->Theme,選擇Darc
 【我的Android進階之旅】 Google Developers中國網站發布啦!
今天,Google Developers 中國網站 (https://developers.google.cn) 正式發布! Goog
 Android JSBridge的原理與實現
在Android中,JSBridge已經不是什麼新鮮的事物了,各家的實現方式也略有差異。大多數人都知道WebView存在一個漏洞,見WebView中接口隱患與手機掛馬利用
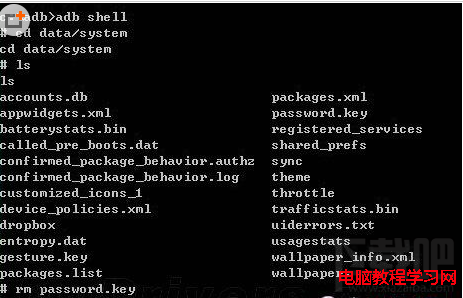 手機密碼忘了怎麼解鎖
你應該有過手機解鎖密碼忘記的經歷吧,一開始對圖案解鎖十分好奇,設置了一個比較復雜的圖案,只是沒有過多久就忘記了,只能通過刷機解決了,還好本文的出現將會幫助一