編輯:關於Android編程
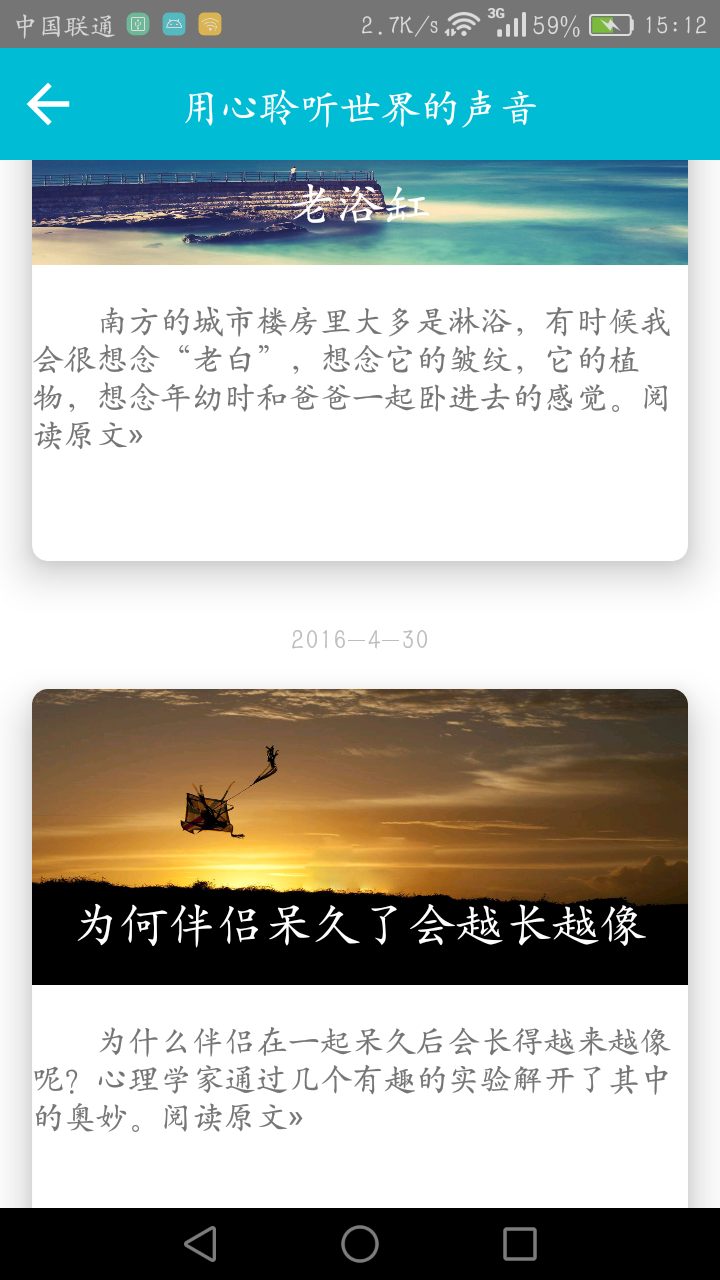
 最近實現了一個使用最新推出的CardView和RecyclerView實現列表功能的Demo,
接下來一一介紹:
1.首先介紹我使用了哪些工具
(1)LeanCloud的存儲功能
(2)RecyclerView
(3)CardView
(4)ImageLoader
2.既然是列表,所以它裡面的實現方式和ListView差不多,
一個(含有RecyclerView)主界面布局(activity_fm_item.xml),
一個Adapter(RecyclerView.Adapter),在這先把布局文件貼出來:
(1)activity_fm.xml
<linearlayout xmlns:android="http://schemas.android.com/apk/res/android" android:layout_width="match_parent" android:layout_height="match_parent" android:orientation="vertical" android:background="@color/white">
    <relativelayout android:layout_width="match_parent" android:layout_height="56dp" android:background="@color/basicColor_two">
        <imagebutton android:layout_width="wrap_content" android:layout_height="wrap_content" android:background="@drawable/ic_arrow_back_black_24dp" android:id="@+id/fm_backBtn" android:layout_alignparentleft="true" android:layout_centervertical="true" android:layout_marginleft="8dp">
        <textview android:layout_width="wrap_content" android:layout_height="wrap_content" android:layout_centerhorizontal="true" android:layout_centervertical="true" android:gravity="center" android:text="用心聆聽世界的聲音" android:textsize="20sp" android:textcolor="@color/white">
    </textview></imagebutton></relativelayout>
    <android.support.v7.widget.recyclerview android:layout_width="match_parent" android:layout_height="match_parent" android:id="@+id/fm_recyclerView">

    </android.support.v7.widget.recyclerview>
</linearlayout></code>
 第一個RelativeLayout的布局實現的是ActionBar的布局,第二個裡是RecyclerView的布局


 (2)activity_fm_item.xml
<relativelayout xmlns:android="http://schemas.android.com/apk/res/android" xmlns:app="http://schemas.android.com/apk/res-auto" android:orientation="vertical" android:layout_width="match_parent" android:layout_height="360dp" android:background="@color/white">
    <textview android:layout_width="wrap_content" android:layout_height="wrap_content" android:layout_centerhorizontal="true" android:layout_alignparenttop="true" android:layout_marginbottom="16dp" android:textcolor="@color/txt_low" android:id="@+id/fm_date">
   <android.support.v7.widget.cardview android:layout_width="match_parent" android:layout_height="296dp" android:layout_marginstart="16dp" android:layout_marginend="16dp" android:layout_below="@+id/fm_date" android:background="@color/white" app:cardcornerradius="8dp" app:cardelevation="16dp" android:id="@+id/view">
       <linearlayout android:layout_width="match_parent" android:layout_height="match_parent" android:orientation="vertical">
           <framelayout android:layout_width="match_parent" android:layout_height="148dp">
               <imageview android:layout_width="match_parent" android:layout_height="match_parent" android:id="@+id/fm_cardBack" android:scaletype="fitXY">
               <textview android:layout_width="wrap_content" android:layout_height="wrap_content" android:layout_gravity="center_horizontal|bottom" android:layout_marginbottom="16dp" android:textcolor="@color/white" android:textsize="24sp" android:id="@+id/fm_title">
           </textview></imageview></framelayout>
           <relativelayout android:layout_width="match_parent" android:layout_height="148dp">
               <textview android:layout_width="wrap_content" android:layout_height="wrap_content" android:id="@+id/fm_summary" android:layout_alignparenttop="true" android:layout_margintop="16dp" android:textsize="16sp">
           </textview></relativelayout>
       </linearlayout>

   </android.support.v7.widget.cardview>
</textview></relativelayout></code>
應該根據Material Design的設計理念對cardView進行布局,比如標題的text的大小,正文的Text的大小等等,可以去官網中查一查


3.設置一個ItemBean,對數據進行封裝
public class fm_itemBean {
    String fm_imageUrl;
    String fm_title;
    String fm_summary;
    String fm_date;

    public String getFm_date() {
        return fm_date;
    }

    public void setFm_date(String fm_date) {
        this.fm_date = fm_date;
    }

    public fm_itemBean(String fm_imageUrl, String fm_title, String fm_summary, String fm_date) {

        this.fm_imageUrl = fm_imageUrl;
        this.fm_title = fm_title;
        this.fm_summary = fm_summary;
        this.fm_date = fm_date;
    }

    public String getFm_imageUrl() {
        return fm_imageUrl;
    }

    public void setFm_imageUrl(String fm_imageUrl) {
        this.fm_imageUrl = fm_imageUrl;
    }

    public String getFm_title() {
        return fm_title;
    }

    public void setFm_title(String fm_title) {
        this.fm_title = fm_title;
    }

    public String getFm_summary() {
        return fm_summary;
    }

    public void setFm_summary(String fm_summary) {
        this.fm_summary = fm_summary;
    }
}
4.實現對於一個列表必須的Adapter--RecyclerView.Adapter,
從該Adapter看出Goolge已經開始強制使用ViewHolder模式了。介紹一下該Adapter所需要復寫的方法--在
onCreateViewHolder中進行創建ViewHolder(相當於初始化控件--我是這麼理解的),
getItemCount返回的是數據的數量,還需創建一個內部類來繼承ViewHolder
public class MyRecyclerAdapter_fm extends RecyclerView.Adapter{
    private LayoutInflater mInflater;
    private List mDatas=new ArrayList<>();
    MyImageLoader myImageLoader;
    public MyRecyclerAdapter_fm(Context context, List mDatas) {
        this.mDatas = mDatas;
        mInflater=LayoutInflater.from(context);
        myImageLoader=new MyImageLoader();
    }
    /*
    實現接口的三步走:1.定義一個接口,在定義裡寫出對方法的定義
                   2.實例化一個接口對象,通過set方法將接口設置進來
                   3.在相應的地方使用(onBindViewHolder中)
     */

    private OnItemClickListener onItemClickListener;


    public void setOnItemClickListener(OnItemClickListener onItemClickListener) {
        this.onItemClickListener = onItemClickListener;
    }
    interface OnItemClickListener{
        void  onItemClick(View view,int position);
        void  onItemLongClick(View view ,int position);
    }
    @Override
    public MyViewHolder onCreateViewHolder(ViewGroup parent, int viewType) {
        View view=mInflater.inflate(R.layout.activity_fm_item,parent,false);
        return new MyViewHolder(view);
    }

    @Override
    public void onBindViewHolder(final MyViewHolder holder, final int position) {
        //給每個控件設置數據
        holder.fm_txt_title.setText(mDatas.get(position).fm_title);
        holder.fm_txt_summary.setText(mDatas.get(position).fm_summary);
        holder.fm_date.setText(mDatas.get(position).fm_date);
        String mUrl=mDatas.get(position).fm_imageUrl;
        //給每個ImageView根據url設置相應的圖片,使用的是ImageLoader方式。還可以使用多線程和AsyncTask
        myImageLoader.setBitmapFromUrl(holder.fm_image_cardBack,mUrl);
//        new ImageLoader().showImageByThread(holder.fm_image_cardBack,mUrl);

        //實現點擊事件的第三部
        holder.itemView.setOnClickListener(new View.OnClickListener() {
            @Override
            public void onClick(View v) {
                if (onItemClickListener!=null)
                onItemClickListener.onItemClick(holder.itemView,position);
            }
        });
        holder.itemView.setOnLongClickListener(new View.OnLongClickListener() {
            @Override
            public boolean onLongClick(View v) {
                if (onItemClickListener!=null)
                onItemClickListener.onItemLongClick(holder.itemView,position);
                return false;
            }
        });
    }

    @Override
    public int getItemCount() {
        return mDatas.size();
    }

    public  class MyViewHolder extends RecyclerView.ViewHolder{
        ImageView fm_image_cardBack;//CardView的背景
        TextView fm_txt_title;//CardView的title
        TextView fm_txt_summary;//cardView的summary
        TextView fm_date;//每個CardView的時間
        public MyViewHolder(View itemView) {
            super(itemView);//初始化相應的控件,即item中所包含的控件
            fm_image_cardBack= (ImageView) itemView.findViewById(R.id.fm_cardBack);
            fm_txt_title= (TextView) itemView.findViewById(R.id.fm_title);
            fm_txt_summary= (TextView) itemView.findViewById(R.id.fm_summary);
            fm_date= (TextView) itemView.findViewById(R.id.fm_date);
        }
    }

}
 5.在將url轉成相應的圖片使用了ImageLoader的模式
     ImageLoader需要兩個東西  (1)BitmapCache(使用LruCache)
                             (2)ImageLoaderListener
    public class BitmapCache implements ImageLoader.ImageCache {
    public LruCache cache;//使用LruCache
    public int max=10*1024*1024;//緩存的大小
    public BitmapCache(){
        //初始化LruCache ,max為緩存的大小,sizeOf方法返回的是bitmap的大小
        cache=new LruCache(max){
            @Override
            protected int sizeOf(String key, Bitmap value) {
                return value.getRowBytes()*value.getRowBytes();
            }
        };
    }
    @Override
    public Bitmap getBitmap(String s) {
        return cache.get(s);
    }

    @Override
    public void putBitmap(String s, Bitmap bitmap) {
          cache.put(s,bitmap);
    }
}
ImageLoader:將根據圖片的url給相應的控件設置url所對應的圖片
public class MyImageLoader {//ImageLoader需要三個東西,一個是Queues,第二個是ImageCahe,第三個是Listener
    BitmapCache mBitmapCache=new BitmapCache();
   public void setBitmapFromUrl(ImageView imageView,String url){
       com.android.volley.toolbox.ImageLoader mImageLoader=new ImageLoader(MyApplication.getQueues(),mBitmapCache);
       ImageLoader.ImageListener listener=ImageLoader.getImageListener(imageView, R.drawable.touxiang,R.drawable.touxiang);
       mImageLoader.get(url,listener);
   }
}
Application:(還需要在AndroidManifest.xml中設置application的
:name=.MyApplication)
public class MyApplication extends Application {
    public  static RequestQueue queues;

    @Override
    public void onCreate() {
        super.onCreate();
        queues= Volley.newRequestQueue(getApplicationContext());
        AVOSCloud.initialize(this,AVCloudKey);//初始化AVcloud
    }

    public static RequestQueue getQueues() {
        return queues;
    }
}
接下來是主程序:在主程序中使用了Leancloud,因為我將所有的數據都放在了上面,並不是通過Json數據解析得來的

public class Activity_fm extends AppCompatActivity {
    List mDatas;
    RecyclerView mRecyclerView;
    ImageButton backBtn;
    MyRecyclerAdapter_fm adapterFm;

    @Override
    protected void onCreate(Bundle savedInstanceState) {
        super.onCreate(savedInstanceState);
        setContentView(R.layout.activity_fm);
        initView();
        initDatas();
    }

    private void initDatas() {
        mDatas=new ArrayList<>();
        AVQuery query=new AVQuery<>("FM");//從Leancloud的fm表中查詢數據
        query.findInBackground(new FindCallback() {
            @Override
            public void done(List list, AVException e) {//遍歷FM 表
                for (AVObject avObject:list){
                               //返回相應字段的值
                    String title= (String) avObject.get("title");
                    String summary= (String) avObject.get("summary");
                    String imageUrl= (String) avObject.get("imageUrl");
                    String date= (String) avObject.get("date");
                              //fm_itemBean實現數據的封裝
                    fm_itemBean itemBean_fm=new fm_itemBean(imageUrl,title,summary,date);
                    mDatas.add(itemBean_fm);
                    adapterFm.notifyDataSetChanged();//此句不加會導致RecyclerView顯示不出來
                }
            }
        });
        //給每個item設置點擊事件
        adapterFm=new MyRecyclerAdapter_fm(Activity_fm.this,mDatas);
        adapterFm.setOnItemClickListener(new MyRecyclerAdapter_fm.OnItemClickListener() {
            @Override
            public void onItemClick(View view, int position) {
                Intent intent=new Intent(Activity_fm.this,Activity_fm_content.class);
                String title=mDatas.get(position).fm_title;
                intent.putExtra("title",title);
                startActivity(intent);
            }

            @Override
            public void onItemLongClick(View view, int position) {

            }
        });
        mRecyclerView.setAdapter(adapterFm);
        //實現返回按鈕
        backBtn.setOnClickListener(new View.OnClickListener() {
            @Override
            public void onClick(View v) {
                Intent intent=new Intent(Activity_fm.this,MainActivity.class);
                startActivity(intent);
            }
        });
    }
    //初始化控件
    private void initView() {
        mRecyclerView= (RecyclerView) findViewById(R.id.fm_recyclerView);
        backBtn= (ImageButton) findViewById(R.id.fm_backBtn);
        mRecyclerView.setLayoutManager(new LinearLayoutManager(Activity_fm.this));
    }
}
 安卓手機重置便攜式熱點密碼方法
安卓手機重置便攜式熱點密碼方法如何?小編就來演示一下。 開啟手機,進入手機設置界面; 選擇“無線和網絡”; 選擇&
 Android隨手筆記44之JSON數據解析
JSON(JavaScript Object Notation)是一種輕量級的數據交換格式,采用完全獨立於語言的文本格式,為Web應用開發提供了一種理想的數據交換格式。
 Android3.0 ActionBar導航標題欄使用解析
先看圖:[1]是ActionBar的圖標,[2]是兩個action按鈕,[3]是overflow按鈕。介紹:Action Bar是一種新増的導航欄功能,在Android
 詳解Android中Intent的使用方法
一、Intent的用途Intent主要有以下幾種重要用途: 1. 啟動Activity:可以將Intent對象傳遞給startActivity()方法或startActi