編輯:關於Android編程
我們要理解Android的消息系統,Looper,Handle,View等概念還是需要從消息系統的基本原理及其構造這個源頭開始。從這個源頭,我們才能很清楚的看到Android設計者設計消息系統之意圖及其設計的技術路線。
從一般的系統設計來講,一個消息循環系統的建立需要有以下幾個要素:
消息隊列
發送消息
消息讀取
消息分發
消息循環線程
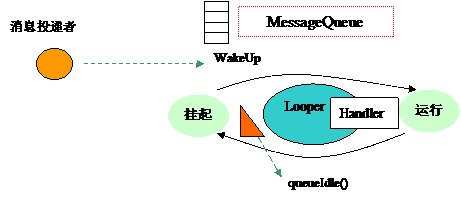
首先來研究一下消息驅動的基本模型,我使用如下的圖形來表示一個消息系統最基本構成:

上面的模型代表應用程序一直查詢自己的消息隊列,如果有有消息進來,應用消息處理函數中根據消息類型及其參數來作相應的處理。消息系統要運作起來,必定有消息的產生和消費。我們可以從下圖看到消息生產和消費的一個基本的鏈條,這是一個最基本的,最簡單的消息系統。

生產線程將消息發送到消息隊列,消息消費者線程從消息隊列取出消息進行相應的處理。但是這樣簡單的模型對實際運行的系統來說是不夠的,例如對系統資源的消耗等不能很好的處理,我們就需要一個有旗語的消息系統模型,在上面的消息系統模型中加入了一個旗語,讓消息消費者線程在沒有消息隊列為空時,等待旗語,進入到掛起狀態,而有消息到達時,才被喚醒繼續運行。當然生產者同時也可以是消費者。

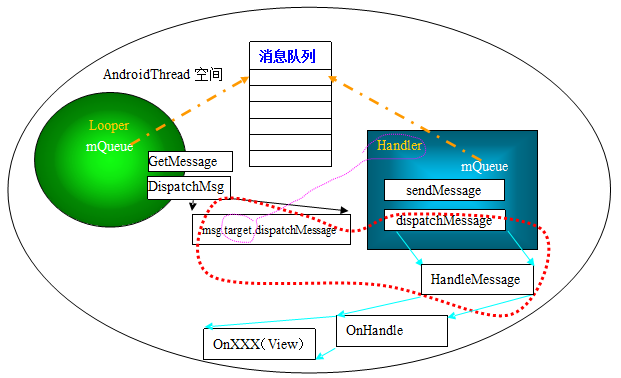
Android要建立一個消息系統使用了Looper,MessageQueue,Handler等概念,從上節的原理我們可以知道這些都是概念包裝,本質的東西就是消息隊列中消息的分發路徑的和消息分發處理方式的設計。Android巧妙的利用了對象抽象技術抽象出了Looper和Handler的概念。在Looper和Handler兩個概念的基礎上,通過View的處理函數框架,Android十分完美的達到消息分發的目的。 參照基本消息系統描述模型,我給出了Android消息系統整體框架,表示如下:
Android消息系統消息分發框架
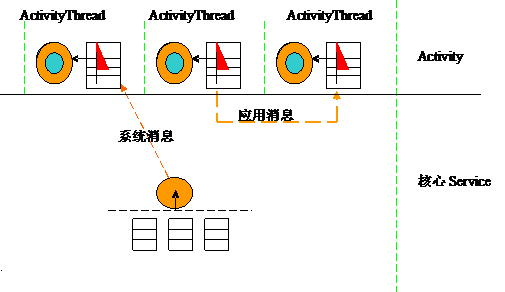
Looper只是產生一個消息循環框架,首先Looper創建了消息隊列並把它掛接在Linux的線程上下文中,進入到取消息,並分發消息的循環當中。Handler對象在同一個線程上下文中取得消息隊列,對消息隊列進行封裝操作,最主要的就是SendMessage和擔當起dispatchMessage這個實際工作。外部系統需要向某個Android線程發送消息,必須通過屬於該AndroidThread的Handler這個對象進行。
Handler屬於某個線程,取決Handlerd對象在哪個線程中建立。Handler在構建時做了如下的默認動作:
1、從線程上下文取得Looper。
2、通過Looper獲取到消息隊列並記錄在自己的成員mQueue變量中,Handler使用消息隊列進行對象封裝,提供如下的成員函數:
3、通過post(Runnable r)發送。Runnable是消息處理的回調函數,通過該消息的發送,引起Runable的回調運行,post消息放置消息隊列的前面。Message.callback=Runable。
/** * Causes the Runnable r to be added to the message queue. The runnable will * be run on the thread to which this handler is attached. * * @param r * The Runnable that will be executed. * * @return Returns true if the Runnable was successfully placed in to the * message queue. Returns false on failure, usually because the * looper processing the message queue is exiting. */ public final boolean post(Runnable r) { return sendMessageDelayed(getPostMessage(r), 0); }
通過 sendMessage發送。放置在所有的Post消息之後,sendMessage發送消息。(具體源碼:)
/** * Pushes a message onto the end of the message queue after all pending * messages before the current time. It will be received in * {@link handleMessage}, in the thread attached to this handler. * * @return Returns true if the message was successfully placed in to the * message queue. Returns false on failure, usually because the * looper processing the message queue is exiting. */ public final boolean sendMessage(Message msg) { return sendMessageDelayed(msg, 0); }
dispatchMessage分發消息。消息帶有回調函數,則執行消息回調函數,如何沒有則使用默認處理函數:handleMessage。而handleMessage往往被重載成某個繼承Handler對象的新的特定的handleMessage。幾乎所有的Message發送時,都指定了target。Message.target=(this).
/*package*/ Handler target; /*package*/ Runnable callback; .... .... ..... ..... public void setTarget(Handler target) { this.target = target; }
Looper運行在Activity何處?我們現在可以從代碼堆棧中縱觀一下Looper的位置。
NaiveStart.main() ZygoteInit.main ZygoteInit$MethodAndArgsCall.run Method.Invoke method.invokeNative ActivityThread.main() Looper.loop() ViewRoot$RootHandler().dispatch() handleMessage ....
這樣我們就更清楚的了解到Looper的運行位置。
通過對Handler的學習,使我們理解了線程的運行,當我們使用多個線程的時候,會感覺很亂,如果我們應用Handler,我們可以更加清晰的去進行更新。下面是利用線程Handler更新進度條的示例:
public class Main extends Activity { /** Called when the activity is first created. */ ProgressBar pb1; Handler handle = new Handler(); // 新建一個Handler對象 Button b1; Button b2; @Override public void onCreate(Bundle savedInstanceState) { super.onCreate(savedInstanceState); setContentView(R.layout.main); pb1 = (ProgressBar) findViewById(R.id.pb1); pb1.setProgress(0); b1 = (Button) findViewById(R.id.b1); b1.setOnClickListener(b1Lis); b2 = (Button) findViewById(R.id.b2); b2.setOnClickListener(b2Lis); } private OnClickListener b1Lis = new OnClickListener() { @Override public void onClick(View v) { // TODO Auto-generated method stub handle.post(add); // 開始執行add } }; private OnClickListener b2Lis = new OnClickListener() { @Override public void onClick(View v) { // TODO Auto-generated method stub handle.removeCallbacks(add); // 停止執行 pb1.setProgress(0); } }; int pro = 0; Runnable add = new Runnable() { // 定義add @Override public void run() { // TODO Auto-generated method stub pro = pb1.getProgress() + 1; pb1.setProgress(pro); setTitle(String.valueOf(pro)); if (pro < 100) { handle.postDelayed(add, 500); // 如果進度小於100,,則延遲500毫秒後重復執行add } } }; }
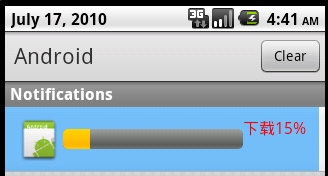
最近研究了Notification,參考了一些文檔,寫了一些心得。在官方文檔中得知在Android的Notification中可以顯示進度條,就想做個例子試一下。在網上查了下,沒有找到。決定自己寫下,費了九牛二虎之力搞定了,現在拿出與大家分享下:廢話少說,上代碼:
先自定義一個view
<linearlayout xmlns:android="http://schemas.android.com/apk/res/android android:layout_width=" fill_parent="" android:layout_height="fill_parent android:background=" 880490ff="" android:orientation="horizontal android:padding=" 10dp"="">
接著在Activity中寫了邏輯代碼:
public class MainActivity extends Activity {
	// 當前進度條裡的進度值
	private int progress = 0;
	private RemoteViews view = null;
	private Notification notification = new Notification();
	private NotificationManager manager = null;
	private Intent intent = null;
	private PendingIntent pIntent = null;// 更新顯示
	private Handler handler = new Handler() {
		@Override
		public void handleMessage(Message msg) {
			view.setProgressBar(R.id.pb, 100, progress, false);
			view.setTextViewText(R.id.tv, "下載" + progress + "%");// 關鍵部分,如果你不重新更新通知,進度條是不會更新的
			notification.contentView = view;
			notification.contentIntent = pIntent;
			manager.notify(0, notification);
			super.handleMessage(msg);
		}
	};
	@Override
	public void onCreate(Bundle savedInstanceState) {
		super.onCreate(savedInstanceState);
		setContentView(R.layout.main);
		manager = (NotificationManager) getSystemService(NOTIFICATION_SERVICE);
		view = new RemoteViews(getPackageName(), R.layout.custom_dialog);
		intent = new Intent(MainActivity.this, NotificationService.class);
		pIntent = PendingIntent.getService(MainActivity.this, 0, intent, 0);
		Button button = (Button) findViewById(R.id.bt);
		button.setOnClickListener(new Button.OnClickListener() {
			@Override
			public void onClick(View v) {
				// 通知的圖標必須設置(其他屬性為可選設置),否則通知無法顯示
				notification.icon = R.drawable.icon;
				view.setImageViewResource(R.id.image, R.drawable.icon);// 起一個線程用來更新progress
				new Thread(new Runnable() {
					@Override
					public void run() {
						for (int i = 0; i < 20; i++) {
							progress = (i + 1) * 5;
							try {
								if (i < 19) {
									Thread.sleep(1000);
								} else {
									Thread.currentThread().interrupt();
								}
							} catch (InterruptedException e) {
								e.printStackTrace();
							}
							Message msg = new Message();
							handler.sendMessage(msg);
						}
					}
				}).start();
			}
		});
	}
}
代碼如下:
public class MyHandlerActivity extends Activity {
	Button button;
	MyHandler myHandler;
	protected void onCreate(Bundle savedInstanceState) {
		super.onCreate(savedInstanceState);
		setContentView(R.layout.handlertest);
		button = (Button) findViewById(R.id.button);
		myHandler = new MyHandler();
		// 當創建一個新的Handler實例時, 它會綁定到當前線程和消息的隊列中,開始分發數據
		// Handler有兩個作用, (1) : 定時執行Message和Runnalbe 對象
		// (2): 讓一個動作,在不同的線程中執行.
		// 它安排消息,用以下方法
		// post(Runnable)
		// postAtTime(Runnable,long)
		// postDelayed(Runnable,long)
		// sendEmptyMessage(int)
		// sendMessage(Message);
		// sendMessageAtTime(Message,long)
		// sendMessageDelayed(Message,long)
		// 以上方法以 post開頭的允許你處理Runnable對象
		// sendMessage()允許你處理Message對象(Message裡可以包含數據,)
		MyThread m = new MyThread();
		new Thread(m).start();
	}
	/**
	 * 接受消息,處理消息 ,此Handler會與當前主線程一塊運行
	 * */
	class MyHandler extends Handler {
		public MyHandler() {
		}
		public MyHandler(Looper L) {
			super(L);
		}
		// 子類必須重寫此方法,接受數據
		@Override
		public void handleMessage(Message msg) {
			// TODO Auto-generated method stub
			Log.d("MyHandler", "handleMessage......");
			super.handleMessage(msg);
			// 此處可以更新UI
			Bundle b = msg.getData();
			String color = b.getString("color");
			MyHandlerActivity.this.button.append(color);
		}
	}
	class MyThread implements Runnable {
		public void run() {
			try {
				Thread.sleep(10000);
			} catch (InterruptedException e) {
				// TODO Auto-generated catch block
				e.printStackTrace();
			}
			Log.d("thread.......", "mThread........");
			Message msg = new Message();
			Bundle b = new Bundle();// 存放數據
			b.putString("color", "我的");
			msg.setData(b);
			MyHandlerActivity.this.myHandler.sendMessage(msg); // 向Handler發送消息,更新UI
		}
	}
}
通過對Handler的學習,使我們理解了線程的運行,當我們使用多個線程的時候,會感覺很亂,如果我們應用Handler,我們可以更加清晰的去進行更新。下面是一個規定時間自動更新Title的示例:
public class HandlerDemo extends Activity {
	// title為setTitle方法提供變量,這裡為了方便我設置成了int型
	private int title = 0;
	private Handler mHandler = new Handler() {
		public void handleMessage(Message msg) {
			switch (msg.what) {
			case 1:
				updateTitle();
				break;
			}
		};
	};
	public void onCreate(Bundle savedInstanceState) {
		super.onCreate(savedInstanceState);
		setContentView(R.layout.main);
		Timer timer = new Timer();
		timer.scheduleAtFixedRate(new MyTask(), 1, 5000);
	}
	private class MyTask extends TimerTask {
		@Override
		public void run() {
			Message message = new Message();
			message.what = 1;
			mHandler.sendMessage(message);
		}
	}
	public void updateTitle() {
		setTitle("Welcome to Mr Wei's blog " + title);
		title++;
	}
}
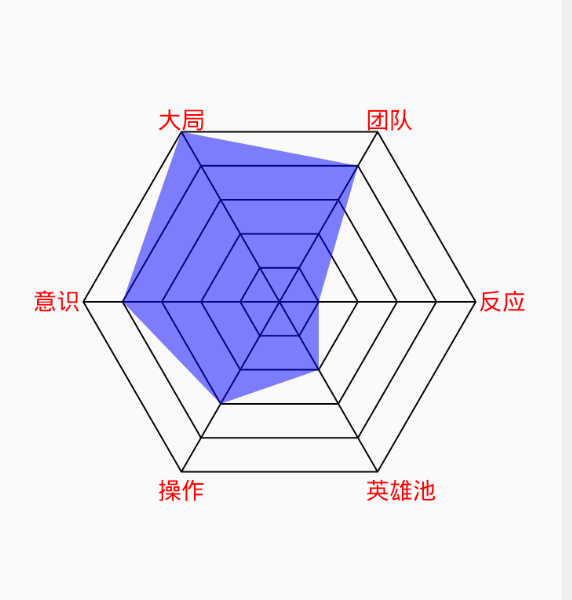 Android繪制選手實力圖
導語這種繪制屬於自定義View的基本練習,網絡上也有很多案例;可以根據需要將其中的代碼進行修改,集成到項目中去:效果:相關代碼自定義View的代碼:public clas
 HandlerThread源碼分析
我們知道在Android系統中,我們執行完耗時操作都要另外開啟子線程來執行,執行完線程以後線程會自動銷毀。想象一下如果我們在項目中經常要執行耗時操作,如果經常要開啟線程,
 Android自定義UI手勢密碼改進版源碼下載
在之前文章的鋪墊下,再為大家分享一篇:Android手勢密碼,附源碼下載,不要錯過。源碼下載:http://xiazai.jb51.net/201610/yuanma/a
 Android NDK開發的環境搭建與簡單示例
一、NDK與JNI簡介NDK全稱為native development kit本地語言(C&C++)開發包。而對應的是經常接觸的Android-SDK,(software