編輯:關於Android編程
偶然間突發奇想,想到能不能讓我們的在我們的手機設備上滑動觸摸屏進而控制pc上的鼠標移動,也就說把我們的android設備當成是pc設備的觸摸板呢?要想實現這個目標,首先要想一想android設備和pc設備之間的通訊基礎是什麼?這個通訊技術必須是android和pc同時支持的,目前看來也就是wifi,藍牙。首先說一下藍牙,藍牙是一個提供個人局域網的安全無線電通訊技術,相對於wifi而言,藍牙的功耗相對較低,尤其是BLE技術使得藍牙的功耗可以和zigbee媲美了,並且android也支持了基於藍牙的socket操作。但是pc上的java部分對於藍牙的socket支持就不是很好了,實現起來比較麻煩。但是wifi雖然功耗相對藍牙而言比較高了點,但是實現起來非常容易,就是socket就好了!所以在第一版本中,可以先使用wifi作為傳輸技術。
解決了傳輸技術之後,還需要解決的是都有哪些數據類型,怎麼傳遞數據,使用什麼樣的協議的問題。這些問題很關鍵,這涉及到以後的程序可擴展性問題,如果這部分欠缺考慮的話,那麼後期的修改和擴展將是一個災難。進過仔細考量之後,決定采用google的protobuf來封裝所有的數據,因為protobuf靈活,小巧,高效,正好就是我要的。
進過了幾天的業余時間開發,終於出來了一個可以運行展示的初級版本,這個版本可以滿足基本的需求。目前我已經將這個代碼開源出來了,項目地址是github:https://github.com/CreateChance/WirelessHid
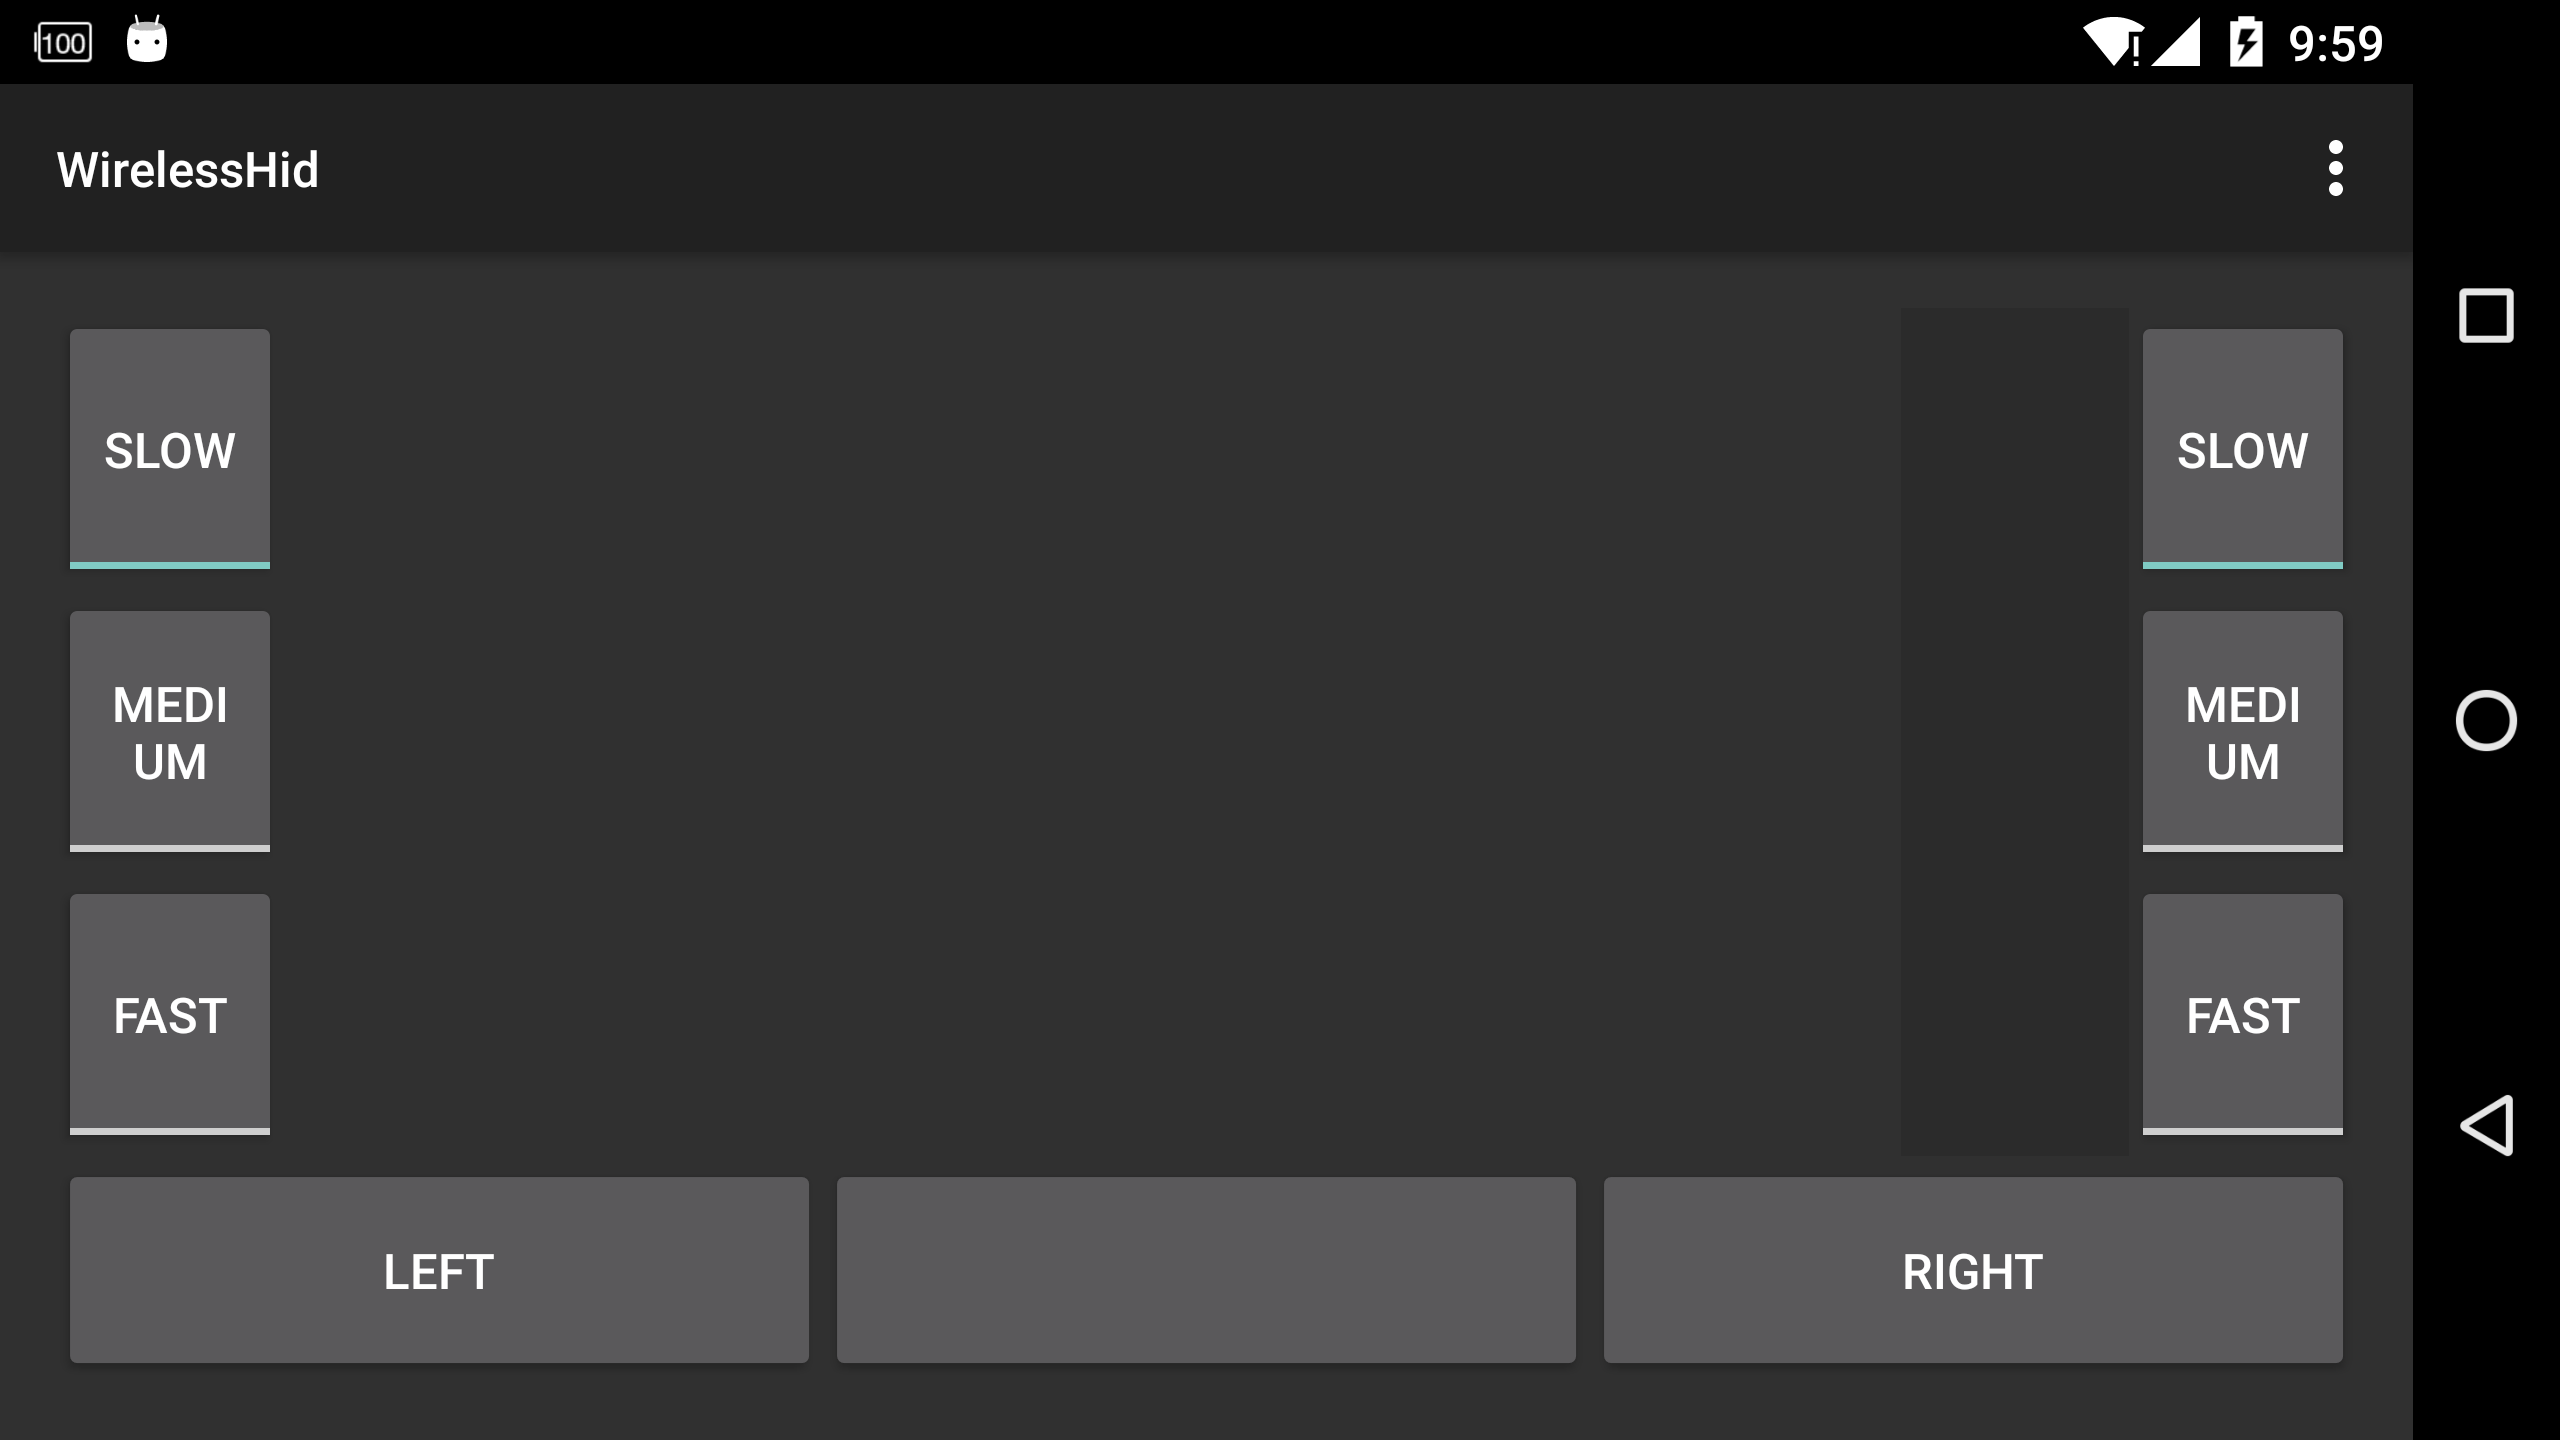
我要做的就是使用手機實現一個touchpad和keyboard,這就決定了UI的設計必須符合我們日常見到的實體touchpad和keyboard的樣式。進過設計之後,touchpad部分設計為一個fragment,它的布局如下:
運行時的效果如下:
 vc+4tNTTwcujrNXisr+31tKyysfSu7j2ZnJhZ21lbnSjrNX7zOWyvL7WyOfPwqO6PC9wPg0KPHByZSBjbGFzcz0="brush:java;">
這個布局中首先放上3個textview在一個LinearLayout這三個textview充當真實鍵盤上的3個led燈:num lock, caps lock, scroll lock。然後就是一個存放實際keyboard布局的LinearLayout容器,這麼做的目的是這樣的:因為手機的屏幕很小,想要放下一個標准鍵盤上的所有的按鍵肯定是不行的,因此需要將鍵盤分區,然後分別展示,這裡的這個容器就是用來存放不同分區,不同布局的鍵盤部分。目前我把鍵盤分成了2個部分:主鍵盤部分,導航部分加上數字部分。其中主鍵盤部分是我們最常使用的部分,這部分包含了26個字母,0~9數字(字母上排),12個功能鍵等,導航部分就是上下左右鍵盤,上頁下頁部分等,數字部分就是數字小鍵盤和一些控制按鍵,我把導航鍵和數字鍵合並在一起了,這兩部分的布局如下:
主鍵盤部分:
導航鍵部分:
數字鍵部分:
這裡的布局需要說明一下,這裡我使用了layout標簽表明,然後使用XmlResourceParser類來解析這個裡面的內容,最後再添加到布局中去。下面貼出兩張鍵盤的運行效果圖:
主鍵盤:

從鍵盤(導航鍵和數字鍵):

Server整體代碼就是一個app,內容不是很復雜,這裡我只陳述我的代碼功能和必要的代碼片段,詳細代碼內容有限於篇幅就不貼出來了,可以查看我的github項目主頁(https://github.com/CreateChance/WirelessHid)上的開源代碼。
代碼的基本分布如下:

各個類的作用如下:
這是主界面類,基本就是MouseFragment的容器,另外就是監聽用戶點擊回退事件,如果用戶在1.5s之內連續點擊兩次回退就退出app,基本邏輯比較簡單。
這是整個app的服務,這個服務是實際將數據發送出去的地方,主要就是通過looper和handler的方式將消息隊列中的數據發送出去。發送部分的邏輯:
一個looper線程
private class DataSendThread extends Thread {

        private OutputStream os = null;

        @Override
        public void run() {
            super.run();

            Looper.prepare();

            try {
                Log.d(TAG, "I'm waiting for connecting.");
                mServerSocket = new ServerSocket(Constant.HID_TCP_PORT);
                mServerSocket.setReuseAddress(true);
                mSocket = mServerSocket.accept();
                os = mSocket.getOutputStream();
                Toast.makeText(getApplicationContext(), "Client connected!",
                        Toast.LENGTH_SHORT).show();
                Log.d(TAG, "client connected!");
            } catch (IOException e) {
                e.printStackTrace();
                return;
            }

            mDataSendHandler = new Handler() {
                @Override
                public void handleMessage(Message msg) {
                    super.handleMessage(msg);

                    // send data here.
                    try {
                        ((WirelessHidProto.HidData)msg.obj).writeDelimitedTo(os);
                    } catch (IOException e) {
                        Log.d(TAG, "IOException, close all resource.");
                        mDataSendHandler = null;
                        if (mListener != null) {
                            mListener.onHandlerChanged(mDataSendHandler);
                        }
                        this.getLooper().quit();
                        sendBroadcast(new Intent(ACTION_RESET_CONNECTION));
                    } finally {
                        try {
                            mServerSocket.close();
                        } catch (IOException e) {
                            e.printStackTrace();
                        }
                    }
                }
            };

            if (mListener != null) {
                mListener.onHandlerChanged(mDataSendHandler);
            }

            Looper.loop();
        }
    }
界面Fragment使用Handler和server交互,fragment需要實現server的DataHandlerListener接口,當Handler變化的時候通知Fragment,以便Fragment拿到最新的對象引用:
需要實現的接口
public interface DataHandlerListener {
        void onHandlerChanged(Handler handler);
}
設置listener的接口:
public void setListener(DataHandlerListener listener) {
        this.mListener = listener;
}
fragment也可以主動獲取:
public Handler getDataSendHandler() {
    return this.mDataSendHandler;
}
這裡的發送使用的就是protobuf的序列化接口,關於這個接口的描述這裡就不詳述,可以參考google protobuf的java部分的編程指導:
https://developers.google.com/protocol-buffers/docs/javatutorial
這個類是fragment類,主要是嵌套在MainActivity類中,主要邏輯功能如下:
1. 捕獲用戶觸摸屏移動,點擊事件
@Override
            public boolean onTouch(View v, MotionEvent event) {
                switch (event.getAction()) {
                    case MotionEvent.ACTION_DOWN:
                        //single and double click handle here.
                        mPrevX = (int) event.getX();
                        mPrevY = (int) event.getY();
                        time = new Date().getTime();
                        break;
                    case MotionEvent.ACTION_UP:
                        if (new Date().getTime() - time < mDoubleClickTimeThreshold) {
                            if ((int) event.getX() - mPrevX < mDoubleClickPosThreshold
                                    && (int) event.getY() - mPrevY < mDoubleClickPosThreshold) {
                                mouseClickPress(Constant.MOUSE_BUTTON_LEFT);
                                mouseClickRelease(Constant.MOUSE_BUTTON_LEFT);
                            }
                        }

                    case MotionEvent.ACTION_MOVE:
                        //mouse move handle here.
                        int x = (int) (event.getX() * mSpeed);
                        int y = (int) (event.getY() * mSpeed);

                        mouseMove(x - mPrevX, y - mPrevY);

                        mPrevX = x;
                        mPrevY = y;
                        break;
                }

                return true;
            }
2. 鼠標右擊,左擊事件(通過button模擬)
// setup buttons
        ViewGroup bar = (ViewGroup) view.findViewById(R.id.buttons);
        int count = bar.getChildCount();

        for (int i = 0; i < count; i++) {
            View child = bar.getChildAt(i);

            try {
                Button button = (Button) child;
                button.setOnTouchListener(new OnTouchListener() {

                    @Override
                    public boolean onTouch(View v, MotionEvent event) {
                        int which = Integer.valueOf((String) v.getTag());

                        switch (event.getAction()) {
                            case MotionEvent.ACTION_DOWN:
                                //mouse button pressed
                                //para which shows which button is pressed
                                //0 is left button
                                //1 is not used(reserved).
                                //2 is right button
                                if (which == 0) {
                                    mouseClickPress(Constant.MOUSE_BUTTON_LEFT);
                                } else if (which == 1) {
                                    //Do nothing for now.
                                } else if (which == 2) {
                                    mouseClickPress(Constant.MOUSE_BUTTON_RIGHT);
                                }
                                break;

                            case MotionEvent.ACTION_UP:
                                //mouse button released
                                if (which == 0) {
                                    mouseClickRelease(Constant.MOUSE_BUTTON_LEFT);
                                } else if (which == 1) {
                                    //Do nothing for now.
                                } else if (which == 2) {
                                    mouseClickRelease(Constant.MOUSE_BUTTON_RIGHT);
                                }
                                break;
                        }

                        return false;
                    }

                });
            } catch (ClassCastException e) {
                // not a button :)
            }
        }
3. 鼠標滾軸滾動事件
// setup scroll
        mScrollZone = view.findViewById(R.id.scrollzone);
        mScrollZone.setOnTouchListener(new OnTouchListener() {

            private int mPrevY;

            @Override
            public boolean onTouch(View v, MotionEvent event) {
                switch (event.getAction()) {
                    case MotionEvent.ACTION_DOWN:
                        //click scroll handle here.
                        mPrevY = (int) (event.getY() * mScrollSpeed);
                        break;

                    case MotionEvent.ACTION_MOVE:
                        //mouse scroll handle here.
                        int amt = (int) (event.getY() * mScrollSpeed);

                        mouseScroll(mPrevY - amt);

                        mPrevY = amt;
                        break;
                }

                return true;
            }
        });
4. 設置鼠標移動,滾軸滾動速度。
設置移動速度
// setup speed controls
        bar = (ViewGroup) view.findViewById(R.id.speed_control);
        count = bar.getChildCount();

        for (int i = 0; i < count; i++) {
            View child = bar.getChildAt(i);

            try {
                ToggleButton button = (ToggleButton) child;
                button.setOnClickListener(new OnClickListener() {

                    @Override
                    public void onClick(View v) {
                        ToggleButton button = (ToggleButton) v;

                        // do not allow to uncheck button
                        if (!button.isChecked()) {
                            button.setChecked(true);
                            return;
                        }

                        updateSpeed(Integer.parseInt((String) button.getTag()));
                    }

                });
            } catch (ClassCastException e) {
                // not a button :)
            }
        }
設置滾動速度
// setup scroll speed controls
        bar = (ViewGroup) view.findViewById(R.id.scroll_speed_control);
        count = bar.getChildCount();

        for (int i = 0; i < count; i++) {
            View child = bar.getChildAt(i);

            try {
                ToggleButton button = (ToggleButton) child;
                button.setOnClickListener(new OnClickListener() {

                    @Override
                    public void onClick(View v) {
                        ToggleButton button = (ToggleButton) v;

                        // do not allow to uncheck button
                        if (!button.isChecked()) {
                            button.setChecked(true);
                            return;
                        }

                        updateScrollSpeed(Integer.parseInt((String) button.getTag()));
                    }

                });
            } catch (ClassCastException e) {
                // not a button :)
            }
        }
更新移動速度
private void updateSpeed(int newSpeed) {
        // note: we assume at least button have proper speed-tag so this will
        // check what it should

        mSpeed = newSpeed;

        ViewGroup bar = (ViewGroup) getView().findViewById(R.id.speed_control);
        int count = bar.getChildCount();

        for (int i = 0; i < count; i++) {
            View child = bar.getChildAt(i);

            try {
                ToggleButton button = (ToggleButton) child;

                int speed = Integer.parseInt((String) button.getTag());

                button.setChecked(speed == newSpeed);
            } catch (ClassCastException e) {
                // not a button :)
            }
        }
    }
更行滾動速度:
private void updateScrollSpeed(int newSpeed) {
        // note: we assume at least button have proper speed-tag so this will
        // check what it should

        mScrollSpeed = newSpeed;

        ViewGroup bar = (ViewGroup) getView().findViewById(R.id.scroll_speed_control);
        int count = bar.getChildCount();

        for (int i = 0; i < count; i++) {
            View child = bar.getChildAt(i);

            try {
                ToggleButton button = (ToggleButton) child;

                int speed = Integer.parseInt((String) button.getTag());

                button.setChecked(speed == newSpeed);
            } catch (ClassCastException e) {
                // not a button :)
            }
        }
    }
這是鍵盤的fragment,這其實是一個FragmentActivity,具體的鍵盤通過ViewGroup添加view接口addView添加相應的view:
keyboard = (ViewGroup) this.findViewById(R.id.keyboard);
keyboard.addView(view);
這裡針對兩類鍵盤設計了兩個創建接口:
主鍵盤:
private View creatQwertyKeyboard(Context context) {
    return createKeyboard(context, R.xml.qwerty_keyboard);
}
從鍵盤:
private View createNavigationAndNumericKeyboard(Context context) {
    ViewGroup view = (ViewGroup) View.inflate(context, R.layout.numeric_keyboard, null);
    ViewGroup child;

    child = (ViewGroup) view.findViewById(R.id.navigation_keyboard);
    child.addView(createKeyboard(context, R.xml.navigation_keyboard));

    child = (ViewGroup) view.findViewById(R.id.numeric_keyboard);
    child.addView(createKeyboard(context, R.xml.numeric_keyboard));

    return view;
}
他們都使用了createKeyboard接口創建實際的鍵盤:
private Keyboard createKeyboard(Context context, int xmlResourceID) {

        final Keyboard keyboard = new Keyboard(context, xmlResourceID);
        keyboard.setKeyboardListener(new Keyboard.KeyboardListener() {
            @Override
            public void onKeyUp(int keyCode) {
                Log.d(TAG, "up keycode: " + keyCode);

                if (mDataSendHandler != null) {
                    mDataSendHandler.removeCallbacks(mLongPressCheckTask);
                }
                if (mIsLongPressed) {
                    mIsLongPressed = false;
                    WirelessHidProto.HidData data = WirelessHidProto.HidData.newBuilder()
                            .setType(WirelessHidProto.HidData.DataType.KEYBOARD_LONG_RELEASE)
                            .setKeyboardValue(keyCode).build();
                    if (mDataSendHandler != null) {
                        mDataSendHandler.obtainMessage(0, data).sendToTarget();
                    }
                } else {
                    WirelessHidProto.HidData data = WirelessHidProto.HidData.newBuilder()
                            .setType(WirelessHidProto.HidData.DataType.KEYBOARD_HIT)
                            .setKeyboardValue(keyCode).build();
                    if (mDataSendHandler != null) {
                        mDataSendHandler.obtainMessage(0, data).sendToTarget();
                    }
                }
            }

            @Override
            public void onKeyDown(int keyCode) {
                Log.d(TAG, "key down: " + keyCode);

                if (keyCode == 144) {
                    // 144 means number lock
                    mIsNumLockActive = !mIsNumLockActive;
                    KeyboardFragment.this.findViewById(R.id.led_numlock).
                            setBackgroundColor(getResources().getColor(mIsNumLockActive ? R.color.led_on : R.color.led_off));
                } else if (keyCode == 20) {
                    // 20 means caps lock.
                    mIsCapsLockActive = !mIsCapsLockActive;
                    KeyboardFragment.this.findViewById(R.id.led_capslock).
                            setBackgroundColor(getResources().getColor(mIsCapsLockActive ? R.color.led_on : R.color.led_off));
                } else if (keyCode == 145) {
                    // 145 means scroll lock
                    mIsScrollLockActive = !mIsScrollLockActive;
                    KeyboardFragment.this.findViewById(R.id.led_scrolllock).
                            setBackgroundColor(getResources().getColor(mIsScrollLockActive ? R.color.led_on : R.color.led_off));
                } else if (mDataSendHandler != null) {
                    mLongPressCheckTask.setKeyCode(keyCode);
                    mDataSendHandler.postDelayed(mLongPressCheckTask, 1000);
                }
            }
        });
        return keyboard;
    }
這裡返回一個Keyboard類對象,Keyboard類就是鍵盤實際的類了,這個類是LinearLayout的子類,使用XmlResourceParser來解析剛才我們定義的xml文件去獲得鍵值和創建布局。
private LinearLayout parseKeyLayout(Context context, XmlResourceParser xmlParser)
            throws XmlPullParserException, IOException {
        LinearLayout linearLayout = new LinearLayout(context);
        linearLayout.setLayoutParams(new LayoutParams(
                xmlParser.getAttributeIntValue(null, "width", LayoutParams.MATCH_PARENT),
                xmlParser.getAttributeIntValue(null, "height", 0),
                xmlParser.getAttributeFloatValue(null, "weight", 1.0f)));
        linearLayout.setOrientation(xmlParser.getAttributeIntValue(null, "orientation",
                LinearLayout.HORIZONTAL));

        String tag;
        do {
            xmlParser.next();
            tag = xmlParser.getName();

            if (xmlParser.getEventType() == XmlResourceParser.START_TAG) {
                if (tag.equals(XML_TAG_LAYOUT)) {
                    linearLayout.addView(parseKeyLayout(context, xmlParser));
                } else if (tag.equals(XML_TAG_KEY)) {
                    Key.KeyAttributes attrs = new Key.KeyAttributes();
                    attrs.keyFunction = getStringAttributeValue(xmlParser, "keyFunc", "");
                    attrs.mainLabel = getStringAttributeValue(xmlParser, "keyLabel", "");
                    attrs.shiftLabel = getStringAttributeValue(xmlParser, "shiftLabel", "");
                    attrs.keyCode = xmlParser.getAttributeIntValue(null, "keyCode", 0);

                    Key key = new Key(context, attrs);
                    key.setLayoutParams(new LayoutParams(
                            xmlParser.getAttributeIntValue(null, "width", 0),
                            xmlParser.getAttributeIntValue(null, "height",
                                    LayoutParams.MATCH_PARENT),
                            xmlParser.getAttributeFloatValue(null, "weight", 1)));
                    key.setVisibility(xmlParser.getAttributeBooleanValue(null, "visible", true) ?
                        VISIBLE : INVISIBLE);
                    key.setKeyListener(this);

                    if (attrs.shiftLabel != null & attrs.shiftLabel.length() > 0) {
                        mKeysWithShiftLabel.add(key);
                    }

                    linearLayout.addView(key);
                }
            }
        } while (xmlParser.getEventType() != XmlResourceParser.END_TAG
                || !tag.equals(XML_TAG_LAYOUT));

        return linearLayout;
    }
這是protobuf的數據定義文件,內容如下:
syntax = "proto2";

option java_package = "com.baniel.wirelesshid";
option java_outer_classname = "WirelessHidProto";

message HidData {
    enum DataType {
        MOUSE_MOVE = 0;
        MOUSE_CLICK_PRESS = 1;
        MOUSE_CLICK_RELEASE = 2;
        MOUSE_SCROLL = 3;
        KEYBOARD_LONG_PRESS = 4;
        KEYBOARD_LONG_RELEASE = 5;
        KEYBOARD_HIT = 6;
    }

    required DataType type = 1;
    optional int32 x_shift = 2;
    optional int32 y_shift = 3;
    optional int32 mouse_key_value = 4;
    optional int32 mouse_scroll = 5;
    optional int32 keyboard_value = 6;
}
這裡我只定義了一個消息類型,那就是HidData這是android需要發送給pc的消息數據。這其中有消息的類型:鼠標移動,鼠標按下,鼠標釋放,鼠標滾軸,鍵盤長按,鍵盤長按釋放,鍵盤單擊。x軸偏移,y軸偏移(pc系統的鼠標移動是以坐標偏移作為參數的;鼠標按鍵鍵值,鼠標滾動值,鍵盤按鍵值。關於protobuf詳細的數據定義語法請見:
https://developers.google.com/protocol-buffers/docs/proto
WirelessHidProto類就是上面這個文件通過protobuf編譯器編譯生成的。
client端的代碼就比較簡單了,這裡我只有兩個類:

具體類的說明如下:
這個是client的主類,主要就是從socket讀取來自android的數據,然後通過java Robot類移動鼠標,操作鍵盤輸入操作:
主方法:
public static void main(String[] args) {
        final int HID_TCP_PORT = 34567;
        Socket mSocket = null;
        InputStream is = null;

        HidData data = null;
        try {
            mSocket = new Socket(args[0], HID_TCP_PORT);
            is = mSocket.getInputStream();
            mRobot = new Robot();
            printClientInfo(mSocket);
            while (true) {
                data = HidData.parseDelimitedFrom(is);
                if (data != null) {
                    handleData(data);
                } else {
                    break;
                }
            }
        } catch (UnknownHostException e) {
            // TODO Auto-generated catch block
            e.printStackTrace();
            System.exit(-1);
        } catch (IOException e) {
            // TODO Auto-generated catch block
            e.printStackTrace();
            System.exit(-1);
        } catch (AWTException e) {
            // TODO: handle exception
            System.exit(-1);
        }

        System.out.println("Connection lost.");
    }
具體操作:
//move mouse pointer to posX,posY of current position.
    private static void doMouseMove(int posX, int posY) {
        mRobot.mouseMove(mPrevX + posX, mPrevY + posY);
        mPrevX += posX;
        mPrevY += posY;
    }

    //handle mouse button press.
    private static void doMousePress(int keyValue) {
        //System.out.println("mouse click value = " + keyValue);
        mRobot.mousePress(keyValue);
    }

    private static void doMouseRelease(int keyValue) {
        mRobot.mouseRelease(keyValue);
    }

    private static void doMouseScroll(int amt) {
        mRobot.mouseWheel(amt);
    }

    private static void doKeyHit(int keyCode) {
        mRobot.keyPress(keyCode);
        mRobot.keyRelease(keyCode);
    }

    private static void doKeyLongPress(int keyCode) {
        mRobot.keyPress(keyCode);
    }

    private static void doKeyLongRelease(int keyCode) {
        mRobot.keyRelease(keyCode);
    }
這個類是protobuf編譯器生成的,主要包含數據類的序列化操作邏輯。
好了,到這裡就完全分析完了我的實現,感興趣的朋友可以從我的github下載編譯好的二進制文件,直接運行感受一下(提醒一下,客戶端最好在linux上運行,windows上有點卡頓,影響體驗,具體的原因以後我會找出並且解決這個問題!或者哪位大神知道可以告訴我哦~~)。下載地址:
https://github.com/CreateChance/WirelessHid/tree/master/bin
運行方式:
server端(android):
直接安裝app,然後啟動即可(前提是你要鏈接到一個局域的wifi,並且你的pc電腦能夠和android設備通訊)
client端(linux或者windows):
命令運行:java -jar WirelessHidClient.jar 你的android設備地址
 Android使用AIDL實現進程間通信
為使應用程序之間能夠彼此通信,Android提供了IPC (Inter Process Communication,進程間通信)的一種獨特實現: AIDL (Androi
 騰訊wifi管家破解wifi密碼教程
騰訊Wifi管家app這是騰訊旗下的一款類似Wifi萬能鑰匙。一款騰訊WiFi管家在手,讓你一鍵連接WiFi,很多朋友都在問騰訊WiFi管家怎麼破解密碼?快
 Android 實現密碼輸入框動態明文/密文切換顯示效果
在項目中遇到需要提供給用戶一個密碼輸入框明文/密文切換顯示的需求,在網上搜索一圈都沒有發現完整的實現,幸而找到了一個實現的思路。先上效果圖,看了錄制屏幕gif的教程,無奈
 Android IntentService使用全面介紹及源碼解析
一 IntentService介紹IntentService定義的三個基本點:是什麼?怎麼用?如何work?官方解釋如下://IntentService定義的三個基本點: