編輯:關於Android編程
什麼是AIDL以及如何使用
①aidl是Android interface definition Language 的英文縮寫,意思Android 接口定義語言。
②使用aidl可以幫助我們發布以及調用遠程服務,實現跨進程通信。
③將服務的aidl放到對應的src目錄,工程的gen目錄會生成相應的接口類
我們通過bindService(Intent,ServiceConnect,int)方法綁定遠程服務,在bindService中有一個ServiceConnec接口,我們需要覆寫該類的onServiceConnected(ComponentName,IBinder)方法,這個方法的第二個參數IBinder對象其實就是已經在aidl中定義的接口,因此我們可以將IBinder對象強制轉換為aidl中的接口類。
我們通過IBinder獲取到的對象(也就是aidl文件生成的接口)其實是系統產生的代理對象,該代理對象既可以跟我們的進程通信,又可以跟遠程進程通信,作為一個中間的角色實現了進程間通信
獲取總內存及可用內存
private String getAvailMemory() {// 獲取android當前可用內存大小

ActivityManager am = (ActivityManager) getSystemService(Context.ACTIVITY_SERVICE);
MemoryInfo mi = new MemoryInfo();
am.getMemoryInfo(mi);//mi.availMem; 當前系統的可用內存

return Formatter.formatFileSize(getBaseContext(), mi.availMem);// 將獲取的內存大小規格化
}
private String getTotalMemory() {
String str1 = "/proc/meminfo";// 系統內存信息文件
String str2;
String[] arrayOfString;
long initial_memory = 0;

try {
FileReader localFileReader = new FileReader(str1);
BufferedReader localBufferedReader = new BufferedReader(
localFileReader, 8192);
str2 = localBufferedReader.readLine();// 讀取meminfo第一行,系統總內存大小

arrayOfString = str2.split("\\s+");
for (String num : arrayOfString) {
Log.i(str2, num + "\t");
}
initial_memory = Integer.valueOf(arrayOfString[1]).intValue() * 1024;// 獲得系統總內存,單位是KB,乘以1024轉換為Byte
localBufferedReader.close();

} catch (IOException e) {
}
return Formatter.formatFileSize(getBaseContext(), initial_memory);// Byte轉換為KB或者MB,內存大小規格化
}
dp、px轉換
 /**
     * 根據手機的分辨率從 dip 的單位 轉成為 px(像素)
     */
    public static int dip2px(Context context, float dpValue) {
        final float scale = context.getResources().getDisplayMetrics().density;
        return (int) (dpValue * scale + 0.5f);
    }

    /**
     * 根據手機的分辨率從 px(像素) 的單位 轉成為 dp
     */
    public static int px2dip(Context context, float pxValue) {
        final float scale = context.getResources().getDisplayMetrics().density;
        return (int) (pxValue / scale + 0.5f);
    }
程序的安裝與卸載
安裝:
        Intent intent = new Intent(Intent.ACTION_VIEW);
                intent.setDataAndType(Uri.fromFile(new File("/sdcard/xxx.apk")),
                        "application/vnd.android.package-archive");

                MainActivity.this.startActivity(intent);
    卸載:
         Uri uri = Uri.parse("package:com.xxx.xxx(包名)");
                Intent intent2 = new Intent(Intent.ACTION_DELETE, uri);
                MainActivity.this.startActivity(intent2);
根據URI獲取真實路徑
    public static String getRealFilePath( final Context context, final Uri uri ) {
        if ( null == uri ) return null;

        final String scheme = uri.getScheme();
        String data = null;

        if ( scheme == null )
            data = uri.getPath();
        else if ( ContentResolver.SCHEME_FILE.equals( scheme ) ) {
            data = uri.getPath();
        } else if ( ContentResolver.SCHEME_CONTENT.equals( scheme ) ) {
            Cursor cursor = context.getContentResolver().query( uri, new String[] { ImageColumns.DATA }, null, null, null );
            if ( null != cursor ) {
                if ( cursor.moveToFirst() ) {
                    int index = cursor.getColumnIndex( ImageColumns.DATA );
                    if ( index > -1 ) {
                        data = cursor.getString( index );
                    }
                }
                cursor.close();
            }
        }
        return data;
    }
關閉開啟網絡
  public static void setDataConnectionState(Context cxt, boolean state) {
        ConnectivityManager connectivityManager = null;
        Class connectivityManagerClz = null;
        try {
            connectivityManager = (ConnectivityManager) cxt
                    .getSystemService("connectivity");
            connectivityManagerClz = connectivityManager.getClass();
            Method method = connectivityManagerClz.getMethod(
                    "setMobileDataEnabled", new Class[] { boolean.class });
            method.invoke(connectivityManager, state);
        } catch (Exception e) {
            e.printStackTrace();
        }
    }
還原短信
    ContentValues values = new ContentValues();
        values.put("address", "123456789");
        values.put("body", "haha");
        values.put("date", "135123000000");
        getContentResolver().insert(Uri.parse("content://sms/sent"), values);
橫豎屏切換
< activity android:name="MyActivity"
android:configChanges="orientation|keyboardHidden">


public void onConfigurationChanged(Configuration newConfig) {

   super.onConfigurationChanged(newConfig);

if (this.getResources().getConfiguration().orientation == Configuration.ORIENTATION_LANDSCAPE) {
           //加入橫屏要處理的代碼

}else if (this.getResources().getConfiguration().orientation == Configuration.ORIENTATION_PORTRAIT) {

           //加入豎屏要處理的代碼

}
}
獲取mac地址
1、
2、private String getLocalMacAddress() {
    WifiManager wifi = (WifiManager) getSystemService(Context.WIFI_SERVICE);
    WifiInfo info = wifi.getConnectionInfo();
    return info.getMacAddress();
  }
獲取SD卡狀態
/** 獲取存儲卡路徑 */
File sdcardDir=Environment.getExternalStorageDirectory();
/** StatFs 看文件系統空間使用情況 */
StatFs statFs=new StatFs(sdcardDir.getPath());
/** Block 的 size*/
Long blockSize=statFs.getBlockSize();
/** 總 Block 數量 */
Long totalBlocks=statFs.getBlockCount();
/** 已使用的 Block 數量 */
Long availableBlocks=statFs.getAvailableBlocks();
獲取狀態欄和標題欄的高度
1.Android獲取狀態欄高度:

decorView是window中的最頂層view,可以從window中獲取到decorView,然後decorView有個getWindowVisibleDisplayFrame方法可以獲取到程序顯示的區域,包括標題欄,但不包括狀態欄。

於是,我們就可以算出狀態欄的高度了。

Rect frame = new Rect();
getWindow().getDecorView().getWindowVisibleDisplayFrame(frame);
int statusBarHeight = frame.top;

2.獲取標題欄高度:

getWindow().findViewById(Window.ID_ANDROID_CONTENT)這個方法獲取到的view就是程序不包括標題欄的部分,然後就可以知道標題欄的高度了。

int contentTop = getWindow().findViewById(Window.ID_ANDROID_CONTENT).getTop();
//statusBarHeight是上面所求的狀態欄的高度
int titleBarHeight = contentTop - statusBarHeight

例子代碼:

package com.cn.lhq;
import android.app.Activity;
import android.graphics.Rect;
import android.os.Bundle;
import android.util.Log;
import android.view.Window;
import android.widget.ImageView;
public class Main extends Activity {
 ImageView iv;
 @Override
 public void onCreate(Bundle savedInstanceState) {
  super.onCreate(savedInstanceState);
  setContentView(R.layout.main);
  iv = (ImageView) this.findViewById(R.id.ImageView01);
  iv.post(new Runnable() {
   public void run() {
    viewInited();
   }
  });
  Log.v("test", "== ok ==");
 }
 private void viewInited() {
  Rect rect = new Rect();
  Window window = getWindow();
  iv.getWindowVisibleDisplayFrame(rect);
  int statusBarHeight = rect.top;
  int contentViewTop = window.findViewById(Window.ID_ANDROID_CONTENT)
    .getTop();
  int titleBarHeight = contentViewTop - statusBarHeight;
  // 測試結果:ok之後 100多 ms 才運行了
  Log.v("test", "=-init-= statusBarHeight=" + statusBarHeight
    + " contentViewTop=" + contentViewTop + " titleBarHeight="
    + titleBarHeight);
 }
}
獲取各種窗體高度
  //取得窗口屬性
        getWindowManager().getDefaultDisplay().getMetrics(dm);

        //窗口的寬度
        int screenWidth = dm.widthPixels;
        //窗口高度
        int screenHeight = dm.heightPixels;
        textView = (TextView)findViewById(R.id.textView01);
        textView.setText("屏幕寬度: " + screenWidth + "\n屏幕高度: " + screenHeight);

二、獲取狀態欄高度
decorView是window中的最頂層view,可以從window中獲取到decorView,然後decorView有個getWindowVisibleDisplayFrame方法可以獲取到程序顯示的區域,包括標題欄,但不包括狀態欄。
於是,我們就可以算出狀態欄的高度了。
view plain


Rect frame = new Rect();
getWindow().getDecorView().getWindowVisibleDisplayFrame(frame);
int statusBarHeight = frame.top;


三、獲取標題欄高度
getWindow().findViewById(Window.ID_ANDROID_CONTENT)這個方法獲取到的view就是程序不包括標題欄的部分,然後就可以知道標題欄的高度了。
view plain


int contentTop = getWindow().findViewById(Window.ID_ANDROID_CONTENT).getTop();
//statusBarHeight是上面所求的狀態欄的高度
int titleBarHeight = contentTop - statusBarHeight
獲取內外置存儲卡路徑
/** 獲取存儲卡路徑 */
File sdcardDir=Environment.getExternalStorageDirectory();
/** StatFs 看文件系統空間使用情況 */
StatFs statFs=new StatFs(sdcardDir.getPath());
/** Block 的 size*/
Long blockSize=statFs.getBlockSize();
/** 總 Block 數量 */
Long totalBlocks=statFs.getBlockCount();
/** 已使用的 Block 數量 */
Long availableBlocks=statFs.getAvailableBlocks();


private static String getStoragePath(Context mContext, boolean is_removale) {

      StorageManager mStorageManager = (StorageManager) mContext.getSystemService(Context.STORAGE_SERVICE);
        Class storageVolumeClazz = null;
        try {
            storageVolumeClazz = Class.forName("android.os.storage.StorageVolume");
            Method getVolumeList = mStorageManager.getClass().getMethod("getVolumeList");
            Method getPath = storageVolumeClazz.getMethod("getPath");
            Method isRemovable = storageVolumeClazz.getMethod("isRemovable");
            Object result = getVolumeList.invoke(mStorageManager);
            final int length = Array.getLength(result);
            for (int i = 0; i < length; i++) {
                Object storageVolumeElement = Array.get(result, i);
                String path = (String) getPath.invoke(storageVolumeElement);
                boolean removable = (Boolean) isRemovable.invoke(storageVolumeElement);
                if (is_removale == removable) {
                    return path;
                }
            }
        } catch (ClassNotFoundException e) {
            e.printStackTrace();
        } catch (InvocationTargetException e) {
            e.printStackTrace();
        } catch (NoSuchMethodException e) {
            e.printStackTrace();
        } catch (IllegalAccessException e) {
            e.printStackTrace();
        }
        return null;
}

通過反射的方式使用在sdk中被 隱藏 的類 StroageVolume 中的方法getVolumeList(),獲取所有的存儲空間(Stroage Volume),然後通過參數is_removable控制,來獲取內部存儲和外部存儲(內外sd卡)的路徑,參數 is_removable為false時得到的是內置sd卡路徑,為true則為外置sd卡路徑。

在API 23 Enviroment 類中的內部類 UserEnvironment 中有一方法getExternalDirs與此一樣,代碼如下:

public File[] getExternalDirs() {
    final StorageVolume[] volumes = StorageManager.getVolumeList(mUserId,StorageManager.FLAG_FOR_WRITE);
    final File[] files = new File[volumes.length];
    for (int i = 0; i < volumes.length; i++) {
        files[i] = volumes[i].getPathFile();
    }
    return files;
}

再看Enviroment的getExternalStorageDirectory方法實現:

public static File getExternalStorageDirectory() {
    throwIfUserRequired();
    return sCurrentUser.getExternalDirs()[0];
}

可以看出,在API 23時,先是通過getExternalDirs()獲取到所有存儲空間的File[]數組,這個數組的第一個值:getExternalDirs()[0],即為內置sd卡所在路徑。

而在API 23 之前的版本中,並沒有類似getExternalDirs()的方法通過StorageVolume直接獲得存儲空間(Storage Volume),而時通過別的方式來實現的,看關鍵方法的源碼:
public static File getExternalStorageDirectory() {
    throwIfUserRequired();
    return sCurrentUser.getExternalDirsForApp()[0];
}

這裡的 getExternalDirsForApp() 和上面的 getExternalDirs() 的作用是一樣的,都是得到所有存儲空間的File[]數組。

public File[] getExternalDirsForApp() {
    return mExternalDirsForApp;
}
捕獲Application全局異常
/**
 * UncaughtException處理類,當程序發生Uncaught異常的時候,有該類來接管程序,並記錄發送錯誤報告.
 *
 *
 *
 */
public class CrashHandler implements UncaughtExceptionHandler {

    public static final String TAG = "CrashHandler";

    //系統默認的UncaughtException處理類
    private Thread.UncaughtExceptionHandler mDefaultHandler;
    //CrashHandler實例
    private static CrashHandler INSTANCE = new CrashHandler();
    //程序的Context對象
    private Context mContext;
    //用來存儲設備信息和異常信息
    private Map infos = new HashMap();

    //用於格式化日期,作為日志文件名的一部分
    private DateFormat formatter = new SimpleDateFormat("yyyy-MM-dd-HH-mm-ss");

    /** 保證只有一個CrashHandler實例 */
    private CrashHandler() {
    }

    /** 獲取CrashHandler實例 ,單例模式 */
    public static CrashHandler getInstance() {
        return INSTANCE;
    }

    /**
     * 初始化
     *
     * @param context
     */
    public void init(Context context) {
        mContext = context;
        //獲取系統默認的UncaughtException處理器
        mDefaultHandler = Thread.getDefaultUncaughtExceptionHandler();
        //設置該CrashHandler為程序的默認處理器
        Thread.setDefaultUncaughtExceptionHandler(this);
    }

    /**
     * 當UncaughtException發生時會轉入該函數來處理
     */
    @Override
    public void uncaughtException(Thread thread, Throwable ex) {
        if (!handleException(ex) && mDefaultHandler != null) {
            //如果用戶沒有處理則讓系統默認的異常處理器來處理
            mDefaultHandler.uncaughtException(thread, ex);
        } else {
            try {
                Thread.sleep(3000);
            } catch (InterruptedException e) {
                Log.e(TAG, "error : ", e);
            }
            //退出程序
            android.os.Process.killProcess(android.os.Process.myPid());
            System.exit(1);
        }
    }

    /**
     * 自定義錯誤處理,收集錯誤信息 發送錯誤報告等操作均在此完成.
     *
     * @param ex
     * @return true:如果處理了該異常信息;否則返回false.
     */
    private boolean handleException(Throwable ex) {
        if (ex == null) {
            return false;
        }
        //使用Toast來顯示異常信息
        new Thread() {
            @Override
            public void run() {
                Looper.prepare();
                Toast.makeText(mContext, "很抱歉,程序出現異常,即將退出.", Toast.LENGTH_LONG).show();
                Looper.loop();
            }
        }.start();
        //收集設備參數信息
        collectDeviceInfo(mContext);
        //保存日志文件
        saveCrashInfo2File(ex);
        return true;
    }

    /**
     * 收集設備參數信息
     * @param ctx
     */
    public void collectDeviceInfo(Context ctx) {
        try {
            PackageManager pm = ctx.getPackageManager();
            PackageInfo pi = pm.getPackageInfo(ctx.getPackageName(), PackageManager.GET_ACTIVITIES);
            if (pi != null) {
                String versionName = pi.versionName == null ? "null" : pi.versionName;
                String versionCode = pi.versionCode + "";
                infos.put("versionName", versionName);
                infos.put("versionCode", versionCode);
            }
        } catch (NameNotFoundException e) {
            Log.e(TAG, "an error occured when collect package info", e);
        }
        Field[] fields = Build.class.getDeclaredFields();
        for (Field field : fields) {
            try {
                field.setAccessible(true);
                infos.put(field.getName(), field.get(null).toString());
                Log.d(TAG, field.getName() + " : " + field.get(null));
            } catch (Exception e) {
                Log.e(TAG, "an error occured when collect crash info", e);
            }
        }
    }

    /**
     * 保存錯誤信息到文件中
     *
     * @param ex
     * @return  返回文件名稱,便於將文件傳送到服務器
     */
    private String saveCrashInfo2File(Throwable ex) {

        StringBuffer sb = new StringBuffer();
        for (Map.Entry entry : infos.entrySet()) {
            String key = entry.getKey();
            String value = entry.getValue();
            sb.append(key + "=" + value + "\n");
        }

        Writer writer = new StringWriter();
        PrintWriter printWriter = new PrintWriter(writer);
        ex.printStackTrace(printWriter);
        Throwable cause = ex.getCause();
        while (cause != null) {
            cause.printStackTrace(printWriter);
            cause = cause.getCause();
        }
        printWriter.close();
        String result = writer.toString();
        sb.append(result);
        try {
            long timestamp = System.currentTimeMillis();
            String time = formatter.format(new Date());
            String fileName = "crash-" + time + "-" + timestamp + ".log";
            if (Environment.getExternalStorageState().equals(Environment.MEDIA_MOUNTED)) {
                String path = "/sdcard/crash/";
                File dir = new File(path);
                if (!dir.exists()) {
                    dir.mkdirs();
                }
                FileOutputStream fos = new FileOutputStream(path + fileName);
                fos.write(sb.toString().getBytes());
                fos.close();
            }
            return fileName;
        } catch (Exception e) {
            Log.e(TAG, "an error occured while writing file...", e);
        }
        return null;
    }
}


在收集異常信息時,朋友們也可以使用Properties,因為Properties有一個很便捷的方法properties.store(OutputStream out, String comments),用來將Properties實例中的鍵值對外輸到輸出流中,但是在使用的過程中發現生成的文件中異常信息打印在同一行,看起來極為費勁,所以換成Map來存放這些信息,然後生成文件時稍加了些操作。
完成這個CrashHandler後,我們需要在一個Application環境中讓其運行,為此,我們繼承android.app.Application,添加自己的代碼,CrashApplication.java代碼如下:

public class CrashApplication extends Application {
    @Override
    public void onCreate() {
        super.onCreate();
        CrashHandler crashHandler = CrashHandler.getInstance();
        crashHandler.init(getApplicationContext());
    }
}


/**
     * 網絡是否可用
     *
     * @param context
     * @return
     */
    public static boolean isNetworkAvailable(Context context) {
        ConnectivityManager mgr = (ConnectivityManager) context.getSystemService(Context.CONNECTIVITY_SERVICE);
        NetworkInfo[] info = mgr.getAllNetworkInfo();
        if (info != null) {
            for (int i = 0; i < info.length; i++) {
                if (info[i].getState() == NetworkInfo.State.CONNECTED) {
                    return true;
                }
            }
        }
        return false;
    }
禁止Home鍵
 問題的提出
  Android Home鍵系統負責監聽,捕獲後系統自動處理。有時候,系統的處理往往不隨我們意,想自己處理點擊Home後的事件,那怎麼辦?
 問題的解決
 先禁止Home鍵,再在onKeyDown裡處理按鍵值,點擊Home鍵的時候就把程序關閉,或者隨你XXOO。

@Override
 public boolean onKeyDown(int keyCode, KeyEvent event)

{ // TODO Auto-generated method stub

  if(KeyEvent.KEYCODE_HOME==keyCode)
 android.os.Process.killProcess(android.os.Process.myPid());
     return super.onKeyDown(keyCode, event);
  }
@Override
 public void onAttachedToWindow()
 { // TODO Auto-generated method stub
    this.getWindow().setType(WindowManager.LayoutParams.TYPE_KEYGUARD);
    super.onAttachedToWindow();
 }
加權限禁止Home鍵
開機啟動
public class StartupReceiver extends BroadcastReceiver {

  @Override
  public void onReceive(Context context, Intent intent) {
    Intent startupintent = new Intent(context,StrongTracks.class);
    startupintent.addFlags(Intent.FLAG_ACTIVITY_NEW_TASK);
    context.startActivity(startupintent);
  }

}
2)
控制對話框位置
 window =dialog.getWindow();//    得到對話框的窗口.
      WindowManager.LayoutParams wl = window.getAttributes();
       wl.x = x;//這兩句設置了對話框的位置.0為中間
       wl.y =y;
       wl.width =w;
       wl.height =h;
       wl.alpha =0.6f;// 這句設置了對話框的透明度
模擬器錯誤
1、找到android模擬器安裝目錄:C:\Documents and Settings\Administrator\.android\avd\AVD23.avd
2、編輯config.ini文件,就是這塊配置錯誤導致錯誤產生。
3、如果硬盤空間比較緊張,可以把模擬器文件放到其它盤符上:你可以在命令行下用mkcard創建一個SDCARD文件,如: mksdcard 50M D:\sdcard.img
4、下面代碼可以整個覆蓋原來的config文件 hw.sdCard=yes hw.lcd.density=240 skin.path=800×480 skin.name=800×480 vm.heapSize=24 sdcard.path=D:\sdcard.img hw.ramSize=512 image.sysdir.1=platforms\android-8\images\
5、OK,模擬器正常運行
挪動dialog的位置
Window mWindow = dialog.getWindow();
WindowManager.LayoutParams lp = mWindow.getAttributes();
lp.x = 10;   //新位置X坐標
lp.y = -100; //新位置Y坐標
dialog.onWindowAttributesChanged(lp);
屏幕適配
 常見手機屏幕像素及對應分別率級別:
       ldpi 320*240
       mdpi 480*320
       hdpi 800*480
       xhdpi 1280*720
       xxhdpi 1920*1080
       dp和px之間的簡單換算關系:
       ldpi的手機 1dp=0.75px
       mdpi的手機 1dp=1.0px
       hdpi的手機 1dp=1.5px
       xhdpi的手機 1dp=2.0px
       xxhdpi的手機 1dp=3.0px
名詞解釋:
       分辨率:eg:480*800,1280*720。表示物理屏幕區域內像素點的總和。(切記:跟屏幕適配沒有任何關系)
       因為我們既可以把1280*720的分辨率做到4.0的手機上面。我也可以把1280*720的分辨率做到5.0英寸的手機上面,如果分辨率相同,手機屏幕越小清晰。
       px(pix):像素,就是屏幕中最小的一個顯示單元
       dpi(像素密度):即每英寸屏幕所擁有的像素數,像素密度越大,顯示畫面細節就越豐富。
       計算公式:像素密度=√{(長度像素數^2+寬度像素數^2)}/ 屏幕尺寸
       注:屏幕尺寸單位為英寸 例:分辨率為1280*720 屏幕寬度為6英寸 計算所得像素密度約等於245,屏幕尺寸指屏幕對角線的長度。


 1、屏幕適配方式都有哪些

       1.1 適配方式之dp
       1.2 適配方式之dimens
        在values-1280x720中,中間的是大寫字母X的小寫形式x,而不是加減乘除的乘號。如果我們在values-1280x720中放置了dimens常量,一定記得也將該常量的對應值在values目錄下的dimens.xml中放一份,因為該文件是默認配置,當用戶的手機不是1280*720的情況下系統應用使用的是默認values目錄中的dimens.xml。
       1.3 適配方式之layout
       跟values一樣,在Android工程目錄中layout目錄也支持類似values目錄一樣的適配,在layout中我們可以針對不同手機的分辨率制定不同的布局
       1.4 適配方式之java代碼適配
    為了演示用java代碼控制適配的效果,因此假設有這樣的需求,讓一個TextView控件的寬和高分別為屏幕的寬和高的一半。
 //獲取TextView控件
                TextView tv  = (TextView) findViewById(R.id.tv);
                //找到當前控件的夫控件(父控件上給當前的子控件去設定一個規則)
                DisplayMetrics metrics  = new DisplayMetrics();
                //給當前metrics去設置當前屏幕信息(寬(像素)高(像素))
                getWindowManager().getDefaultDisplay().getMetrics(metrics);
                //獲取屏幕的高度和寬度
                Constant.srceenHeight = metrics.heightPixels;
                Constant.srceenWidth = metrics.widthPixels;
                //日志輸出屏幕的高度和寬度
                Log.i(tag, "Constant.srceenHeight = "+Constant.srceenHeight);
                Log.i(tag, "Constant.srceenWidth = "+Constant.srceenWidth);
                                //寬高各 50%
                RelativeLayout.LayoutParams layoutParams = new RelativeLayout.LayoutParams(
                                //數學角度上 四捨五入
                                (int)(Constant.srceenWidth*0.5+0.5),
                                (int)(Constant.srceenHeight*0.5+0.5));
                //給tv控件設置布局參數
                tv.setLayoutParams(layoutParams);

    1.5適配方式之weight權重適配
    在控件中使用屬性android:layout_weight="1"可以起到適配效果,但是該屬性的使用有如下規則:
       1、只能用在線性控件中,比如LinearLayout。
       2、豎直方向上使用權重的控件高度必須為0dp(Google官方的推薦用法)
       3、水平方向上使用權重的控件寬度必須為0dp(Google官方的推薦用法)

2、屏幕適配的處理技巧都有哪些

   手機自適應主要分為兩種情況:橫屏和豎屏的切換,以及分辨率大小的不同。

   2.1橫屏和豎屏的切換
    1、Android應用程序支持橫豎屏幕的切換,Android中每次屏幕的切換動會重啟Activity,所以應該在Activity銷毀(執行onPause()方法和onDestroy()方法)前保存當前活動的狀態;在Activity再次創建的時候載入配置,那樣,進行中的游戲就不會自動重啟了!有的程序適合從豎屏切換到橫屏,或者反過來,這個時候怎麼辦呢?可以在配置Activity的地方進行如下的配置android:screenOrientation="portrait"(landscape是橫向,portrait是縱向)。這樣就可以保證是豎屏總是豎屏了。
       2、而有的程序是適合橫豎屏切換的。如何處理呢?首先要在配置Activity的時候進行如下的配置:
android:configChanges="keyboardHidden|orientation",另外需要重寫Activity的onConfigurationChanged方法。實現方式如下:

    @Override
public void onConfigurationChanged(Configuration newConfig){
    super.onConfigurationChanged(newConfig);
    if(this.getResources().getConfiguration().orientation==Configuration.ORIENTATION_LANDSCAPE){
        //TODO
    }else if(
        this.getResources().getConfiguration().orientation==Configuration.ORIENTATION_PORTRAIT){
        //TODO
    }
}

2.2 分辨率大小不同
      對於分辨率問題,官方給的解決辦法是創建不同的layout文件夾,這就需要對每種分辨率的手機都要寫一個布局文件,雖然看似解決了分辨率的問題,但是如果其中一處或多處有修改了,就要每個布局文件都要做出修改,這樣就造成很大的麻煩。那麼可以通過以下幾種方式解決:
       一)使用layout_weight
       目前最為推薦的Android多屏幕自適應解決方案。
       該屬性的作用是決定控件在其父布局中的顯示權重,一般用於線性布局中。其值越小,則對應的layout_width或layout_height的優先級就越高(一般到100作用就不太明顯了);一般橫向布局中,決定的是layout_width的優先級;縱向布局中,決定的是layout_height的優先級。
       傳統的layout_weight使用方法是將當前控件的layout_width和layout_height都設置成fill_parent,這樣就可以把控件的顯示比例完全交給layout_weight;這樣使用的話,就出現了layout_weight越小,顯示比例越大的情況(即權重越大,顯示所占的效果越小)。不過對於2個控件還好,如果控件過多,且顯示比例也不相同的時候,控制起來就比較麻煩了,畢竟反比不是那麼好確定的。於是就有了現在最為流行的0px設值法。看似讓人難以理解的layout_height=0px的寫法,結合layout_weight,卻可以使控件成正比例顯示,輕松解決了當前Android開發最為頭疼的碎片化問題之一。
       二)清單文件配置:【不建議使用這種方式,需要對不同的界面寫不同的布局】
       需要在AndroidManifest.xml文件的元素如下添加子元素


    以上是為我們的屏幕設置多分辨率支持(更准確的說是適配大、中、小三種密度)。
       Android:anyDensity="true",這一句對整個的屏幕都起著十分重要的作用,值為true,我們的應用程序當安裝在不同密度的手機上時,程序會分別加載hdpi,mdpi,ldpi文件夾中的資源。相反,如果值設置為false,即使我們在hdpi,mdpi,ldpi,xdpi文件夾下擁有同一種資源,那麼應用也不會自動地去相應文件夾下尋找資源。而是會在大密度和小密度手機上加載中密度mdpi文件中的資源。
       有時候會根據需要在代碼中動態地設置某個值,可以在代碼中為這幾種密度分別設置偏移量,但是這種方法最好不要使用,最好的方式是在xml文件中不同密度的手機進行分別設置。這裡地圖的偏移量可以在values-xpdi,values-hpdi,values-mdpi,values-ldpi四種文件夾中的dimens.xml文件進行設置。
       三)、其他:
       說明:
       在不同分辨率的手機模擬器下,控件顯示的位置會稍有不同
       通過在layout中定義的布局設置的參數,使用dp(dip),會根據不同的屏幕分辨率進行適配
       但是在代碼中的各個參數值,都是使用的像素(px)為單位的
       技巧:
       1、盡量使用線性布局,相對布局,如果屏幕放不下了,可以使用ScrollView(可以上下拖動)
       ScrowView使用的注意:
       在不同的屏幕上顯示內容不同的情況,其實這個問題我們往往是用滾動視圖來解決的,也就是ScrowView;需要注意的是ScrowView中使用layout_weight是無效的,既然使用ScrowView了,就把它裡面的控件的大小都設成固定的吧。
       2、指定寬高的時候,采用dip的單位,dp單位動態匹配
       3、由於android代碼中寫的單位都是像素,所有需要通過工具類進行轉化
       4、盡量使用9-patch圖,可以自動的依據圖片上面顯示的內容被拉伸和收縮。其中在編輯的時候,灰色區域是被拉伸的,上下兩個點控制水平方向的拉伸,左右兩點控制垂直方向的拉伸
    3、dp和px之間的關系

       dp:是dip的簡寫,指密度無關的像素。
       指一個抽象意義上的像素,程序用它來定義界面元素。一個與密度無關的,在邏輯尺寸上,與一個位於像素密度為160dpi的屏幕上的像素是一致的。要把密度無關像素轉換為屏幕像素,可以用這樣一個簡單的公式:pixels=dips*(density/160)。舉個例子,在DPI為240的屏幕上,1個DIP等於1.5個物理像素。
       布局時最好使用dp來定義我們程序的界面,因為這樣可以保證我們的UI在各種分辨率的屏幕上都可以正常顯示。
    /**
    * 根據手機的分辨率從 px(像素) 的單位 轉成為 dp
    */
public static int px2dip(Context context, float pxValue) {
    final float scale = context.getResources().getDisplayMetrics().density;
    return (int) (pxValue / scale + 0.5f);
}
/**
* 根據手機的分辨率從 dip 的單位 轉成為 px(像素)
*/
public static int dip2px(Context context, float dpValue) {
    final float scale = context.getResources().getDisplayMetrics().density;
    return (int) (dpValue * scale + 0.5f);
}
設置APN
ContentValues values = new ContentValues();
values.put(NAME, "CMCC cmwap");
values.put(APN, "cmwap");
values.put(PROXY, "10.0.0.172");

values.put(PORT, "80");
values.put(MMSPROXY, "");
values.put(MMSPORT, "");
values.put(USER, "");
values.put(SERVER, "");
values.put(PASSWORD, "");
values.put(MMSC, "");
values.put(TYPE, "");
values.put(MCC, "460");
values.put(MNC, "00");
values.put(NUMERIC, "46000");
reURI = getContentResolver().insert(Uri.parse("content://telephony/carriers"), values);
//首選接入點"content://telephony/carriers/preferapn"
調節屏幕亮度
public void setBrightness(int level) {
    ContentResolver cr = getContentResolver();
    Settings.System.putInt(cr, "screen_brightness", level);
    Window window = getWindow();
    LayoutParams attributes = window.getAttributes();
    float flevel = level;
    attributes.screenBrightness = flevel / 255;
    getWindow().setAttributes(attributes);
}
重啟
第一,root權限,這是必須的
第二,Runtime.getRuntime().exec("su -c reboot");
第三,模擬器上運行不出來,必須真機
第四,運行時會提示你是否加入列表 , 同意就好
拍照、錄音、錄像
package com.cons.dcg.collect;

import java.io.File;
import java.text.SimpleDateFormat;
import java.util.*;
import android.app.*;
import android.content.Intent;
import android.database.Cursor;
import android.net.Uri;
import android.os.AsyncTask;
import android.os.Bundle;
import android.os.Environment;
import android.provider.MediaStore;
import android.view.*;
import android.widget.*;

public class RecordActivity extends Activity implements OnClickListener {

        private static final int RESULT_CAPTURE_IMAGE = 1;// 照相的requestCode
        private static final int REQUEST_CODE_TAKE_VIDEO = 2;// 攝像的照相的requestCode
        private static final int RESULT_CAPTURE_RECORDER_SOUND = 3;// 錄音的requestCode

        private String strImgPath = "";// 照片文件絕對路徑
        private String strVideoPath = "";// 視頻文件的絕對路徑
        private String strRecorderPath = "";// 錄音文件的絕對路徑

        @Override
        protected void onCreate(Bundle savedInstanceState) {
                super.onCreate(savedInstanceState);
                this.setContentView(R.layout.problem_report);
        }

        @Override
        protected void onActivityResult(int requestCode, int resultCode, Intent data) {
                super.onActivityResult(requestCode, resultCode, data);
                switch (requestCode) {
                case RESULT_CAPTURE_IMAGE://拍照
                        if (resultCode == RESULT_OK) {
                                Toast.makeText(this, strImgPath, Toast.LENGTH_SHORT).show();
                        }
                        break;
                case REQUEST_CODE_TAKE_VIDEO://拍攝視頻
                        if (resultCode == RESULT_OK) {
                                Uri uriVideo = data.getData();
                                Cursor cursor=this.getContentResolver().query(uriVideo, null, null, null, null);
                                if (cursor.moveToNext()) {
                                        /** _data:文件的絕對路徑 ,_display_name:文件名 */
                                        strVideoPath = cursor.getString(cursor.getColumnIndex("_data"));
                                        Toast.makeText(this, strVideoPath, Toast.LENGTH_SHORT).show();
                                }
                        }
                        break;
                case RESULT_CAPTURE_RECORDER_SOUND://錄音
                        if (resultCode == RESULT_OK) {
                                Uri uriRecorder = data.getData();
                                Cursor cursor=this.getContentResolver().query(uriRecorder, null, null, null, null);
                                if (cursor.moveToNext()) {
                                        /** _data:文件的絕對路徑 ,_display_name:文件名 */
                                        strRecorderPath = cursor.getString(cursor.getColumnIndex("_data"));
                                        Toast.makeText(this, strRecorderPath, Toast.LENGTH_SHORT).show();
                                }
                        }
                        break;
                }
        }
        /**
         * 照相功能
         */
        private void cameraMethod() {
                Intent imageCaptureIntent = new Intent(MediaStore.ACTION_IMAGE_CAPTURE);
                strImgPath = Environment.getExternalStorageDirectory().toString() + "/CONSDCGMPIC/";//存放照片的文件夾
                String fileName = new SimpleDateFormat("yyyyMMddHHmmss").format(new Date()) + ".jpg";//照片命名
                File out = new File(strImgPath);
                if (!out.exists()) {
                        out.mkdirs();
                }
                out = new File(strImgPath, fileName);
                strImgPath = strImgPath + fileName;//該照片的絕對路徑
                Uri uri = Uri.fromFile(out);
                imageCaptureIntent.putExtra(MediaStore.EXTRA_OUTPUT, uri);
                imageCaptureIntent.putExtra(MediaStore.EXTRA_VIDEO_QUALITY, 1);
                startActivityForResult(imageCaptureIntent, RESULT_CAPTURE_IMAGE);

        }

        /**
         * 拍攝視頻
         */
        private void videoMethod() {
                Intent intent = new Intent(MediaStore.ACTION_VIDEO_CAPTURE);
                intent.putExtra(MediaStore.EXTRA_VIDEO_QUALITY, 0);
                startActivityForResult(intent, REQUEST_CODE_TAKE_VIDEO);
        }

        /**
         * 錄音功能
         */
        private void soundRecorderMethod() {
                Intent intent = new Intent(Intent.ACTION_GET_CONTENT);
                intent.setType("audio/amr");
                startActivityForResult(intent, RESULT_CAPTURE_RECORDER_SOUND);
        }

        /**
         * 提示信息
         * @param text
         * @param duration
         */
        private void showToast(String text, int duration) {
                Toast.makeText(ProblemReport.this, text, duration).show();
        }
}
隱藏軟鍵盤
getWindow().setSoftInputMode(WindowManager.LayoutParams.SOFT_INPUT_ADJUST_RESIZE | WindowManager.LayoutParams.SOFT_INPUT_STATE_HIDDEN);
隱藏以及顯示軟鍵盤以及不自動彈出鍵盤的方法
1、//隱藏軟鍵盤

((InputMethodManager)getSystemService(INPUT_METHOD_SERVICE)).hideSoftInputFromWindow(WidgetSearchActivity.this.getCurrentFocus().getWindowToken(), InputMethodManager.HIDE_NOT_ALWAYS);

2、//顯示軟鍵盤,控件ID可以是EditText,TextView

((InputMethodManager)getSystemService(INPUT_METHOD_SERVICE)).showSoftInput(控件ID, 0);
BitMap、Drawable、inputStream及byte[] 互轉
(1) BitMap  to   inputStream:
    ByteArrayOutputStream baos = new ByteArrayOutputStream();
    bm.compress(Bitmap.CompressFormat.PNG, 100, baos);
    InputStream isBm = new ByteArrayInputStream(baos .toByteArray());

 (2)BitMap  to   byte[]:
  Bitmap defaultIcon = BitmapFactory.decodeStream(in);
  ByteArrayOutputStream stream = new ByteArrayOutputStream();
  defaultIcon.compress(Bitmap.CompressFormat.JPEG, 100, stream);
  byte[] bitmapdata = stream.toByteArray();
 (3)Drawable  to   byte[]:
  Drawable d; // the drawable (Captain Obvious, to the rescue!!!)
  Bitmap bitmap = ((BitmapDrawable)d).getBitmap();
  ByteArrayOutputStream stream = new ByteArrayOutputStream();
  defaultIcon.compress(Bitmap.CompressFormat.JPEG, 100, bitmap);
  byte[] bitmapdata = stream.toByteArray();

(4)byte[]  to  Bitmap :
  Bitmap bitmap =BitmapFactory.decodeByteArray(byte[], 0,byte[].length);
drawable轉bitmap
/**
     * drawable?bitmap
     *
     * @param drawable
     * @return
     */
    private Bitmap drawableToBitamp(Drawable drawable)
    {
        if (drawable instanceof BitmapDrawable)
        {
            BitmapDrawable bd = (BitmapDrawable) drawable;
            return bd.getBitmap();
        }
        int w = drawable.getIntrinsicWidth();
        int h = drawable.getIntrinsicHeight();
        Bitmap bitmap = Bitmap.createBitmap(w, h, Bitmap.Config.ARGB_8888);
        Canvas canvas = new Canvas(bitmap);
        drawable.setBounds(0, 0, w, h);
        drawable.draw(canvas);
        return bitmap;
    }
Android目錄結構
data
app:用戶安裝的應用 data:應用的專屬文件夾 system:系統的配置信息,注冊表文件 anr:anr異常的記錄信息dev:devices的縮寫
存放設備所對應的文件mnt:mount的縮寫
掛載在系統上的設備:sdcard,u盤proc:硬件配置,狀態信息
cpuinfo、meminfosbin:system bin
系統重要的二進制執行文件 adbd:服務器的adb進程system:
app:存放系統應用,默認不能刪除 bin:Android中可執行的linux指令文件 etc:host:主機名和ip地址的映射 fonts:Android中自帶的字體 framework:存放谷歌提供的java api lib:核心功能的類庫,C/C++文件 media/audio:存放Android的音效文件 tts:語音發聲引擎,默認不支持中文 usr:用戶設備的配置信息,鍵盤編碼和按鍵編碼的映射 xbin:是專為開發人員准備的二進制指令Android下的Linux指令
su:superuserAndroid中特有的指令
am:ActivityManager,可以進行跟activity相關的操作
am start -n com.test.createfile/com.test.createfile.MainActivity:開啟指定Activity am kill com.test.createfile:結束非前台進程 am force-stop com.test.createfile:結束進程pm:PackageManager
pm disable 包名:凍結指定應用 pm enable 包名:解凍指定應用monkey -p com.test.createfile 1000:自動點擊指定應用1000次
刷模擬器,rom寫文件(su)
如果想讓真實手機運行這些指令,手機必須要有root權限 刷root原理:把su二進制文件拷貝到/system/bin或者/system/xbin Android刷root軟件,工作的原理全部都是利用系統的漏洞實現 rom:可以理解為android系統的安裝文件 把su文件和superuser.apk寫入img文件 執行su指令修改字體
把ttf文件刷進img中 Android系統默認的中文字體為DroidSansFallBack.ttf 用你想使用的字體ttf文件替換掉這個文件即可修改開機動畫
從真機中得到bootanimation.zip 把bootanimation.zip放入system/media目錄下刪除鎖屏密碼
刪除data/system下的key文件關於9path

上傳代碼到github
1、github創建庫
2、進入創建好的Android項目目錄
3、配置郵箱和用戶名,這樣就可以表示是誰提交的了
git config --global user.name "Lemoner"
git config --flobal user.email "[email protected]"
4、開始拷貝下來的GitHub倉庫地址了,把它拷貝過來
git clone https://github.com/Lemoner/demo.git
5、看到一個跟GitHub倉庫同名的目錄,把裡面的文件都拷貝到上一級目錄,GitHub的同名目錄就可以刪掉了。
   下面輸入命令將文件添加進版本控制:
    git add .
注意add後面的空格是一定要加的,不然會報錯。
添加進來之後,執行提交命令
    git commit -m "My First Commit"
這樣就將修改提交到了本地倉庫
接下來將本地倉庫內容上傳到GitHub上
    git push origin master
最後一步如果沒有登錄可能需要你的GitHub密碼,直接按照提示輸入就好了
 Android跑馬燈MarqueeView源碼解析
跑馬燈效果,大家可以去原作者浏覽https://github.com/sfsheng0322/MarqueeView 下面看自定義控件的代碼public class Ma
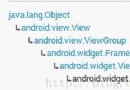
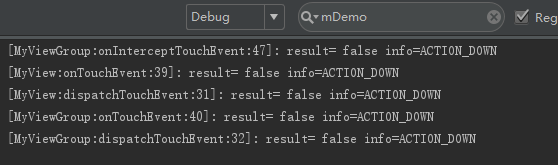 Android開發-分析ViewGroup、View的事件分發機制、結合職責鏈模式
介紹介紹了職責鏈模式,作為理解View事件分發機制的基礎。套用職責鏈模式的結構分析,當我們的手指在屏幕上點擊或者滑動,就是一個事件,每個顯示在屏幕上的View或者View
 如何在ES文件浏覽器內使用網盤
如何在ES文件浏覽器內使用網盤。是一款多功能的手機文件/程序/進程管理器,可以在手機、電腦、遠程和藍牙間浏覽管理文件,是一個功能強大的免費的本地和網絡文件管
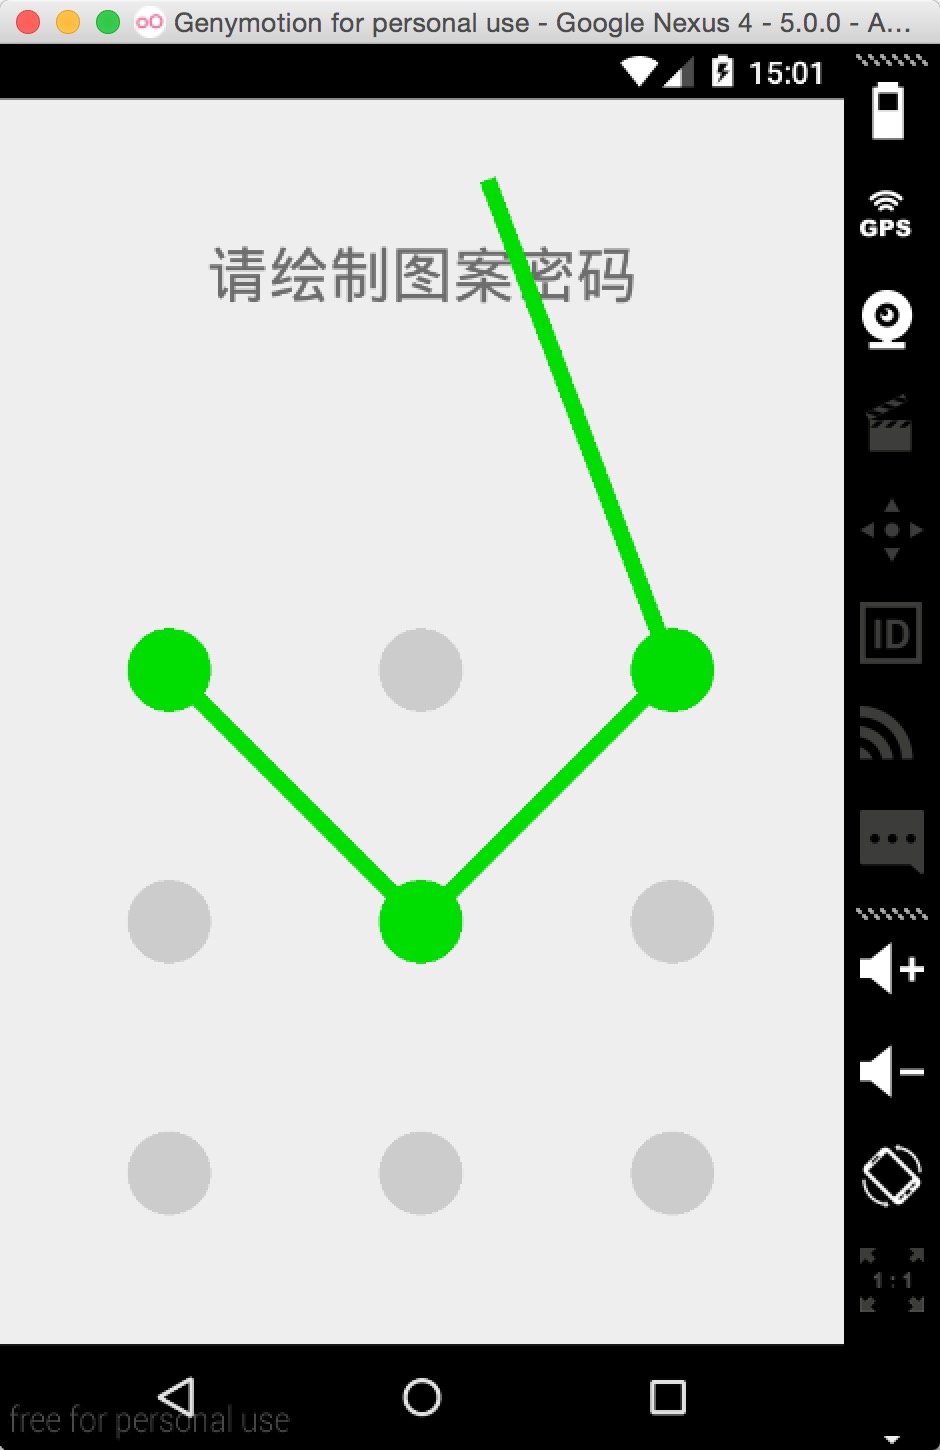 Android中圖案鎖的實現
很多品牌的Android手機都實現了圖案解鎖屏幕的功能,有些應用程序出於保護的目的也使用了圖案鎖(比如支付寶),本文將介紹一種圖案鎖的實現方式,這種實現的一個優勢在於方便