編輯:關於Android編程
什麼是RemoteViews?從字面意思可以理解為遠程View。需要注意的是,RemoteViews並不是View的子類,它是Object的子類。它的作用是可以跨進程更新界面,是不是功能很強大?它在實際應用中主要在通知欄和桌面小控件,下面就全部基於通知欄來分析。


定義了兩個按鈕,分別用來發送不同的通知
java代碼
    case R.id.btn_normal:
            //1.創建通知對象
            Notification nf = new Notification() ;
            //2.通知的一些常用設置
            //圖標
            nf.icon = R.drawable.ic_launcher ;
            //通知時間
            nf.when = System.currentTimeMillis();
            //消息來臨時顯示的提示信息
            nf.tickerText = "這是普通的通知";
            //設置通知自動取消
            nf.flags = Notification.FLAG_AUTO_CANCEL;
            //3.創建延時意圖
            Intent intent = new Intent(this,NormalNotificationActivity.class);
            PendingIntent pi = PendingIntent.getActivity(this, 0, intent, PendingIntent.FLAG_UPDATE_CURRENT);
            //
            nf.setLatestEventInfo(this, "普通通知", "這是來自普通通知的摘要信息", pi);
            //4.創建notificationmanager對象
            NotificationManager nm = (NotificationManager) getSystemService(NOTIFICATION_SERVICE);
            //這裡的id最好保證每次都是不一樣的,否則第二次發送無效
            nm.notify(nId++ , nf);
            break;
這只是一個簡單的通知,並沒有涉及RemoteViews,主要是知道普通的通知應該如何書寫。
    case R.id.btn_zdy:
            //1.創建通知對象
            Notification myNf = new Notification() ;
            //2.通知的一些常用設置
            //圖標
            myNf.icon = R.drawable.ic_launcher ;
            //通知時間
            myNf.when = System.currentTimeMillis();
            myNf.tickerText = "這是自定義的通知";
            myNf.flags = Notification.FLAG_AUTO_CANCEL;
            //3.創建延時意圖
            Intent myIntent = new Intent(this,NormalNotificationActivity.class);
            PendingIntent myPi = PendingIntent.getActivity(this, 0, myIntent, PendingIntent.FLAG_UPDATE_CURRENT);
            /**
             * 注意:這個字段是要配合nf.contentView這個字段一起使用的,如果只是設置一個會報錯
             * nf.contentIntent = pi ;
             */
            /******************
             *沒有設置contentIntent時:java.lang.IllegalArgumentException: contentIntent required: pkg=com.lw.remoteviewsdemo id=0 notification=Notification(vibrate=null,sound=null,defaults=0x0,flags=0x10)
             * ****************************/
            //4.創建RemoteViews
            RemoteViews rv = new RemoteViews(getPackageName(),R.layout.activity_mynotification);

            //給remoteviews手動設置值
            rv.setTextViewText(R.id.msg, "我是自定義通知");
            rv.setTextViewText(R.id.des, "我是對自定義通知的一些簡單描述信息");

            myNf.contentView = rv ;
            myNf.contentIntent = myPi ;
            //5.創建notificationmanager對象
            NotificationManager myNm= (NotificationManager) getSystemService(NOTIFICATION_SERVICE);
            //這裡的id最好保證每次都是不一樣的,否則第二次發送無效
            myNm.notify(nId++ , myNf);
            break;
這是自定義通知,上面的都有注釋,就幾個注意的地方說下,使用自定義通知需要為通知的這兩個屬性賦值,否則就會報上面提到的異常,少一個都不行。
    myNf.contentView = rv ;
    myNf.contentIntent = myPi ;
還有一點就是在通知myNm.notify(nId++ , myNf)的第一個參數不要設置為一個常量,否則只能發送一個通知。
在概述中提到,RemoteViews是跨進程更新UI的,也就是通過Binder,那麼也就是說RemoteViews肯定實現了序列化接口,看源碼:
public class RemoteViews implements Parcelable, Filter
再看上面的例子,RemoteViews是如何自定義一些文本內容的呢,大部分都是通過setTextViewText()等方法完成的,看源碼
    public void setTextViewText(int viewId, CharSequence text) {
        setCharSequence(viewId, "setText", text);
    }
調用了setCharSequence方法,注意:這裡的第二個參數是setText,是不是和TextView的setText很像呢,點進去
    public void setCharSequence(int viewId, String methodName, CharSequence value) {
        addAction(new ReflectionAction(viewId, methodName, ReflectionAction.CHAR_SEQUENCE, value));
    }
那麼ReflectionAction又是什麼東西呢?從字面可以理解為反射動作。
    /**
     * Base class for the reflection actions.
     */
    private class ReflectionAction extends Action {
        static final int TAG = 2;

        static final int BOOLEAN = 1;
        static final int BYTE = 2;
        static final int SHORT = 3;
        static final int INT = 4;
        static final int LONG = 5;
        static final int FLOAT = 6;
        static final int DOUBLE = 7;
        static final int CHAR = 8;
        static final int STRING = 9;
        static final int CHAR_SEQUENCE = 10;
        static final int URI = 11;
        // BITMAP actions are never stored in the list of actions. They are only used locally
        // to implement BitmapReflectionAction, which eliminates duplicates using BitmapCache.
        static final int BITMAP = 12;
        static final int BUNDLE = 13;
        static final int INTENT = 14;
從源碼可以看出,它是Action的子類,從注釋可以看出它是反射類的基類,通過之前傳遞過來的setText來進行反射獲取信息,這個類需要配合一會分析的RemoteViews的apply()方法配合看。再回到前面的addAction方法
     /**
     * Add an action to be executed on the remote side when apply is called.
     *
     * @param a The action to add
     */
    private void addAction(Action a) {
        if (hasLandscapeAndPortraitLayouts()) {
            throw new RuntimeException("RemoteViews specifying separate landscape and portrait" +
                    " layouts cannot be modified. Instead, fully configure the landscape and" +
                    " portrait layouts individually before constructing the combined layout.");
        }
        if (mActions == null) {
            mActions = new ArrayList();
        }
        mActions.add(a);

        // update the memory usage stats
        a.updateMemoryUsageEstimate(mMemoryUsageCounter);
    }
可以看出,系統首先判斷mActions是否為null,如果為null,則創建一個存放Action的List集合,然後就將傳遞過來的Action添加到mActions中。再來看一些Action源碼
    /**
     * Base class for all actions that can be performed on an
     * inflated view.
     *
     *  SUBCLASSES MUST BE IMMUTABLE SO CLONE WORKS!!!!!
     */
    private abstract static class Action implements Parcelable {
        public abstract void apply(View root, ViewGroup rootParent,
                OnClickHandler handler) throws ActionException;

        public static final int MERGE_REPLACE = 0;
        public static final int MERGE_APPEND = 1;
        public static final int MERGE_IGNORE = 2;

        public int describeContents() {
            return 0;
        }

        /**
         * Overridden by each class to report on it's own memory usage
         */
        public void updateMemoryUsageEstimate(MemoryUsageCounter counter) {
            // We currently only calculate Bitmap memory usage, so by default, don't do anything
            // here
            return;
        }

        public void setBitmapCache(BitmapCache bitmapCache) {
            // Do nothing
        }

        public int mergeBehavior() {
            return MERGE_REPLACE;
        }

        public abstract String getActionName();

        public String getUniqueKey() {
            return (getActionName() + viewId);
        }

        int viewId;
    }
從注釋可以看出它是一個在被填充的展現出來的所有Action的基類,實現Parcelable接口。
簡單來說setTextViewText(int viewId, CharSequence text) 方法首先將其封裝成一個動作Action類,然後添加到一個actions集合中去。
接著,再來看看RemoteViews的apply方法
    public View apply(Context context, ViewGroup parent) {
        return apply(context, parent, null);
    }
再點進去
    public View apply(Context context, ViewGroup parent, OnClickHandler handler) {
        RemoteViews rvToApply = getRemoteViewsToApply(context);

        View result;

        Context c = prepareContext(context);

        LayoutInflater inflater = (LayoutInflater)
                c.getSystemService(Context.LAYOUT_INFLATER_SERVICE);

        inflater = inflater.cloneInContext(c);
        inflater.setFilter(this);

        result = inflater.inflate(rvToApply.getLayoutId(), parent, false);

        rvToApply.performApply(result, parent, handler);

        return result;
    }
首先,通過上下文獲取RemoteViews,然後調用performApply()方法,再看下performApply()源碼
    private void performApply(View v, ViewGroup parent, OnClickHandler handler) {
        if (mActions != null) {
            handler = handler == null ? DEFAULT_ON_CLICK_HANDLER : handler;
            final int count = mActions.size();
            for (int i = 0; i < count; i++) {
                Action a = mActions.get(i);
                a.apply(v, parent, handler);
            }
        }
    }
這裡就可以看出來了,首先判斷mActions集合是否為null,不為null,依次遍歷actions,然後將處理交給action的apply方法,由於之前我調用的是setTextViewText方法,在那裡添加的action的是ReflectionAction,所以這裡查看的是ReflectionAction的apply方法,
     @Override
        public void apply(View root, ViewGroup rootParent, OnClickHandler handler) {
            final View view = root.findViewById(viewId);
            if (view == null) return;

            Class param = getParameterType();
            if (param == null) {
                throw new ActionException("bad type: " + this.type);
            }

            Class klass = view.getClass();
            Method method;
            try {
                method = klass.getMethod(this.methodName, getParameterType());
            }
            catch (NoSuchMethodException ex) {
                throw new ActionException("view: " + klass.getName() + " doesn't have method: "
                        + this.methodName + "(" + param.getName() + ")");
            }

            if (!method.isAnnotationPresent(RemotableViewMethod.class)) {
                throw new ActionException("view: " + klass.getName()
                        + " can't use method with RemoteViews: "
                        + this.methodName + "(" + param.getName() + ")");
            }

            try {
                //noinspection ConstantIfStatement
                if (false) {
                    Log.d(LOG_TAG, "view: " + klass.getName() + " calling method: "
                        + this.methodName + "(" + param.getName() + ") with "
                        + (this.value == null ? "null" : this.value.getClass().getName()));
                }
                method.invoke(view, this.value);
            }
            catch (Exception ex) {
                throw new ActionException(ex);
            }
        }
從上面的代碼可以看出,主要是通過反射來執行代碼,而方法名之前也已經有了,只需要調用invoke即可。OK,這就是RemoteViews的大致流程了。下面就這種思想使用RemoteViews來實現一個跨進程更新UI的例子
創建兩個應用,一個作為本地,一個作為遠程,當然如果想要在一個應用使用兩個Activity實現也是可以的,只需要在其中一個你想要的Activity作為遠程Activity中的配置文件中指定以下代碼即可,我這裡就是使用兩個應用,效果觀看更加明顯。
android:process=":remote"
通知欄的跨進程是通過Binder實現的,我這裡就通過廣播接受者來實現。OK,上代碼
本地布局文件
子LinearLayout是用來存放從遠程傳遞過來的布局的。
本地java代碼
    public class MainActivity extends Activity {
    private IntentFilter filter;
    @Override
    protected void onCreate(Bundle savedInstanceState) {
        super.onCreate(savedInstanceState);
        setContentView(R.layout.activity_main);
        ll_layout = (LinearLayout) findViewById(R.id.ll_layout);
        filter = new IntentFilter("com.lw.remoteviewstest1");
        registerReceiver(mRemoteViewsReceiver, filter);

    }

    private BroadcastReceiver mRemoteViewsReceiver = new BroadcastReceiver() {
        @Override
        public void onReceive(Context context, Intent intent) {
            RemoteViews remoteViews = intent
                    .getParcelableExtra("remoteViews");
            if (remoteViews != null) {
                updateLayout(remoteViews);
            }
        }
    };
    private LinearLayout ll_layout;

    @Override
    protected void onDestroy() {
        super.onDestroy();
        //反注冊廣播接受者
        if(mRemoteViewsReceiver != null ){
            unregisterReceiver(mRemoteViewsReceiver);
        }
    }
    /**
     * 根據remoteViews更新ui
     * @param remoteViews
     */
    protected void updateLayout(RemoteViews remoteViews) {
        View view = remoteViews.apply(this, ll_layout);
        ll_layout.addView(view);
    };

}
主要在onCreate動態創建一個廣播接收者,然後再onDestory中反注冊,當從遠程獲取到remoteViews的時候調用updateLayout的方法,通過remoteViews的apply方法,這個方法前面已經詳細分析了,就不在談了。
遠程布局文件
遠程java代碼
     public void send(View view){
        //創建remoteviews
        RemoteViews rv = new RemoteViews(getPackageName(),R.layout.activity_notification);
        //創建intent,設置當點擊按鈕時要跳轉的Activity
        Intent sendIntent = new Intent(this,SecondActivity.class);
        //創建延時意圖
        PendingIntent pendingIntent = PendingIntent.getActivity(this, 0, sendIntent, PendingIntent.FLAG_UPDATE_CURRENT);
        //為延時意圖中的按鈕設置點擊事件
        rv.setOnClickPendingIntent(R.id.btn_toast, pendingIntent) ;
        //創建隱式跳轉
        Intent intent = new Intent("com.lw.remoteviewstest1");
        //將RemoteViews帶到應用一中去
        intent.putExtra("remoteViews", rv);
        //發送廣播
        sendBroadcast(intent);
    }
這裡提下,如果想要為remoteviews添加點擊事件,則必須使用PendingIntent,其實最後還是通過添加action,不過這裡的action不是前面提到的反射action,而是SetOnClickPendingIntent,我們可以看下這個類的apply方法,這裡只需要看最後一個代碼,最後調用了setOnclickListener方法,其它的注釋都比較詳細,就不說了。
     @Override
        public void apply(View root, ViewGroup rootParent, final OnClickHandler handler) {
            final View target = root.findViewById(viewId);
            if (target == null) return;

            // If the view is an AdapterView, setting a PendingIntent on click doesn't make much
            // sense, do they mean to set a PendingIntent template for the AdapterView's children?
            if (mIsWidgetCollectionChild) {
                Log.w(LOG_TAG, "Cannot setOnClickPendingIntent for collection item " +
                        "(id: " + viewId + ")");
                ApplicationInfo appInfo = root.getContext().getApplicationInfo();

                // We let this slide for HC and ICS so as to not break compatibility. It should have
                // been disabled from the outset, but was left open by accident.
                if (appInfo != null &&
                        appInfo.targetSdkVersion >= Build.VERSION_CODES.JELLY_BEAN) {
                    return;
                }
            }

            if (target != null) {
                // If the pendingIntent is null, we clear the onClickListener
                OnClickListener listener = null;
                if (pendingIntent != null) {
                    listener = new OnClickListener() {
                        public void onClick(View v) {
                            // Find target view location in screen coordinates and
                            // fill into PendingIntent before sending.
                            final float appScale = v.getContext().getResources()
                                    .getCompatibilityInfo().applicationScale;
                            final int[] pos = new int[2];
                            v.getLocationOnScreen(pos);

                            final Rect rect = new Rect();
                            rect.left = (int) (pos[0] * appScale + 0.5f);
                            rect.top = (int) (pos[1] * appScale + 0.5f);
                            rect.right = (int) ((pos[0] + v.getWidth()) * appScale + 0.5f);
                            rect.bottom = (int) ((pos[1] + v.getHeight()) * appScale + 0.5f);

                            final Intent intent = new Intent();
                            intent.setSourceBounds(rect);
                            handler.onClickHandler(v, pendingIntent, intent);
                        }
                    };
                }
                target.setOnClickListener(listener);
            }
        }
Demo整體思路:遠程主要通過Intent攜帶RemoteViews傳遞到本地連接,本地連接獲取到RemoteViews之後,調用apply方法返回個View對象,這個view對象就是遠程RotateViews攜帶的布局,然後添加到本地對應的布局中去。
OK,這篇關於RemoteViews的學習總結就到這了
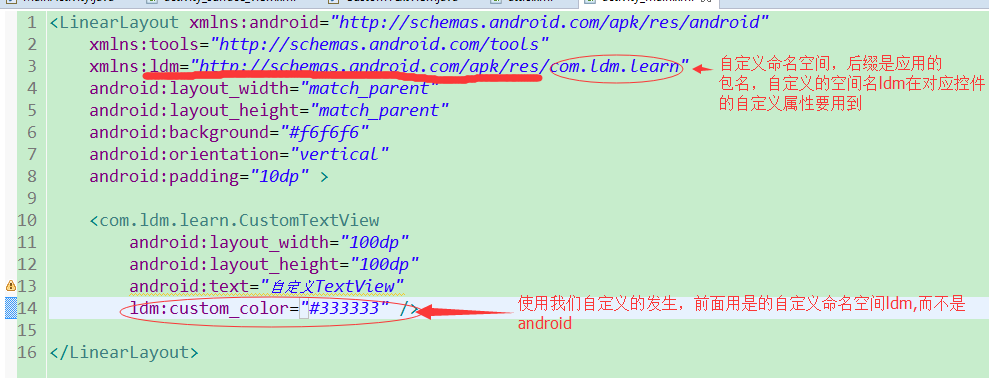 詳解Android自定義控件屬性
在Android開發中,往往要用到自定義的控件來實現我們的需求或效果。在使用自定義 控件時,難免要用到自定義屬性,那怎麼使用自定義屬性呢?在文件res/values/下新
 Android 圓形旋轉菜單
最近幫朋友做了一個動畫菜單,感覺有一定的實用價值,就在此給大家分享一下,先看看效果:源碼下載地址在末尾實現思路:從圖中可以看出,這三個(或更多,需要自己再實現)菜單是圍繞
 Android入門:多線程斷點下載詳細介紹
本案例在於實現文件的多線程斷點下載,即文件在下載一部分中斷後,可繼續接著已有進度下載,並通過進度條顯示進度。也就是說在文件開始下載的同時,自動創建每個線程的下載進度的本地
 高通Quick Charge 2.0快充技術從入門到精通
高通Quick Charge 2.0快充技術(下稱QC2.0),近日成為了我們關注的焦點,同時也是整個行業熱議的話題。在此之前快充只能通過提升電流的方式來達