編輯:關於Android編程
今天這篇文章,我們來看看Canvas。Canvas 是畫布,來響應繪畫(Draw)的調用(並將其寫入Btmap)。
我們先看看官方文檔對Canvas的描述:
The Canvas class holds the "draw" calls. To draw something, you need 4 basic components: A Bitmap to hold the pixels,
a Canvas to host the draw calls (writing into the bitmap), a drawing primitive (e.g. Rect, Path, text, Bitmap),
and a paint (to describe the colors and styles for the drawing).
簡單翻譯:Canvas 類持有Draw的調用。繪圖的時候,你需要4個基本的組件:一個包含像素的Btmap(位圖),一個Canvas 提供Draw調用(寫入到Btmap中),一個圖元(如矩形、路徑、文本、位圖),和一個畫筆(用來描述顏色和樣式為繪圖)。
Canvas類,前面已經簡單描述過。繪制的時候,需要用畫筆(Paint)在畫布(Canvas)上面繪畫(Draw)。
一.下面列舉一些Canvas(畫布)常用的繪制方法,
1 public void drawArc (float left, float top, float right, float bottom, float startAngle, float sweepAngle, boolean useCenter, Paint paint)
參數
  startAngle 	弧的開始的起始角(度)
  sweepAngle 	順時針測量的弧度(度)
  useCenter 	如果是真,包含圓弧的中心和如果它是描邊將關閉。這將是一個楔形。
  paint 	繪制弧形的畫筆
繪制指定的弧形,該圓弧將按比例縮小到指定的橢圓內。
2 public void drawCircle (float cx, float cy, float radius, Paint paint)
參數
  cx 	繪制的圓中心的x坐標
  cy 	繪制的圓中心的y坐標
  radius 繪制的圓半徑
  paint  繪制圓的畫筆
繪制指定圓使用指定的畫筆。如果半徑小於等於0,什麼都不繪制。圓將被填滿或者描線基於畫筆的樣式。
3 public void drawLine (float startX, float startY, float stopX, float stopY, Paint paint)
參數
  startX  線起始點的x坐標
  startY  線起始點的y坐標
  paint   繪制線的畫筆
繪制一條線段使用指定的起點、終點,x,y坐標,使用指定的畫筆。注意,一條線默認是實線,所以畫筆的樣式被忽略。退化線(長度為0)將不是繪制。
4 public void drawOval (float left, float top, float right, float bottom, Paint paint)
繪制指定的橢圓使用指定的畫筆。橢圓將被填充或者描線基於畫筆的樣式。
5 public void drawRGB (int r, int g, int b)
參數
  r 	 在畫布上繪制的紅色色值,取值范圍(0..255).
  g 	 在畫布上繪制的綠色色值,取值范圍(0..255).
  b 	 在畫布上繪制的藍色色值,取值范圍(0..255).
填充全部的畫布的位圖(限於當前剪輯)使用指定的RGB顏色。
6 public void drawRect (float left, float top, float right, float bottom, Paint paint)
參數
  left 	  要繪制的矩形的左邊
  top 	  要繪制的矩形的上邊
  right   要繪制的矩形的右邊
  bottom  要繪制的矩形的下邊
  paint   繪制區域的使用的畫筆
在指定的區域繪制使用指定的畫筆。矩形將被填充或者描邊基於畫筆的樣式。
7 public void drawRect (RectF rect, Paint paint)
參數
  rect    繪制的區域
  paint   繪制矩形的畫筆
在指定的區域繪制使用指定的畫筆。矩形將被填充或者描邊基於畫筆的樣式。
8 public void drawRect (Rect r, Paint paint)
參數
  r 	 繪制的矩形
  paint  繪制矩形的畫筆
在指定的區域繪制使用指定的畫筆。矩形將被填充或者描邊基於畫筆的樣式。
ps:
1. RectF類。
RectF holds four float coordinates for a rectangle. The rectangle is represented by the coordinates of its 4 edges (left, top, right bottom). These fields can be accessed directly. Use width() and height() to retrieve the rectangle's width and height. Note: most methods do not check to see that the coordinates are sorted correctly (i.e. left <= right and top <= bottom).
RectF 這個類包含一個矩形的四個單精度浮點坐標。矩形通過上下左右4個邊的坐標來表示一個矩形。這些坐標值屬性可以被直接訪問,用width()和 height()方法可以獲取矩形的寬和高。注意:大多數方法不會檢查這些坐標分類是否錯誤(也就是left<=right和top<=bottom).
RectF一共有四個構造方法:
RectF()構造一個無參的矩形
RectF(float left,float top,float right,float bottom)構造一個指定了4個參數的矩形
RectF(Rect F r)根據指定的RectF對象來構造一個RectF對象(對象的左邊坐標不變)
RectF(Rect r)根據給定的Rect對象來構造一個RectF對象
2. Rect類。
Rect holds four integer coordinates for a rectangle. The rectangle is represented by the coordinates of its 4 edges (left, top, right bottom). These fields can be accessed directly. Use width() and height() to retrieve the rectangle's width and height. Note: most methods do not check to see that the coordinates are sorted correctly (i.e. left <= right and top <= bottom).
Rect 這個類包含一個矩形的四個整形坐標。矩形通過上下左右4個邊的坐標來表示一個矩形。這些坐標值屬性可以被直接訪問,用width()和 height()方法可以獲取矩形的寬和高。注意:大多數方法不會檢查這些坐標分類是否錯誤(也就是left<=right和top<=bottom).
3. 二者的區別。
Rect類,這個類同RectF類很相似,不同的地方是Rect類的坐標是用整形表示的,而RectF類的坐標是用單精度浮點型表示的。
9  public void drawText (String text, float x, float y, Paint paint)
參數
  text 	繪制的文本
  x 	繪制文本的原點的x坐標
  y 	繪制文本的基線的y坐標
  paint 用於繪制文本的畫筆。(例如顏色、大小、樣式)
繪制文本,原點坐標(x,y),使用指定的畫筆。原點顯示是基於畫筆設置的對齊方式。
10 public void drawBitmap (Bitmap bitmap, Matrix matrix, Paint paint)
參數
  bitmap  繪制位圖
  matrix  繪制位圖時使用的矩陣
  paint   可能為控制。繪制位圖使用的畫筆
使用指定的矩陣繪制位圖
11 public boolean clipPath (Path path)
參數
  path 	與當前剪輯相交的路徑
返回值
  如果返回真,表示結果非空
指定的路徑與當前剪輯相交
12 public boolean clipRect (Rect rect, Region.Op op)
參數
  rect 	與當前剪輯相交的矩形
  op 	   如何剪輯
返回值
  如果返回真,表示剪輯結果非空
修建當前剪輯和指定的矩形,在局部坐標中表示。
13 public void drawBitmap (Bitmap bitmap, Matrix matrix, Paint paint)
參數
 bitmap  繪制的位圖
 matrix  當繪制位圖時需要轉變時使用的矩陣
 paint 	 可能為空.繪制位圖的畫筆.
使用指定的矩陣繪制位圖
14 public void drawBitmap (Bitmap bitmap, float left, float top, Paint paint)
參數
 bitmap  繪制的位圖
 left  開始繪制位圖時的左側位置
 top  開始繪制位圖時的上面位置
 paint  可能為空.繪制位圖的畫筆
繪制指定的位圖,它的上/左包含在內,使用指定的畫筆,通過當前矩陣變換。
15 public void translate (float dx, float dy)
參數
  dx 	x軸移動的距離
  dy 	y軸移動的距離
畫布平移。基於上次移動後的點為原點。初始值原點坐標為(0,0)
例子:畫布原點假如落在(0,0),那麼translate(10,10)就是在原點(0,0)基礎上分別在x軸、y軸移動10,則原點變為(10,10),再次調用translate(10,10),那麼原點變為(20,20)。
16 public int save ()
返回值
    The value to pass to restoreToCount() to balance this save()
    該值傳遞到restoreToCount()中權衡save()
保存當前的矩陣和切片到一個私有的棧中。隨後調用平移、縮放、旋轉、傾斜、連接或者剪輯,都將照常操作,但是當調用restore()後,所有的都將被遺棄,恢復到save()之前存在的狀態。
17 public void restore ()
恢復畫布到save()之前的狀態
ps:當我們對畫布進行旋轉,縮放,平移等操作的時候其實我們是想對特定的元素進行操作,比如圖片,一個矩形等,但是當你用canvas的方法來進行這些操作的時候,其實是對整個畫布進行了操作,那麼之後在畫布上的元素都會受到影響,所以我們在操作之前調用canvas.save()來保存畫布當前的狀態,當操作之後取出之前保存過的狀態,這樣就不會對其他的元素進行影響。
18 public void scale (float sx, float sy)
參數
sx 	X縮放的數值
sy 	Y縮放的數值
使用當前矩陣對畫布進行縮放
19 public final void scale (float sx, float sy, float px, float py)
參數
sx 	X縮放的數值
sy 	Y縮放的數值
px 	中心點的x坐標(未縮放)
py 	中心點的y坐標(未縮放)
使用當前矩陣對畫布進行縮放
ps:從源碼上可以非常清楚的看出scale (float sx, float sy, float px, float py)和scale(float sx , float sy)的差別:
以上就是Canvas (畫布)的常用Api,說了這麼多,可能還是有些抽象,下面,我們通過實際的例子來演示方法。
二. 例子。
1.新建Android項目。
2.自定義View。
public class View1 extends View {
private Paint mPaint = new Paint();
private int DEFAULT_STROKE_WIDTH = 10;// strokeWidth
private int DEFAULT_RADIUS = 30;// 半徑
private int DEFAULT_TEXT_SIZE = 20;//
private int mStrokeWidth = dp2px(DEFAULT_STROKE_WIDTH);
private int mRadius = dp2px(DEFAULT_RADIUS);
private int mTextSize = sp2px(DEFAULT_TEXT_SIZE);
RectF rect;// 矩形
public View1(Context context) {
this(context, null);
// TODO Auto-generated constructor stub
}
public View1(Context context, AttributeSet attrs) {
this(context, attrs, 0);
// TODO Auto-generated constructor stub
}
public View1(Context context, AttributeSet attrs, int defStyleAttr) {
super(context, attrs, defStyleAttr);
// TODO Auto-generated constructor stub
}
@Override
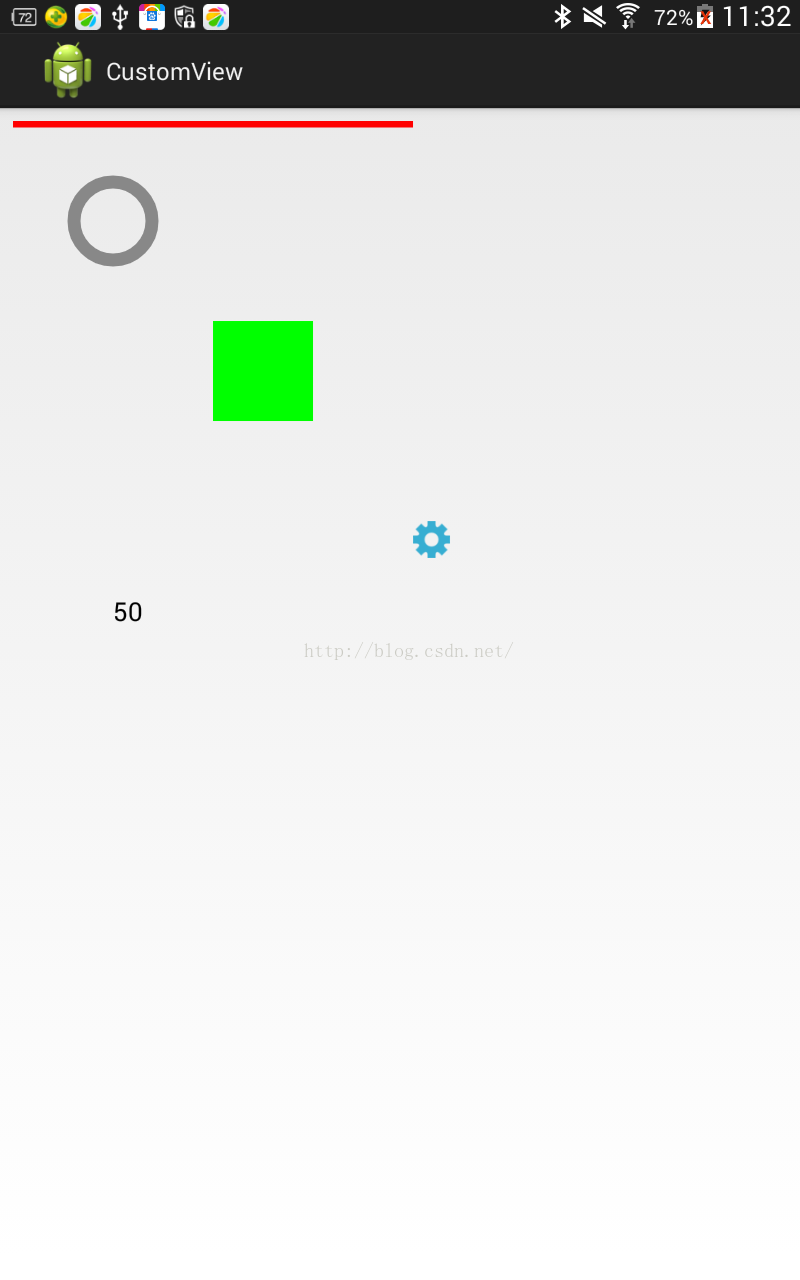
protected void onDraw(Canvas canvas) {
// TODO Auto-generated method stub
// 繪制一條線段
mPaint.setColor(Color.RED);// 設置畫筆顏色為白色
mPaint.setAntiAlias(true);// 坑鋸齒
mPaint.setStrokeWidth(mStrokeWidth);// 設置畫筆的寬度
canvas.drawLine(0, 0, 400, 0, mPaint);// 繪制一條線段
// 繪制空心圓
mPaint.setColor(Color.GRAY);// 設置畫筆顏色為藍色
mPaint.setAntiAlias(true);// 坑鋸齒
mPaint.setStyle(Style.STROKE);// 樣式是描邊
canvas.drawCircle(100, 100, mRadius, mPaint);// 繪制圓
// 繪制矩形
mPaint.setColor(Color.GREEN);// 設置畫筆顏色為綠色
mPaint.setStyle(Style.FILL);// 樣式是填充
rect = new RectF(200, 200, 300, 300);// 初始化矩形
canvas.drawRect(rect, mPaint);
Bitmap bitmap = BitmapFactory.decodeResource(getResources(),
R.drawable.setting);
canvas.drawBitmap(bitmap, 400, 400, mPaint);
// 繪制文字
mPaint.setColor(Color.BLACK);// 設置畫筆顏色為綠色
mPaint.setTextSize(mTextSize);// 設置畫筆文字的大小
canvas.drawText("50", 100, 500, mPaint);// 繪制文字
}
/**
* @param dpVal
* @return
*/
private int dp2px(int dpVal) {
return (int) TypedValue.applyDimension(TypedValue.COMPLEX_UNIT_DIP,
dpVal, getResources().getDisplayMetrics());
}
/**
* @param spVal
* @return
*/
private int sp2px(int spVal) {
return (int) TypedValue.applyDimension(TypedValue.COMPLEX_UNIT_SP,
spVal, getResources().getDisplayMetrics());
}
}
效果截圖,如下所示,
3.自定義View,展示畫布平移。
public class View3 extends View {
	private Paint mPaint = new Paint();
	private int DEFAULT_STROKE_WIDTH = 10;// strokeWidth
	private int DEFAULT_RADIUS = 30;// 半徑
	private int DEFAULT_TEXT_SIZE=20;//
	private int mStrokeWidth = dp2px(DEFAULT_STROKE_WIDTH);
	private int mRadius = dp2px(DEFAULT_RADIUS);
	private int mTextSize=sp2px(DEFAULT_TEXT_SIZE);
	RectF rect;// 矩形
	public View2(Context context) {
		this(context, null);
		// TODO Auto-generated constructor stub
	}
	public View2(Context context, AttributeSet attrs) {
		this(context, attrs, 0);
		// TODO Auto-generated constructor stub
	}
	public View2(Context context, AttributeSet attrs, int defStyleAttr) {
		super(context, attrs, defStyleAttr);
		// TODO Auto-generated constructor stub
	}
	@Override
	protected void onDraw(Canvas canvas) {
		// TODO Auto-generated method stub
		// 繪制一條線段
		mPaint.setColor(Color.RED);// 設置畫筆顏色為白色
		mPaint.setAntiAlias(true);// 坑鋸齒
		mPaint.setStrokeWidth(mStrokeWidth);// 設置畫筆的寬度
		rect = new RectF(0, 0, 200, 200);//初始化矩形
		canvas.drawRect(rect, mPaint);
		canvas.translate(50, 50);
		mPaint.setColor(Color.BLACK);// 設置畫筆顏色為白色
		canvas.drawRect(rect, mPaint);
		canvas.translate(50, 50);
		mPaint.setColor(Color.BLUE);// 設置畫筆顏色為白色
		canvas.drawRect(rect, mPaint);
	}
	/**
	 * @param dpVal
	 * @return
	 */
	private int dp2px(int dpVal) {
		return (int) TypedValue.applyDimension(TypedValue.COMPLEX_UNIT_DIP,
				dpVal, getResources().getDisplayMetrics());
	}
	/**
	 * @param spVal
	 * @return
	 */
	private int sp2px(int spVal) {
		return (int) TypedValue.applyDimension(TypedValue.COMPLEX_UNIT_SP,
				spVal, getResources().getDisplayMetrics());
	}
}
效果截圖,

可以看出,每次調用平移後,都是在上次平移後疊加的!
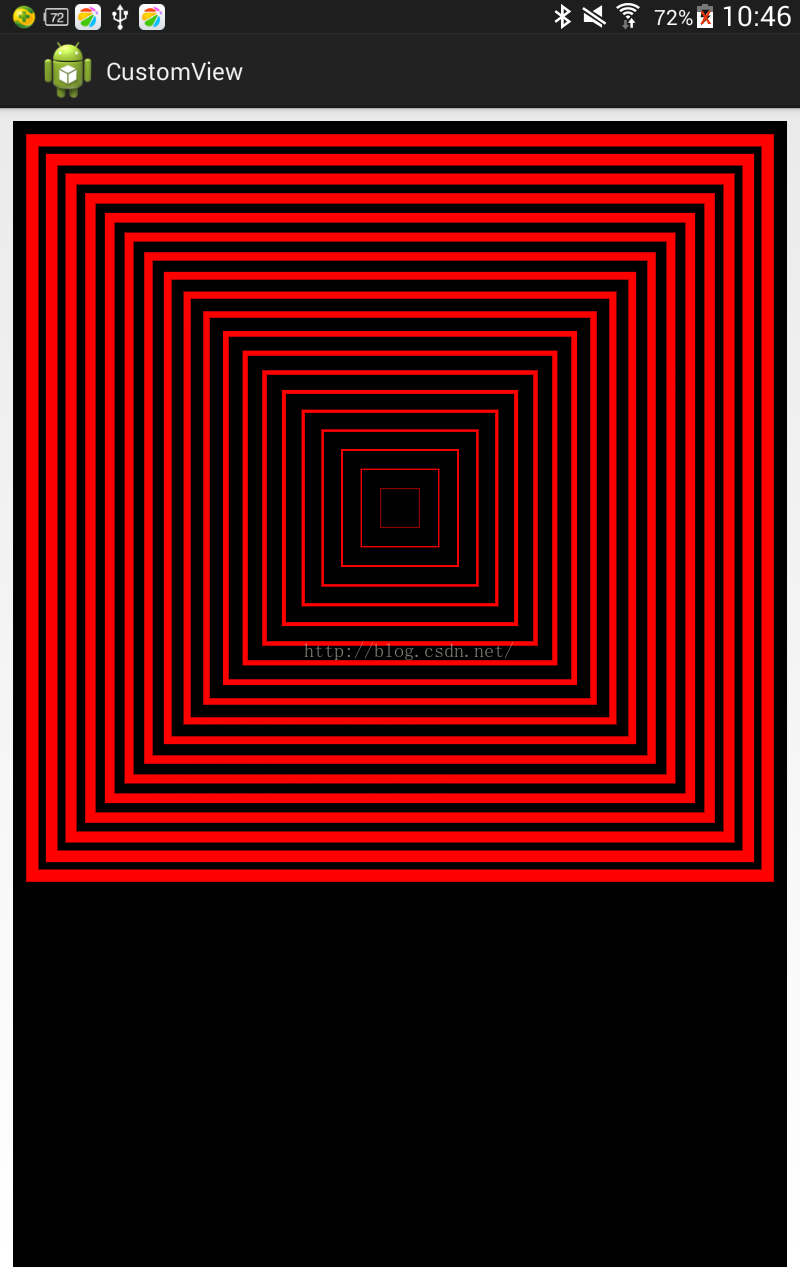
public class View3 extends View {
	private Paint mPaint = new Paint();// 畫筆
	private int DEFAULT_STROKE_WIDTH = 10;// strokeWidth
	private int mStrokeWidth = dp2px(DEFAULT_STROKE_WIDTH);
	private int TOTAL_SQUARE_COUNT = 20;// 矩形個數
	private int mWidth = 0;// 寬度
	private int mHalfWidth = 0;// 寬度一半
	RectF rect;// 矩形
	public View3(Context context) {
		this(context, null);
		// TODO Auto-generated constructor stub
	}
	public View3(Context context, AttributeSet attrs) {
		this(context, attrs, 0);
		// TODO Auto-generated constructor stub
	}
	public View3(Context context, AttributeSet attrs, int defStyleAttr) {
		super(context, attrs, defStyleAttr);
		// TODO Auto-generated constructor stub
		setBackgroundColor(Color.BLACK);// 設置背景色
	}
	@Override
	protected void onDraw(Canvas canvas) {
		// TODO Auto-generated method stub

		mWidth = getMeasuredWidth();// 獲取寬度
		mHalfWidth = mWidth / 2;//
		mPaint.setColor(Color.RED);// 設置畫筆顏色為白色
		mPaint.setAntiAlias(true);// 坑鋸齒
		mPaint.setStyle(Style.STROKE);// 樣式是描邊
		mPaint.setStrokeWidth(mStrokeWidth);// 設置畫筆的寬度
		rect = new RectF(0, 0, mWidth, mWidth);//初始化矩形
		drawSquare(canvas);
	}
	/**
	 * 繪制圖案
	 *
	 * @param canvas
	 */
	private void drawSquare(Canvas canvas) {
		for (int i = 0; i < TOTAL_SQUARE_COUNT; i++) {
			canvas.save();
			float fraction = (float) i / TOTAL_SQUARE_COUNT;
			canvas.scale(fraction, fraction, mHalfWidth, mHalfWidth);
			canvas.drawRect(rect, mPaint);
			canvas.restore();
		}
	}
	/**
	 * @param dpVal
	 * @return
	 */
	private int dp2px(int dpVal) {
		return (int) TypedValue.applyDimension(TypedValue.COMPLEX_UNIT_DIP,
				dpVal, getResources().getDisplayMetrics());
	}
	/**
	 * @param spVal
	 * @return
	 */
	private int sp2px(int spVal) {
		return (int) TypedValue.applyDimension(TypedValue.COMPLEX_UNIT_SP,
				spVal, getResources().getDisplayMetrics());
	}
}
效果截圖如下,
三. 總結。
相信大家在自定義View中,或多或少都會見到上述Canvas(畫布)Api的調用。如果你對自定義View有所顧慮、擔心,推薦看看Hongyang的博客以及慕課網的視頻教程,相信肯定對你有幫忙!本人水平有限,如有錯誤,歡迎指出!
 詳解Android中的MVP架構分解和實現
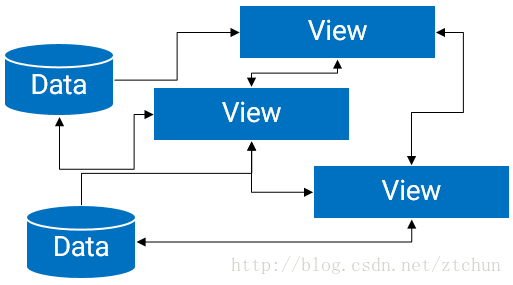
1、概述傳統的Android開發架構一般是MVC模式, Model:業務邏輯和實體模型 View:對應於布局文件 Controllor:對應於Activity 單
 Android上在兩個Activity之間傳遞Bitmap對象
Android上在兩個Activity之間傳遞Bitmap對象因為我做Android應用的時間不長,所以當我第一次在android之間傳遞Bitmap對象的時候我直接用了
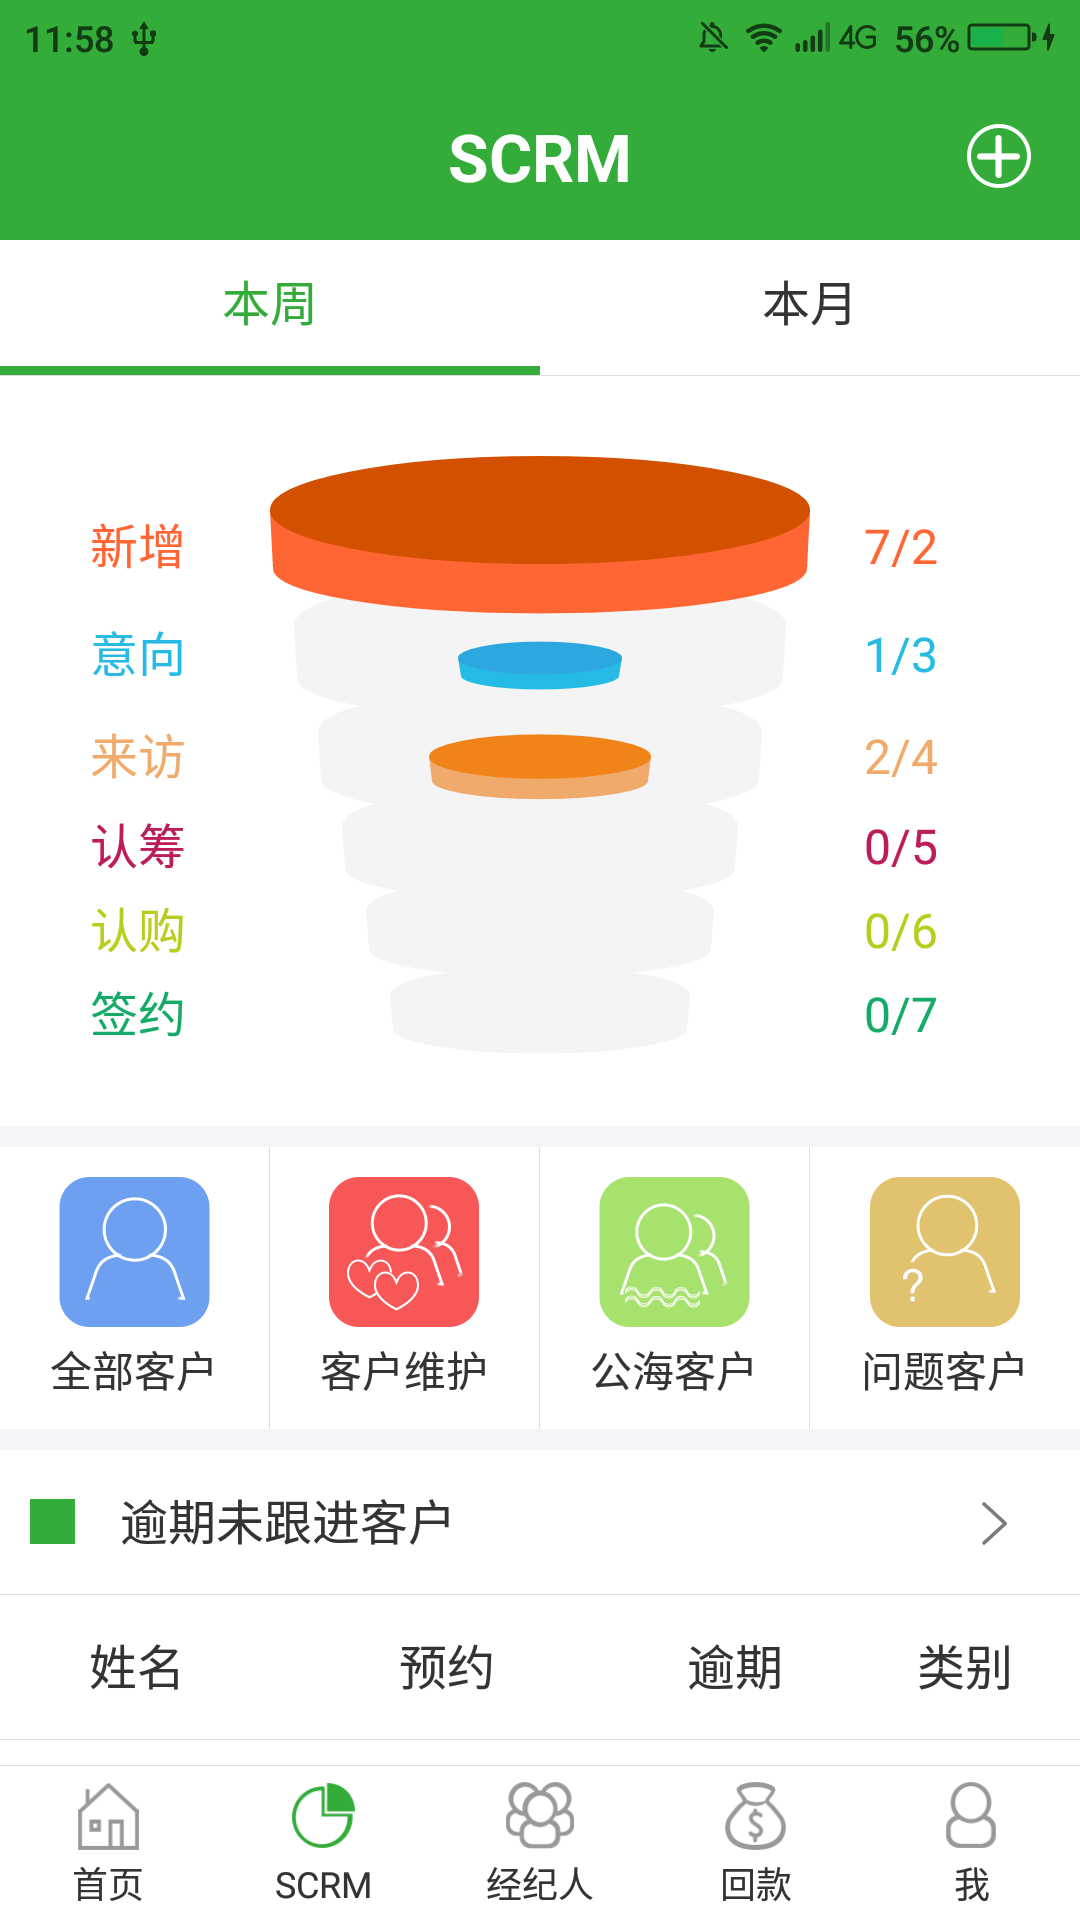 android 3D效果的餅狀圖實現銷售漏斗
先上效果圖實現思路:核心其實就是圓柱的繪制,上下兩個橢圓中間用線起來就行了。直接上代碼/*** Created by catos on 2016/7/21.* 銷售漏斗*
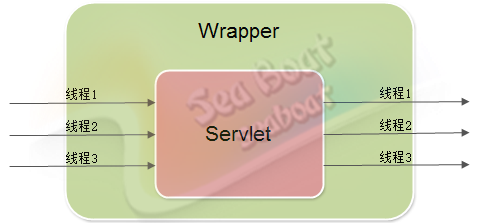 關於tomcat中Servlet對象池
Servlet在不實現SingleThreadModel的情況下運行時是以單個實例模式,如下圖,這種情況下,Wrapper容器只會通過反射實例化一個Servlet對象,對