編輯:關於Android編程
好久沒寫android的博客,最近在做一個android的項目,裡面用到我們經常用的一個控件就是對話框,大家都知道android自帶的對話框是很丑的,android5.x之後除外.所以就出現了自定義view,自己定義美觀的對話框.好我們就來自定義對話框.
整體思路:定義一個類然後去繼承Dialog類,然後重寫相應的構造器方法.大家都知道一般的對話框的創建過程都是來一個AlertDialog.Builder對象,然後使用一些set方法來設置標題內容以及設置一些自定義的view和點擊的Button以及相應的點擊事件並且可以采用鏈式編程一連串設置一些屬性.但是有沒有想過這些都是套路,都是很多類似的操作,只是數據不一樣而已.以至於如果在一個項目中用到多次對話框,可能對話框樣式有一些不一樣,難道我們每一個對話框都要去走一個類似甚至相同的操作嗎?這樣貌似代碼的冗余太強了.所以既然學了面向對象編程思想,我們不妨來試著封裝一下,並且可以簡化代碼和實現復用代碼,可以實現一次封裝,以後只要拿來用即可.
既然要使用封裝的面向對象思想,為了更好地體現封裝優點,我們就一起來對比一下一般正常的套路和使用封裝的不一樣的套路兩種方式實現:
首先,我們需要簡單定義一下對話框的樣式(注意:自定義對話框樣式思想來源於網上的一名大神,必須尊重別人成果,然後個人在其基礎上更多加入了封裝使得使用起來非常方便),先定義一個主題styles.xml:
布局文件:
<framelayout android:clickable="true" android:layout_height="fill_parent" android:layout_width="fill_parent" android:orientation="vertical" android:padding="20.0dip" xmlns:android="http://schemas.android.com/apk/res/android"></framelayout>
當然你可以去自定義你的對話框的樣式和布局,可以根據個人喜好來定,但是這不是今天的重點.
CustomDialog自定義View類:
package com.mikyou.myguardian.myview;

import android.app.Dialog;
import android.content.Context;
import android.content.DialogInterface;
import android.view.LayoutInflater;
import android.view.View;
import android.view.ViewGroup.LayoutParams;
import android.widget.Button;
import android.widget.LinearLayout;
import android.widget.TextView;


public class CustomDialog extends Dialog {

	public CustomDialog(Context context) {
		super(context);
	}

	public CustomDialog(Context context, int theme) {
		super(context, theme);
	}

	public static class Builder {
		private Context context;
		private String title;
		private String message;
		private String positiveButtonText;
		private String negativeButtonText;
		private View contentView;
		private OnClickListener positiveButtonClickListener;
		private OnClickListener negativeButtonClickListener;

		public Builder(Context context) {
			this.context = context;
		}

		public Builder setMessage(String message) {
			this.message = message;
			return this;
		}

		/**
		 * Set the Dialog message from resource
		 *
		 * @param title
		 * @return
		 */
		public Builder setMessage(int message) {
			this.message = (String) context.getText(message);
			return this;
		}

		/**
		 * Set the Dialog title from resource
		 *
		 * @param title
		 * @return
		 */
		public Builder setTitle(int title) {
			this.title = (String) context.getText(title);
			return this;
		}

		/**
		 * Set the Dialog title from String
		 *
		 * @param title
		 * @return
		 */

		public Builder setTitle(String title) {
			this.title = title;
			return this;
		}

		public Builder setContentView(View v) {
			this.contentView = v;
			return this;
		}

		/**
		 * Set the positive button resource and it's listener
		 *
		 * @param positiveButtonText
		 * @return
		 */
		public Builder setPositiveButton(int positiveButtonText,
				OnClickListener listener) {
			this.positiveButtonText = (String) context
					.getText(positiveButtonText);
			this.positiveButtonClickListener = listener;
			return this;
		}

		public Builder setPositiveButton(String positiveButtonText,
				OnClickListener listener) {
			this.positiveButtonText = positiveButtonText;
			this.positiveButtonClickListener = listener;
			return this;
		}

		public Builder setNegativeButton(int negativeButtonText,
				OnClickListener listener) {
			this.negativeButtonText = (String) context
					.getText(negativeButtonText);
			this.negativeButtonClickListener = listener;
			return this;
		}

		public Builder setNegativeButton(String negativeButtonText,
				OnClickListener listener) {
			this.negativeButtonText = negativeButtonText;
			this.negativeButtonClickListener = listener;
			return this;
		}

		public CustomDialog create() {
			LayoutInflater inflater = (LayoutInflater) context
					.getSystemService(Context.LAYOUT_INFLATER_SERVICE);
			// instantiate the dialog with the custom Theme
			final CustomDialog dialog = new CustomDialog(context, R.style.Dialog);
			View layout = inflater.inflate(R.layout.dialog_normal_layout, null);
			dialog.addContentView(layout, new LayoutParams(
					LayoutParams.FILL_PARENT, LayoutParams.WRAP_CONTENT));
			// set the dialog title
			((TextView) layout.findViewById(R.id.title)).setText(title);
			// set the confirm button
			if (positiveButtonText != null) {
				((Button) layout.findViewById(R.id.positiveButton))
						.setText(positiveButtonText);
				if (positiveButtonClickListener != null) {
					((Button) layout.findViewById(R.id.positiveButton))
							.setOnClickListener(new View.OnClickListener() {
								public void onClick(View v) {
									positiveButtonClickListener.onClick(dialog,
											DialogInterface.BUTTON_POSITIVE);
								}
							});
				}
			} else {
				// if no confirm button just set the visibility to GONE
				layout.findViewById(R.id.positiveButton).setVisibility(
						View.GONE);
			}
			// set the cancel button
			if (negativeButtonText != null) {
				((Button) layout.findViewById(R.id.negativeButton))
						.setText(negativeButtonText);
				if (negativeButtonClickListener != null) {
					((Button) layout.findViewById(R.id.negativeButton))
							.setOnClickListener(new View.OnClickListener() {
								public void onClick(View v) {
									negativeButtonClickListener.onClick(dialog,
											DialogInterface.BUTTON_NEGATIVE);
								}
							});
				}
			} else {
				// if no confirm button just set the visibility to GONE
				layout.findViewById(R.id.negativeButton).setVisibility(
						View.GONE);
			}
			// set the content message
			if (message != null) {
				((TextView) layout.findViewById(R.id.message)).setText(message);
			} else if (contentView != null) {
				// if no message set
				// add the contentView to the dialog body
				((LinearLayout) layout.findViewById(R.id.content))
						.removeAllViews();
				((LinearLayout) layout.findViewById(R.id.content)).addView(
						contentView, new LayoutParams(
								LayoutParams.FILL_PARENT,
								LayoutParams.FILL_PARENT));
			}
			dialog.setContentView(layout);
			return dialog;
		}

	}
}
測試Activity的布局只有三個Button,用於點擊後彈出三個不一樣的對話框,所以布局很簡單就貼了,那麼我們還是來一起看下MainActivity
這種使用一般普通的方法.
package com.mikyou.dialogdemo;
import android.content.DialogInterface;
import android.os.Bundle;
import android.support.v7.app.AppCompatActivity;
import android.view.View;
import android.widget.Toast;
import com.mikyou.dialogdemo.myview.CustomDialog;
public class MainActivity extends AppCompatActivity {
public void dialog1(View view){//彈出第一個對話框
CustomDialog.Builder dialog=new CustomDialog.Builder(this);
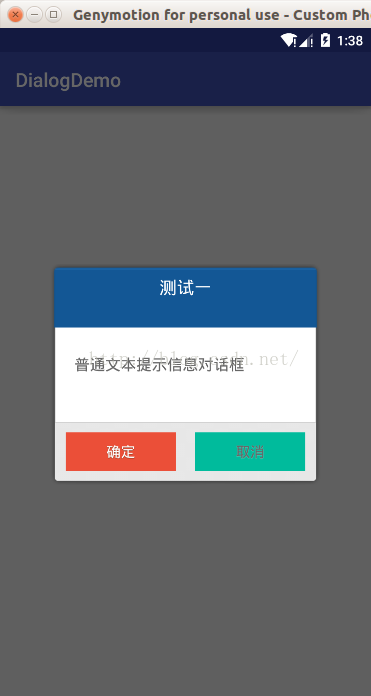
dialog.setTitle("測試一")
.setMessage("普通文本提示信息對話框")
.setPositiveButton("確定", new DialogInterface.OnClickListener() {
@Override
public void onClick(DialogInterface dialogInterface, int i) {
dialogInterface.dismiss();
Toast.makeText(MainActivity.this, "確定", Toast.LENGTH_SHORT).show();
}
}).setNegativeButton("取消", new DialogInterface.OnClickListener() {
@Override
public void onClick(DialogInterface dialogInterface, int i) {
dialogInterface.dismiss();
Toast.makeText(MainActivity.this, "取消", Toast.LENGTH_SHORT).show();
}
}).create().show();
}
public void dialog2(View view){//彈出第二個對話框
CustomDialog.Builder dialog=new CustomDialog.Builder(this);
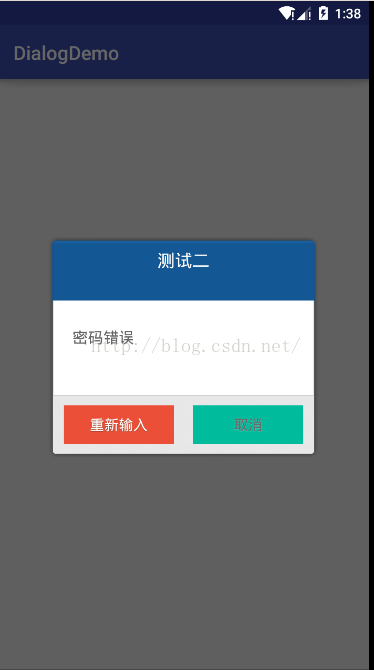
dialog.setTitle("測試二")
.setMessage("密碼錯誤")
.setPositiveButton("重新輸入", new DialogInterface.OnClickListener() {
@Override
public void onClick(DialogInterface dialogInterface, int i) {
dialogInterface.dismiss();
Toast.makeText(MainActivity.this, "重新輸入", Toast.LENGTH_SHORT).show();
}
}).setNegativeButton("取消", new DialogInterface.OnClickListener() {
@Override
public void onClick(DialogInterface dialogInterface, int i) {
dialogInterface.dismiss();
Toast.makeText(MainActivity.this, "取消", Toast.LENGTH_SHORT).show();
}
}).create().show();
}
public void dialog3(View view){//彈出第三個對話框
View customView =View.inflate(this,R.layout.input_text_dialog,null);
CustomDialog.Builder dialog=new CustomDialog.Builder(this);
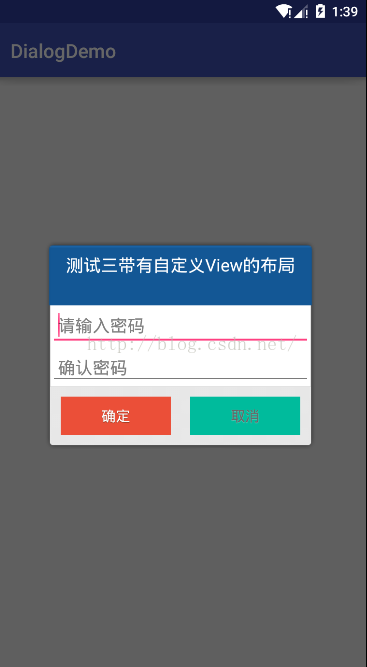
dialog.setTitle("測試三帶有自定義View的布局")
.setContentView(customView)//設置自定義customView
.setPositiveButton("確定", new DialogInterface.OnClickListener() {
@Override
public void onClick(DialogInterface dialogInterface, int i) {
dialogInterface.dismiss();
Toast.makeText(MainActivity.this, "確定", Toast.LENGTH_SHORT).show();
}
}).setNegativeButton("取消", new DialogInterface.OnClickListener() {
@Override
public void onClick(DialogInterface dialogInterface, int i) {
dialogInterface.dismiss();
Toast.makeText(MainActivity.this, "取消", Toast.LENGTH_SHORT).show();
}
}).create().show();
}
@Override
protected void onCreate(Bundle savedInstanceState) {
super.onCreate(savedInstanceState);
setContentView(R.layout.activity_main);
initView();
}
private void initView() {
}
}
運行結果:
注意:我們可以很清楚從測試的activity中可以發現,這三個方法中的代碼幾乎是一樣的,只是設置內容和布局不一樣,寫了這麼多代碼實際上更多是的毫無技術含量,有的人說不礙事粘貼復制呗,粘貼復制這種最傻的方式我們就不說了.所以我們能不能想想將他們共同的部分抽取出來,把不一樣或者會變化的內容作為參數傳進去.
封裝的思路:
看到這個第一時間就是寫一個類利用設計模式中的組合模式的思想,在我們的自定義的類中保存CustomDialog引用,然後就去操作這個類.
然後仔細想下需要注意幾點:
第一點,我們可以看到確定和取消按鈕都有一個點擊事件的回調監聽器,這個監聽器的設計的初衷就是為了讓用戶點擊確定後去實現確定的邏輯代碼,點擊取消後去實現取消的邏輯代碼,所以必須將該接口拋給用戶去處理,因為確定和取消後的邏輯並不是我們所能控制的.所以最後就可以得出就是我們必須要去自定義一個事件監聽器,讓我們自定義這個監聽器去綁定和聯系確定和取消點擊事件,也就是可以理解為把原來在確定和取消點擊事件做的業務邏輯委派給我們自己定義事件監聽器統一管理和操作.
第二點,就是傳數據,具體要傳入哪些數據呢?這不是我說了算,也不是你說了算,而是根據裡面邏輯具體需要什麼,並且傳入數據是變化的不是固定的.
所以我們就可以大概羅列一下需要哪些參數:
1,首先上下文對象context(因為在初始化CustomDialog.Builder對象需要,以及如果傳入一個自定布局加載成一個view對象的時候需要上下文對象)
2,然後就是傳入標題(title),內容(message),布局id,這裡需要注意一下,就是message和布局id(用於自定義view對話框)是互斥關系
也就是設置了內容再去設置布局id的view後者是無效有沖突.所以,我們也很容易想到一點就是初始化我們的這個封裝的對話框應該有兩種方式分別是文本類型和自定義view界面類型,實際上也就引出了我們這個自定義的類中應該兩個構造器重載,一個用與初始化文本類型,一個是用於自定義view類型,然後還需要傳入兩個button需要顯示文本內容
第三點,就是是否暴露一些數據接口用於方便用戶後期的操作,這裡有時候不要,看實際情況.仔細想想我們這裡需要嗎?實際上是需要就是我們在使用自定義view的對象,因為我們有時候需要去操作自定義布局中的一些控件,就比如上面最後例子就是輸入密碼,可能我們需要獲得EditText中的內容,首先需要拿到EditText對象,所以需要傳出一個自定義布局的view對象,所以我就提供一個setter和getter方法留給外部用戶使用,這裡為了後面的使用方便我就把這個view對象使用回調方法將其回調出去.
那麼具體來看下代碼的實現:
package com.mikyou.dialogdemo.myview;

import android.content.Context;
import android.content.DialogInterface;
import android.view.View;
import android.widget.Toast;

/**
 * @自定義封裝的通用對話框:MikyouCommonDialog
 *
 * Created by mikyou on 16-7-21.
 * @param dialogTitle 對話框的標題
 * @param dialogMessage 對話框的內容
 * @param positiveText 表示是確定意圖的按鈕上text文本
 * @param negativeText 表示是取消意圖的按鈕上text文本
 * @param customeLayoutId 對話框自定義布局的id 若沒有自定義布局  默認傳入0
 * @param context 上下文對象
 * @param dialogView 自定義布局的View對象,提供被外界訪問的接口get和set方法,並且利用自定義的監聽器將view對象回調出去
 * @param listener 監聽器 用於將確定和取消意圖的兩個點擊事件監聽器,合成一個監聽器,並傳入一個標記變量區別確定和取消意圖
 */
public class MikyouCommonDialog {
    private Context context;
    private int customeLayoutId;
    private String dialogTitle;
    private String dialogMessage;
    private String positiveText;
    private String negativeText;

    private View dialogView;
    private OnDialogListener listener;
    //帶有自定義view的構造器
    public MikyouCommonDialog(Context context, int customeLayoutId, String dialogTitle, String positiveText, String negativeText) {
        this.context = context;
        this.customeLayoutId = customeLayoutId;
        this.dialogTitle = dialogTitle;
        this.positiveText = positiveText;
        this.negativeText = negativeText;
        this.dialogView=View.inflate(context,customeLayoutId,null);
    }
    //不帶自定義view的構造器
    public MikyouCommonDialog(Context context, String dialogMessage,String dialogTitle, String positiveText, String negativeText) {
        this.context = context;
        this.dialogTitle = dialogTitle;
        this.dialogMessage = dialogMessage;
        this.positiveText = positiveText;
        this.negativeText = negativeText;
    }

    public View getDialogView() {
        return dialogView;
    }

    public void setDialogView(View dialogView) {
        this.dialogView = dialogView;
    }

    public void showDialog(){
        CustomDialog.Builder dialog=new CustomDialog.Builder(context);
        dialog.setTitle(dialogTitle);//設置標題
        //注意:dialogMessage和dialogView是互斥關系也就是dialogMessage存在dialogView就不存在,dialogView不存在dialogMessage就存在
        if (dialogMessage!=null){
            Toast.makeText(context, "sddsdsds", Toast.LENGTH_SHORT).show();
            dialog.setMessage(dialogMessage);//設置對話框內容
        }else{

            dialog.setContentView(dialogView);//設置對話框的自定義view對象
        }
        /**
         * 盡管有兩個點擊事件監聽器,可以通過我們自定義的監聽器設置一個標記變量,從而可以實現將兩個點擊事件合並成一個
         * 監聽器OnDialogListener
         * */
        //確定意圖傳入positive標記值
        dialog.setPositiveButton(positiveText, new DialogInterface.OnClickListener() {
            @Override
            public void onClick(DialogInterface dialogInterface, int which) {
                dialogInterface.dismiss();
                if (listener!=null){
                    listener.dialogListener("positive",dialogView,dialogInterface,which);
                }
            }
            //取消意圖傳入negative標記值
        }).setNegativeButton(negativeText, new DialogInterface.OnClickListener() {
            @Override
            public void onClick(DialogInterface dialogInterface, int which) {
                dialogInterface.dismiss();
                if (listener!=null){
                    listener.dialogListener("negative",dialogView,dialogInterface,which);
                }
            }
        }).create().show();
    }
    //注冊監聽器方法
    public MikyouCommonDialog setOnDiaLogListener(OnDialogListener listener){
        this.listener=listener;
        return this;//把當前對象返回,用於鏈式編程
    }
    //定義一個監聽器接口
    public interface OnDialogListener{
        //customView 這個參數需要注意就是如果沒有自定義view,那麼它則為null
        public void dialogListener(String btnType, View customView, DialogInterface dialogInterface, int which);
    }
}
  private void popInputPwdDialog() {
        new MikyouCommonDialog(this,R.layout.input_pwd_dialog,"輸入安全密碼","確定","取消")
                .setOnDiaLogListener(new MikyouCommonDialog.OnDialogListener() {
                    @Override
                    public void dialogListener(String btnType, View customView, DialogInterface dialogInterface, int which) {
                        switch (btnType){
                            case "positive"://點擊確定按鈕的操作
                                EditText eTPwd=(EditText) customView.findViewById(R.id.input_pwd);
                                checkAndSavePwd("input",eTPwd.getText().toString(),"");
                                break;
                            case "negative"://點擊取消按鈕的操作
                                break;
                        }
                    }
                }).showDialog();

    }
測試的Activity那麼我們一起來對比一下封裝後的代碼:
package com.mikyou.dialogdemo;

import android.content.DialogInterface;
import android.os.Bundle;
import android.support.v7.app.AppCompatActivity;
import android.view.View;
import android.widget.Toast;

import com.mikyou.dialogdemo.myview.MikyouCommonDialog;

public class MainActivity extends AppCompatActivity {

    public void dialog1(View view){//彈出第一個對話框
   new MikyouCommonDialog(this,"普通文本提示信息對話框","測試一","確定","取消")
           .setOnDiaLogListener(new MikyouCommonDialog.OnDialogListener() {
               @Override
               public void dialogListener(String btnType, View customView, DialogInterface dialogInterface, int which) {
                   switch (btnType){
                       case "positive":
                           Toast.makeText(MainActivity.this, "確定", Toast.LENGTH_SHORT).show();
                           break;
                       case "negative":
                           Toast.makeText(MainActivity.this, "取消", Toast.LENGTH_SHORT).show();
                           break;
                   }
               }
           }).showDialog();
    }
    public void dialog2(View view){//彈出第二個對話框
       new MikyouCommonDialog(this,"密碼錯誤","測試二","重新輸入","取消")
               .setOnDiaLogListener(new MikyouCommonDialog.OnDialogListener() {
                   @Override
                   public void dialogListener(String btnType, View customView, DialogInterface dialogInterface, int which) {
                       switch (btnType){
                           case "positive":
                               Toast.makeText(MainActivity.this, "重新輸入", Toast.LENGTH_SHORT).show();
                               break;
                           case "negative":
                               Toast.makeText(MainActivity.this, "取消", Toast.LENGTH_SHORT).show();
                               break;
                       }
                   }
               }).showDialog();
    }
   public void dialog3(View view){//彈出第三個對話框
       new MikyouCommonDialog(this,R.layout.input_text_dialog,"測試三帶有自定義View的布局","確定","取消")
               .setOnDiaLogListener(new MikyouCommonDialog.OnDialogListener() {
                   @Override
                   public void dialogListener(String btnType, View customView, DialogInterface dialogInterface, int which) {
                       switch (btnType){
                           case "positive":
                               Toast.makeText(MainActivity.this, "確定", Toast.LENGTH_SHORT).show();
                               break;
                           case "negative":
                               Toast.makeText(MainActivity.this, "取消", Toast.LENGTH_SHORT).show();
                               break;
                       }
                   }
               }).showDialog();
   }
    @Override
    protected void onCreate(Bundle savedInstanceState) {
        super.onCreate(savedInstanceState);
        setContentView(R.layout.activity_main);
        initView();
    }

    private void initView() {
    }
}
是不是感覺比開始那種最原始方法要好些,代碼邏輯更清晰些.我們現在的這種封裝還能進一步優化嗎?我們都知道封裝思想在於什麼,在於用戶外部接口調用傳入數據不一樣進行操作不一樣,但是整個封裝的框架是一樣的.所以仔細觀察一下上面的代碼,是不是會發現那三個方法中的switch顯得很雞肋,因為在三個方法中還需要去判斷是否是確定還是取消類型,並且在封裝類裡面我們還得把標記的字符串變量通過回調方法回調出來,感覺就有點多此一舉了.
優化思想:
就是我們不需要傳入標記變量並且不需要在外部調用的時候使用switch來判斷,而是采用兩個回調方法,一個是確定類型的回調方法,另一個則是取消類型的回調方法.然後分別在不同類型回調方法實現各自的業務邏輯.這種方式實際上最原始那種方式也就是這樣處理.
看下優化的代碼:
package com.mikyou.myguardian.myview;

import android.content.Context;
import android.content.DialogInterface;
import android.view.View;

/**
 * @自定義封裝的通用對話框:MikyouCommonDialog
 *
 * Created by mikyou on 16-7-21.
 * @param dialogTitle 對話框的標題
 * @param dialogMessage 對話框的內容
 * @param positiveText 表示是確定意圖的按鈕上text文本
 * @param negativeText 表示是取消意圖的按鈕上text文本
 * @param customeLayoutId 對話框自定義布局的id 若沒有自定義布局  默認傳入0
 * @param context 上下文對象
 * @param dialogView 自定義布局的View對象,提供被外界訪問的接口get和set方法,並且利用自定義的監聽器將view對象回調出去
 * @param listener 監聽器 用於將確定和取消意圖的兩個點擊事件監聽器,合成一個監聽器,並傳入一個標記變量區別確定和取消意圖
 */
public class MikyouCommonDialog2 {
    private Context context;
    private int customeLayoutId;
    private String dialogTitle;
    private String dialogMessage;
    private String positiveText;
    private String negativeText;

    private View dialogView;
    private OnDialogListener listener;
    //帶有自定義view的構造器
    public MikyouCommonDialog2(Context context, int customeLayoutId, String dialogTitle, String positiveText, String negativeText) {
        this.context = context;
        this.customeLayoutId = customeLayoutId;
        this.dialogTitle = dialogTitle;
        this.positiveText = positiveText;
        this.negativeText = negativeText;
        this.dialogView=View.inflate(context,customeLayoutId,null);
    }
    //不帶自定義view的構造器
    public MikyouCommonDialog2(Context context, String dialogMessage, String dialogTitle, String positiveText, String negativeText) {
        this.context = context;
        this.dialogTitle = dialogTitle;
        this.dialogMessage = dialogMessage;
        this.positiveText = positiveText;
        this.negativeText = negativeText;
    }

    public View getDialogView() {
        return dialogView;
    }

    public void setDialogView(View dialogView) {
        this.dialogView = dialogView;
    }

    public void showDialog(){
        CustomDialog.Builder dialog=new CustomDialog.Builder(context);
        dialog.setTitle(dialogTitle);//設置標題
        //注意:dialogMessage和dialogView是互斥關系也就是dialogMessage存在dialogView就不存在,dialogView不存在dialogMessage就存在
        if (dialogMessage!=null){
            dialog.setMessage(dialogMessage);//設置對話框內容
        }else{
            dialog.setContentView(dialogView);//設置對話框的自定義view對象
        }
        dialog.setPositiveButton(positiveText, new DialogInterface.OnClickListener() {
            @Override
            public void onClick(DialogInterface dialogInterface, int which) {
                dialogInterface.dismiss();
                if (listener!=null){
                    listener.dialogPositiveListener(dialogView,dialogInterface,which);
                }
            }
        }).setNegativeButton(negativeText, new DialogInterface.OnClickListener() {
            @Override
            public void onClick(DialogInterface dialogInterface, int which) {
                dialogInterface.dismiss();
                if (listener!=null){
                    listener.dialogNegativeListener(dialogView,dialogInterface,which);
                }
            }
        }).create().show();
    }
    //注冊監聽器方法
    public MikyouCommonDialog2 setOnDiaLogListener(OnDialogListener listener){
        this.listener=listener;
        return this;//把當前對象返回,用於鏈式編程
    }
    //定義一個監聽器接口
    public interface OnDialogListener{
        //customView 這個參數需要注意就是如果沒有自定義view,那麼它則為null
        public void dialogPositiveListener(View customView, DialogInterface dialogInterface, int which);
        public void dialogNegativeListener(View customView, DialogInterface dialogInterface, int which);
    }
}
 private void popInputPwdDialog() {
        new MikyouCommonDialog2(this,R.layout.input_pwd_dialog,"輸入安全密碼","確定","取消")
                .setOnDiaLogListener(new MikyouCommonDialog2.OnDialogListener() {
                    @Override
                    public void dialogPositiveListener(View customView, DialogInterface dialogInterface, int which) {//點擊確定按鈕的操作
                        EditText eTPwd=(EditText) customView.findViewById(R.id.input_pwd);
                        checkAndSavePwd("input",eTPwd.getText().toString(),"");
                    }
                    @Override
                    public void dialogNegativeListener(View customView, DialogInterface dialogInterface, int which) {//點擊取消按鈕的操作
+
                    }
                }).showDialog();
    }
package com.mikyou.dialogdemo;

import android.content.DialogInterface;
import android.os.Bundle;
import android.support.v7.app.AppCompatActivity;
import android.view.View;
import android.widget.Toast;

import com.mikyou.dialogdemo.myview.MikyouCommonDialog;

public class MainActivity extends AppCompatActivity {
    public void dialog1(View view){//彈出第一個對話框
        new MikyouCommonDialog(this,"普通文本提示信息對話框","測試一","確定","取消")
                .setOnDiaLogListener(new MikyouCommonDialog.OnDialogListener() {
                    @Override
                    public void dialogPositiveListener(View customView, DialogInterface dialogInterface, int which) {
                        Toast.makeText(MainActivity.this, "確定", Toast.LENGTH_SHORT).show();
                    }

                    @Override
                    public void dialogNegativeListener(View customView, DialogInterface dialogInterface, int which) {
                        Toast.makeText(MainActivity.this, "取消", Toast.LENGTH_SHORT).show();
                    }
                }).showDialog();
    }
    public void dialog2(View view){//彈出第二個對話框
        new MikyouCommonDialog(this,"密碼錯誤","測試二","重新輸入","取消")
                .setOnDiaLogListener(new MikyouCommonDialog.OnDialogListener() {
                    @Override
                    public void dialogPositiveListener(View customView, DialogInterface dialogInterface, int which) {
                        Toast.makeText(MainActivity.this, "重新輸入", Toast.LENGTH_SHORT).show();
                    }

                    @Override
                    public void dialogNegativeListener(View customView, DialogInterface dialogInterface, int which) {
                        Toast.makeText(MainActivity.this, "取消", Toast.LENGTH_SHORT).show();
                    }
                }).showDialog();
    }
    public void dialog3(View view){//彈出第三個對話框
        new MikyouCommonDialog(this,R.layout.input_text_dialog,"測試三帶有自定義View的布局","確定","取消")
                .setOnDiaLogListener(new MikyouCommonDialog.OnDialogListener() {
                    @Override
                    public void dialogPositiveListener(View customView, DialogInterface dialogInterface, int which) {
                        Toast.makeText(MainActivity.this, "確定", Toast.LENGTH_SHORT).show();
                    }

                    @Override
                    public void dialogNegativeListener(View customView, DialogInterface dialogInterface, int which) {
                        Toast.makeText(MainActivity.this, "取消", Toast.LENGTH_SHORT).show();
                    }
                }).showDialog();
    }
    @Override
    protected void onCreate(Bundle savedInstanceState) {
        super.onCreate(savedInstanceState);
        setContentView(R.layout.activity_main);
        initView();
    }

    private void initView() {
    }
}
 android 動畫入門(一)
准備花一些時間研究下androd動畫,因為一些酷的效果是離不開動畫的,但是所有的知識都是要從最基本的講起,只有把基礎打好,學一些高級的技術或者效果才會有思路,而不會在某一
 【我的Android進階之旅】 高效的設計稿標注及測量工具Markman介紹
前言 高效的設計稿標注及測量工具Markman介紹。最近有個煩惱是UI設計師可能太忙了,經常給出的UI設計稿中有很多地方都沒有標注,比如長度和顏色值等。這個時候每次都要通
 Android中FoldingLayout折疊布局的用法及實戰全攻略
一、概述無意中翻到的FoldingLayout的介紹的博客,以及github地址。感覺很nice呀,於是花了點時間研究以及編寫,本篇博客將帶大家從最基本的原理分析,一步一
 華為榮耀X2智能解鎖怎麼用 榮耀X2智能解鎖功能使用教程
華為榮耀X2手機系統版本更新到B013版以後,鎖屏和密碼中增加了一項智能解鎖功能,聽起來都很高大上的功能,比指紋解鎖還NB,那這個智能解鎖功能怎麼用呢?下面