編輯:關於Android編程
??上一篇中,我們已經介紹了屬性動畫的基本使用,至少在動畫應用上問題不大,而本篇我們將來了解插值器(Interpolator)和類型估算器(TypeEvaluator)的內部實現原理,並分別提供一個自定義Interpolator和自定義TypeEvaluator的案例,看完本篇後至少我們可以完全明白插值器和估值器存在的意義以及其內部原理,當然同時也掌握了自定義插值器和估值器的方法。本篇更多從原理層面分析,至於動畫效果如何,依各人的數學思維能力而異了,哈~。
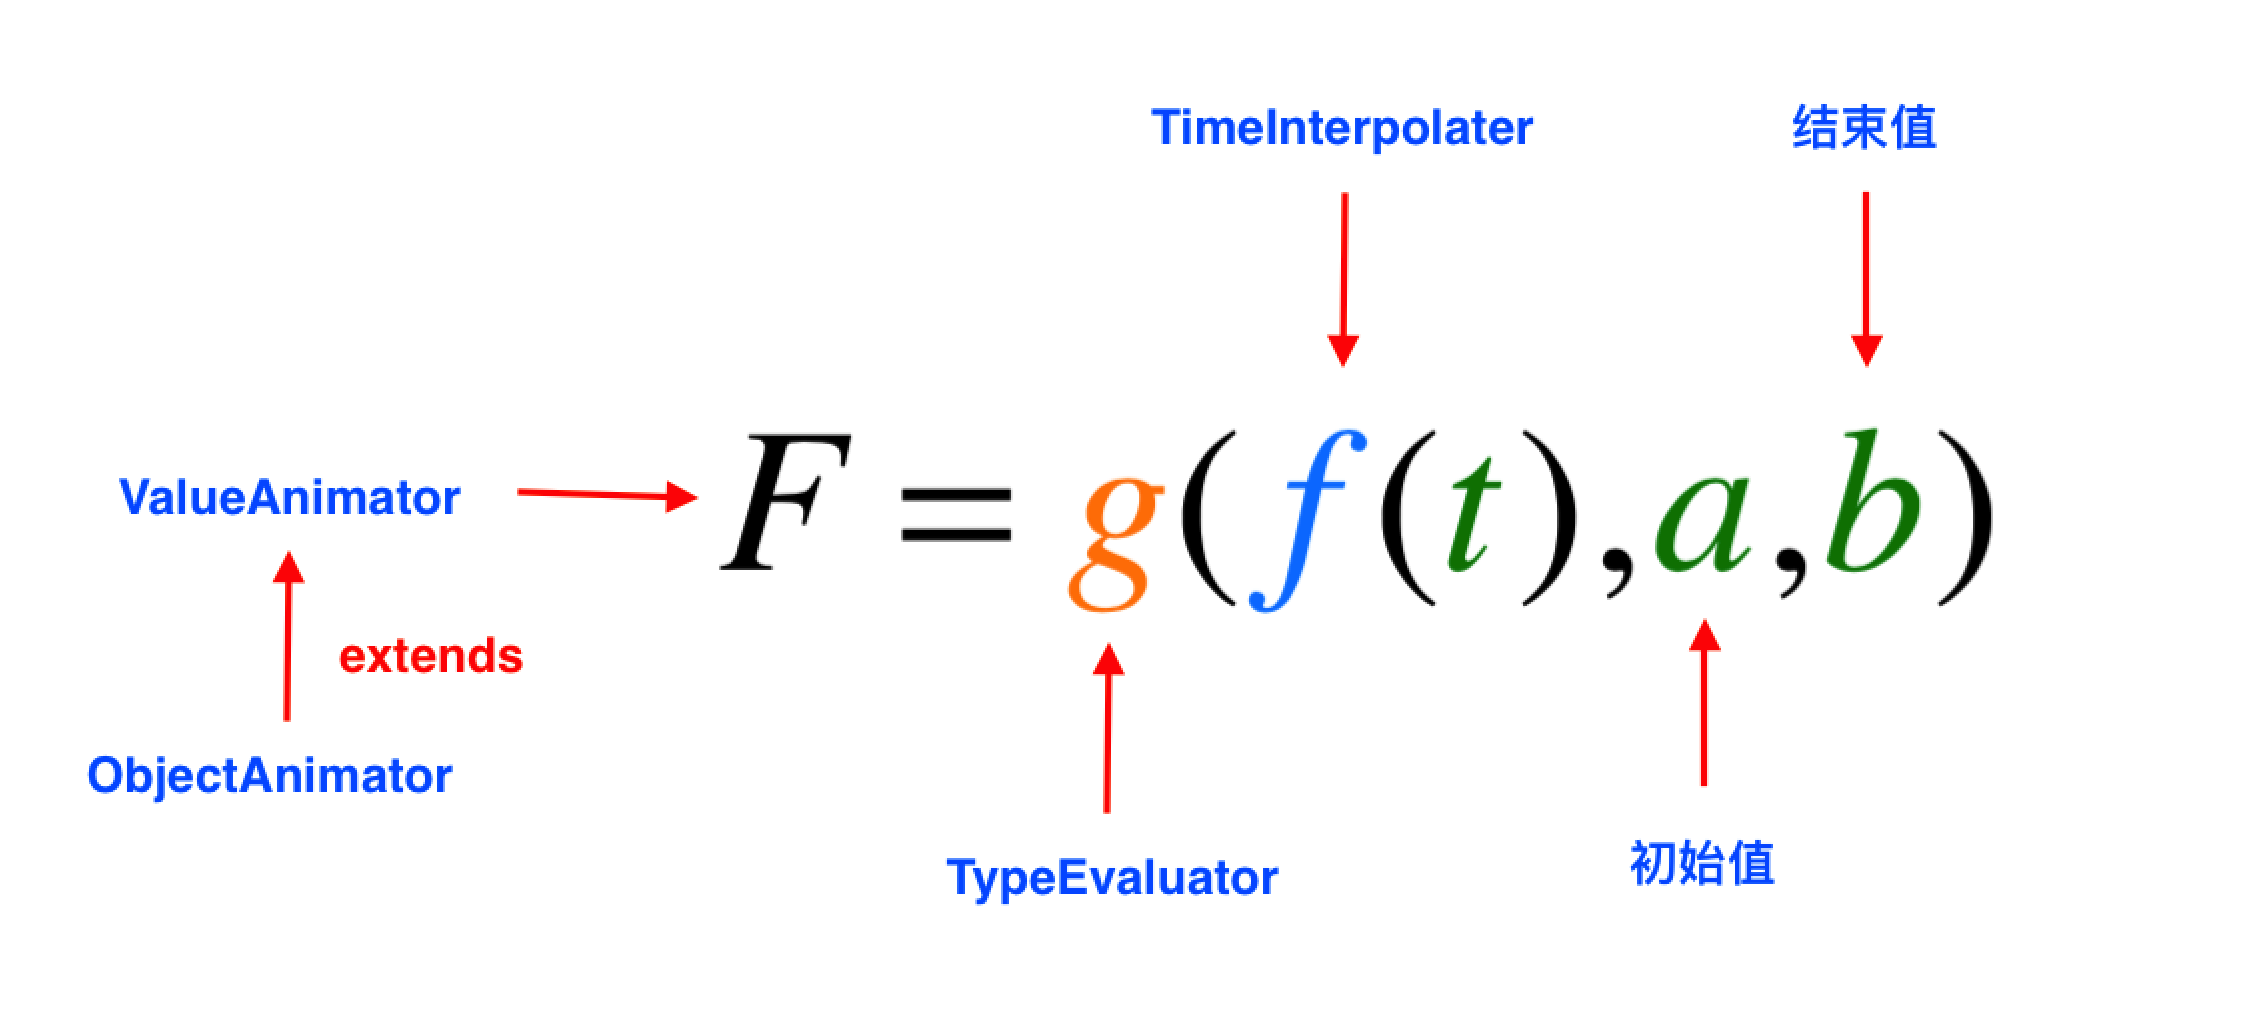
??在開始前,我們先來全局的角度了解一下Interpolator與TypeEvaluator,以便我們後面更好的理解和學習。在我們現實的生活中,時間是線性勻速地一秒一秒逝去,在設置完動畫運動時間後,動畫也是按時間線性勻速化進行的,但如果現在想讓動畫加速或者減速前進的話,我們就需要插值器-Interpolator幫忙了,它的任務就是修改動畫進行的節奏,也就是說Interpolator的作用是控制動畫過程速度快慢,這也就是Interpolator存在的意義了,當然單有Interpolator還是不足以完成任務的,我們還需要TypeEvaluator的協助,那麼TypeEvaluator又是干嘛的呢?其實TypeEvaluator的作用是控制整個動畫過程的運動軌跡,通俗地講就是這條路往哪裡走由TypeEvaluator說了算。最終Interpolator和TypeEvaluator的處理效果會體現在ValueAnimator上,我們應該還記得上一篇文章中提到過ValueAnimator本身沒有動畫效果,它只是對一個數值做“運動”,而在這裡我們要說明白的是,ValueAnimator內部對數值做“運動”就是通過Interpolator和TypeEvaluator來實現的。好~,到這裡我們也就大概了解了Interpolator和TypeEvaluator的作用了,如果還不理解,那也沒關系,下面我們會詳細分析它們。
??插值器的頂級父類是TimeInterpolator,又稱為時間插值器,TimeInterpolator是在Android 3.0時加入的,android 3.0之前類是Interpolator,而現在Interpolator繼承自TimeInterpolator,我們不妨查看一下源碼:
TimeInterpolator如下,
package android.animation;
/**
 * A time interpolator defines the rate of change of an animation. This allows animations
 * to have non-linear motion, such as acceleration and deceleration.
 */
public interface TimeInterpolator {
    /**
     * Maps a value representing the elapsed fraction of an animation to a value that represents
     * the interpolated fraction. This interpolated value is then multiplied by the change in
     * value of an animation to derive the animated value at the current elapsed animation time.
     *
     * @param input A value between 0 and 1.0 indicating our current point
     *        in the animation where 0 represents the start and 1.0 represents
     *        the end
     * @return The interpolation value. This value can be more than 1.0 for
     *         interpolators which overshoot their targets, or less than 0 for
     *         interpolators that undershoot their targets.
     */
    float getInterpolation(float input);
}
Interpolator如下:
package android.view.animation;
import android.animation.TimeInterpolator;
/**
 * An interpolator defines the rate of change of an animation. This allows
 * the basic animation effects (alpha, scale, translate, rotate) to be
 * accelerated, decelerated, repeated, etc.
 */
public interface Interpolator extends TimeInterpolator {
    // A new interface, TimeInterpolator, was introduced for the new android.animation
    // package. This older Interpolator interface extends TimeInterpolator so that users of
    // the new Animator-based animations can use either the old Interpolator implementations or
    // new classes that implement TimeInterpolator directly.
}
??其實從源碼中可以看出Interpolator繼承自TimeInterpolator,但Interpolator也只是單純的繼承罷了,鑒於這點Google官方考慮更多是兼容舊版本,畢竟舊版本的動畫插值器實現的還是Interpolator,當然我們這裡也沒必要深究這個問題。從源碼可以看出插值器接口只有一個抽象方法:
float getInterpolation(float input);
這個方法的返回值就是當前屬性值改變的百分比,也可以理解為前面所說的速度快慢,而參數input則表示時間流逝的百分比,那什麼是時間流逝的百分比呢?我們舉個例子,我們執行的動畫全部時間需要4秒鐘,而現在時間過了2秒,那麼時間流逝的百分比就是2/4=0.5。了解完這兩個知識點後,我們用一個比較專業性的話來概述TimeInterpolator的作用,TimeInterpolator的作用是根據時間流逝的百分比來計算出當前屬性值改變的百分比。因此根據時間的百分比我們就可以計算出當前屬性值改變的百分比,這個屬性改變的百分比最終會傳遞給TyleEvaluator用於計算我們動畫屬性值的實際變化(後面會分析),這裡為更加直白表現出插值器的工作原理,我們引入數學的函數表達式,我們把時間流逝的百分比設置為t,t的取值范圍是[0,1],0表示動畫開始,1表示動畫結束。當前屬性值改變的百分比設置x,假設TimeInterpolator是函數:x=f(t),這個函數代表的就是插值器內部做的事,而實際上TimeInterpolator是一個頂級接口,因此每個實現該接口的子類都可以看成不同函數公式,為什麼這麼說呢,接著我們來驗證一下這個問題,先來看看線性插值器LinearInterpolator的源碼:
package android.view.animation;

import android.content.Context;
import android.util.AttributeSet;

import com.android.internal.view.animation.HasNativeInterpolator;
import com.android.internal.view.animation.NativeInterpolatorFactory;
import com.android.internal.view.animation.NativeInterpolatorFactoryHelper;

/**
 * An interpolator where the rate of change is constant
 */
@HasNativeInterpolator
public class LinearInterpolator extends BaseInterpolator implements NativeInterpolatorFactory {

    public LinearInterpolator() {
    }

    public LinearInterpolator(Context context, AttributeSet attrs) {
    }
    //直接返回傳遞進來的時間流逝的百分比,顯然我們函數可以變形為x=t,
    //也就是線性勻速的函數,返回值代表當前屬性值改變的百分比x
    public float getInterpolation(float input) {
        return input;
    }

    /** @hide */
    @Override
    public long createNativeInterpolator() {
        return NativeInterpolatorFactoryHelper.createLinearInterpolator();
    }
}
??BaseInterpolator類繼承自Interpolator接口,內部只是一些配置改變的操作,這點不用深究,我們還是看看LinearInterpolator的實現,其中最重要的方法就是getInterpolation(float input),該方法直接返回傳遞進來的時間流逝的百分比,顯然我們函數可以變形為x=t,也就是線性勻速的函數,所以線性插值器LinearInterpolator代表就是一種線性勻速的動畫速度,下面我們通過給動畫設置LinearInterpolator演示這個效果,代碼如下:
ObjectAnimator objectAnimator=ObjectAnimator.ofFloat(image,"translationY",0f,250);?
objectAnimator.setDuration(5000);?
objectAnimator.setInterpolator(new LinearInterpolator());?
objectAnimator.start();
效果如下:

線性插值器LinearInterpolator代表的函數圖像如下:

??到這裡我們就明白了,線性插值器內部的實現其實就代表著一個函數公式x=t,而這個函數公式的值代表當前屬性值改變的百分比,也是控制動畫播放的速度。LinearInterpolator只不過是其中一種插值器,除此之外系統還為我們提供其他插值器,其中常用的有LinearInterpolator(線性插值器:勻速動畫,剛分析過),AccelerateDecelerateInterpolator(加速減速器:動畫開頭和結束慢,中間快,默認插值器),DecelerateInterpolator(減速插值器:動畫越來越慢)、BounceInterpolator (彈跳插值器)、AnticipateInterpolator (回蕩秋千插值器)、CycleInterpolator (正弦周期變化插值器)等等,它們各自都代表著一種函數表達式,這些插值器我們留在後面分析,現在我們思考一個問題,插值器計算出來的當前屬性改變的百分比x,這個值最終會傳遞給類型估算器(TypeEvaluator),然後由類型估值器來計算屬性改變後的屬性的實際變化值,那麼TypeEvaluator內部又是如何工作的呢?接下來,我們就來了解一下類型估算器(TypeEvaluator)。
??TypeEvaluator翻譯為類型估值算法,又稱估值器,它的作用是通過起始值、結束值以及插值器返回值來計算在該時間點的屬性值應該是多少,也就是控制動畫實際運動軌跡,系統給我們提供IntEvaluator(針對整型屬性)、FloatEvaluator(針對浮點型屬性)以及ArgbEvaluator(針對Color屬性)。我們不妨來看看TypeEvaluator接口的源碼:
/**
 * Interface for use with the {@ link ValueAnimator#setEvaluator(TypeEvaluator)} function. Evaluators
 * allow developers to create animations on arbitrary property types, by allowing them to supply
 * custom evaluators for types that are not automatically understood and used by the animation
 * system.
 */
public interface TypeEvaluator {
    /**
     * This function returns the result of linearly interpolating the start and end values, with
     * fraction representing the proportion between the start and end values. The
     * calculation is a simple parametric calculation: result = x0 + t * (x1 - x0),
     * where x0 is startValue, x1 is endValue,
     * and t is fraction.
     */
    public T evaluate(float fraction, T startValue, T endValue);
}
??顯然從注釋中可以看到,我們通過下ValueAnimator#setEvaluator(TypeEvaluator)來為動畫設置不同的估值器,而TypeEvaluator接口也只有一個方法:
public T evaluate(float fraction, T startValue, T endValue);
??第一個參數是估值小數,也就是插值器計算出來的當前屬性改變的百分比,第二個參數是動畫開始值,第三個參數是動畫的結束值。那麼估算器是怎麼工作的呢?我們現在來看看IntEvaluator的源碼:
package android.animation; /** * This evaluator can be used to perform type interpolation between int values. */ public class IntEvaluator implements TypeEvaluator{ /** * This function returns the result of linearly interpolating the start and end values, with * fraction representing the proportion between the start and end values. The * calculation is a simple parametric calculation: result = x0 + t * (v1 - v0), * where x0 is startValue, x1 is endValue, * and t is fraction. * * @param fraction The fraction from the starting to the ending values * @param startValue The start value; should be of type int or * Integer * @param endValue The end value; should be of type int or Integer * @return A linear interpolation between the start and end values, given the * fraction parameter. */ public Integer evaluate(float fraction, Integer startValue, Integer endValue) { int startInt = startValue; return (int)(startInt + fraction * (endValue - startInt)); } }
??我們主要看一下IntEvaluator的函數實現,通過初始值startInt不斷去累加每個時刻屬性變化的數值,從而控制對象屬性變化最後達到所謂的動畫效果。也可以看出TypeEvaluator確實是通過插值器的計算值和開始值以及結束值來實現對動畫過程的控制的。同樣的到道理,我們也可以通過一個函數表達式來表示TypeEvaluator的工作原理,如下:
最終可以轉換為:
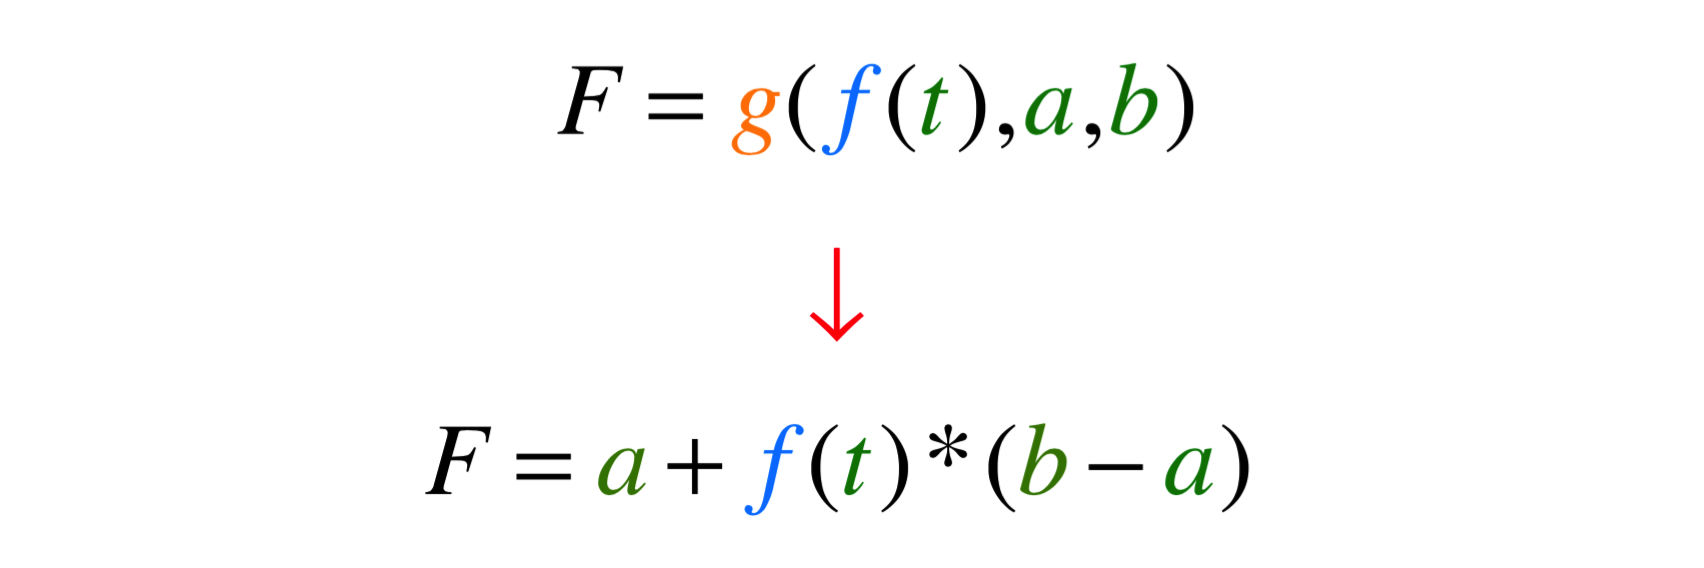
??這也就和我們的IntEvaluator內部計算原理一樣了,所以本本質上來說每個TypeEvaluator衍生子類也代表著不同種類的函數表達式罷了,上面表達式中的F代表ValueAnimator的主要原因是,ValueAnimator本身沒有任何動畫效果,它只對一個數值進行做”運動”,而內部則是通過Interpolator和TypeEvaluator相結合來實現對數值做”運動”的,因此通過上面函數表達式我們也就明白了ValueAnimator、TimeInterpolator和TypeEvaluator間的關系了。我們很容易得出這樣的結論:每一個ValueAnimator就是一個TimeInterpolator和一個TypeEvaluator的結合體。從數學的函數角度來說,ValueAnimator就是由TimeInterpolator和TypeEvaluator這兩個簡單函數組合而成的一個復合函數。至於ValueAnimator的代碼內部是如何去實現的,這個我們還是放在動畫源碼分析篇再詳細談吧,這裡就先不深入了。為了更好的理解TimeInterpolator和TypeEvaluator,我們來看一個簡單的代碼案例吧
??如下圖,表示一個勻速的動畫,采用的是線性插值器和整型估值器算法,在40ms內,View的x屬性值實現從0到40的變換:
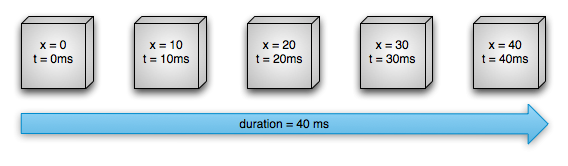
??上一篇我們提到過動畫的默認刷新率為10ms/幀,也就是說該動畫將分5幀進行,我們考慮第3幀(也就是x=20,t=20ms),當時間t=20ms時,計算出時間流逝的百分比為20/40=0.5,那麼x應該改變多少呢,如我們前面所說的動畫的播放時由插值器和估值器一起控制的,由於現在我們使用的是線性插值器,根據我們前面分析過的線性插值器源碼,最終f(t)=t(為了防止符號沖突我們改為f(t)代替),也就是進線性插值器直接返回傳入的時間流逝的百分比,也就意味著當前屬性變化的百分比為0.5,這個時候線性插值器的工作就完成了,具體x該移動多少,這個就需要估值器來確定了,我們再一次看看IntEvaluator的源碼:
package android.animation; public class IntEvaluator implements TypeEvaluator{ public Integer evaluate(float fraction, Integer startValue, Integer endValue) { int startInt = startValue; return (int)(startInt + fraction * (endValue - startInt)); } }
??根據我們之前分析,很顯然fraction=0.5,startInt=0,endValue=40,那麼整型估值器的最後返回的結果顯然就是0.5*(40-0)=20,也就是當t=20ms時,x需要移動的距離為20。
??結合前面所有的分析以及上面的案例,我們對TimeInterpolator和TypeEvaluator應該有很清晰的概念了,說白了每一個TimeInterpolator和TypeEvaluator都是一個函數計算公式,只不過TimeInterpolator控制的是動畫的速度,而TypeEvaluator控制的是動畫的過程,畢竟最終如何運動是要通過TypeEvaluator計算出來的,而TimeInterpolator和TypeEvaluator兩者結合的效果最終體現ValueAnimator對象上,再通過該對象(或者其子類ObjectValue)作用到我們需要執行動畫的對象上,也就達到我們所想要的預期動畫效果。現在我們再回頭看看下面的函數公式,應該一幕了然了吧。
??好~TimeInterpolator和TypeEvaluator的工作原理就分析到這裡。接著我們來了解一下系統為我們提供的Interpolator。
??AccelerateDecelerateInterpolator,又稱加速減速器,特點動畫開頭和結束慢,中間快,屬性動畫默認插值器。其源碼如下:
public class AccelerateDecelerateInterpolator extends BaseInterpolator
        implements NativeInterpolatorFactory {
    public AccelerateDecelerateInterpolator() {
    }

    @SuppressWarnings({"UnusedDeclaration"})
    public AccelerateDecelerateInterpolator(Context context, AttributeSet attrs) {
    }

    public float getInterpolation(float input) {
        return (float)(Math.cos((input + 1) * Math.PI) / 2.0f) + 0.5f;
    }

    /** @hide */
    @Override
    public long createNativeInterpolator() {
        return NativeInterpolatorFactoryHelper.createAccelerateDecelerateInterpolator();
    }
}
??結合源碼中的getInterpolation(float input)方法和前面對插值器的分析,可以知道該函數方法等如下函數公式,其函數公式在坐標系的圖像:

??從坐標圖像可以看出該函數公式確實是開頭慢中間開始變快,AccelerateDecelerateInterpolator插值器動畫效果如下:

??AccelerateInterpolator,又稱加速器插值器,其特點是開始很慢後面越來越快。其源碼如下(去掉了一些沒必要看的代碼):
public class AccelerateInterpolator extends BaseInterpolator implements NativeInterpolatorFactory {
    private final float mFactor;
    private final double mDoubleFactor;

    public AccelerateInterpolator() {
        mFactor = 1.0f;
        mDoubleFactor = 2.0;
    }

    /**
     * Constructor
     *  將factor設置為1.0f會產生一條y=x^2的拋物線。
     *  增加factor 到 1.0f 後,開頭更加慢,結尾更加快
     * @param factor Degree to which the animation should be eased. Seting
     *        factor to 1.0f produces a y=x^2 parabola. Increasing factor above
     *        1.0f  exaggerates the ease-in effect (i.e., it starts even
     *        slower and ends evens faster)
     */
    public AccelerateInterpolator(float factor) {
        mFactor = factor;
        mDoubleFactor = 2 * mFactor;
    }

    public AccelerateInterpolator(Context context, AttributeSet attrs) {
        this(context.getResources(), context.getTheme(), attrs);
    }

    /** @hide */
    public AccelerateInterpolator(Resources res, Theme theme, AttributeSet attrs) {
        TypedArray a;
        if (theme != null) {
            a = theme.obtainStyledAttributes(attrs, R.styleable.AccelerateInterpolator, 0, 0);
        } else {
            a = res.obtainAttributes(attrs, R.styleable.AccelerateInterpolator);
        }

        mFactor = a.getFloat(R.styleable.AccelerateInterpolator_factor, 1.0f);
        mDoubleFactor = 2 * mFactor;
        setChangingConfiguration(a.getChangingConfigurations());
        a.recycle();
    }

    public float getInterpolation(float input) {
        if (mFactor == 1.0f) {
            return input * input;
        } else {
            return (float)Math.pow(input, mDoubleFactor);
        }
    }
}
??從源碼可以看出該插值器有一個factor的變量,這個參數實際上是個閥值,用於控制加速的快慢度,從getInterpolation(float input)方法可以看出當factor=1時與factor!=1時選擇的內部計算方式是不一樣的。我們分別來分析一下,直接上圖:
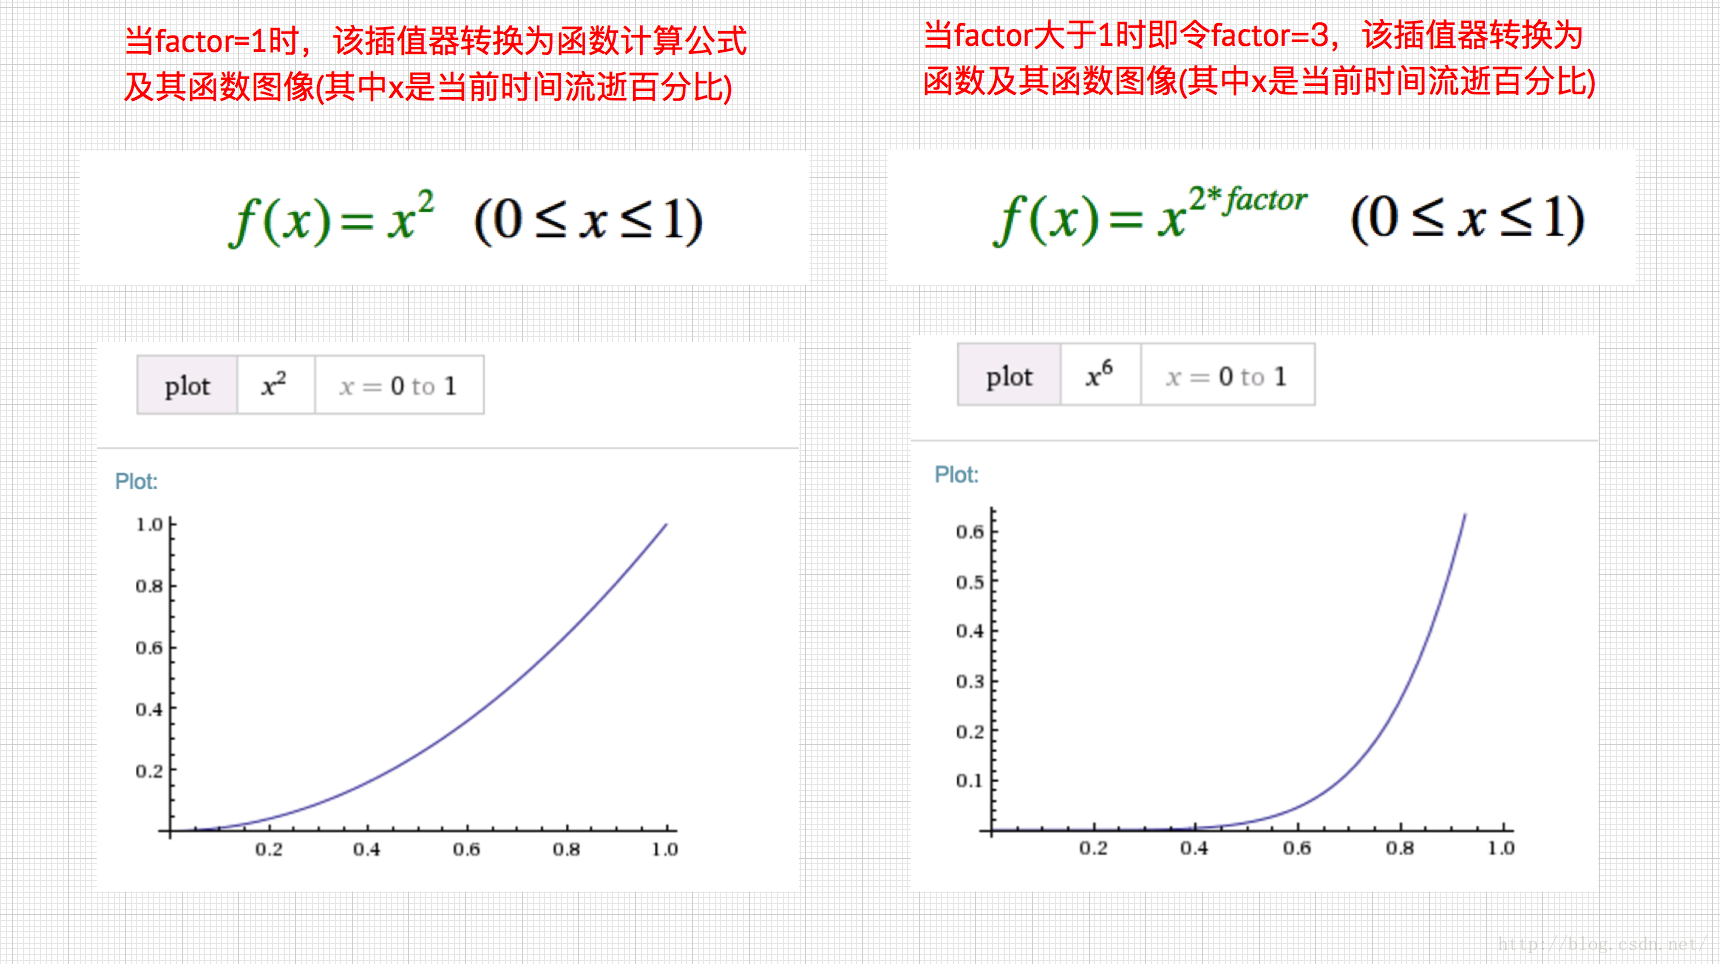
當factor=1時,動畫效果:

當factor !=1時,我們假設factor=3時,也就是y=x^6 ,其動畫效果如下:

??從上面的圖像和動畫看來,無論factor等於1或者大於1,動畫都呈現加速趨勢。只不過factor的值影響加速快慢罷了。當factor大於1而且越大時,開始加速就越小,但結尾加速更加快,這就是AccelerateInterpolator插值器帶來的效果。
??DecelerateInterpolator,又稱減速插值器,特點開頭快,結尾慢。其源碼如下:
public class DecelerateInterpolator extends BaseInterpolator implements NativeInterpolatorFactory {
public DecelerateInterpolator() {
}
/**
* Constructor
* 將factor值設置為1.0f時,是一條從上向下的y=x^2拋物線。
* 增加factor大於1.0f以後開頭更快,結尾更慢
* @param factor Degree to which the animation should be eased. Setting factor to 1.0f produces
* an upside-down y=x^2 parabola. Increasing factor above 1.0f makes exaggerates the ease-out effect
* (i.e., it starts even faster and ends evens slower)
* */
public DecelerateInterpolator(float factor) {
mFactor = factor;
}
public DecelerateInterpolator(Context context, AttributeSet attrs) {
this(context.getResources(), context.getTheme(), attrs);
}
public DecelerateInterpolator(Resources res, Theme theme, AttributeSet attrs) {
TypedArray a;
if (theme != null) {
a = theme.obtainStyledAttributes(attrs, R.styleable.DecelerateInterpolator, 0, 0);
} else {
a = res.obtainAttributes(attrs, R.styleable.DecelerateInterpolator);
}
mFactor = a.getFloat(R.styleable.DecelerateInterpolator_factor, 1.0f);
setChangingConfiguration(a.getChangingConfigurations());
a.recycle();
}
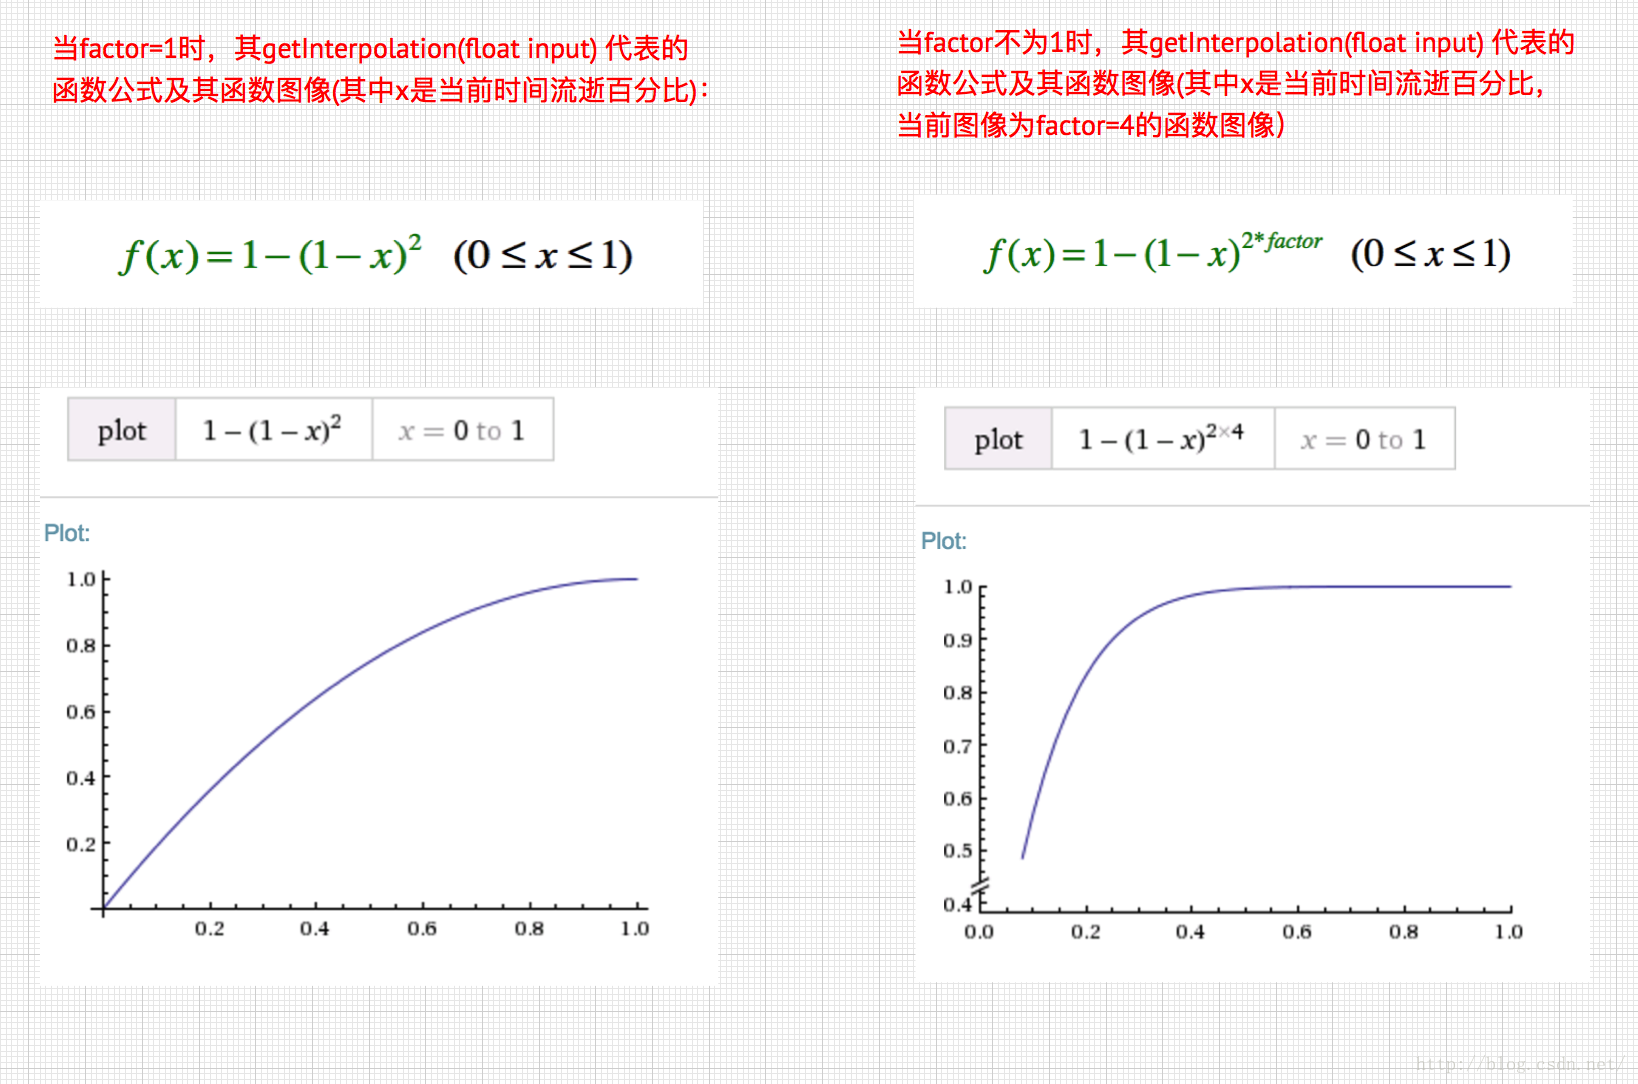
public float getInterpolation(float input) {
float result;
if (mFactor == 1.0f) {
result = (float)(1.0f - (1.0f - input) * (1.0f - input));
} else {
result = (float)(1.0f - Math.pow((1.0f - input), 2 * mFactor));
}
return result;
}
private float mFactor = 1.0f;
}
??factor的變量,默認值為1,這個參數同樣是個閥值,用於控制加速的快慢度,分別分析其取值不同。以下是當factor為1和不為1時,其getInterpolation(float input) 代表的函數公式(其中x是當前時間流逝百分比)及其圖像如下:
當factor為1時動畫效果:

當factor不為1時且factor=4時,動畫效果:

??從函數圖像和動畫看,無論factor為1或者大於1,DecelerateInterpolator都是開頭快,結尾慢的特點,而且當factor的值越大時,開頭就顯得越快,當然結尾也就顯得越慢了,也就是說DecelerateInterpolator代表的是一種開頭快速的運動,而結尾平滑過渡的效果。
??AnticipateInterpolator,又稱回蕩插值器,特點慢速反向運動然後加速會往回落,先來看看其源碼實現:
public class AnticipateInterpolator extends BaseInterpolator implements NativeInterpolatorFactory {
    private final float mTension;

    public AnticipateInterpolator() {
        mTension = 2.0f;
    }

    /**
     *  可以翻譯為繃緊程度,當繃緊程序為0.0f時,也就沒有了反向作用力,默認值為2.0f,插值器將退化成一個y=x^3的加速插值器。
     * @param tension Amount of anticipation. When tension equals 0.0f, there is
     *                no anticipation and the interpolator becomes a simple
     *                acceleration interpolator.
     */
    public AnticipateInterpolator(float tension) {
        mTension = tension;
    }

    public AnticipateInterpolator(Context context, AttributeSet attrs) {
        this(context.getResources(), context.getTheme(), attrs);
    }

    /** @hide */
    public AnticipateInterpolator(Resources res, Theme theme, AttributeSet attrs) {
        TypedArray a;
        if (theme != null) {
            a = theme.obtainStyledAttributes(attrs, R.styleable.AnticipateInterpolator, 0, 0);
        } else {
            a = res.obtainAttributes(attrs, R.styleable.AnticipateInterpolator);
        }

        mTension = a.getFloat(R.styleable.AnticipateInterpolator_tension, 2.0f);
        setChangingConfiguration(a.getChangingConfigurations());
        a.recycle();
    }

    public float getInterpolation(float t) {
        // a(t) = t * t * ((tension + 1) * t - tension)
        return t * t * ((mTension + 1) * t - mTension);
    }
}
??源碼中有個變量tension,這個代表是繃緊程度,它大小決定動畫開始時反向運動的大小,現在我們分別來看看tension=0,tension=2,tension=8時的函數公式及其圖像變換其中tension=2為默認值
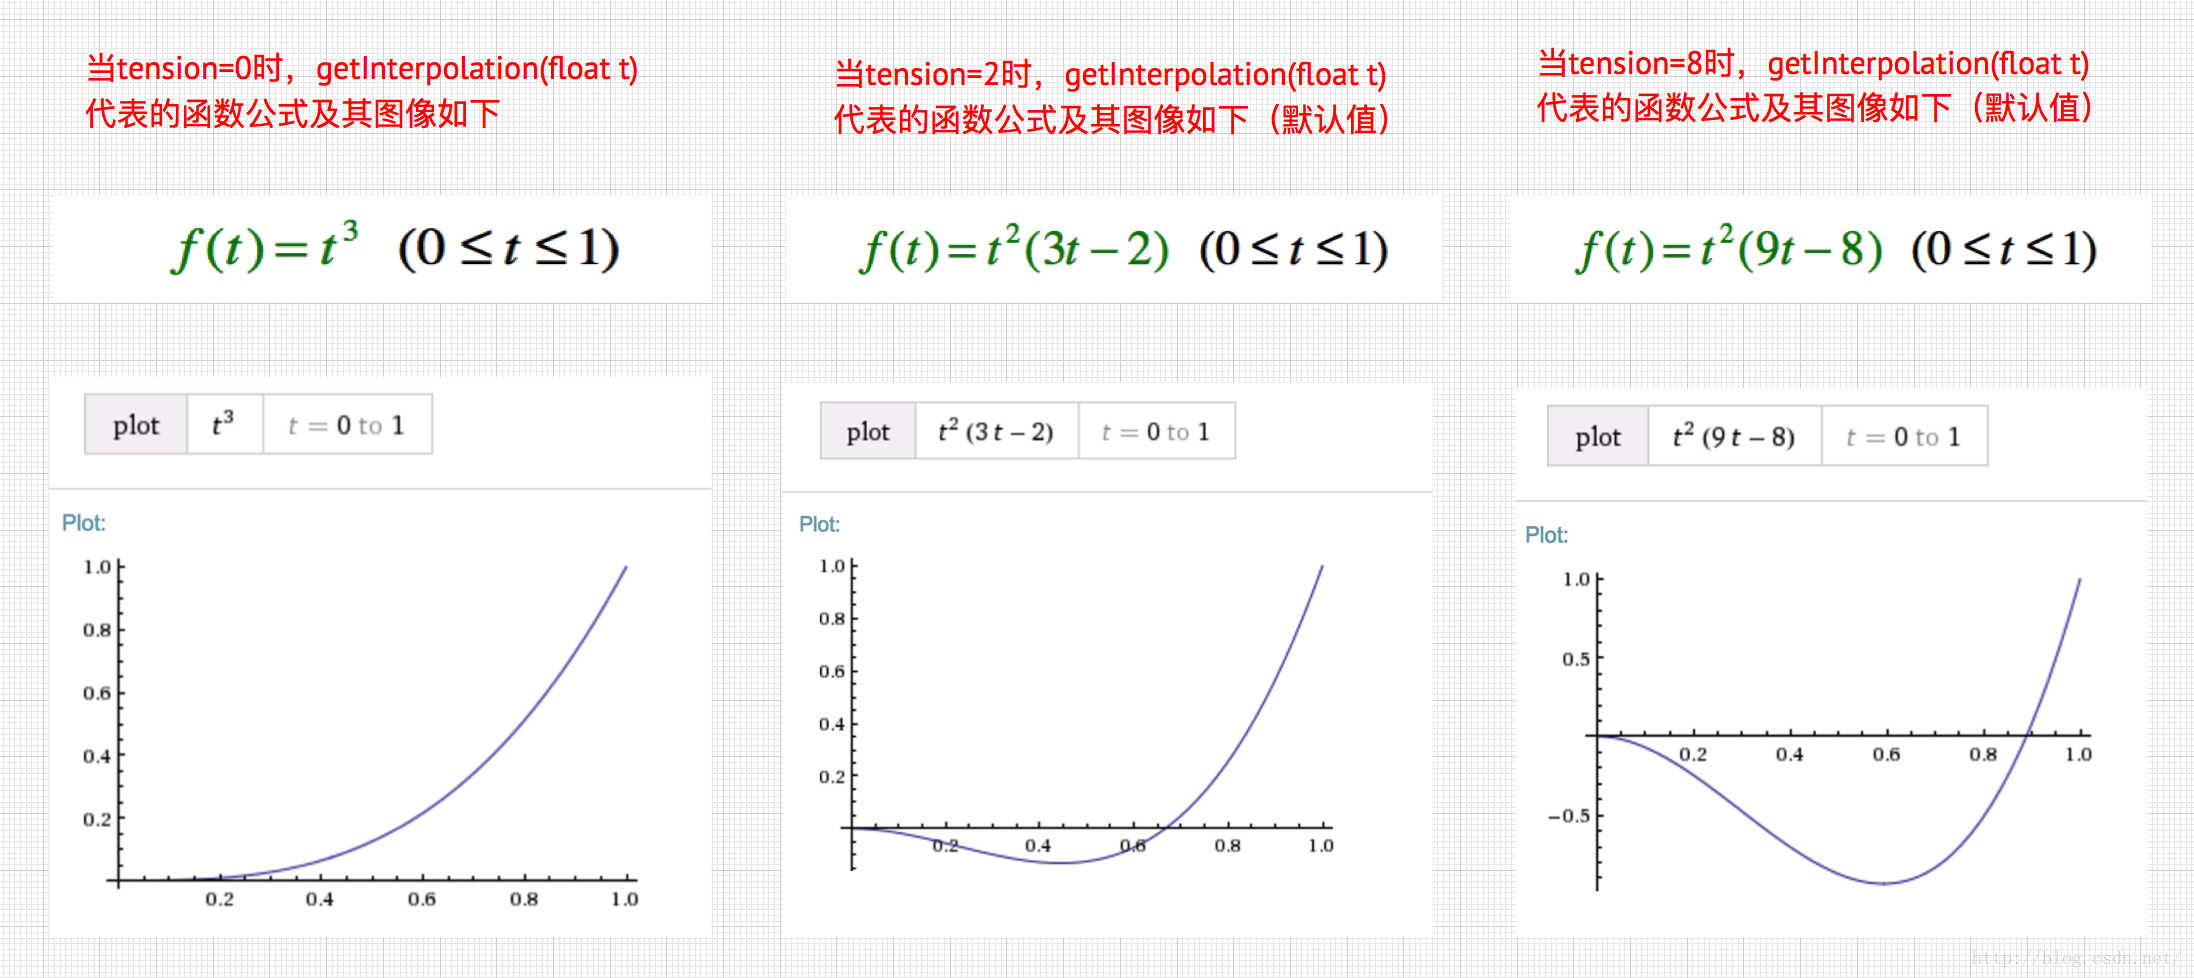
當tension=0時的動畫效果:

實際上此時tension=0,AnticipateInterpolator插值器沒有任何回彈的效果,接著看看當tension=2時的動畫效果:

我們可以看出動畫回彈了一下點,然後加速下滑了,再來看看當tension=8時的動畫效果:

??我們發現當tension增大後反向彈的速度和距離也變得大了,這就是tension變量控制的效果。從上面的圖像和動畫效果看來顯然在縱坐標下方的部分代表著AnticipateInterpolator插值器回彈的效果,我們或許有個疑問,前面說過插值器只控制速度,怎麼現在連軌跡也變化了?其實插值器還是控制速度的,這是因為從坐標下方代表著負值,所以此時速度便也是負值,最終通過估值器計算出來的自然也是負值,因此在動畫體現出來的就是反向運動效果,這就是軌跡發生變化的原因。到此我們AnticipateInterpolator的理解應該比較清晰了,哈~。
??CycleInterpolator,又稱正弦周期插值器,特點以指定的周期重復動畫,變化率曲線為正弦。這裡來看一個正弦周期的動畫效果:

動畫過程剛好符合一個正弦周期。看看其源碼:
public class CycleInterpolator extends BaseInterpolator implements NativeInterpolatorFactory {
    public CycleInterpolator(float cycles) {
        mCycles = cycles;
    }

    public CycleInterpolator(Context context, AttributeSet attrs) {
        this(context.getResources(), context.getTheme(), attrs);
    }

    /** @hide */
    public CycleInterpolator(Resources resources, Theme theme, AttributeSet attrs) {
        TypedArray a;
        if (theme != null) {
            a = theme.obtainStyledAttributes(attrs, R.styleable.CycleInterpolator, 0, 0);
        } else {
            a = resources.obtainAttributes(attrs, R.styleable.CycleInterpolator);
        }

        mCycles = a.getFloat(R.styleable.CycleInterpolator_cycles, 1.0f);
        setChangingConfiguration(a.getChangingConfigurations());
        a.recycle();
    }

    public float getInterpolation(float input) {
        return (float)(Math.sin(2 * mCycles * Math.PI * input));
    }

    private float mCycles;
}
??從源碼可以看到一個變量mCycles,該變量就是控制正弦周期的,我們上面演示的正弦動畫傳入的mCycles=1,所以剛好是一個完整的正弦周期,當mCycles=1時,其正弦函數如下:

其函數圖像如下:

??這個比較簡單,軌跡變化的原因跟前面說的是一樣的,這裡不過多分析了。好~對於系統的插值器就分析到此,其他的插值器就不一一分析了,因為它們的都是一樣的套路,這裡小結一下插值器(沒有提到的自行查閱官方文檔哈~):
??OK,通過以上各類插值器的源碼分析,我們已經對Interpolator的內部實現機制有了比較清楚的認識了,那麼接下來我們就開始嘗試編寫一個自定義的Interpolator。
??通過前面的分析我們知道編寫自定義Interpolator最主要都是在於數學計算方面的,所這裡我們就來編寫一個非常簡單f(x)=cos(2πx)的函數,該函數圖像如下:
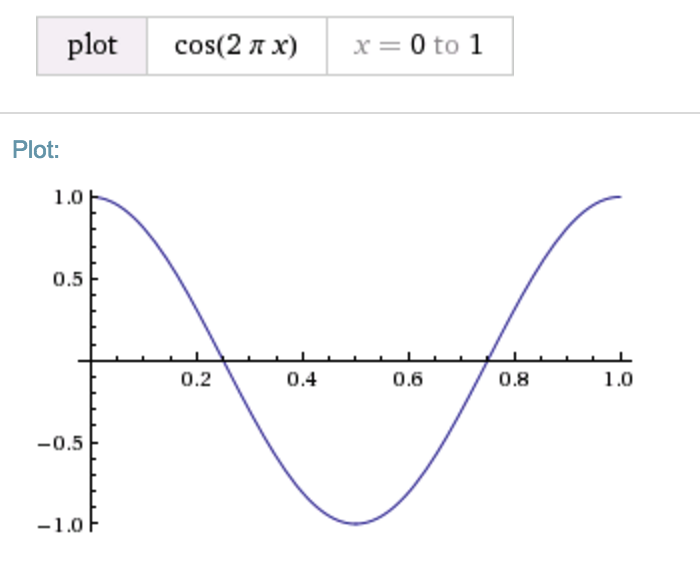
我們自定義一個類,命名為MyInterpolator,實現TimeInterpolator接口,代碼如下:
package com.zejian.animator;

import android.animation.TimeInterpolator;
import android.annotation.TargetApi;
import android.os.Build;

/**
 * Created by zejian
 * Time 16/8/25.
 * Description:
 */
@TargetApi(Build.VERSION_CODES.HONEYCOMB)
public class MyInterpolator implements TimeInterpolator {
    private float mCycles;

    /**
     * 通過構造函數傳遞周期數
     * @param cycles
     */
    public MyInterpolator(float cycles) {
        mCycles = cycles;
    }
    @Override
    public float getInterpolation(float input) {
        return (float) (Math.cos(2 * mCycles*Math.PI * input));
    }
}
調用代碼如下:
ObjectAnimator objectAnimator=ObjectAnimator.ofFloat(image,"translationY",0f,240);
objectAnimator.setDuration(5000);
objectAnimator.setInterpolator(new MyInterpolator(1));
objectAnimator.start();
效果如下:

??跟我們前面的函數圖像運動軌跡是一樣的,縱坐標負方向運動(向上運動)完,再從縱坐標正方向運動(向下運動)。哈~,這個案例比較簡單,如果需要特別絢麗的效果就得靠大家發揮牛逼的數學才華了。ok~,自定義Interpolator就到這裡。至於自定義TpyeEvaulator,則需要實現TpyeEvaulator接口即可,官方提供的都是簡單類型,那我們就來簡單地自定義一個對象類型的TpyeEvaulator,讓我們圖片水平方向是一個簡單的一個函數,豎直方向是一個3次方的拋物線,代碼如下:
package com.zejian.animator; import android.animation.TypeEvaluator; import android.annotation.TargetApi; import android.graphics.PointF; import android.os.Build; /** * Created by zejian * Time 16/8/26. * Description: */ @TargetApi(Build.VERSION_CODES.HONEYCOMB) public class MyEvalutor implements TypeEvaluator{ public PointF evaluate(float fraction, PointF startValue, PointF endValue) { PointF point = new PointF(); //x方向移動函數,線性軌跡,勻速移動 point.x = 300*fraction; // y方向移動函數,拋物線軌跡,加速移動 point.y = 500 * fraction * fraction * fraction; return point; } }
調用代碼如下:
final ImageView image= (ImageView) findViewById(R.id.image);

ValueAnimator valueAnimator = new ValueAnimator();
valueAnimator.setDuration(3000);
//PointF數值為float,Point數值為int,我們這裡選擇PointF
valueAnimator.setObjectValues(new PointF(0, 0));
//設置自定義的估值器
valueAnimator.setEvaluator(new MyEvalutor());
valueAnimator.start();
valueAnimator.addUpdateListener(new ValueAnimator.AnimatorUpdateListener() {
    @Override
    public void onAnimationUpdate(ValueAnimator animation) {
        PointF point = (PointF) animation.getAnimatedValue();
        //設置動畫
        image.setX(point.x);
        image.setY(point.y);
    }
});
看看其運動效果:

??效果很明顯,其運動軌跡就是我們自定義的x方向線性運行,而y方向拋物線運行。其實從整篇的分析來看插值器和估值器的工作原理並不難,而自定義插值器和估值器的代碼實現也非常簡單,唯一的難點是我們如何利用數學知識定義出我們所需要的函數路徑,這點也就是我們開頭所說的關於動畫效果的實現,依各人的數學思維能力而異了,哈~。
??最後這裡來個小結吧,每個TimeInterpolator和TypeEvaluator的衍生類都是代表著一個數學中的函數公式,而每一個ValueAnimator也不過是一個TimeInterpolator和一個TypeEvaluator的結合體。從數學的函數角度來說,ValueAnimator就是由TimeInterpolator和TypeEvaluator這兩個簡單函數組合而成的一個復合函數,ValueAnimator而就是通過TimeInterpolator和TypeEvaluator相結合的方式來對一個數值作運動的。當然系統提供了不少TimeInterpolator和TypeEvaluator,而我們也可以通過實現TimeInterpolator或者TypeEvaluator接口來自定義插值器和估值器,自定義插值器的過程也是設置函數計算的過程,而在估值器中我們可以自定義任意對象類型作為返回值,如前面的PointF也可以是自定義類型的對象。這就是屬性動畫的TimeInterpolator和TypeEvaluator工作過程以及他們的原理,哈~,本篇到此結束。
??剩余的屬性動畫的知識點如ofObject,ViewPropertyAnimator以及如何實現對任意沒有set或者get方法的對象做動畫,布局動畫等,我們都將放在下篇(也就完結篇)分析,歡迎繼續關注。
 Android studio 快捷鍵大全
Android Studio常用快捷鍵、Android Studio快捷鍵大全接下來這篇android studio使用教程,主要為大家介紹的是android studi
 Android 偷拍功能實現(手機關閉依然拍照)詳解及實例代碼
Android 偷拍功能/手機關閉能拍照效果如下: 其實偷拍與偷錄實現方式是一樣的,都是使用到的WindowManager來繪制桌面小控件的原理。那我就不多說
 基於Android的mvc、mvp以及mvvm架構分析(上)
前言:工欲善其事,必先利其器,工作一段時間後,對於以上十個字的感觸是最深的。剛參加工作的時候,並沒有對於要做的事情有著自己的理解,經常是上面分配了工作,自己就乖乖地跑去做
 Android嵌套滑動控件的沖突解決和ViewPager適配當前子控件高度不留空白的辦法
最近項目有一個需求,需要多層可滑動控件的嵌套展示,demo效果如下,demo的下載地址在最後 咋一看好像挺簡單啊,不就是一個ScrollView + ViewP