編輯:關於Android編程
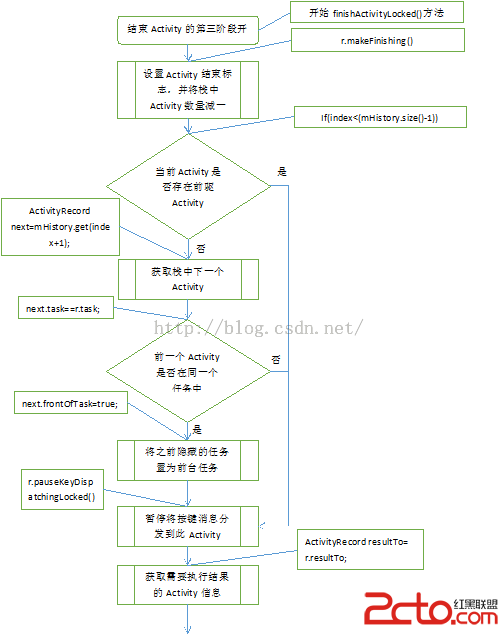
最近呢,本人辭職了,在找工作期間,不幸碰到了這個求職淡季,另外還是大學生畢業求職的高峰期,簡歷發了無數份卻都石沉大海,寶寶心裡那是一個苦啊!翻著過去的代碼,本人偶然找到了一個有意思的控件,那時本人還沒有寫博客的習慣,現在補上,先看效果圖:
然後看用法代碼:
StellarMap stellarMap = (StellarMap) findViewById(R.id.stellar);
		// 設置數據
		RecommendAdapter adapter = new RecommendAdapter();
		stellarMap.setAdapter(adapter);

		// 首頁選中
		stellarMap.setGroup(0, true);

		// 拆分屏幕
		stellarMap.setRegularity(15, 20);
class RecommendAdapter implements Adapter {
		/** 默認組數 */
		public static final int	PAGESIZE	= 15;

		@Override
		public int getGroupCount() {
			// 數據分組
			int groupCount = data.size() / PAGESIZE;
			// 最後一組
			if (data.size() % PAGESIZE != 0) {
				return groupCount + 1;
			}
			return groupCount;
		}

		@Override
		public int getCount(int group) {
			// 最後一組
			if (data.size() % PAGESIZE != 0) {
				if (group == getGroupCount() - 1) {
					return data.size() % PAGESIZE;
				}
			}
			return PAGESIZE;
		}

		@Override
		public View getView(int group, int position, View convertView) {
			TextView tv = new TextView(MainActivity.this);
			int index = group * PAGESIZE + position;
			tv.setText(data.get(index));
			// 隨機大小
			Random random = new Random();
			// 14-17
			int size = random.nextInt(4) + 14;
			tv.setTextSize(size);

			// 隨機顏色
			int alpha = 255;
			int red = random.nextInt(190) + 30;
			int green = random.nextInt(190) + 30;
			int blue = random.nextInt(190) + 30;
			int argb = Color.argb(alpha, red, green, blue);
			tv.setTextColor(argb);

			return tv;
		}

		@Override
		public int getNextGroupOnPan(int group, float degree) {
			if(group == getGroupCount() - 1){
				group = -1;
			}
			return group + 1;
		}

		@Override
		public int getNextGroupOnZoom(int group, boolean isZoomIn) {
			if(group == getGroupCount() - 1){
				group = -1;
			}
			return group + 1;
		}

	}
接下來才是正餐,我們看看StellarMap的實現,StellarMap繼承於FrameLayout:
/** 構造方法 */
	public StellarMap(Context context, AttributeSet attrs, int defStyle) {
		super(context, attrs, defStyle);
		init();
	}

	public StellarMap(Context context, AttributeSet attrs) {
		super(context, attrs);
		init();
	}

	public StellarMap(Context context) {
		super(context);
		init();
	}
/** 初始化方法 */
	private void init() {
		mGroupCount = 0;
		mHidenGroupIndex = -1;
		mShownGroupIndex = -1;
		mHidenGroup = new RandomLayout(getContext());
		mShownGroup = new RandomLayout(getContext());

		addView(mHidenGroup, new LayoutParams(LayoutParams.FILL_PARENT, LayoutParams.FILL_PARENT));
		mHidenGroup.setVisibility(View.GONE);
		addView(mShownGroup, new LayoutParams(LayoutParams.FILL_PARENT, LayoutParams.FILL_PARENT));

		mGestureDetector = new GestureDetector(this);
		setOnTouchListener(this);
		// 設置動畫
		mZoomInNearAnim = AnimationUtil.createZoomInNearAnim();
		mZoomInNearAnim.setAnimationListener(this);
		mZoomInAwayAnim = AnimationUtil.createZoomInAwayAnim();
		mZoomInAwayAnim.setAnimationListener(this);
		mZoomOutNearAnim = AnimationUtil.createZoomOutNearAnim();
		mZoomOutNearAnim.setAnimationListener(this);
		mZoomOutAwayAnim = AnimationUtil.createZoomOutAwayAnim();
		mZoomOutAwayAnim.setAnimationListener(this);
	}
按照代碼執行順序來,下一步是設置Adapter:
/** 設置本Adapter */
	public void setAdapter(Adapter adapter) {
		mAdapter = adapter;
		mGroupCount = mAdapter.getGroupCount();
		if (mGroupCount > 0) {
			mShownGroupIndex = 0;
		}
		setChildAdapter();
	}
/** 為子Group設置Adapter */
	private void setChildAdapter() {
		if (null == mAdapter) {
			return;
		}
		mHidenGroupAdapter = new RandomLayout.Adapter() {
			// 取出本Adapter的View對象給HidenGroup的Adapter
			@Override
			public View getView(int position, View convertView) {
				return mAdapter.getView(mHidenGroupIndex, position, convertView);
			}

			@Override
			public int getCount() {
				return mAdapter.getCount(mHidenGroupIndex);
			}
		};
		mHidenGroup.setAdapter(mHidenGroupAdapter);

		mShownGroupAdapter = new RandomLayout.Adapter() {
			// 取出本Adapter的View對象給ShownGroup的Adapter
			@Override
			public View getView(int position, View convertView) {
				return mAdapter.getView(mShownGroupIndex, position, convertView);
			}

			@Override
			public int getCount() {
				return mAdapter.getCount(mShownGroupIndex);
			}
		};
		mShownGroup.setAdapter(mShownGroupAdapter);
	}
/** 構造方法 */
	public RandomLayout(Context context) {
		super(context);
		init();
	}
/** 初始化方法 */
	private void init() {
		mLayouted = false;
		mRdm = new Random();
		setRegularity(1, 1);
		mFixedViews = new HashSet();
		mRecycledViews = new LinkedList();
	}
/** 設置數據源 */
	public void setAdapter(Adapter adapter) {
		this.mAdapter = adapter;
	}
/** 給指定的Group設置動畫 */
	public void setGroup(int groupIndex, boolean playAnimation) {
		switchGroup(groupIndex, playAnimation, mZoomInNearAnim, mZoomInAwayAnim);
	}
/** 給下一個Group設置進出動畫 */
	private void switchGroup(int newGroupIndex, boolean playAnimation, Animation inAnim,
			Animation outAnim) {
		if (newGroupIndex < 0 || newGroupIndex >= mGroupCount) {
			return;
		}
		// 把當前顯示Group角標設置為隱藏的
		mHidenGroupIndex = mShownGroupIndex;
		// 把下一個Group角標設置為顯示的
		mShownGroupIndex = newGroupIndex;
		// 交換兩個Group
		RandomLayout temp = mShownGroup;
		mShownGroup = mHidenGroup;
		mShownGroup.setAdapter(mShownGroupAdapter);
		mHidenGroup = temp;
		mHidenGroup.setAdapter(mHidenGroupAdapter);
		// 刷新顯示的Group
		mShownGroup.refresh();
		// 顯示Group
		mShownGroup.setVisibility(View.VISIBLE);

		// 啟動動畫
		if (playAnimation) {
			if (mShownGroup.hasLayouted()) {
				mShownGroup.startAnimation(inAnim);
			}
			mHidenGroup.startAnimation(outAnim);
		} else {
			mHidenGroup.setVisibility(View.GONE);
		}
	}
最後一行代碼,stellarMap.setRegularity(15, 20)方法:
/** 設置隱藏組和顯示組的x和y的規則 */
	public void setRegularity(int xRegularity, int yRegularity) {
		mHidenGroup.setRegularity(xRegularity, yRegularity);
		mShownGroup.setRegularity(xRegularity, yRegularity);
	}
/** 設置mXRegularity和mXRegularity,確定區域的個數 */
	public void setRegularity(int xRegularity, int yRegularity) {
		if (xRegularity > 1) {
			this.mXRegularity = xRegularity;
		} else {
			this.mXRegularity = 1;
		}
		if (yRegularity > 1) {
			this.mYRegularity = yRegularity;
		} else {
			this.mYRegularity = 1;
		}
		this.mAreaCount = mXRegularity * mYRegularity;// 個數等於x方向的個數*y方向的個數
		this.mAreaDensity = new int[mYRegularity][mXRegularity];// 存放區域的二維數組
	}
/** 確定子View的位置,這個就是區域分布的關鍵 */
	@Override
	public void onLayout(boolean changed, int l, int t, int r, int b) {
		final int count = getChildCount();
		// 確定自身的寬高
		int thisW = r - l - this.getPaddingLeft() - this.getPaddingRight();
		int thisH = b - t - this.getPaddingTop() - this.getPaddingBottom();
		// 自身內容區域的右邊和下邊
		int contentRight = r - getPaddingRight();
		int contentBottom = b - getPaddingBottom();
		// 按照順序存放把區域存放到集合中
		List availAreas = new ArrayList(mAreaCount);
		for (int i = 0; i < mAreaCount; i++) {
			availAreas.add(i);
		}

		int areaCapacity = (count + 1) / mAreaCount + 1; // 區域密度,表示一個區域內可以放幾個View,+1表示至少要放一個
		int availAreaCount = mAreaCount; // 可用的區域個數

		for (int i = 0; i < count; i++) {
			final View child = getChildAt(i);
			if (child.getVisibility() == View.GONE) { // gone掉的view是不參與布局
				continue;
			}

			if (!mFixedViews.contains(child)) {// mFixedViews用於存放已經確定好位置的View,存到了就沒必要再次存放
				LayoutParams params = (LayoutParams) child.getLayoutParams();
				// 先測量子View的大小
				int childWidthMeasureSpec = MeasureSpec.makeMeasureSpec(this.getMeasuredWidth(), MeasureSpec.AT_MOST);// 為子View准備測量的參數
				int childHeightMeasureSpec = MeasureSpec.makeMeasureSpec(this.getMeasuredHeight(), MeasureSpec.AT_MOST);
				child.measure(childWidthMeasureSpec, childHeightMeasureSpec);
				// 子View測量之後的寬和高
				int childW = child.getMeasuredWidth();
				int childH = child.getMeasuredHeight();
				// 用自身的高度去除以分配值,可以算出每一個區域的寬和高
				float colW = thisW / (float) mXRegularity;
				float rowH = thisH / (float) mYRegularity;

				while (availAreaCount > 0) { // 如果使用區域大於0,就可以為子View嘗試分配
					int arrayIdx = mRdm.nextInt(availAreaCount);// 隨機一個list中的位置
					int areaIdx = availAreas.get(arrayIdx);// 再根據list中的位置獲取一個區域編號
					int col = areaIdx % mXRegularity;// 計算出在二維數組中的位置
					int row = areaIdx / mXRegularity;
					if (mAreaDensity[row][col] < areaCapacity) {// 區域密度未超過限定,將view置入該區域
						int xOffset = (int) colW - childW; // 區域寬度 和 子View的寬度差值,差值可以用來做區域內的位置隨機
						if (xOffset <= 0) {// 說明子View的寬比較大
							xOffset = 1;
						}
						int yOffset = (int) rowH - childH;
						if (yOffset <= 0) {// 說明子View的高比較大
							yOffset = 1;
						}
						// 確定左邊,等於區域寬度*左邊的區域
						params.mLeft = getPaddingLeft() + (int) (colW * col + mRdm.nextInt(xOffset));
						int rightEdge = contentRight - childW;
						if (params.mLeft > rightEdge) {// 加上子View的寬度後不能超出右邊界
							params.mLeft = rightEdge;
						}
						params.mRight = params.mLeft + childW;

						params.mTop = getPaddingTop() + (int) (rowH * row + mRdm.nextInt(yOffset));
						int bottomEdge = contentBottom - childH;
						if (params.mTop > bottomEdge) {// 加上子View的寬度後不能超出右邊界
							params.mTop = bottomEdge;
						}
						params.mBottom = params.mTop + childH;

						if (!isOverlap(params)) {// 判斷是否和別的View重疊了
							mAreaDensity[row][col]++;// 沒有重疊,把該區域的密度加1
							child.layout(params.mLeft, params.mTop, params.mRight, params.mBottom);// 布局子View
							mFixedViews.add(child);// 添加到已經布局的集合中
							break;
						} else {// 如果重疊了,把該區域移除,
							availAreas.remove(arrayIdx);
							availAreaCount--;
						}
					} else {// 區域密度超過限定,將該區域從可選區域中移除
						availAreas.remove(arrayIdx);
						availAreaCount--;
					}
				}
			}
		}
		mLayouted = true;
	}
在StellarMap中加入了手勢,用於用戶滑動的時候給與交互:
@Override
	public boolean onFling(MotionEvent e1, MotionEvent e2, float velocityX, float velocityY) {
		int centerX = getMeasuredWidth() / 2;
		int centerY = getMeasuredWidth() / 2;

		int x1 = (int) e1.getX() - centerX;
		int y1 = (int) e1.getY() - centerY;
		int x2 = (int) e2.getX() - centerX;
		int y2 = (int) e2.getY() - centerY;

		if ((x1 * x1 + y1 * y1) > (x2 * x2 + y2 * y2)) {
			zoomOut();
		} else {
			zoomIn();
		}
		return true;
	}
/** 給Group設置動畫入 */
	public void zoomIn() {
		final int nextGroupIndex = mAdapter.getNextGroupOnZoom(mShownGroupIndex, true);
		switchGroup(nextGroupIndex, true, mZoomInNearAnim, mZoomInAwayAnim);
	}

	/** 給Group設置出動畫 */
	public void zoomOut() {
		final int nextGroupIndex = mAdapter.getNextGroupOnZoom(mShownGroupIndex, false);
		switchGroup(nextGroupIndex, true, mZoomOutNearAnim, mZoomOutAwayAnim);
	}
 iOS開發中TableView類似QQ分組的折疊與展開效果
類似QQ分組的樣子,實現tableView的折疊與展開。其實要做這個效果我先想到的是在tableView中再嵌套多個tableView,這個想法實現起來就有點難了。所以還
 android筆記4——Fragment的使用
說明第一下:按照前面的方式我們創建了項目,如果使用的是最新的ADT,Minimum Android SDK選的是android2.*或1.*,此時會默認創建一個兼容的項目
 淺談android適配(下)
上一篇我們主要了解了為什麼適配,以及怎麼適配,同時給出了部分切圖規范,和在開發過程中需要的一些注意事項,這一遍主要從官方給出的指導建議出發,從視覺的角度來說說怎麼適配。度
 Android Studio NDK開發
以前接觸過NDK的開發,是在Eclipse環境下開發的。今天嘗試了下用Android Studio來配置,結果真是處處都是坑,現在總結一下:一、步驟1. 首先創建Main