編輯:關於Android編程
京東客戶端的輪播文字效果:


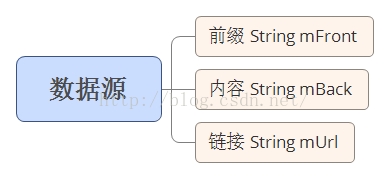
public class ADEnity {
    private String mFront ; //前面的文字
    private String mBack ; //後面的文字
    private String mUrl ;//包含的鏈接

    public ADEnity(String mFront, String mBack,String mUrl) {
        this.mFront = mFront;
        this.mBack = mBack;
        this.mUrl = mUrl;
    }

    public String getmUrl() {
        return mUrl;
    }

    public void setmUrl(String mUrl) {
        this.mUrl = mUrl;
    }

    public String getmFront() {
        return mFront;
    }

    public void setmFront(String mFront) {
        this.mFront = mFront;
    }

    public String getmBack() {
        return mBack;
    }

    public void setmBack(String mBack) {
        this.mBack = mBack;
    }
}

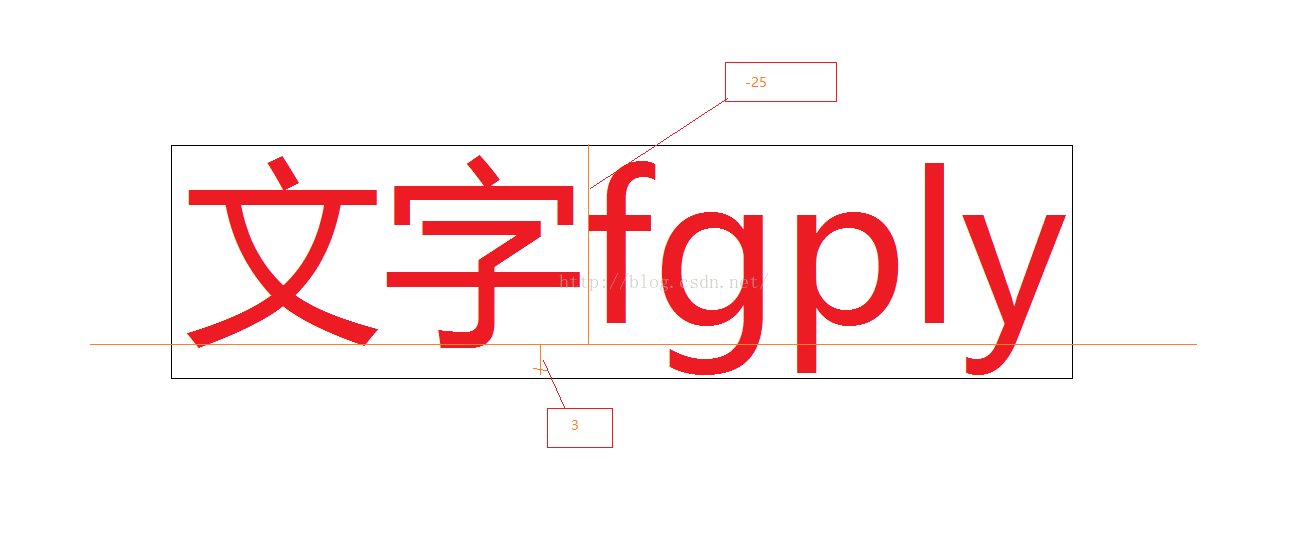
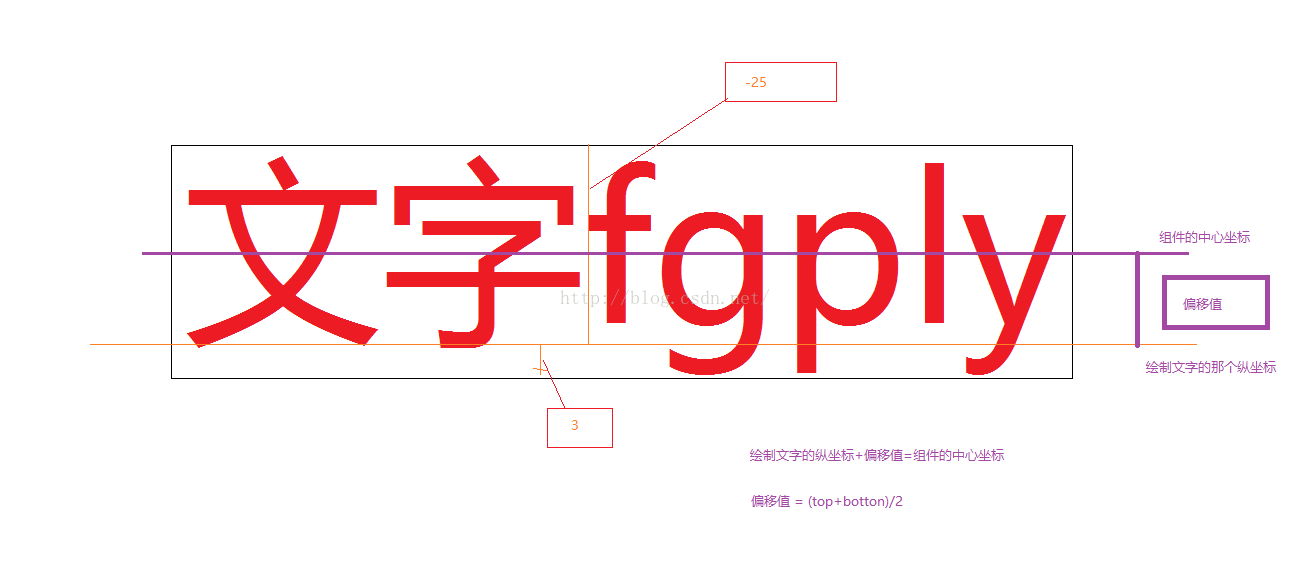
  mHeight  / 2 - (bound.top + bound.bottom) / 2
//在縱坐標為mY的地方繪制文字
//計算方式
//mheight /2 = mY + (bound.top + bound.bottom) / 2 ;
    mY == 0 - bound.bottom
//在縱坐標為mY的地方繪制,此時文字剛好移動到最高點
//計算方式
//mY + bound.bottom = 0 ;
 mY = mHeight  - indexBound.top;
//在縱坐標為mY的地方繪制,此時文字剛好移動到最高點
//計算方式
//mY + bound.top = mHeight  ;
//初始化默認值
private void init() {
    mDuration = 500;
    mInterval = 1000;
    mIndex = 0;
    mPaintFront = new Paint();
    mPaintFront.setAntiAlias(true);
    mPaintFront.setDither(true);
    mPaintFront.setTextSize(30);


    mPaintBack = new Paint();
    mPaintBack.setAntiAlias(true);
    mPaintBack.setDither(true);
    mPaintBack.setTextSize(30);

}
//獲取當前的數據
ADEnity model = mTexts.get(mIndex);
String font = model.getmFront();
String back = model.getmBack();
// 繪制前綴的外框
Rect indexBound = new Rect();
mPaintFront.getTextBounds(font, 0, font.length(), indexBound);

//繪制內容的外框
Rect contentBound = new Rect();
mPaintBack.getTextBounds(back, 0, back.length(), contentBound);
if (mY == 0 && hasInit == false) {
    mY = getMeasuredHeight() - indexBound.top;
    hasInit = true;
}
//移動到最上面
if (mY == 0 - indexBound.bottom) {
    Log.i(TAG, "onDraw: " + getMeasuredHeight());
    mY = getMeasuredHeight() - indexBound.top;//返回底部
    mIndex++;//換下一組數據
}
//移動到中間
if (mY == getMeasuredHeight() / 2 - (indexBound.top + indexBound.bottom) / 2) {
    isMove = false;//停止移動
    Timer timer = new Timer();
    timer.schedule(new TimerTask() {
        @Override
        public void run() {
            postInvalidate();//通知重繪
            isMove = true;//設置移動為true
        }
    }, mInterval);//停頓多少毫秒之後再次移動
}
mY -= 1;//每次只移動一個像素,盡量保證平滑顯示
//循環使用數據
if (mIndex == mTexts.size()) {
    mIndex = 0;
}
//如果是處於移動狀態時的,則延遲繪制
//計算公式為一個比例,一個時間間隔移動組件高度,則多少毫秒來移動1像素
if (isMove) {
    postInvalidateDelayed(mDuration / getMeasuredHeight());
}
public interface onClickLitener {
    public void onClick(String mUrl);
}

private onClickLitener onClickLitener;

public void setOnClickLitener(TextViewAd.onClickLitener onClickLitener) {
    this.onClickLitener = onClickLitener;
}
//重寫onTouchEvent事件,並且要返回true,表明當前的點擊事件由這個組件自身來處理 @Override public boolean onTouchEvent(MotionEvent event) { int action = event.getAction(); switch (action) { case MotionEvent.ACTION_DOWN: //調用回調,將當前數據源的鏈接傳出去 if (onClickLitener != null) { onClickLitener.onClick(mTexts.get(mIndex).getmUrl()); } break; } return true; }
//設置數據源
public void setmTexts(List mTexts) {
    this.mTexts = mTexts;
}

//設置廣告文字的停頓時間
public void setmInterval(int mInterval) {
    this.mInterval = mInterval;
}

//設置文字從出現到消失的時長
public void setmDuration(int mDuration) {
    this.mDuration = mDuration;
}

//設置前綴的文字顏色
public void setFrontColor(int mFrontColor) {
    mPaintFront.setColor(mFrontColor);
}

//設置正文內容的顏色
public void setBackColor(int mBackColor) {
    mPaintBack.setColor(mBackColor);
}
package com.qiyuan.jindongshangcheng.view;
import android.content.Context;
import android.graphics.Canvas;
import android.graphics.Paint;
import android.graphics.Rect;
import android.util.AttributeSet;
import android.util.Log;
import android.view.MotionEvent;
import android.widget.TextView;
import com.qiyuan.jindongshangcheng.enity.ADEnity;
import java.util.List;
import java.util.Timer;
import java.util.TimerTask;
/**
* Created by huanghaojie on 2016/9/30.
*/
public class TextViewAd extends TextView {
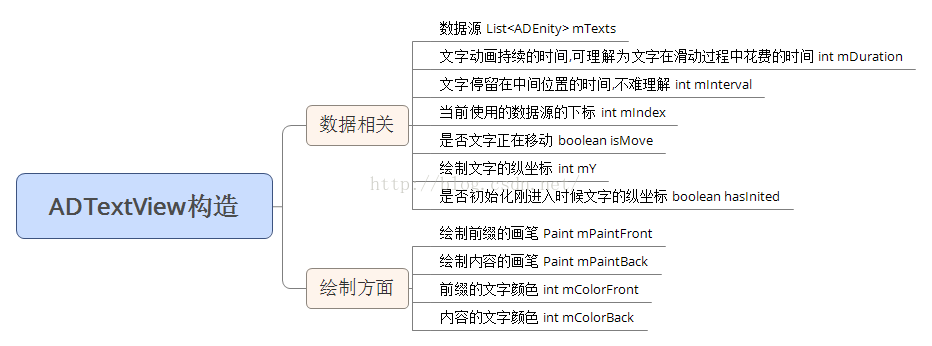
private int mDuration; //文字從出現到顯示消失的時間
private int mInterval; //文字停留在中間的時長切換的間隔
private List mTexts; //顯示文字的數據源
private int mY = 0; //文字的Y坐標
private int mIndex = 0; //當前的數據下標
private Paint mPaintBack; //繪制內容的畫筆
private Paint mPaintFront; //繪制前綴的畫筆
private boolean isMove = true; //文字是否移動
private String TAG = "ADTextView";
private boolean hasInit = false;//是否初始化剛進入時候文字的縱坐標
public interface onClickLitener {
public void onClick(String mUrl);
}
private onClickLitener onClickLitener;
public void setOnClickLitener(TextViewAd.onClickLitener onClickLitener) {
this.onClickLitener = onClickLitener;
}
public TextViewAd(Context context) {
this(context, null);
}
public TextViewAd(Context context, AttributeSet attrs) {
super(context, attrs);
init();
}
//重寫onTouchEvent事件,並且要返回true,表明當前的點擊事件由這個組件自身來處理
@Override
public boolean onTouchEvent(MotionEvent event) {
int action = event.getAction();
switch (action) {
case MotionEvent.ACTION_DOWN:
//調用回調,將當前數據源的鏈接傳出去
if (onClickLitener != null) {
onClickLitener.onClick(mTexts.get(mIndex).getmUrl());
}
break;
}
return true;
}
//設置數據源
public void setmTexts(List mTexts) {
this.mTexts = mTexts;
}
//設置廣告文字的停頓時間
public void setmInterval(int mInterval) {
this.mInterval = mInterval;
}
//設置文字從出現到消失的時長
public void setmDuration(int mDuration) {
this.mDuration = mDuration;
}
//設置前綴的文字顏色
public void setFrontColor(int mFrontColor) {
mPaintFront.setColor(mFrontColor);
}
//設置正文內容的顏色
public void setBackColor(int mBackColor) {
mPaintBack.setColor(mBackColor);
}
//初始化默認值
private void init() {
mDuration = 500;
mInterval = 1000;
mIndex = 0;
mPaintFront = new Paint();
mPaintFront.setAntiAlias(true);
mPaintFront.setDither(true);
mPaintFront.setTextSize(30);
mPaintBack = new Paint();
mPaintBack.setAntiAlias(true);
mPaintBack.setDither(true);
mPaintBack.setTextSize(30);
}
@Override
protected void onSizeChanged(int w, int h, int oldw, int oldh) {
super.onSizeChanged(w, h, oldw, oldh);
Log.i(TAG, "onSizeChanged: " + h);
}
@Override
protected void onDraw(Canvas canvas) {
if (mTexts != null) {
Log.i(TAG, "onDraw: " + mY);
//獲取當前的數據
ADEnity model = mTexts.get(mIndex);
String font = model.getmFront();
String back = model.getmBack();
// 繪制前綴的外框
Rect indexBound = new Rect();
mPaintFront.getTextBounds(font, 0, font.length(), indexBound);
//繪制內容的外框
Rect contentBound = new Rect();
mPaintBack.getTextBounds(back, 0, back.length(), contentBound);
//剛開始進入的時候文字應該是位於組件的底部的 ,但是這個值是需要獲取組件的高度和當前顯示文字的情況下來判斷的,
// 所以應該放在onDraw內來初始化這個值,所以需要前面的是否初始化的屬性,判斷當mY==0並且未初始化的時候給mY賦值.
if (mY == 0 && hasInit == false) {
mY = getMeasuredHeight() - indexBound.top;
hasInit = true;
}
//移動到最上面
if (mY == 0 - indexBound.bottom) {
Log.i(TAG, "onDraw: " + getMeasuredHeight());
mY = getMeasuredHeight() - indexBound.top;//返回底部
mIndex++;//換下一組數據
}
canvas.drawText(back, 0, back.length(), (indexBound.right - indexBound.left) + 20, mY, mPaintBack);
canvas.drawText(font, 0, font.length(), 10, mY, mPaintFront);
//移動到中間
if (mY == getMeasuredHeight() / 2 - (indexBound.top + indexBound.bottom) / 2) {
isMove = false;//停止移動
Timer timer = new Timer();
timer.schedule(new TimerTask() {
@Override
public void run() {
postInvalidate();//通知重繪
isMove = true;//設置移動為true
}
}, mInterval);//停頓多少毫秒之後再次移動
}
//移動的處理與數據源的處理
mY -= 1;//每次只移動一個像素,盡量保證平滑顯示
//循環使用數據
if (mIndex == mTexts.size()) {
mIndex = 0;
}
//如果是處於移動狀態時的,則延遲繪制
//計算公式為一個比例,一個時間間隔移動組件高度,則多少毫秒來移動1像素
if (isMove) {
postInvalidateDelayed(mDuration / getMeasuredHeight());
}
}
}
}
怎麼使用呢?
1,現在xml文件裡引入這個自定義控件
2.在MainActivity中使用
/** * Created by huanghaojie on 2016/9/30. */ public class MainActivity extends Activity { private TextViewAd textViewAd; private List mList; @Override protected void onCreate(Bundle savedInstanceState) { super.onCreate(savedInstanceState); setContentView(R.layout.activity_main4); textViewAd = (TextViewAd) findViewById(R.id.textad); mList = new ArrayList<>(); for (int i = 0; i < 10; i++) { ADEnity adEnity = new ADEnity("前綴" + i, "後綴" + i, "http://www.baidu.com"+i); mList.add(adEnity); } textViewAd.setmTexts(mList); textViewAd.setFrontColor(Color.RED); textViewAd.setBackColor(Color.BLUE); textViewAd.setmDuration(1000); textViewAd.setmInterval(1000); textViewAd.setOnClickLitener(new TextViewAd.onClickLitener() { @Override public void onClick(String mUrl) { Toast.makeText(MainActivity.this,"點擊了"+mUrl,Toast.LENGTH_LONG).show(); } }); } }
 Android實現界面左右滑動切換功能
相信大家一定都使用過手機QQ和微信之類的軟件,當我們使用時不難發現其界面的切換不僅可以通過點擊頁標簽來實現,還可以通過左右滑動來實現的,耗子君剛開始學Android時就覺
 Android網絡框架Volley
Volley是Google I/O 2013推出的網絡通信庫,在volley推出之前我們一般會選擇比較成熟的第三方網絡通信庫,如:android-async-httpre
 5CoordinatorLayout與AppBarLayout--嵌套滑動
上文我們說了AppBarLayout的簡單滑動,本篇主要介紹CoordinatorLayout下的嵌套滑動相關知識,本文對此做介紹例子按照慣例,先看效果,再談原理。可以看
 Andoird Crash的跟蹤方法,使用騰訊Bugly來捕捉一些疑難雜症,讓我們APP穩定上線
我們在開發中常常會注意到一些Crash,這正是很頭疼的,而且Crash會帶來很多意想不到的狀態,很惡心,所以今天,我們來著重研究一下Crash,同時,我們也將使用第三方