編輯:關於Android編程
Notification的用法 --- 狀態欄通知
發送一個狀態欄通知必須的兩個類:
1. NotificationManager --- 狀態欄通知的管理類,負責發通知,清除通知等
NotificationManager : 是一個系統Service,必須通過 context.getSystemService(NOTIFICATION_SERVICE)方法獲取
NotificationManager notificationManager = (NotificationManager) context.getSystemService(android.content.Context.NOTIFICATION_SERVICE);
2. Notification --- 具體的狀態欄通知對象,可以設置icon,文字,提示音,震動等參數
下面是設置一個通知需要的基本參數
Anicon(通知的圖標)
Atitleanexpandedmessage(通知的標題和內容)
APendingIntent(點擊通知執行頁面跳轉)
1.創建Notification
通過NotificationManager的notify(int Id , Notification)方法來啟動Notification
參數一:Notification的唯一標識
參數二:Notification對象
2.更新Notification
調用Notification的setLatestEventInfo()方法來更新內容,然後調用NotificationManager的notify()方法即可
3.刪除Notification
通過NotificationManager的cancle(int id) 方法,清除通知 參數: 要清除的Notification的唯一標識
4.Notification設置 -- 震動,鈴聲等
1.基本設置:
//新建狀態欄通知
baseNF=new Notification();
//設置通知在狀態欄顯示的圖標
baseNF.icon=R.drawable.icon;
//通知時在狀態欄顯示的內容
baseNF.tickerText="YouclickedBaseNF!";
//通知的默認參數DEFAULT_SOUND,DEFAULT_VIBRATE,DEFAULT_LIGHTS.
//如果要全部采用默認值,用DEFAULT_ALL.
//此處采用默認聲音
baseNF.defaults=Notification.DEFAULT_SOUND;
//第二個參數:下拉狀態欄時顯示的消息標題expandedmessagetitle
//第三個參數:下拉狀態欄時顯示的消息內容expandedmessagetext
//第四個參數:點擊該通知時執行頁面跳轉
baseNF.setLatestEventInfo(Lesson_10.this,"Title01","Content01",pd);
//發出狀態欄通知
//ThefirstparameteristheuniqueIDfortheNotification
//andthesecondistheNotificationobject.
nm.notify(Notification_ID_BASE,baseNF);
2.添加聲音
baseNF.default=Notification.DEFAULT_SOUND; -- 使用系統默認提示音
notification.sound=Uri.parse("file:///sdcard/notification/ringer.mp3"); --- 自定義聲音
使用用系統自帶的鈴聲,可以這樣:
notification.sound=Uri.withAppendedPath(Audio.Media.INTERNAL_CONTENT_URI,"6");
3.添加震動
notification.defaults|=Notification.DEFAULT_VIBRATE; 使用默認震動方式
4.添加閃光
notification.defaults|=Notification.DEFAULT_LIGHTS;
5.其他有用的設置 :
flags:
Notification.FLAG_INSISTENT;//讓聲音、振動無限循環,直到用戶響應
Notification.FLAG_AUTO_CANCEL;//通知被點擊後,自動消失
Notification.FLAG_NO_CLEAR;//點擊'Clear'時,不清楚該通知(QQ的通知無法清除,就是用的這個
//自定義下拉視圖,比如下載軟件時,顯示的進度條。
Notificationnotification=newNotification();
notification.icon=R.drawable.icon;
notification.tickerText="Custom!";
RemoteViewscontentView=newRemoteViews(getPackageName(),R.layout.custom);
contentView.setImageViewResource(R.id.image,R.drawable.icon);
contentView.setTextViewText(R.id.text,"Hello,thismessageisinacustomexpandedview");
notification.contentView=contentView;
//使用自定義下拉視圖時,不需要再調用setLatestEventInfo()方法
//但是必須定義contentIntent
notification.contentIntent=pd;
nm.notify(3,notification);
應用實例一:
根據activity的生命周期,在activity不顯示時,會執行onStop函數(比如按下home鍵),所以你在onStop函數(按退出鍵除外)裡面把notification放在通知欄裡,再此顯示時,把notification從通知欄裡去掉。或者,只要程序在運行就一直顯示通知欄圖標。 下面對Notification類中的一些常量,字段,方法簡單介紹一下: 常量: DEFAULT_ALL 使用所有默認值,比如聲音,震動,閃屏等等 DEFAULT_LIGHTS 使用默認閃光提示 DEFAULT_SOUNDS 使用默認提示聲音 DEFAULT_VIBRATE 使用默認手機震動 【說明】:加入手機震動,一定要在manifest.xml中加入權限:以上的效果常量可以疊加,即通過 notification.defaults =DEFAULT_SOUND|DEFAULT_VIBRATE; notification.defaults |= DEFAULT_SOUND (最好在真機上測試,震動效果模擬器上沒有) //設置flag位 FLAG_AUTO_CANCEL 該通知能被狀態欄的清除按鈕給清除掉 FLAG_NO_CLEAR 該通知能被狀態欄的清除按鈕給清除掉 FLAG_ONGOING_EVENT 通知放置在正在運行 FLAG_INSISTENT 是否一直進行,比如音樂一直播放,知道用戶響應 常用字段: contentIntent 設置PendingIntent對象,點擊時發送該Intent defaults 添加默認效果 flags 設置flag位,例如FLAG_NO_CLEAR等 icon 設置圖標 sound 設置聲音 tickerText 顯示在狀態欄中的文字 when 發送此通知的時間戳 NotificationManager常用方法介紹: public void cancelAll() 移除所有通知(只是針對當前Context下的Notification) public void cancel(int id) 移除標記為id的通知 (只是針對當前Context下的所有Notification) public void notify(String tag ,int id, Notification notification) 將通知加入狀態欄,標簽為tag,標記為id public void notify(int id, Notification notification) 將通知加入狀態欄,標記為id package com.ljq.activity; import android.app.Activity; import android.app.Notification; import android.app.NotificationManager; import android.app.PendingIntent; import android.content.Intent; import android.graphics.Color; import android.os.Bundle; public class MainActivity extends Activity { /** Called when the activity is first created. */ @Override public void onCreate(Bundle savedInstanceState) { super.onCreate(savedInstanceState); setContentView(R.layout.main); clearNotification(); } @Override protected void onStop() { showNotification(); super.onStop(); } @Override protected void onStart() { clearNotification(); super.onStart(); } /** * 在狀態欄顯示通知 */ private void showNotification(){ // 創建一個NotificationManager的引用 NotificationManager notificationManager = (NotificationManager) this.getSystemService(android.content.Context.NOTIFICATION_SERVICE); // 定義Notification的各種屬性 Notification notification =new Notification(R.drawable.icon, "督導系統", System.currentTimeMillis()); //FLAG_AUTO_CANCEL 該通知能被狀態欄的清除按鈕給清除掉 //FLAG_NO_CLEAR 該通知不能被狀態欄的清除按鈕給清除掉 //FLAG_ONGOING_EVENT 通知放置在正在運行 //FLAG_INSISTENT 是否一直進行,比如音樂一直播放,知道用戶響應 notification.flags |= Notification.FLAG_ONGOING_EVENT; // 將此通知放到通知欄的"Ongoing"即"正在運行"組中 notification.flags |= Notification.FLAG_NO_CLEAR; // 表明在點擊了通知欄中的"清除通知"後,此通知不清除,經常與FLAG_ONGOING_EVENT一起使用 notification.flags |= Notification.FLAG_SHOW_LIGHTS; //DEFAULT_ALL 使用所有默認值,比如聲音,震動,閃屏等等 //DEFAULT_LIGHTS 使用默認閃光提示 //DEFAULT_SOUNDS 使用默認提示聲音 //DEFAULT_VIBRATE 使用默認手機震動,需加上 權限 notification.defaults = Notification.DEFAULT_LIGHTS; //疊加效果常量 //notification.defaults=Notification.DEFAULT_LIGHTS|Notification.DEFAULT_SOUND; notification.ledARGB = Color.BLUE; notification.ledOnMS =5000; //閃光時間,毫秒 // 設置通知的事件消息 CharSequence contentTitle ="督導系統標題"; // 通知欄標題 CharSequence contentText ="督導系統內容"; // 通知欄內容 Intent notificationIntent =new Intent(MainActivity.this, MainActivity.class); // 點擊該通知後要跳轉的Activity PendingIntent contentItent = PendingIntent.getActivity(this, 0, notificationIntent, 0); notification.setLatestEventInfo(this, contentTitle, contentText, contentItent); // 把Notification傳遞給NotificationManager notificationManager.notify(0, notification); } ? //刪除通知 private void clearNotification(){ // 啟動後刪除之前我們定義的通知 NotificationManager notificationManager = (NotificationManager) this .getSystemService(NOTIFICATION_SERVICE); notificationManager.cancel(0); } }
應用實例二:
我們在用手機的時候,如果來了短信,而我們沒有點擊查看的話,是不是在手機的最上邊的狀態欄裡有一個短信的小圖標提示啊?你是不是也想實現這種功能呢?今天的Notification就是解決這個問題的。
package cn.com.chenzheng_java; import android.app.Activity; import android.app.Notification; import android.app.NotificationManager; import android.app.PendingIntent; import android.content.Context; import android.content.Intent; import android.net.Uri; import android.os.Bundle; import android.provider.MediaStore.Audio; import android.view.View; import android.widget.Button; /*** *@description狀態欄通知相關 *@authorchenzheng_java * */ public class NotificationActivity extends Activity{ @Override protected void onCreate(BundlesavedInstanceState){ super .onCreate(savedInstanceState); setContentView(R.layout.notification); Buttonbutton=(Button)findViewById(R.id.button); button.setOnClickListener( new View.OnClickListener(){ @Override public void onClick(Viewv){ addNotificaction(); } }); } /** *添加一個notification */ private void addNotificaction(){ NotificationManagermanager=(NotificationManager) this .getSystemService(Context.NOTIFICATION_SERVICE); //創建一個Notification Notificationnotification= new Notification(); //設置顯示在手機最上邊的狀態欄的圖標 notification.icon=R.drawable.excel; //當當前的notification被放到狀態欄上的時候,提示內容 notification.tickerText= "注意了,我被扔到狀態欄了" ; /*** *notification.vibrate當手機震動時,震動周期設置 */ //添加聲音提示 notification.defaults=Notification.DEFAULT_SOUND; //audioStreamType的值必須AudioManager中的值,代表著響鈴的模式 notification.audioStreamType=android.media.AudioManager.ADJUST_LOWER; //下邊的兩個方式可以添加音樂 Intentintent= new Intent( this ,Notification2Activity. class ); PendingIntentpendingIntent=PendingIntent.getActivity( this , 0 ,intent,PendingIntent.FLAG_ONE_SHOT); //點擊狀態欄的圖標出現的提示信息設置 notification.setLatestEventInfo( this , "內容提示:" , "我就是一個測試文件" ,pendingIntent); manager.notify( 1 ,notification); } }
點擊按鈕時候,狀態欄會顯示:

看到了吧,狀態欄多出來一個excel圖標,當我按住圖標不放,往下拖動的時候,出來了這個頁面
然後,當我們點擊這個對話框之後,就會觸發intent,跳轉到Notification2Activity.java這個activity。
----------------------------------------------------------------------------------------
注意,NotificationManager裡的notify(id,notification)中的id是用來唯一標識我們當前的這個notification的標識符,我們通過cancel方法刪除通知時,傳遞的就是這個值。可能讀者在看很多文檔的時候,發現這個地方指定了一個莫名奇妙的值,例如R.drawable.icon,很多朋友就納悶了,為什麼這裡要指定一個圖片呢。這裡筆者就介紹下,為什麼呢?
答案其實很簡單,我們都知道,我們這裡對參數的唯一要求就是,這個id要和notify方法中的一致,並且是唯一;只要滿足了這兩項,其他的都無所謂。notify和cancel裡一致我們作為開發者,太好控制了,但是唯一呢,我們還真不好說,於是這裡就有些人動小腦筋了,很巧妙的用了我們系統中的圖片資源或者其他資源的索引ID,我們都知道,這些值肯定都是唯一的!
------------------------------------------------------------------------------------------
下面是從網上找的一些資料:
如果要添加一個Notification,可以按照以下幾個步驟
1:獲取NotificationManager:
NotificationManager m_NotificationManager=(NotificationManager)this.getSystemService(NOTIFICATION_SERVICE);
2:定義一個Notification:
Notification m_Notification=new Notification();
3:設置Notification的各種屬性:
//設置通知在狀態欄顯示的圖標
m_Notification.icon=R.drawable.icon;
//當我們點擊通知時顯示的內容
m_Notification.tickerText="Button1 通知內容.....";
通知時發出的默認聲音
m_Notification.defaults=Notification.DEFAULT_SOUND;
//設置通知顯示的參數
Intent m_Intent=new Intent(NotificationDemo.this,DesActivity.class);
PendingIntent m_PendingIntent=PendingIntent.getActivity(NotificationDemo.this, 0, m_Intent, 0);
m_Notification.setLatestEventInfo(NotificationDemo.this, "Button1", "Button1通知",m_PendingIntent );
//這個可以理解為開始執行這個通知
m_NotificationManager.notify(0,m_Notification);
4:既然可以增加同樣我們也可以刪除。當然是只是刪除你自己增加的。
m_NotificationManager.cancel(0);
這裡的0是一個ID號碼,和notify第一個參數0一樣。
這也就完成了,添加刪除工作。
------------------------------------------------------------------------------------------------------
NoticificationManager很容易可以放在狀態欄,也很容易實現從statusbar進入程序 中,
NoticificationManager中通過intent執行此程序的activity就可以了
NoticificationManager狀態欄操作
NotificationManager(通知管理器):
NotificationManager負責通知用戶事件的發生.
NotificationManager有三個公共方法:
1. cancel(int id) 取消以前顯示的一個通知.假如是一個短暫的通知,試圖將隱藏,假如是一個持久的通知,將從狀態條中移走.
2. cancelAll() 取消以前顯示的所有通知.
3. notify(int id, Notification notification) 把通知持久的發送到狀態條上.
//初始化NotificationManager:
NotificationManager nm =
(NotificationManager)getSystemService(NOTIFICATION_SERVICE);
Notification代表著一個通知.
Notification的屬性:
audioStreamType 當聲音響起時,所用的音頻流的類型
contentIntent 當通知條目被點擊,就執行這個被設置的Intent.
contentView 當通知被顯示在狀態條上的時候,同時這個被設置的視圖被顯示.
defaults 指定哪個值要被設置成默認的.
deleteIntent 當用戶點擊"Clear All Notifications"按鈕區刪除所有的通知的時候,這個被設置的Intent被執行.
icon 狀態條所用的圖片.
iconLevel 假如狀態條的圖片有幾個級別,就設置這裡.
ledARGB LED燈的顏色.
ledOffMS LED關閉時的閃光時間(以毫秒計算)
ledOnMS LED開始時的閃光時間(以毫秒計算)
number 這個通知代表事件的號碼
sound 通知的聲音
tickerText 通知被顯示在狀態條時,所顯示的信息
vibrate 振動模式.
when 通知的時間戳.
將Notification發送到狀態條上:
Notification notification = new Notification();
Notification的設置過程……..
nm.notify(0, notification); //發送到狀態條上
------------------------------------------------------------------------------------------------------------
Notification提供了豐富的手機提示方式:
a)在狀態欄(Status Bar)顯示的通知文本提示,如:
notification.tickerText = "hello";
b)發出提示音,如:
notification.defaults = Notification.DEFAULT_SOUND;
notification.sound = Uri.parse(" file:///sdcard/notification/ringer.mp3 ");
notification.sound = Uri.withAppendedPath(Audio.Media.INTERNAL_CONTENT_URI, "6");
c)手機振動,如:
notification.defaults = Notification.DEFAULT_VIBRATE;
long[] vibrate = {0,100,200,300};
notification.vibrate = vibrate;
d)LED燈閃爍,如:
notification.defaults = Notification.DEFAULT_LIGHTS;
notification.ledARGB = 0xff00ff00;
notification.ledOnMS = 300;
notification.ledOffMS = 1000;
notification.flags= Notification.FLAG_SHOW_LIGHTS;
4)發送通知:
private static final int ID_NOTIFICATION = 1;
mNotificationManager.notify(ID_NOTIFICATION, notification);
應用實例3 ---- 結合Broadcast 和Broadcast Receiver
private static final String ACTION_1="com.example.androidbasicdemo1.NEW_BROADCAST_1";
	private static final String ACTION_2="com.example.androidbasicdemo1.NEW_BROADCAST_2";
@Override
	public boolean onCreateOptionsMenu(Menu menu) {
		menu.add(0,Menu.FIRST,0,"顯示Notification");
		menu.add(0,Menu.FIRST+1,0,"清楚Notification");

		return super.onCreateOptionsMenu(menu);
	}

	@Override
	public boolean onOptionsItemSelected(MenuItem item) {
		int id = item.getItemId();
		if (id == Menu.FIRST) {
			actionClickMenuItem1();
			return true;
		}
		if (id == Menu.FIRST+1) {
			actionClickMenuItem2();
			return true;
		}
		return super.onOptionsItemSelected(item);
	}
	private void actionClickMenuItem1() {
		Intent intent1 = new Intent(ACTION_1);
		sendBroadcast(intent1);
	}
	private void actionClickMenuItem2() {
		Intent intent2 = new Intent(ACTION_2);
		sendBroadcast(intent2);
	}
Broadcast Receiver1
package com.example.broadcastreceiver;

import com.example.androidbasicdemo1.DBDemoActivity;

import android.R;
import android.app.Notification;
import android.app.NotificationManager;
import android.app.PendingIntent;
import android.content.BroadcastReceiver;
import android.content.Context;
import android.content.Intent;
/**
 * 必須在AndroidManifest.xml中進行注冊
 * 自定義Broadcast Receiver繼承BroadcastReceiver
 * 重寫onReceive()方法
 *
 * @author JayHe
 *
 */
public class MyAndroidReceiver1 extends BroadcastReceiver {

	private Context context;
	public static int NOTIFICATION_ID=21321;

	@Override
	public void onReceive(Context context, Intent intent) {
		this.context = context;
		showNotification();
	}

	private void showNotification() {
		NotificationManager notificationManager = (NotificationManager) context.getSystemService(android.content.Context.NOTIFICATION_SERVICE);
		Notification notification = new Notification(R.drawable.ic_btn_speak_now, "來自MyReceiver1中", System.currentTimeMillis());

		PendingIntent contentIntent = PendingIntent.getActivity(context, 0,
				new Intent(context,DBDemoActivity.class), 0);

		notification.setLatestEventInfo(context, "在MyReceiver1中", null, contentIntent);
		notificationManager.notify(NOTIFICATION_ID, notification);
	}

}
Broadcast Receiver2
package com.example.broadcastreceiver;

import android.app.NotificationManager;
import android.content.BroadcastReceiver;
import android.content.Context;
import android.content.Intent;

public class MyAndroidReceiver2 extends BroadcastReceiver {

	Context context;

	@Override
	public void onReceive(Context context, Intent intent) {
		this.context = context;
		deleteNotification();

	}

	//deleteNotification方法將剛生成的Notification從狀態欄刪除。
	/**
	 * 注意:每一個Notification都有一個唯一的id記性標識,而在程序中的這個Notification的id為MyAndroidReceiver1.NOTIFICATION_ID
	 */
	private void deleteNotification() {
		NotificationManager notificationManager = (NotificationManager) context.getSystemService(android.content.Context.NOTIFICATION_SERVICE);
		notificationManager.cancel(MyAndroidReceiver1.NOTIFICATION_ID);
	}

}
 Android Studio查看Android 5.x源碼的步驟詳解
關於Android Studio的好處我就不用說了,下面兩點就足矣讓你轉投Android Studio了: 1、Andro
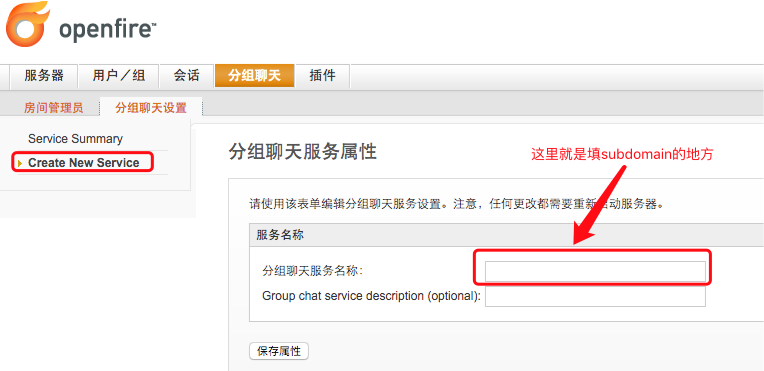 XMPP系列(六)---創建群組
最近公司項目需要,要做一個自己的IMSDK,順便先把之前沒有記錄的群聊功能記錄一下。先上資料,查看XMPP群聊相關的資料,可以去這裡看協議:XEP-0045 。創建群組X
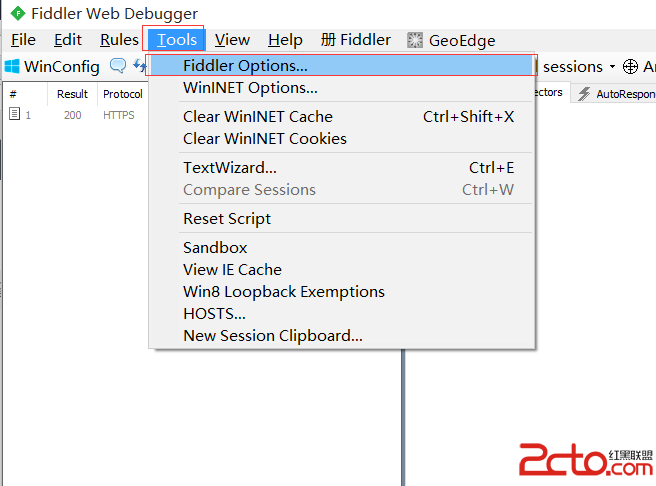 Android截包與反編譯
近期由於學習需要,嘗試了下截包與反編譯,發現對於簡單的反編譯與截包其實挺簡單的,而本文也主要介紹截包與反編譯工具的使用.截包截包的工具有很多,我這裡主要介紹簡單實用的fi
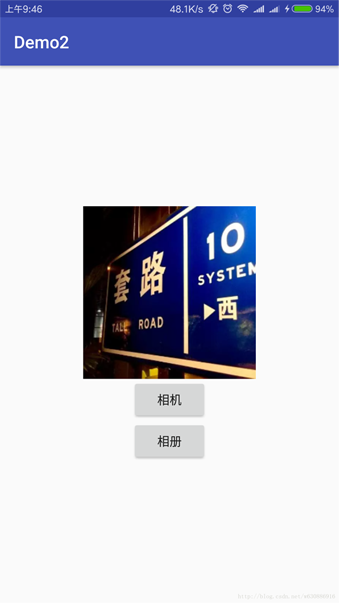 Android個人中心的頭像上傳,圖片編碼及截取實例
首先需要有網絡權限,然後我們這裡匹配的網絡請求是之前封裝好的Okhttp。非常的簡單方便,直接復制進去,依賴一下包,然後調用方法即可。 這裡是把圖片轉換成Base64.d