編輯:關於Android編程
我們的應用常常要聯網以取得網絡上的數據,然後進行解析,必須要先等到數據之後才能進行下一步的業務。那麼網絡的請求就是一個非常重要的知識,下面我就概括了自己常用的三種方式,第一是最基本的沒用框架的原始方法,第二是Volley框架,第三是xutils框架。
1.HttpURLConnection方法
這是基於網絡通信HTTP協議的網絡請求,其它兩種框架也是基於HTTP協議的。HTTP協議是一款基於短連接的協議,每次交互完畢後連接斷開,而HTTP請求又分為GET和POST兩種方式,GET請求比較簡單,只需要在網址後面用?拼接請求的資源路徑,如百度圖片輸入***動漫***關鍵字的地址http://image.baidu.com/search/index?tn=baiduimage&ipn=r&ct=201326592&cl=2&lm=-1&st=-1&fm=index&fr=&sf=1&fmq=&pv=&ic=0&nc=1&z=&se=1&showtab=0&fb=0&width=&height=&face=0&istype=2&ie=utf-8&word=%E5%8A%A8%E6%BC%AB,可以看到index?後面跟了很多&連接的項目,這個&就是代表了一個個搜索的條件,而最後一個word=%E5%8A%A8%E6%BC%AB又是什麼意思呢,我上面不是輸入了兩個字"動漫"嗎,這就是UTF-8編碼後的字節,中文一個字符會編成三個字節,這是用16進制表示了一個字節。從中也可以看到GET請求的一個限制,那就是不能傳遞中文,也不適合大數據量的數據提交。而POST則就沒這個限制,且安全性也比GET請求高,總結就是簡單的網絡請求用GET,比較復雜的要與服務器與交互的就用POST請求。接下來就是如何使用android代表發送GET請求和POST請求了。
GET請求
    //1.  URL
        URL url = new URL("http://image.baidu.com/search/index?tn=baiduimage&ipn=r&ct=201326592&cl=2&lm=-1&st=-1&fm=index&fr=&sf=1&fmq=&pv=&ic=0&nc=1&z=&se=1&showtab=0&fb=0&width=&height=&face=0&istype=2&ie=utf-8&word=%E5%8A%A8%E6%BC%AB");
        //2.  HttpURLConnection
        HttpURLConnection conn=(HttpURLConnection)url.openConnection();
        //3.  set(GET)
        conn.setRequestMethod("GET");
        //4.  getInputStream
        InputStream is = conn.getInputStream();
        //5.  解析is,獲取responseText,這裡用緩沖字符流
        BufferedReader reader = new BufferedReader(new InputStreamReader(is));
        StringBuilder sb = new StringBuilder();
        String line = null;
        while((line=reader.readLine()) != null){
            sb.append(line);
        }
        //獲取響應文本
        String responseText = sb.toString();
POST請求
//1. URL
        URL url = new URL("http://image.baidu.com/search/index");
        //2. HttpURLConnection
        HttpURLConnection conn = (HttpURLConnection)url.openConnection();
        //3. POST
        conn.setRequestMethod("POST");
        //4. Content-Type,這裡是固定寫法,發送內容的類型
        conn.setRequestProperty("Content-Type", "application/x-www-form-urlencoded");
        //5. output,這裡要記得開啟輸出流,將自己要添加的參數用這個輸出流寫進去,傳給服務端,這是socket的基本結構
        conn.setDoOutput(true);
        OutputStream os = conn.getOutputStream();
        String param = "tn=baiduimage&ipn=r&ct=201326592&cl=2&lm=-1&st=-1&fm=index&fr=&sf=1&fmq=&pv=&ic=0&nc=1&z=&se=1&showtab=0&fb=0&width=&height=&face=0&istype=2&ie=utf-8&word=%E5%8A%A8%E6%BC%AB";
        //一定要記得將自己的參數轉換為字節,編碼格式是utf-8
        os.write(param.getBytes("utf-8"));
        os.flush();
        //6. is
        InputStream is = conn.getInputStream();
        //7. 解析is,獲取responseText
        BufferedReader reader = new BufferedReader(new InputStreamReader(is));
        StringBuilder sb = new StringBuilder();
        String line = null;
        while((line=reader.readLine()) != null){
            sb.append(line);
        }
        //獲取響應文本
        String responseText = sb.toString();
2.Volley框架
GET請求
    //1. 創建RequestQueue,這是一個請求隊列,相當於消息機制處理
    private RequestQueue    mQueue = Volley.newRequestQueue(this);
        //2. StringRequest
        String url = "http://www.baidu.com";
        StringRequest req = new StringRequest(url,
                new Listener() {
                    //請求成功後回調  在主線程中執行
                    public void onResponse(String responseText) {
                        //解析json 封裝結果數據
                        Gson gson = new Gson();
                        //這裡用的Gson解析JSON字符串           User result=gson.fromJson(responseText,RequestResult.class);
                                            }
                }, new ErrorListener() {
                    //請求出錯時 執行回調  在主線程中執行
                    public void onErrorResponse(VolleyError error) {
                        error.printStackTrace();
                    }
                });
    //把req 添加到 請求隊列中,一定要記得這一步,不然就相當於沒有發送請求
        mQueue.add(req);
POST請求
private RequestQueue mQueue;
//post請求要用commonRequest請求實現
    String url="www.baidu.com";
    CommonRequest request = new CommonRequest(Request.Method.POST,url,new Response.Listener() {
            public void onResponse(String response) {
                try {
                //這裡是請求成功後調用的接口,用JSON工具解析數據
                    JSONObject obj = new JSONObject(response);

                } catch (JSONException e) {
                    e.printStackTrace();
                }
            }
        },new Response.ErrorListener() {
            public void onErrorResponse(VolleyError error) {
            }
        }){
            //如果用POST請求,要添加參數,一定要重寫這個方法來添加參數
            @Override
            protected Map getParams() throws AuthFailureError {
                Map resultMap = new HashMap();
                //這裡的添加的具體參數     resultMap.put("username",user.getName());
                resultMap.put("userAge",user.getAge());
                resultMap.put("userGender",user.getGender());
resultMap.put("userSchool",user.getSchool());

                return resultMap;
            }
        };
        mQueue.add(request);
    }
3.Xutils框架
GET請求
//第一步,新建一個請求參數對象
RequestParams params=new RequestParams("www.baidu.com?inm=2");
//直接調用x.http().get()方法,這裡注意x是要用全局MyApplication中初始化後才可以使用,初始化方法為x.Ext.init(this)
        x.http().get(params, new Callback.CommonCallback() {

            @Override
            public void onCancelled(CancelledException arg0) {

            }

            @Override
            public void onError(Throwable arg0, boolean arg1) {

                Log.i("hap.zhu", "http_on_error,請求網絡數據失敗");
            }

            @Override
            public void onFinished() {

            }

            @Override
            public void onSuccess(String result) {
                Log.i("hap.zhu", "請求數據結果為:"+result);
                Gson gson=new Gson();
                Result result=gson.fromJson(result,Result.class);
                Log.i("hap.zhu", "加載圖書為:"+books.toString());
        }
        });
POST請求
//方法同GET,就是這麼簡單,網絡請求成功會回調監聽器裡的success接口,直接處理數據結果就行
    RequestParams params=new RequestParams("www.baidu.com");
        params.addBodyParameter("email", username);
        params.addBodyParameter("password", password);

        x.http().post(params, new CommonCallback() {

            @Override
            public void onCancelled(CancelledException arg0) {
            }

            @Override
            public void onError(Throwable arg0, boolean arg1) {
                //網絡錯誤也會提示錯誤
                callback.Error(arg0.toString());
            }

            @Override
            public void onFinished() {
            }

            @Override
            public void onSuccess(String result) {

                Gson gson=new Gson();
            LoginResult loginResult=gson.fromJson(result, LoginResult.class);
 Android 仿今日頭條簡單的刷新效果實例代碼
點擊按鈕,先自動進行下拉刷新,也可以手動刷新,刷新完後,最後就多一行數據。有四個選項卡。前兩天導師要求做一個給本科學生預定機房座位的app,出發點來自這裡。做著做著遇到很
 android view從無到有的過程
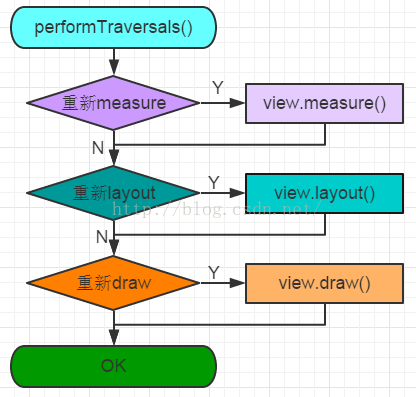
在搜集Android view繪制流程的相關知識時,發現這裡面的流程還是有些復雜的,准備了好幾天,才敢提起筆來。下面就直入主題吧!view繪制流程是從ViewRoot的p
 Android 6.0 Changes
Android 6.0 變化 Android 6.0 ChangesIn this document運行時權限Runtime Perm
 Android性能優化之利用Rxlifecycle解決RxJava內存洩漏詳解
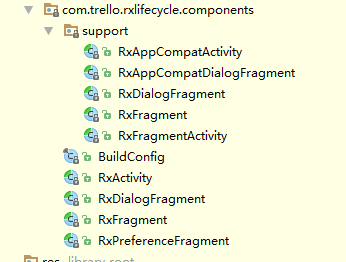
前言:其實RxJava引起的內存洩漏是我無意中發現了,本來是想了解Retrofit與RxJava相結合中是如何通過適配器模式解決的,結果卻發現了RxJava是會引起內存洩