編輯:關於Android編程
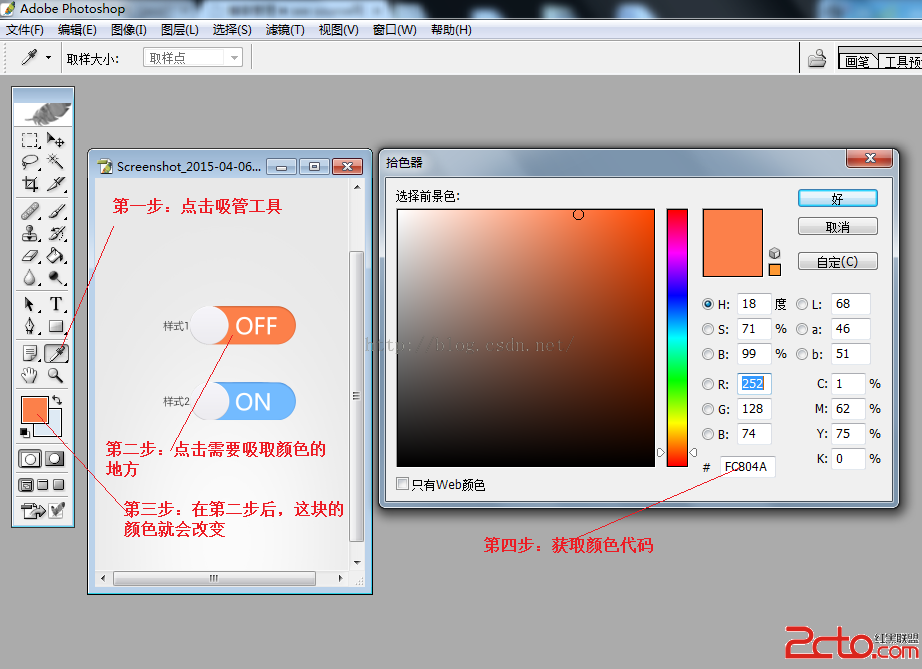
如圖:點擊或者根據圖中黑點滑動獲取圖片色值及黑點坐標。ColorImageView是繼承UIImageView的封裝,用起來很方便。
下面我們先講demo的ViewController布局:
1,引進ColorImageView.h ;
#import "ColorImageView.h"
2, 聲明了兩個label用於顯示rag值 及黑點位置;
@interface ViewController ()
@property (nonatomic,strong)UILabel *rgbLabel;//rgba
@property (nonatomic,strong)UILabel *locationLabel;//黑點位置
@end
3, 就是把聲明的label在 viewDidLoad 中進行添加:
    _rgbLabel = [[UILabel alloc] init];
    _rgbLabel.frame=CGRectMake(10,60, self.view.frame.size.width-20, 23);
    _rgbLabel.backgroundColor = [UIColor clearColor];
    _rgbLabel.font = [UIFont systemFontOfSize:13 ];
    _rgbLabel.textAlignment = NSTextAlignmentCenter;
    _rgbLabel.textColor = [UIColor blackColor];
    _rgbLabel.text = @"點擊或移動下面的彩色圖片,獲取色值!";
    [self.view addSubview:_rgbLabel];

    _locationLabel = [[UILabel alloc] init];
    _locationLabel.frame=CGRectMake(10,90, self.view.frame.size.width-20, 23);
    _locationLabel.backgroundColor = [UIColor clearColor];
    _locationLabel.font = [UIFont systemFontOfSize:13 ];
    _locationLabel.textAlignment = NSTextAlignmentCenter;
    _locationLabel.textColor = [UIColor whiteColor];
    [self.view addSubview:_locationLabel];
4,把封裝的ColorImageView也添加在viewDidLoad中,關於ColorImageView值傳出我用的是一個block,如果對block不理解,就自己上網查咯!
    ColorImageView *colorImageView = [[ColorImageView alloc] initWithFrame:CGRectMake((self.view.frame.size.width-248)/2,130, 248, 248)];
    colorImageView.backgroundColor = [UIColor clearColor];
    colorImageView.userInteractionEnabled = YES;
    colorImageView.image = [UIImage imageNamed:@"color_s"];
    //避免循序引用 弱化
    __weak typeof(self) weakSelf = self;
    colorImageView.block =^ (NSString *rgbaString,NSString *locationString,UIColor *color){
        weakSelf.rgbLabel.text = rgbaString;
        weakSelf.rgbLabel.textColor = color;
        weakSelf.locationLabel.text = locationString;
    };
    [self.view addSubview:colorImageView];
上面ViewController的介紹完了,下面就是(重頭戲)ColorImageView的封裝介紹:
1,開始就是控件的添加 ,有注釋 ;不用多說直接粘代碼:
//
//ColorImageVIew.m
//  TableView_choose
//
//  Created by Simon on 16/6/15.
//  Copyright ? 2016年 Simon. All rights reserved.
//
#import "ColorImageView.h"
#define radiusColor  120 //圖片半徑值
@interface ColorImageView ()
@property (nonatomic,strong)UIImageView *selectColorIamge;//黑點
@property (nonatomic,copy)NSString *rgbaString;//rgb字符串
@property (nonatomic,copy)NSString *locationString;//黑點位置字符串
@end
@implementation ColorImageView
- (id)initWithFrame:(CGRect)frame
{
    self = [super initWithFrame:frame];
    if (self) {
        // Initialization code
        _selectColorIamge = [[UIImageView alloc] init];
        _selectColorIamge.backgroundColor = [UIColor blackColor];
        _selectColorIamge.frame=CGRectMake((frame.size.width-16)/2, (frame.size.height-16)/2, 16, 16);
        _selectColorIamge.layer.cornerRadius = 8;
        _selectColorIamge.layer.masksToBounds = YES;
        [self addSubview:_selectColorIamge];

    }
    return self;
}
2,用系統自帶touchesBegan touchesMoved touchesEnded方法實現我們的點擊,移動;在移動中要限制黑點不能逃出色值圖片的范圍,就有了一個關於高中數學的運算,挺有意思的(不妨看看,是不是很多人都忘了)!這裡block的傳值就是這一句_block(_rgbaString,_locationString,color);
- (void)touchesBegan:(NSSet *)touches withEvent:(UIEvent *)event {
    UITouch* touch = [touches anyObject];
    CGPoint point = [touch locationInView:self]; //where image was tapped
    CGPoint center = CGPointMake(self.frame.size.width/2, self.frame.size.height/2);
    float distance = [self distanceFromPointX:center distanceToPointY:point];
    if(distance 3,上面看到(distanceFromPointX:distanceToPointY:)一直都有調用,他是干什麼的呢;其實很簡單,就是把黑點限制在牢裡用的(不逃出色值圖片范圍): //計算圓點所在位置
-(float)distanceFromPointX:(CGPoint)start distanceToPointY:(CGPoint)end{
    float distance;
    //下面就是高中的數學,不詳細解釋了
    CGFloat xDist = (end.x - start.x);
    CGFloat yDist = (end.y - start.y);
    distance = sqrt((xDist * xDist) + (yDist * yDist));
    return distance;
}

4,(getPixelColorAtLocation:)和(createARGBBitmapContextFromImage:)這兩個方法呢,就是關鍵所在了,把在色值圖片上黑點的位置轉化成我們想要的值。。不明白的多看看,實在不行就找度娘!

#pragma mark private
- (UIColor*)getPixelColorAtLocation:(CGPoint)point {
    UIColor* color = nil;
    CGImageRef inImage = self.image.CGImage;
    // Create off screen bitmap context to draw the image into. Format ARGB is 4 bytes for each pixel: Alpa, Red, Green, Blue
    CGContextRef cgctx = [self createARGBBitmapContextFromImage:inImage];
    if (cgctx == NULL) { return nil; /* error */ }
    size_t w = CGImageGetWidth(inImage);
    size_t h = CGImageGetHeight(inImage);
    CGRect rect = {{0,0},{w,h}};
    // Draw the image to the bitmap context. Once we draw, the memory
    // allocated for the context for rendering will then contain the
    // raw image data in the specified color space.
    CGContextDrawImage(cgctx, rect, inImage);
    if(rect.size.width==480){
        point.x = point.x*2;
        point.y = point.y*2;
    }
    // Now we can get a pointer to the image data associated with the bitmap
    // context.
    unsigned char* data = CGBitmapContextGetData (cgctx);
    if (data != NULL) {
        //讀取RGB顏色值
        //offset locates the pixel in the data from x,y.
        //4 for 4 bytes of data per pixel, w is width of one row of data.
        int offset = 4*((w*round(point.y))+round(point.x));
        int alpha =  data[offset];
        unsigned int red = data[offset+1];
        unsigned int green = data[offset+2];
        unsigned int blue = data[offset+3];
        color = [UIColor colorWithRed:(red/255.0f) green:(green/255.0f) blue:(blue/255.0f) alpha:(alpha/255.0f)];
        _rgbaString = [NSString stringWithFormat:@"RGBA值: red:%d  green:%d  blue:%d  alpha:%d",red,green,blue,alpha];
        _locationString =[NSString stringWithFormat:@"黑點位置point: %.2f  %.2f",point.x,point.y];
    }
    // When finished, release the context
    CGContextRelease(cgctx);
    // Free image data memory for the context
    if (data) {
        free(data);
    }
    return color;
}

- (CGContextRef)createARGBBitmapContextFromImage:(CGImageRef) inImage {
    CGContextRef    context = NULL;
    CGColorSpaceRef colorSpace;
    void *          bitmapData;
    long             bitmapByteCount;
    long             bitmapBytesPerRow;

    // Get image width, height. We'll use the entire image.
    size_t pixelsWide = CGImageGetWidth(inImage);
    size_t pixelsHigh = CGImageGetHeight(inImage);
    // Declare the number of bytes per row. Each pixel in the bitmap in this
    // example is represented by 4 bytes; 8 bits each of red, green, blue, and
    // alpha.
    bitmapBytesPerRow   = (pixelsWide * 4);
    bitmapByteCount     = (bitmapBytesPerRow * pixelsHigh);
    // Use the generic RGB color space.
    colorSpace = CGColorSpaceCreateDeviceRGB();
    if (colorSpace == NULL)
    {
        fprintf(stderr, "Error allocating color space\n");
        return NULL;
    }
    // Allocate memory for image data. This is the destination in memory
    // where any drawing to the bitmap context will be rendered.
    bitmapData = malloc( bitmapByteCount );
    if (bitmapData == NULL)
    {
        fprintf (stderr, "Memory not allocated!");
        CGColorSpaceRelease( colorSpace );
        return NULL;
    }
    // Create the bitmap context. We want pre-multiplied ARGB, 8-bits
    // per component. Regardless of what the source image format is
    // (CMYK, Grayscale, and so on) it will be converted over to the format
    // specified here by CGBitmapContextCreate.
    context = CGBitmapContextCreate (bitmapData,
                                     pixelsWide,
                                     pixelsHigh,
                                     8,      // bits per component
                                     bitmapBytesPerRow,
                                     colorSpace,
                                     kCGImageAlphaPremultipliedFirst);
    if (context == NULL)
    {
        free (bitmapData);
        //fprintf (stderr, "Context not created!");
    }
    // Make sure and release colorspace before returning
    CGColorSpaceRelease( colorSpace );
    return context;
}
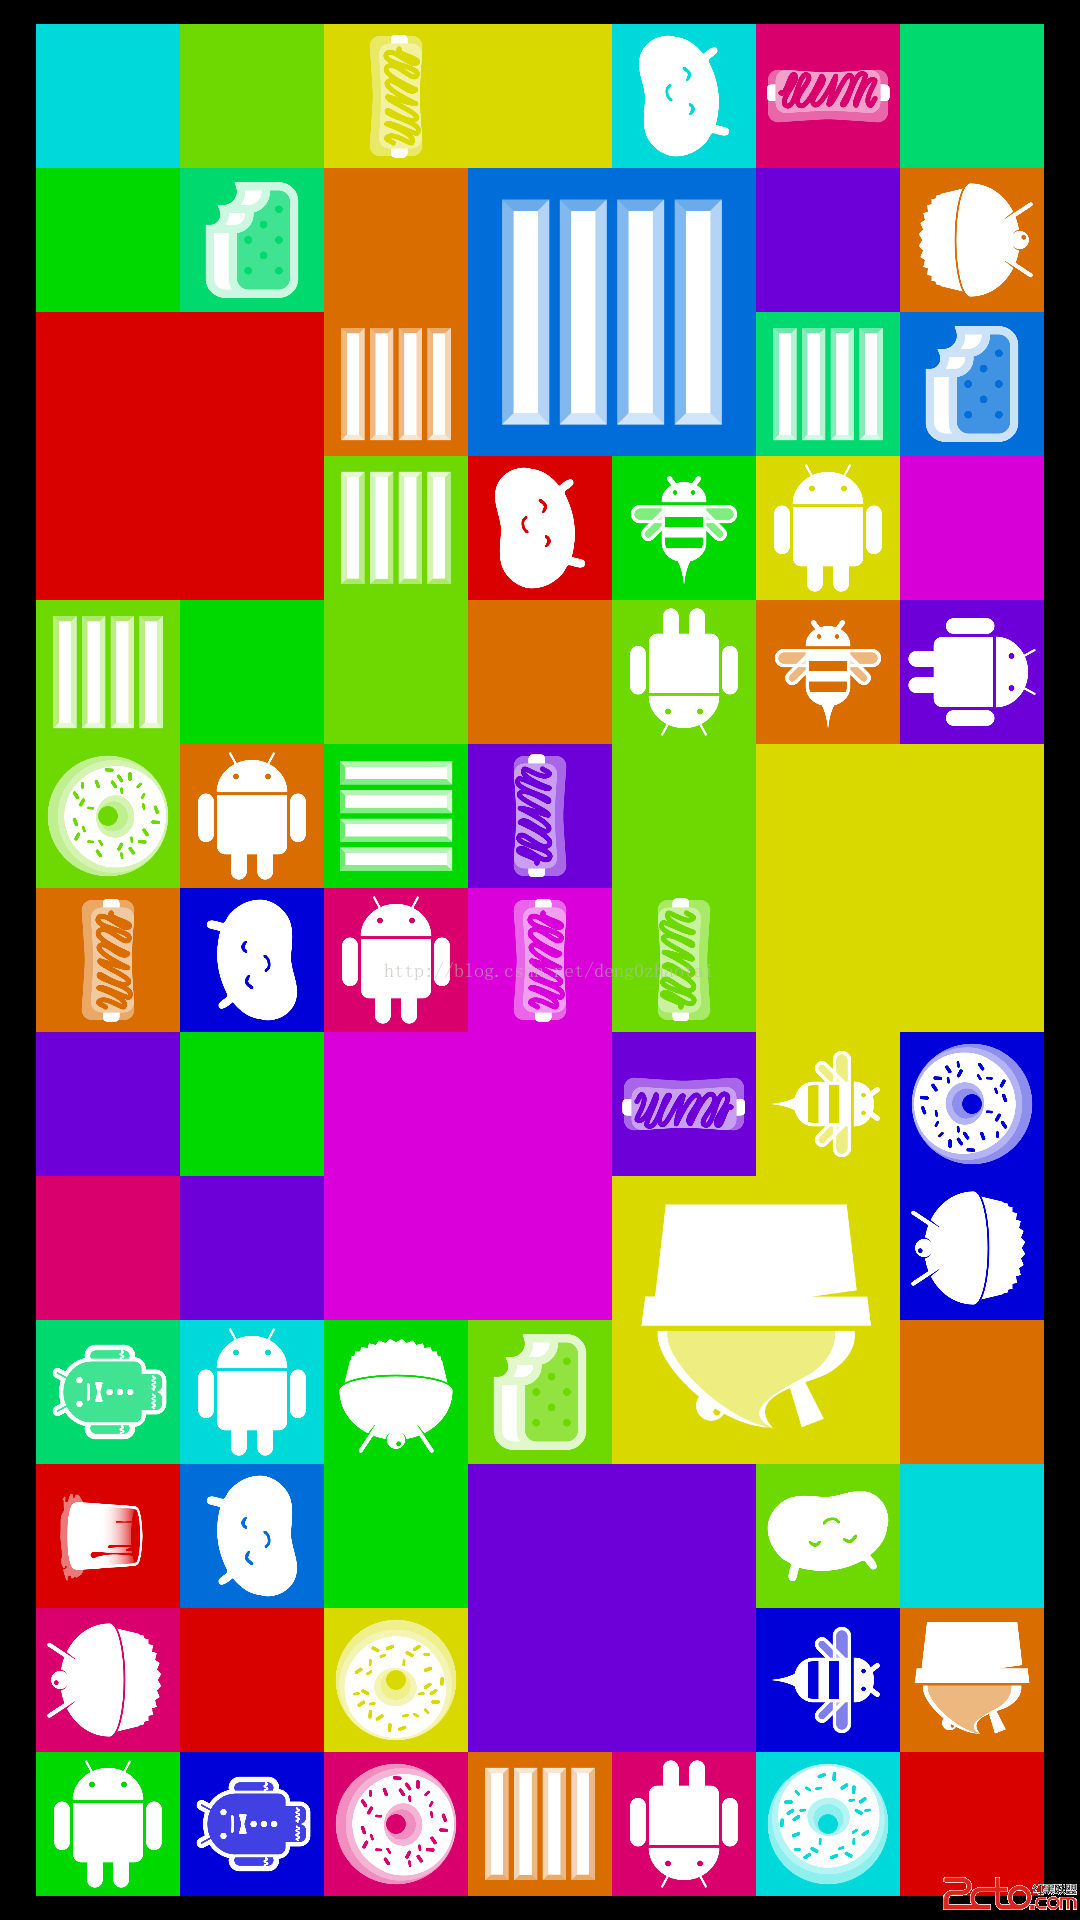 Android4.4 SystemUI分析之DessertCase
在SystemUI中有一個Activity可以顯示所有的Logo這個Activity涉及到的圖標存放在SystemUI/res/drawable-nodpi目錄下在這裡我
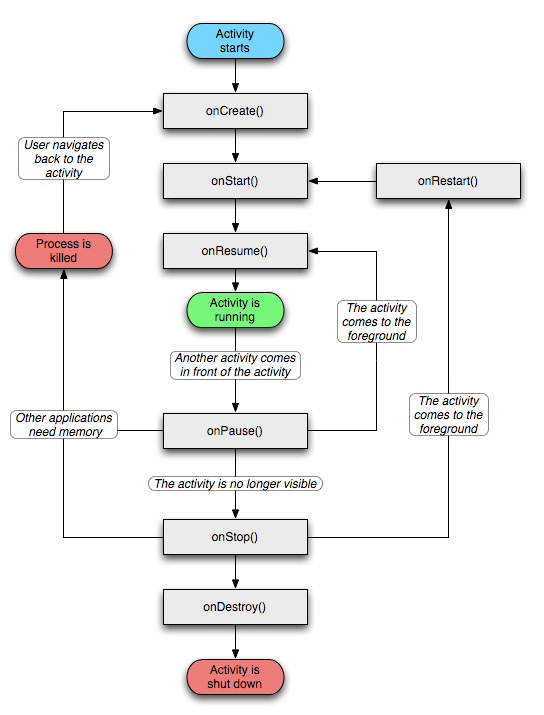
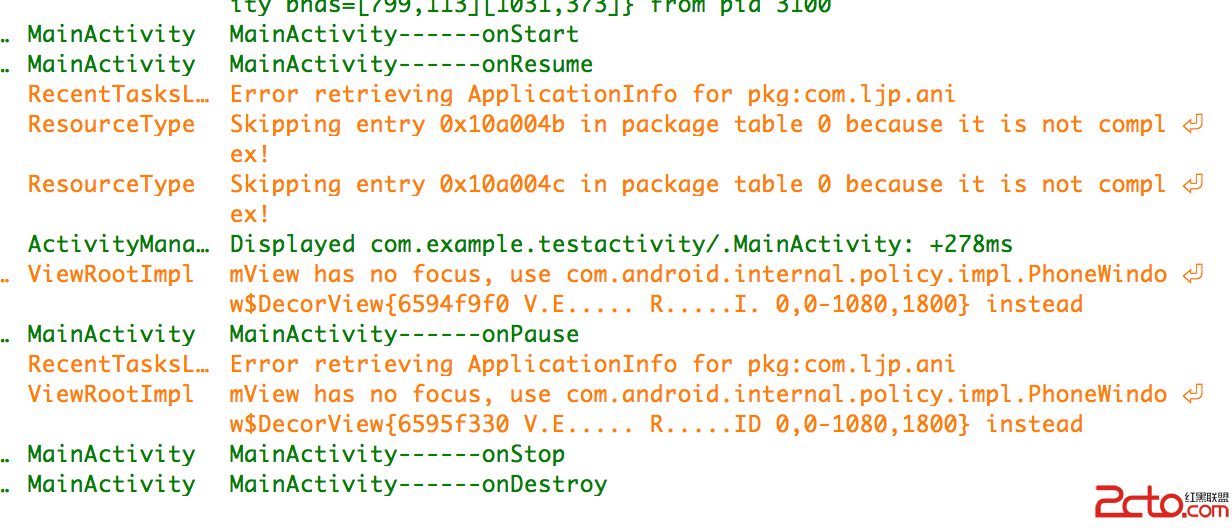 android --Activity生命周期詳解
一. 再探Activity生命周期 為了研究activity的生命周期,簡單測試代碼如下。 package com.example.testactivity; impo
 android中打開相機、打開相冊進行圖片的獲取示例
這裡介紹在Android中實現相機調取、拍照片、獲取照片、存儲新路徑等已經打開相冊、選擇照片等功能首先看一下界面,很簡單配置讀取內存卡和調用照相頭的功能 <!--
 Android緩存機制&一個緩存框架推薦
1、先推薦一個輕量級緩存框架——ACache(ASimpleCache)ACache介紹:ACache類似於SharedPrefere