編輯:關於Android編程
前言:Android中一些開發規范,避免給自己和別人少留坑。
2.2.15 Field Ordering 屬性排序
在類文件頂部聲明的任何屬性都應該按下列的排序規則進行排序:
//create by 逆流的魚yuiop on 2016/9/22
//blog地址:http://blog.csdn.net/hejjunlin
  public static enum {
      ENUM_ONE, ENUM_TWO
  }

  public static final String KEY_NAME = "KEY_NAME";
  public static final int COUNT_USER = 0;

  @Inject SomeAdapter mSomeAdapter;

  @BindView(R.id.text_name) TextView mNameText;
  @BindView(R.id.image_photo) ImageView mPhotoImage;

  private int mUserCount;
  private String mErrorMessage;

  public int mSomeCount;
  public String mSomeString;
使用上述的排序規則有助於保持字段聲明的分組,從而增加字段的可讀性
2.2.16 Class member ordering 類成員排序
為了提高代碼的可讀性,組織類成員在一個符合邏輯的方式中是非常的重要,請按下列的排序方式去實現:
1.Constants 2.Fields 3.Constructors 4.Override methods and callbacks (public or private) 5.Public methods 6.Private methods 7.Inner classes or interfaces例如:
//create by 逆流的魚yuiop on 2016/9/22
//blog地址:http://blog.csdn.net/hejjunlin
public class MainActivity extends Activity {
      private int mStepCount;
      public static newInstance() { }
      @Override
      public void onCreate() { }
      public void setColor(Color color) { }
      private int getId() { }
      static class AnInnerClass { }
      interface SomeInterface { }
}
在Android框架中任何生命周期的方法應該在其相應的生命周期中排序,例如:
//create by 逆流的魚yuiop on 2016/9/22
//blog地址:http://blog.csdn.net/hejjunlin
public class MainActivity extends Activity {

      // Field and constructors

      @Override
      public void onCreate() { }

      @Override
      public void onStart() { }

      @Override
      public void onResume() { }

      @Override
      public void onPause() { }

      @Override
      public void onStop() { }

      @Override
      public void onRestart() { }

      @Override
      public void onDestroy() { }

     // public methods, private methods, inner classes and interfaces
  }
2.2.17 Method parameter ordering 方法的參數排序
當定義方法時,參數應該按照下列的規則排序:
//create by 逆流的魚yuiop on 2016/9/22
//blog地址:http://blog.csdn.net/hejjunlin
public Post loadPost(Context context, int postId);
public void loadPost(Context context, int postId, Callback callback);
Context上下文參數應放在第一位,並且Callback回調參數放置在最後
2.2.18 String constants, naming, and values 字符串常量、命名和值
當使用字符串常量時,其應該修飾為靜態final並且遵循下列規則:
2.2.19 Enums 枚舉
枚舉的使用僅僅在實際需要用到時。如果另外一種方法可行,此時應該選擇更好的方式去實現它,例如:
相對於下面這樣:
//create by 逆流的魚yuiop on 2016/9/22
//blog地址:http://blog.csdn.net/hejjunlin
public enum SomeEnum {
    ONE, TWO, THREE
}
更推薦這樣做:
//create by 逆流的魚yuiop on 2016/9/22
//blog地址:http://blog.csdn.net/hejjunlin
  private static final int VALUE_ONE = 1;
  private static final int VALUE_TWO = 2;
  private static final int VALUE_THREE = 3;
2.2.20 Arguments in fragments and activities
在fragment和activity中的參數
當我們使用Intent或者Bundle傳遞數據時,值的鍵必須使用下面定義的約定:
當創建fragment或者activity的新實例涉及到傳遞數據時,我們應該提供一個靜態的方法來獲取新的實例,傳遞的數據作為參數。例如:
//create by 逆流的魚yuiop on 2016/9/22
//blog地址:http://blog.csdn.net/hejjunlin
//Activity中
public static Intent getStartIntent(Context context, Post post) {
      Intent intent = new Intent(context, CurrentActivity.class);
      intent.putParcelableExtra(EXTRA_POST, post);
      return intent;
}

//Fragment中
public static PostFragment newInstance(Post post) {
      PostFragment fragment = new PostFragment();
      Bundle args = new Bundle();
      args.putParcelable(ARGUMENT_POST, post);
      fragment.setArguments(args)
      return fragment;
}
2.2.21 Line Length Limit 行長度限制
代碼的行數字符長度最好不要超過100個字符,這樣代碼的可讀性會更高。有時為了實現上述要求,我們需要做的:
2.2.21.1 Line-wrapping techniques 換行技巧
當涉及到換行時,有一些情況我們應該保持與格式化代碼的一致性。
//create by 逆流的魚yuiop on 2016/9/22
//blog地址:http://blog.csdn.net/hejjunlin
  int count = countOne + countTwo - countThree + countFour * countFive - countSix
          + countOnANewLineBecauseItsTooLong;
如果需要,你可以直接在“=”後換行:
//create by 逆流的魚yuiop on 2016/9/22
//blog地址:http://blog.csdn.net/hejjunlin
  int count =
          countOne + countTwo - countThree + countFour * countFive + countSix;
方法鏈
//create by 逆流的魚yuiop on 2016/9/22
//blog地址:http://blog.csdn.net/hejjunlin
  Picasso.with(context).load("someUrl").into(imageView);
取而代之應這樣:
  Picasso.with(context)
          .load("someUrl")
          .into(imageView);
長參數
//create by 逆流的魚yuiop on 2016/9/22
//blog地址:http://blog.csdn.net/hejjunlin
  private void someMethod(Context context,
                          String someLongStringName,
                          String text,long
                          thisIsALong, String anotherString) {
  }
當調用這個方法時,我們應該在每個參數的逗號後面換行:
//create by 逆流的魚yuiop on 2016/9/22
//blog地址:http://blog.csdn.net/hejjunlin
  someMethod(context,
          "thisIsSomeLongTextItsQuiteLongIsntIt",
          "someText",
          01223892365463456,
          "thisIsSomeLongTextItsQuiteLongIsntIt");
2.2.22 Method spacing(方法間間距)
在同一個類中,方法與方法之間只需要留有一行的空白,如下:
//create by 逆流的魚yuiop on 2016/9/22
//blog地址:http://blog.csdn.net/hejjunlin
public String getUserName() {
    // Code
}

public void setUserName(String name) {
    // Code
}

public boolean isUserSignedIn() {
    // Code
}
2.2.23 Comments(注釋)
2.2.23.1 Inline comments(行內注釋)
必要的時候,寫注釋,其他情況下最好不要寫注釋,從方法名或者成員變量上就能看出做什麼。
2.2.23.2 JavaDoc Style Comments(java文檔的注釋風格)
方法的名字應該起的和該方法的功能相對應,有時可以提供JavaDoc風格的注釋。方法名起的好會幫助讀者更好的理解方法的功能,同時也會讓使用者明白傳入方法中參數的作用。
/**
 * Authenticates the user against the API given a User id.
 * If successful, this returns a success result
 *
 * @param userId The user id of the user that is to be authenticated.
 */
 public class XXX {

 }
2.2.23.3 Class comments(類注釋)
/**
  * RecyclerView adapter to display a list of {@link Post}.
  * Currently used with {@link PostRecycler} to show the list of Post items.
  */
public class RecyclerView {

}
不要寫初創作者信息,因為以後會有很多人在這個類上改來改去,寫上作者信息是沒有任何意義的。
/**
* Created By yuiop 22/09/2016
*/
public class XXX {

}
2.2.24 Sectioning code(分段代碼)
2.2.24.1 Java code(java代碼)
如果對代碼做了“分段”,應該使用下面的方法完成,如下:
//create by 逆流的魚yuiop on 2016/9/22
//blog地址:http://blog.csdn.net/hejjunlin
public void method() { }

public void someOtherMethod() { }

/********* MVP Method Implementations  ********/

public void anotherMethod() { }

/********* Helper Methods  ********/

public void someMethod() { }
不能像下面這樣:
//create by 逆流的魚yuiop on 2016/9/22
//blog地址:http://blog.csdn.net/hejjunlin
public void method() { }

public void someOtherMethod() { }

// Mvp Method Implementations

public void anotherMethod() { }
這樣會更容易定位類中方法。
2.2.24.2 Strings file(字符串文件)
字符串資源文件string.xml中分段注釋如下:
//create by 逆流的魚yuiop on 2016/9/22 //blog地址:http://blog.csdn.net/hejjunlin // User Profile ActivitySave Cancel // Settings Activity...
這樣寫不僅可以讓string文件看起來整潔,還能在需要更改它們時更容易找到。
2.2.24.3 RxJava chaining(RxJava鏈接)
當進行異步操作時,每一步操作都應該在遇到“.”號之前另起一行,如下:
//create by 逆流的魚yuiop on 2016/9/22
//blog地址:http://blog.csdn.net/hejjunlin
return dataManager.getPost()
            .concatMap(new Func1>() {
                @Override
                 public Observable call(Post post) {
                     return mRetrofitService.getPost(post.id);
                 }
            })
            .retry(new Func2() {
                 @Override
                 public Boolean call(Integer numRetries, Throwable throwable) {
                     return throwable instanceof RetrofitError;
                 }
            });
這樣會使讀者更容易理解接下來的異步操作。
2.2.25 Butterknife(Butterknife)
2.2.25.1 Event listeners(事件監聽者)
如有可能,盡量使用ButterKnife綁定監聽。舉個栗子,可以用ButterKnife替換傳統的點擊事件:
//create by 逆流的魚yuiop on 2016/9/22
//blog地址:http://blog.csdn.net/hejjunlin
mSubmitButton.setOnClickListener(new View.OnClickListener() {
    public void onClick(View v) {
        // Some code here...
    }
  };
換成如下:
//create by 逆流的魚yuiop on 2016/9/22
//blog地址:http://blog.csdn.net/hejjunlin
@OnClick(R.id.button_submit)
public void onSubmitButtonClick() { }
2.3 XML Style Rules(XML文件中樣式規則)
2.3.1 Use self=-closing tags(使用單標記)
在xml布局中,如果一個viwe沒有任何子view,那麼就應該使用單標記。
用這個:
//create by 逆流的魚yuiop on 2016/9/22
//blog地址:http://blog.csdn.net/hejjunlin
不用這個:
//create by 逆流的魚yuiop on 2016/9/22
//blog地址:http://blog.csdn.net/hejjunlin
2.3.2 Resource naming(資源命名)
所有的資源命名規則都應該是小寫和下劃線的組合,如下:
2.3.2.1 ID naming(id命名)
所有的id命名規則都應該用元素作為前綴。
例如:
//create by 逆流的魚yuiop on 2016/9/22
//blog地址:http://blog.csdn.net/hejjunlin
注意:如果一個布局中一種類型的view只有一種,比方toolbar,那麼可以直接起名叫toolbar
2.3.2.2 Strings(字符串)
所有的字符串名字應該以該應用的當前功能頁面作為前綴,如下:
如果沒法像上面一樣命名,咱們可以用下面的方法:
需要注意以下兩點:
1、同一個的字符串資源不能在多個文件中共享使用。如果其中的一個頁面字符串發生改變也會造成另一個頁面的改變從而產生問題。每個頁面使用單獨的字符串資源會給將來省去很多麻煩。 2、字符串資源必須放在字符串資源文件中,不能寫在布局或者類中。2.3.2.3 Styles and themes
當定義style和theme時,每個單詞應該大寫開頭。如下:
//create by 逆流的魚yuiop on 2016/9/22
//blog地址:http://blog.csdn.net/hejjunlin
AppTheme.DarkBackground.NoActionBar
AppTheme.LightBackground.TransparentStatusBar
ProfileButtonStyle
TitleTextStyle
2.3.3 Attributes ordering(屬性排序)
定義屬性不能只為了看起來整潔,同時能夠在布局中快速找到屬性位置。以下是基本規則:
如下:
//create by 逆流的魚yuiop on 2016/9/22
//blog地址:http://blog.csdn.net/hejjunlin
注意:在Android studio中快速格式化快捷鍵是:cmd + shift + L
這樣做,當布局文件發生變化時,可以通過xml屬性快速定位。
本文出自逆流的魚yuiop:http://blog.csdn.net/hejjunlin/article/details/52614696
2.4 Tests style rules(測試風格規則)
2.4.1 Unit tests(單元測試)
所有測試類起名字都應該和他們被測試的類相對應,並且以Test作為後綴,如下:
所有的測試方法應該用@Test進行注釋,測試方法應該用下面的模板:
@Test
public void methodNamePreconditionExpectedResult() { }
舉例,如果我們想測試一個使用不正確郵箱登錄的功能,測試方法應該使用如下的:
@Test
public void signUpWithInvalidEmailFails() { }
測試應該將重點放在測試方法賦予的功能名稱上面,如果在你的測試方法中還有別的情況需要考慮,這些額外的需要測試的情況應該分到它專門的測試方法中。
如果一個類中包含許多不同的方法,測試應該在多個測試類中進行拆分-這樣有助於測試更易於維護和定位。例如,一個數據庫工具類有時候會分解成如下幾個測試類:
DatabaseHelperUserTest
DatabaseHelperPostsTest
DatabaseHelperDraftsTest
2.4.2 Espresso tests(功能測試框架Espresso)
每個Espresso測試類一般都對應一個Activity,所以命名時應該和對應的Activity相一致,其次是測試,如下:
當使用Espresso API的時候,方法應該換行從而可以讓聲明更易讀,舉例如下:
onView(withId(R.id.text_title))
        .perform(scrollTo())
        .check(matches(isDisplayed()))
這種風格的鏈接調用不僅可以讓我們每行不超過100個字符,同時也可以讓Espresso測試中的鏈接更加易讀。
3.1.1 Versioning
如果一個版本號在多個依賴中多被使用,那麼應該在依賴的范圍內定義成一個變量,如下:
//create by 逆流的魚yuiop on 2016/9/22
//blog地址:http://blog.csdn.net/hejjunlin
final SUPPORT_LIBRARY_VERSION = '23.4.0'
compile "com.android.support:support-v4:$SUPPORT_LIBRARY_VERSION"
compile "com.android.support:recyclerview-v7:$SUPPORT_LIBRARY_VERSION"
compile "com.android.support:support-annotations:$SUPPORT_LIBRARY_VERSION"
compile "com.android.support:design:$SUPPORT_LIBRARY_VERSION"
compile "com.android.support:percent:$SUPPORT_LIBRARY_VERSION"
compile "com.android.support:customtabs:$SUPPORT_LIBRARY_VERSION"
將來如果需要更新依賴,那麼只需要更新版本號的變量就可以很輕松的控制所有依賴的版本號。
3.1.2 Grouping(分組)
依賴應該以包名來分組,各個組之間應該有一定的間隙,如下://create by 逆流的魚yuiop on 2016/9/22 //blog地址:http://blog.csdn.net/hejjunlin compile "com.android.support:percent:$SUPPORT_LIBRARY_VERSION" compile "com.android.support:customtabs:$SUPPORT_LIBRARY_VERSION" compile 'io.reactivex:rxandroid:1.2.0' compile 'io.reactivex:rxjava:1.1.5' compile 'com.jakewharton:butterknife:7.0.1' compile 'com.jakewharton.timber:timber:4.1.2' compile 'com.github.bumptech.glide:glide:3.7.0'
Compile、testCompile、androidTestCompile依賴同樣應該分組到相對應的組別中,如下:
// App Dependencies
compile "com.android.support:support-v4:$SUPPORT_LIBRARY_VERSION"
compile "com.android.support:recyclerview-v7:$SUPPORT_LIBRARY_VERSION"

// Instrumentation test dependencies
androidTestCompile "com.android.support:support-annotations:$SUPPORT_LIBRARY_VERSION"

// Unit tests dependencies
testCompile 'org.robolectric:robolectric:3.0'
這兩種方法都可以很容易的找到特定的依賴關系,需要時,它保證依賴的聲明既干淨又整潔。
3.1.3 Independent Dependencies(獨立的依賴關系)
依賴只能應用在應用或者目的測試中,確保使用compile,testCompile,androidTestCompile來編譯它們。例如,robolectric依賴只能被用來做單元測試,它應該如下:testCompile 'org.robolectric:robolectric:3.0'
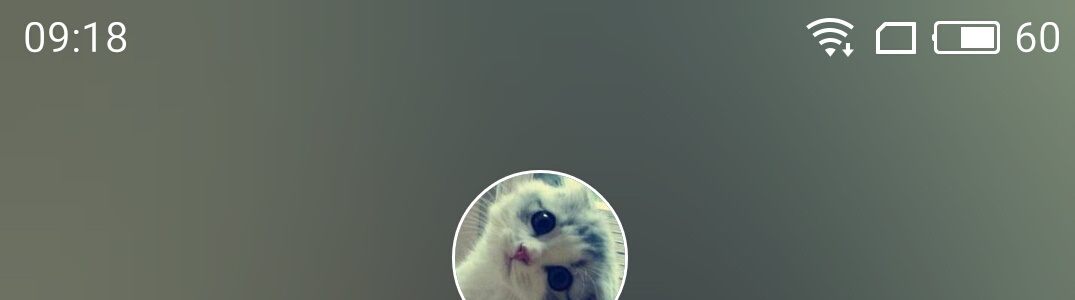 Android 透明狀態欄
發現現在好多App都使用了透明狀態欄,眼紅了好久但是又懶得寫,但是。這高大上的狀態欄真的好有逼格啊,對於有點強迫症的我來說簡直不能忍,所以還是寫篇博客記錄一下,方便以後使
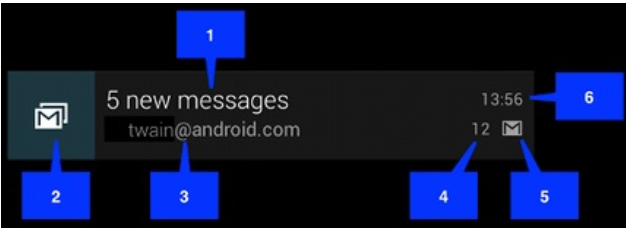 Android通知消息總結
一.通知(Notification)的相關概念Notification是一種具有全局效果的通知,它展示在屏幕的頂端,首先會表現為一個圖標的形式,當用戶向下滑動的時候,展示
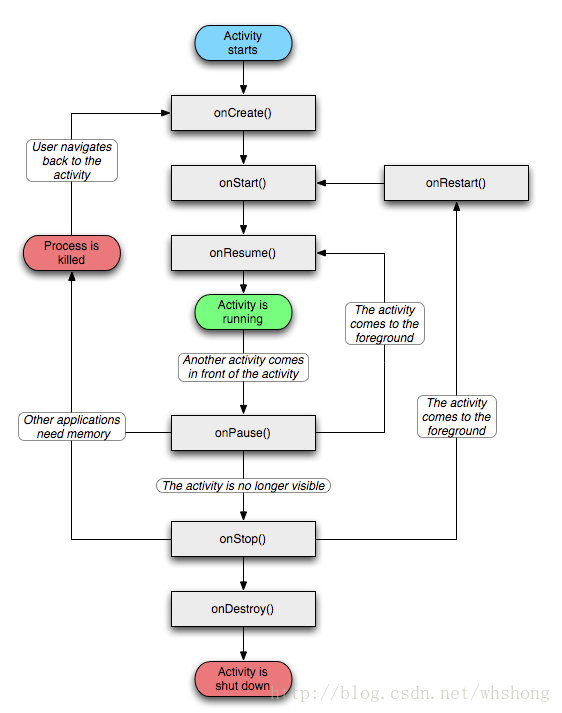 Android學習篇:Activity介紹
Android學習篇:Activity介紹:Activity是Android系統提供的一個活動基類,它是一種可以包含用戶界面的組件,我們項目中所有的活動都必須繼承它才擁有
 小米Note全網通版支持移動/聯通/電信網絡匯總
小米Note全網通版是一款支持電信、聯通、移動手機卡的雙卡雙待手機,是小米Note標准版的升級版,但售價僅比標准版多了100元。下面下載吧小編就為大家總結小