編輯:關於Android編程
總結下來就是:
- IntentService是Service類的子類,用來處理異步請求;
- 客戶端可以通過startService(Intent)方法傳遞請求給IntentService;
- IntentService單獨開啟了一個線程來處理所有的Intent請求所對應的任務,以免事務處理阻塞主線程,而且任務是按先後順序逐個進行處理的;
- 當IntentService處理完所有的任務後,它會在適當的時候自動結束服務。
下面是一個模擬圖片上傳的demo。
ImgUploadService.java類:
public class ImgUploadService extends IntentService {
    public static final String TAG = "ImgUploadService";

    private static final String ACTION_UPLOAD_IMG = "com.demo.service.action.UPLOAD_IMAGE";
    public static final String EXTRA_IMG_PATH = "com.demo.service.extra.IMG_PATH";

    public ImgUploadService(String name) {
        super(name);
        Log.d(TAG, "ImgUploadService[" + " ThreadName: " + name + " ]");
    }

    @Override
    protected void onHandleIntent(Intent intent) {
        Log.d(TAG, "onHandleIntent");
        if (intent != null) {
            final String action = intent.getAction();
            if (ACTION_UPLOAD_IMG.equals(action)) {
                final String path = intent.getStringExtra(EXTRA_IMG_PATH);
                handleUploadImg(path);
            }
        }
    }

    private void handleUploadImg(String path) {
        try {
            Thread.sleep(3000); //模擬上傳耗時
            Intent intent = new Intent(IntentServiceActivity.UPLOAD_RESULT);
            intent.putExtra(EXTRA_IMG_PATH, path);
            LocalBroadcastManager.getInstance(getApplicationContext()).sendBroadcast(intent);
        } catch (InterruptedException e) {
            e.printStackTrace();
        }
    }

    public static void startUploadImg(Context context, String path) {
        Intent intent = new Intent(context, ImgUploadService.class);
        intent.setAction(ACTION_UPLOAD_IMG);
        intent.putExtra(EXTRA_IMG_PATH, path);
        context.startService(intent);
    }

    @Override
    public void onDestroy() {
        super.onDestroy();
        Log.d(TAG, "onDestroy");
    }
}
IntentServiceActivity.java類:
public class IntentServiceActivity extends Activity {
    public static final String UPLOAD_RESULT = "com.demo.service.UPLOAD_RESULT";

    private LinearLayout mLlContainer;
    private TextView mBtnUpload;
    int i = 0;

    @Override
    public void onCreate(Bundle savedInstanceState, PersistableBundle persistentState) {
        super.onCreate(savedInstanceState, persistentState);
        setContentView(R.layout.activity_main_handlerthread);
        mLlContainer = (LinearLayout) findViewById(R.id.ll_container);
        mBtnUpload = (TextView) findViewById(R.id.btn_upload);
        registerReceiver();

        mBtnUpload.setOnClickListener(new View.OnClickListener() {
            @Override
            public void onClick(View v) {
                addTask(); //模擬上傳
            }
        });
    }

    private void registerReceiver() {
        IntentFilter filter = new IntentFilter();
        filter.addAction(UPLOAD_RESULT);
        LocalBroadcastManager.getInstance(this).registerReceiver(mUploadImgReceiver, filter);
    }

    public void addTask() {
        String path = "圖片" + i++ + ".png";
        ImgUploadService.startUploadImg(this, path);

        TextView tv = new TextView(this);
        mLlContainer.addView(tv);
        tv.setText(path + " ....正在上傳中....");
        tv.setTag(path);
    }

    private void handleResult(String path) {
        TextView tv = (TextView) mLlContainer.findViewWithTag(path);
        tv.setText(path + "  ----上傳成功---- ");
    }

    private BroadcastReceiver mUploadImgReceiver = new BroadcastReceiver() {
        @Override
        public void onReceive(Context context, Intent intent) {
            if (intent.getAction().equals(UPLOAD_RESULT)) {
                String path = intent.getStringExtra(ImgUploadService.EXTRA_IMG_PATH);
                handleResult(path);
            }
        }
    };

    @Override
    protected void onDestroy() {
        super.onDestroy();
        LocalBroadcastManager.getInstance(this).unregisterReceiver(mUploadImgReceiver);
    }
}
activity_main.xml文件:
IntentService本身就是一個Service,它擁有Service的所有生命周期方法,但內部是通過HandlerThread實現異步執行任務的,HandlerThread是一個內部維護了一個消息隊列的線程。
既然IntentService有生命周期,那麼就從它的構造函數看起:
/**
 * Creates an IntentService.  Invoked by your subclass's constructor.
 *
 * @param name Used to name the worker thread, important only for debugging.
 */
public IntentService(String name) {
    super();
    mName = name;
}
構造方法很簡單,用於創建一個IntentService對象,參數namne用於定義工作線程的名字,僅用於調試作用。接下來看下IntentService的onCreate()方法:
@Override
public void onCreate() {
    // TODO: It would be nice to have an option to hold a partial wakelock
    // during processing, and to have a static startService(Context, Intent)
    // method that would launch the service & hand off a wakelock.

    super.onCreate();
    // 創建一個HandlerThread對象,並傳入工作線程的名字
    HandlerThread thread = new HandlerThread("IntentService[" + mName + "]");
    // 開啟後台工作線程
    thread.start();

    // 獲取後台工作線程的Looper對象
    mServiceLooper = thread.getLooper();
    // 創建一個ServiceHandler對象,用來處理異步消息。
    mServiceHandler = new ServiceHandler(mServiceLooper);
}
在onCreate()方法裡,首先利用HandlerThread類創建了一個循環的工作線程,接著獲取工作線程中的Looper對象並將其作為參數創建了一個叫ServiceHandler的類,該類是IntentService的內部類,該類繼承了Handler,我們看它的定義:
public abstract class IntentService extends Service {
    //volatile關鍵字保證變量每次在使用的時候,都從主存中取。而不是從各個線程的“工作內存”中讀取
    private volatile Looper mServiceLooper;//
    private volatile ServiceHandler mServiceHandler;
    private String mName;
    private boolean mRedelivery;

    private final class ServiceHandler extends Handler {
        public ServiceHandler(Looper looper) {
            super(looper);
        }

        @Override
        public void handleMessage(Message msg) {
            //一收到消息就回調到onHandleIntent()中進行處理
            onHandleIntent((Intent)msg.obj);
            //處理完消息就調用stopSelf()方法,並傳入消息的索引值
            stopSelf(msg.arg1);
        }
    }
}
從源碼中可以看到,mServiceLooper和mServiceHandler都加了volatile關鍵字修飾,這是為了保證變量在每次使用的時候都從主內存中讀取,而不是從各個線程的“工作內存”中讀取,也就是說保證內存的可見性。
接著看onHandleIntent()方法,該方法是在ServiceHandler收到消息後回調的,也即onHandleIntent()方法是在HandlerThread工作線程中執行的,它是一個抽象方法,留給調用者去實現耗時任務的。
/**
* This method is invoked on the worker thread with a request to process.
 * Only one Intent is processed at a time, but the processing happens on a
 * worker thread that runs independently from other application logic.
 * So, if this code takes a long time, it will hold up other requests to
 * the same IntentService, but it will not hold up anything else.
 * When all requests have been handled, the IntentService stops itself,
 * so you should not call {@link #stopSelf}.
 *
 * @param intent The value passed to {@link
 *               android.content.Context#startService(Intent)}.
 */
protected abstract void onHandleIntent(Intent intent);
此外,因為任務是通過ServiceHandler發送給異步線程的消息隊列來處理的,而消息隊列裡的消息是依次取出並執行的,所以從這裡可以了解到任務必定是串行執行的。而執行完一個消息後,調用了一個帶有startId參數的stopSelf()方法:
** * Old version of {@link #stopSelfResult} that doesn't return a result. * * @see #stopSelfResult */
public final void stopSelf(int startId) {
    if (mActivityManager == null) {
        return;
    }
    try {
        mActivityManager.stopServiceToken(
                new ComponentName(this, mClassName), mToken, startId);
    } catch (RemoteException ex) {
    }
}
該方法實際上是通過調用ActivityManager的stopServiceToken()方法來停止當前服務的,不過服務不會馬上停止,而是等待繼續完成剩下的任務後才自動結束,因為方法參數裡攜帶了一個startId,它可以看做是一個請求的唯一標識,只有當所有的請求都結束,我們的Service才自行銷毀,而startId是從onStartCommand()裡被調用的,我們看下它的源碼:
/**
 * You should not override this method for your IntentService. Instead,
 * override {@link #onHandleIntent}, which the system calls when the IntentService
 * receives a start request.
 * @see android.app.Service#onStartCommand
 */
@Override
public int onStartCommand(Intent intent, int flags, int startId) {
    onStart(intent, startId);
    return mRedelivery ? START_REDELIVER_INTENT : START_NOT_STICKY;
}

@Override
public void onStart(Intent intent, int startId) {
    Message msg = mServiceHandler.obtainMessage();
    msg.arg1 = startId;
    msg.obj = intent;
    mServiceHandler.sendMessage(msg);
}
對於Service,每次調用startServcie方法啟動一個服務,都會調用一次onStartCommand()方法,每次也會帶一個startId過去,如果執行多個任務,那麼就會存在多個startId,然後在onStart()方法中通過mServiceHandler獲得一個消息對象msg,然後將startId作為該消息的消息碼,將異步任務請求intent作為消息內容封裝成一個消息msg發送到mServiceHandler中進行異步處理,最後回調到onHandleIntent()中,子類通過實現onHandleIntent()即可進行異步耗時任務的執行。
這裡注意,我們不需要自己去重寫onStartCommand()和onStart()方法,但onHandleIntent()必須重寫。
當所有的startId都處理完後,IntentService會調用onDestroy()自行銷毀,消息隊列也會自行退出。
 從零開始學android(ACtivity的生命周期.三十九.)
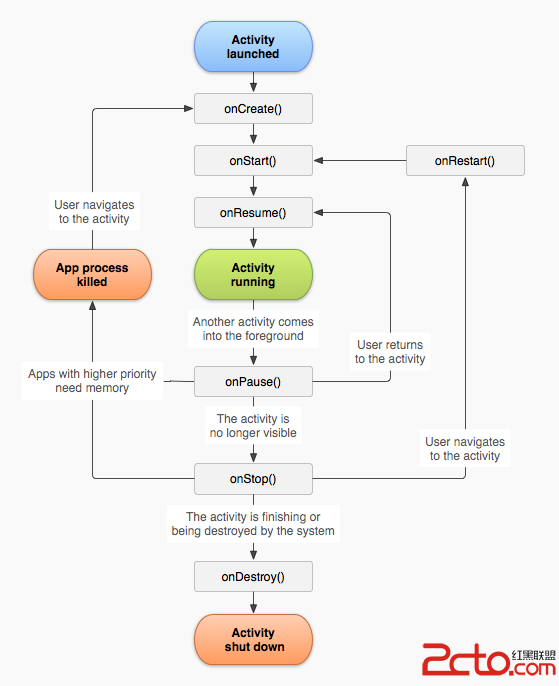
意圖是指兩個UI主界面的轉換,要想了解意圖就必須學習ACtivity的生命周期 默認在UI界面顯示的為運行為運行狀態,而在後台的為onPause方法 主線:
 談談最近很火的android手機病毒
““XXX(機主姓名)看這個,ht://********XXshenqi.apk”最近一種手機病毒爆發,機主收到這樣的短信,開頭是以發
 android產品研發(二十二)--)android實用調試技巧
上一篇文章中我們講解了android UI優化方面的知識。我們講解了android中的include、marge、ViewStub標簽,在使用這些標簽時可以簡化我們的布局
 Android Dialog中軟鍵盤的顯示與隱藏的示例
1.寫在前面本篇的主要內容是關於在Dialog中軟鍵盤的顯示與隱藏問題,需求是在Dialog中有一個密碼輸入框,彈出Dialog顯示軟鍵盤,關閉Dialog隱藏軟鍵盤。