編輯:關於Android編程
android安裝應用分兩種,一種是直接調用PKMS的接口安裝,另一種是掃描目錄安裝,比如系統開機的時候會掃描data/app目錄進行安裝。
我們先來看調用接口應用安裝應用,都會通過如下函數,這個函數先會通過傳進來的uid來判斷是否是adb安裝的,然後創建了一個InstallParams對象這個對象是HandlerParams的子類,然後發送消息。
    @Override
    public void installPackageAsUser(String originPath, IPackageInstallObserver2 observer,
            int installFlags, String installerPackageName, VerificationParams verificationParams,
            String packageAbiOverride, int userId) {
        mContext.enforceCallingOrSelfPermission(android.Manifest.permission.INSTALL_PACKAGES, null);

        final int callingUid = Binder.getCallingUid();
        enforceCrossUserPermission(callingUid, userId, true, true, "installPackageAsUser");

        if (isUserRestricted(userId, UserManager.DISALLOW_INSTALL_APPS)) {
            try {
                if (observer != null) {
                    observer.onPackageInstalled("", INSTALL_FAILED_USER_RESTRICTED, null, null);
                }
            } catch (RemoteException re) {
            }
            return;
        }

        if ((callingUid == Process.SHELL_UID) || (callingUid == Process.ROOT_UID)) {
            installFlags |= PackageManager.INSTALL_FROM_ADB;//根據uid來判斷是否是adb安裝的

        } else {
            // Caller holds INSTALL_PACKAGES permission, so we're less strict
            // about installerPackageName.

            installFlags &= ~PackageManager.INSTALL_FROM_ADB;
            installFlags &= ~PackageManager.INSTALL_ALL_USERS;
        }

        UserHandle user;
        if ((installFlags & PackageManager.INSTALL_ALL_USERS) != 0) {
            user = UserHandle.ALL;
        } else {
            user = new UserHandle(userId);
        }

        // Only system components can circumvent runtime permissions when installing.
        if ((installFlags & PackageManager.INSTALL_GRANT_RUNTIME_PERMISSIONS) != 0
                && mContext.checkCallingOrSelfPermission(Manifest.permission
                .INSTALL_GRANT_RUNTIME_PERMISSIONS) == PackageManager.PERMISSION_DENIED) {
            throw new SecurityException("You need the "
                    + "android.permission.INSTALL_GRANT_RUNTIME_PERMISSIONS permission "
                    + "to use the PackageManager.INSTALL_GRANT_RUNTIME_PERMISSIONS flag");
        }

        verificationParams.setInstallerUid(callingUid);

        final File originFile = new File(originPath);
        final OriginInfo origin = OriginInfo.fromUntrustedFile(originFile);

        final Message msg = mHandler.obtainMessage(INIT_COPY);
        InstallParams installParams = new InstallParams(origin, null, observer, installFlags, installerPackageName,
                null, verificationParams, user, packageAbiOverride, null);
        installParams.setHandlerType(HandlerParams.INSTALL_TYPE);
        msg.obj = installParams;
        mHandler.sendMessage(msg);//發送消息
    }
普通的安裝我們就調用這個接口,我們來看下adb install又是如何實現的。
我們來看下adb中Commandline.cpp中的如下代碼,就是執行adb install命令的。
static int install_app(transport_type transport, const char* serial, int argc,
                       const char** argv)
{
    static const char *const DATA_DEST = "/data/local/tmp/%s";
    static const char *const SD_DEST = "/sdcard/tmp/%s";
    const char* where = DATA_DEST;
    int i;
    struct stat sb;

    for (i = 1; i < argc; i++) {
        if (!strcmp(argv[i], "-s")) {
            where = SD_DEST;
        }
    }

    // Find last APK argument.
    // All other arguments passed through verbatim.
    int last_apk = -1;
    for (i = argc - 1; i >= 0; i--) {
        const char* file = argv[i];
        char* dot = strrchr(file, '.');
        if (dot && !strcasecmp(dot, ".apk")) {
            if (stat(file, &sb) == -1 || !S_ISREG(sb.st_mode)) {
                fprintf(stderr, "Invalid APK file: %s\n", file);
                return -1;
            }

            last_apk = i;
            break;
        }
    }

    if (last_apk == -1) {
        fprintf(stderr, "Missing APK file\n");
        return -1;
    }

    const char* apk_file = argv[last_apk];
    char apk_dest[PATH_MAX];
    snprintf(apk_dest, sizeof apk_dest, where, get_basename(apk_file));
    int err = do_sync_push(apk_file, apk_dest, 0 /* no show progress */);//先push apk文件
    if (err) {
        goto cleanup_apk;
    } else {
        argv[last_apk] = apk_dest; /* destination name, not source location */
    }

    err = pm_command(transport, serial, argc, argv);//調用pm命令

cleanup_apk:
    delete_file(transport, serial, apk_dest);//刪除文件
    return err;
}
上面函數先是把apk文件push到data/local/tmp下面,然後調用pm命令,最後完成之後再刪除文件。
下面我們分別看下幾個函數。
static int pm_command(transport_type transport, const char* serial,
                      int argc, const char** argv)
{
    std::string cmd = "shell:pm";

    while (argc-- > 0) {
        cmd += " " + escape_arg(*argv++);
    }

    return send_shell_command(transport, serial, cmd);
}
刪除就是調用了adb shell rm命令。
static int delete_file(transport_type transport, const char* serial, char* filename)
{
    std::string cmd = "shell:rm -f " + escape_arg(filename);
    return send_shell_command(transport, serial, cmd);
}
我們再看下PM命令,是在Pm.java文件中,最後也是調用了installPackageAsUser函數,這個我們就不看了。下面繼續分析installPackageAsUser函數。
上面分析到發送一個INIT_COPY消息,我們再來看下消息處理。
                case INIT_COPY: {
                    HandlerParams params = (HandlerParams) msg.obj;
                    int idx = mPendingInstalls.size();
                    if (DEBUG_INSTALL) Slog.i(TAG, "init_copy idx=" + idx + ": " + params);
                    // If a bind was already initiated we dont really
                    // need to do anything. The pending install
                    // will be processed later on.
                    if (!mBound) {
                        // If this is the only one pending we might
                        // have to bind to the service again.
                        if (!connectToService()) {
                            Slog.e(TAG, "Failed to bind to media container service");
                            params.serviceError();
                            return;
                        } else {
                            // Once we bind to the service, the first
                            // pending request will be processed.
                            mPendingInstalls.add(idx, params);
                        }
                    } else {
                        mPendingInstalls.add(idx, params);
                        // Already bound to the service. Just make
                        // sure we trigger off processing the first request.
                        if (idx == 0) {
                            mHandler.sendEmptyMessage(MCS_BOUND);
                        }
                    }
                    break;
                }
消息處理先要看mBound是否為true,為true代表DefaultContainerService連接上了(這個service後續需要copy apk等文件的),這個時候會發送一個MCS_BOUND消息。我們先等等看這個消息的處理。這裡如果mBound是false,就要調用connectToService函數。
我們來看這個函數,就是調用BindService來啟動一個Service
        private boolean connectToService() {
            if (DEBUG_SD_INSTALL) Log.i(TAG, "Trying to bind to" +
                    " DefaultContainerService");
            Intent service = new Intent().setComponent(DEFAULT_CONTAINER_COMPONENT);
            Process.setThreadPriority(Process.THREAD_PRIORITY_DEFAULT);
            if (mContext.bindServiceAsUser(service, mDefContainerConn,
                    Context.BIND_AUTO_CREATE, UserHandle.OWNER)) {
                Process.setThreadPriority(Process.THREAD_PRIORITY_BACKGROUND);
                mBound = true;
                return true;
            }
            Process.setThreadPriority(Process.THREAD_PRIORITY_BACKGROUND);
            return false;
        }
    static final ComponentName DEFAULT_CONTAINER_COMPONENT = new ComponentName(
            DEFAULT_CONTAINER_PACKAGE,
            "com.android.defcontainer.DefaultContainerService");
我們再來看Connection,連接上之後會把這個Service的Binder對象IMediaContainerService ,發送一個MCS_BOUND消息。
    final private DefaultContainerConnection mDefContainerConn =
            new DefaultContainerConnection();
    class DefaultContainerConnection implements ServiceConnection {
        public void onServiceConnected(ComponentName name, IBinder service) {
            if (DEBUG_SD_INSTALL) Log.i(TAG, "onServiceConnected");
            IMediaContainerService imcs =
                IMediaContainerService.Stub.asInterface(service);
            mHandler.sendMessage(mHandler.obtainMessage(MCS_BOUND, imcs));
        }

        public void onServiceDisconnected(ComponentName name) {
            if (DEBUG_SD_INSTALL) Log.i(TAG, "onServiceDisconnected");
        }
    }
現在我們再來看這個消息處理。其實這個函數主要就是調用了調用HandlerParams的startCopy函數,其他就是判斷Service是否斷開,是否mPendingInstalls還有其他沒有安裝的應用等處理。
                case MCS_BOUND: {
                    if (DEBUG_INSTALL) Slog.i(TAG, "mcs_bound");
                    if (msg.obj != null) {
                        mContainerService = (IMediaContainerService) msg.obj;
                    }
                    if (mContainerService == null) {
                        if (!mBound) {
                            // Something seriously wrong since we are not bound and we are not
                            // waiting for connection. Bail out.
                            Slog.e(TAG, "Cannot bind to media container service");
                            for (HandlerParams params : mPendingInstalls) {
                                // Indicate service bind error
                                params.serviceError();
                            }
                            mPendingInstalls.clear();
                        } else {
                            Slog.w(TAG, "Waiting to connect to media container service");
                        }
                    } else if (mPendingInstalls.size() > 0) {
                        HandlerParams params = mPendingInstalls.get(0);
                        if (params != null) {
                            if (params.startCopy()) {//調用HandlerParams的startCopy函數
                                // We are done...  look for more work or to
                                // go idle.
                                if (DEBUG_SD_INSTALL) Log.i(TAG,
                                        "Checking for more work or unbind...");
                                // Delete pending install
                                if (mPendingInstalls.size() > 0) {
                                    mPendingInstalls.remove(0);
                                }
                                if (mPendingInstalls.size() == 0) {
                                    if (mBound) {
                                        if (DEBUG_SD_INSTALL) Log.i(TAG,
                                                "Posting delayed MCS_UNBIND");
                                        removeMessages(MCS_UNBIND);
                                        Message ubmsg = obtainMessage(MCS_UNBIND);
                                        // Unbind after a little delay, to avoid
                                        // continual thrashing.
                                        sendMessageDelayed(ubmsg, 10000);
                                    }
                                } else {
                                    // There are more pending requests in queue.
                                    // Just post MCS_BOUND message to trigger processing
                                    // of next pending install.
                                    if (DEBUG_SD_INSTALL) Log.i(TAG,
                                            "Posting MCS_BOUND for next work");
                                    mHandler.sendEmptyMessage(MCS_BOUND);
                                }
                            }
                        }
                    } else {
                        // Should never happen ideally.
                        Slog.w(TAG, "Empty queue");
                    }
                    break;
                }
我們來看下面這個函數,如果超過4次出錯,直接發送一個MCS_GIVE_UP消息,這個消息裡面會調用mPendingInstalls.remove(0);把mPendingInstalls中第一項去除(就是去除第一個要安裝的應用),當我們成功安裝完在MCS_BOUND也會將第一個去除的。
當然正常的是調用handleStartCopy函數,只有出現RemoteException的是否才會返回false,代表這個copy不成功,也就不會remove這項應用信息。下次還會再調調用startCopy函數繼續處理。
        final boolean startCopy() {
            boolean res;
            try {
                if (DEBUG_INSTALL) Slog.i(TAG, "startCopy " + mUser + ": " + this);

                if (++mRetries > MAX_RETRIES) {//如果安裝沒有成功,超過4次。錯誤處理
                    Slog.w(TAG, "Failed to invoke remote methods on default container service. Giving up");
                    mHandler.sendEmptyMessage(MCS_GIVE_UP);
                    handleServiceError();
                    return false;
                } else {
                    handleStartCopy();
                    res = true;
                }
            } catch (RemoteException e) {
                if (DEBUG_INSTALL) Slog.i(TAG, "Posting install MCS_RECONNECT");
                mHandler.sendEmptyMessage(MCS_RECONNECT);
                res = false;
            }
            handleReturnCode();
            return res;
        }
我們先看下handleServiceError函數,也像handleStartCopy會調用createInstallArgs,創建一個InstallArgs,然後mRet為失敗的。這些後面在處理processPendingInstall函數的時候需要
        @Override
        void handleServiceError() {
            mArgs = createInstallArgs(this);
            mRet = PackageManager.INSTALL_FAILED_INTERNAL_ERROR;
        }
我們再來看看handleStartCopy函數,先會調用createInstallArgs來創建一個InstallArgs,這裡只是一個基類而已,然後會調用InstallArgs的copyApk函數,來copy apk文件到data/app下面.
        public void handleStartCopy() throws RemoteException {
            int ret = PackageManager.INSTALL_SUCCEEDED;
            ......
            final InstallArgs args = createInstallArgs(this);
            mArgs = args;
            ......
            else {
                    /*
                     * No package verification is enabled, so immediately start
                     * the remote call to initiate copy using temporary file.
                     */
                    ret = args.copyApk(mContainerService, true);
                }
            }

            mRet = ret;
        }
我們先來看下createInstallArgs函數,根據InstallParams來創建不同的InstallArgs,這裡我們只關心FileInstallArgs。
    private InstallArgs createInstallArgs(InstallParams params) {
        if (params.move != null) {
            return new MoveInstallArgs(params);
        } else if (installOnExternalAsec(params.installFlags) || params.isForwardLocked()) {
            return new AsecInstallArgs(params);
        } else {
            return new FileInstallArgs(params);
        }
    }
我們來看下FileInstallArgs 的copyApk函數,先是調用PackageInstallerService的allocateStageDirLegacy函數來創建一個目錄,然後調用ImediaContainerService binder調用copyPackage函數,這個就是之前的DefaultContainerService。
        int copyApk(IMediaContainerService imcs, boolean temp) throws RemoteException {
            if (origin.staged) {
                if (DEBUG_INSTALL) Slog.d(TAG, origin.file + " already staged; skipping copy");
                codeFile = origin.file;
                resourceFile = origin.file;
                return PackageManager.INSTALL_SUCCEEDED;
            }

            try {
                final File tempDir = mInstallerService.allocateStageDirLegacy(volumeUuid);
                codeFile = tempDir;
                resourceFile = tempDir;
            } catch (IOException e) {
                Slog.w(TAG, "Failed to create copy file: " + e);
                return PackageManager.INSTALL_FAILED_INSUFFICIENT_STORAGE;
            }

            final IParcelFileDescriptorFactory target = new IParcelFileDescriptorFactory.Stub() {
                @Override
                public ParcelFileDescriptor open(String name, int mode) throws RemoteException {
                    if (!FileUtils.isValidExtFilename(name)) {
                        throw new IllegalArgumentException("Invalid filename: " + name);
                    }
                    try {
                        final File file = new File(codeFile, name);
                        final FileDescriptor fd = Os.open(file.getAbsolutePath(),
                                O_RDWR | O_CREAT, 0644);
                        Os.chmod(file.getAbsolutePath(), 0644);
                        return new ParcelFileDescriptor(fd);
                    } catch (ErrnoException e) {
                        throw new RemoteException("Failed to open: " + e.getMessage());
                    }
                }
            };

            int ret = PackageManager.INSTALL_SUCCEEDED;
            ret = imcs.copyPackage(origin.file.getAbsolutePath(), target);
            if (ret != PackageManager.INSTALL_SUCCEEDED) {
                Slog.e(TAG, "Failed to copy package");
                return ret;
            }

            final File libraryRoot = new File(codeFile, LIB_DIR_NAME);
            NativeLibraryHelper.Handle handle = null;
            try {
                handle = NativeLibraryHelper.Handle.create(codeFile);
                ret = NativeLibraryHelper.copyNativeBinariesWithOverride(handle, libraryRoot,
                        abiOverride);
            } catch (IOException e) {
                Slog.e(TAG, "Copying native libraries failed", e);
                ret = PackageManager.INSTALL_FAILED_INTERNAL_ERROR;
            } finally {
                IoUtils.closeQuietly(handle);
            }

            return ret;
        }
這裡的data/app下的臨時文件我們來看下是怎麼樣的
 # ls
IflytekInput.apk
MOffice.apk
NotePadPlus.apk
vmdl202298311.tmp
這裡vmdl202298311.tmp只是一個目錄,下面還有base.apk 和lib,lib也是一個目錄裡面還有各個so文件
base.apk
lib
這裡就完成了將apk copy到data/app下面的臨時目錄中。
然後在startCopy函數中又會調用handleReturnCode函數,這裡就是調用了processPendingInstall函數,注意參數mRett就是之前調用copyApk的返回值。
        @Override
        void handleReturnCode() {
            // If mArgs is null, then MCS couldn't be reached. When it
            // reconnects, it will try again to install. At that point, this
            // will succeed.
            if (mArgs != null) {
                processPendingInstall(mArgs, mRet);

            }
        }
processPendingInstall函數如下,這裡的currentStatus參數就是之前調用copyApk的返回值代表是否copy文件成功,然後調用installPackageLI裝載應用到PKMS中,新建一個PostInstallData對象放入mRunningInstalls中代表正在安裝的應用,最後發送一個POST_INSTALL消息
   private void processPendingInstall(final InstallArgs args, final int currentStatus) {
        mHandler.post(new Runnable() {
            public void run() {
                mHandler.removeCallbacks(this);
                 // Result object to be returned

                PackageInstalledInfo res = new PackageInstalledInfo();
                res.returnCode = currentStatus;
                res.uid = -1;
                res.pkg = null;
                res.removedInfo = new PackageRemovedInfo();
                if (res.returnCode == PackageManager.INSTALL_SUCCEEDED) {//copy文件成功
                    args.doPreInstall(res.returnCode);
                    synchronized (mInstallLock) {
                        installPackageLI(args, res);
                    }
                    args.doPostInstall(res.returnCode, res.uid);
                }

                final boolean update = res.removedInfo.removedPackage != null;
                final int flags = (res.pkg == null) ? 0 : res.pkg.applicationInfo.flags;
                boolean doRestore = !update
                        && ((flags & ApplicationInfo.FLAG_ALLOW_BACKUP) != 0);


                int token;
                if (mNextInstallToken < 0) mNextInstallToken = 1;
                token = mNextInstallToken++;

                PostInstallData data = new PostInstallData(args, res);
                mRunningInstalls.put(token, data);//正在安裝的應用

                if (res.returnCode == PackageManager.INSTALL_SUCCEEDED && doRestore) {
                    IBackupManager bm = IBackupManager.Stub.asInterface(
                            ServiceManager.getService(Context.BACKUP_SERVICE));
                    if (bm != null) {
                        try {
                            if (bm.isBackupServiceActive(UserHandle.USER_OWNER)) {
                                bm.restoreAtInstall(res.pkg.applicationInfo.packageName, token);
                            } else {
                                doRestore = false;
                            }
                        } catch (RemoteException e) {
                            // can't happen; the backup manager is local
                        } catch (Exception e) {
                            Slog.e(TAG, "Exception trying to enqueue restore", e);
                            doRestore = false;
                        }
                    } else {
                        Slog.e(TAG, "Backup Manager not found!");
                        doRestore = false;
                    }
                }

                if (!doRestore) {
                    Message msg = mHandler.obtainMessage(POST_INSTALL, token, 0);
                    mHandler.sendMessage(msg);
                }
            }
        });
    }
上面我們還要注意在調用installPackageLI函數前後都有調用args.doPostInstall函數,下面我麼來看這個函數,沒有uid參數的那個函數也是一樣的。這個函數當沒有安裝成功就刪除之前在data/app下面創建的apk臨時目錄。特別注意在調用完installPackageLI之後也要調用下這個函數,因為在installPackageLI函數的處理中可以會有比如應用已經安裝過這樣的情況等,都會導致安裝失敗,這個時候都要把臨時文件清除。
        int doPostInstall(int status, int uid) {
            if (status != PackageManager.INSTALL_SUCCEEDED) {
                cleanUp();
            }
            return status;
        }
我們先來看下installPackageLI函數如下代碼,我們先會新建一個PackageParser來解析apk文件,這個我們之前的博客中分析過,這裡就不看了。後面成功之後會調用args的rename函數,把臨時文件重新命名。然後如果是一個新應用會調用installNewPackageLI函數。
    private void installPackageLI(InstallArgs args, PackageInstalledInfo res) {
        final int installFlags = args.installFlags;
        final String installerPackageName = args.installerPackageName;
        final String volumeUuid = args.volumeUuid;
        final File tmpPackageFile = new File(args.getCodePath());
        final boolean forwardLocked = ((installFlags & PackageManager.INSTALL_FORWARD_LOCK) != 0);
        final boolean onExternal = (((installFlags & PackageManager.INSTALL_EXTERNAL) != 0)
                || (args.volumeUuid != null));
        ......

        final PackageParser.Package pkg;
        try {
            pkg = pp.parsePackage(tmpPackageFile, parseFlags);
        } catch (PackageParserException e) {
            res.setError("Failed parse during installPackageLI", e);
            return;
        }
        ......

        if (!args.doRename(res.returnCode, pkg, oldCodePath)) {//重新命名
            res.setError(INSTALL_FAILED_INSUFFICIENT_STORAGE, "Failed rename");
            return;
        }

        startIntentFilterVerifications(args.user.getIdentifier(), replace, pkg);

        if (replace) {//升級
            replacePackageLI(pkg, parseFlags, scanFlags | SCAN_REPLACING, args.user,
                    installerPackageName, volumeUuid, res);
        } else {
            installNewPackageLI(pkg, parseFlags, scanFlags | SCAN_DELETE_DATA_ON_FAILURES,
                    args.user, installerPackageName, volumeUuid, res);
        }
        ......
    }
FileInstallArgs的doRename函數調用了getNextCodePath函數來獲取新的apk的目錄的name,然後調用os的rename函數重新命名。然後Package的一些變量改下。
        boolean doRename(int status, PackageParser.Package pkg, String oldCodePath) {
            if (status != PackageManager.INSTALL_SUCCEEDED) {
                cleanUp();
                return false;
            }

            final File targetDir = codeFile.getParentFile();
            final File beforeCodeFile = codeFile;
            final File afterCodeFile = getNextCodePath(targetDir, pkg.packageName);//獲取新名字

            if (DEBUG_INSTALL) Slog.d(TAG, "Renaming " + beforeCodeFile + " to " + afterCodeFile);
            try {
                Os.rename(beforeCodeFile.getAbsolutePath(), afterCodeFile.getAbsolutePath());//rename
            } catch (ErrnoException e) {
                Slog.w(TAG, "Failed to rename", e);
                return false;
            }

            if (!SELinux.restoreconRecursive(afterCodeFile)) {
                Slog.w(TAG, "Failed to restorecon");
                return false;
            }

            // Reflect the rename internally
            codeFile = afterCodeFile;
            resourceFile = afterCodeFile;

            // Reflect the rename in scanned details
            pkg.codePath = afterCodeFile.getAbsolutePath();
            pkg.baseCodePath = FileUtils.rewriteAfterRename(beforeCodeFile, afterCodeFile,
                    pkg.baseCodePath);
            pkg.splitCodePaths = FileUtils.rewriteAfterRename(beforeCodeFile, afterCodeFile,
                    pkg.splitCodePaths);

            // Reflect the rename in app info
            pkg.applicationInfo.volumeUuid = pkg.volumeUuid;
            pkg.applicationInfo.setCodePath(pkg.codePath);
            pkg.applicationInfo.setBaseCodePath(pkg.baseCodePath);
            pkg.applicationInfo.setSplitCodePaths(pkg.splitCodePaths);
            pkg.applicationInfo.setResourcePath(pkg.codePath);
            pkg.applicationInfo.setBaseResourcePath(pkg.baseCodePath);
            pkg.applicationInfo.setSplitResourcePaths(pkg.splitCodePaths);

            return true;
        }
我們看下getNextCodePath獲取新的apk目錄名字,就是apk的那麼加一個後綴。
    private File getNextCodePath(File targetDir, String packageName) {
        int suffix = 1;
        File result;
        do {
            result = new File(targetDir, packageName + "-" + suffix);
            suffix++;
        } while (result.exists());
        return result;
    }
類似如下:
com.moji.mjweather-1
我們再來看看之前在processPendingInstall函數中發送的POST_INSTALL消息的處理:
這裡主要的邏輯是當應用安裝成功後,發送廣播(比如Launcher應用接受廣播後顯示桌面圖標)。
                case POST_INSTALL: {
                    if (DEBUG_INSTALL) Log.v(TAG, "Handling post-install for " + msg.arg1);
                    PostInstallData data = mRunningInstalls.get(msg.arg1);
                    mRunningInstalls.delete(msg.arg1);
                    boolean deleteOld = false;

                    if (data != null) {
                        InstallArgs args = data.args;
                        PackageInstalledInfo res = data.res;

                        if (res.returnCode == PackageManager.INSTALL_SUCCEEDED) {
                            final String packageName = res.pkg.applicationInfo.packageName;
                            res.removedInfo.sendBroadcast(false, true, false);
                            Bundle extras = new Bundle(1);
                            extras.putInt(Intent.EXTRA_UID, res.uid);

                            // Now that we successfully installed the package, grant runtime
                            // permissions if requested before broadcasting the install.
                            if ((args.installFlags
                                    & PackageManager.INSTALL_GRANT_RUNTIME_PERMISSIONS) != 0) {
                                grantRequestedRuntimePermissions(res.pkg, args.user.getIdentifier(),
                                        args.installGrantPermissions);
                            }

                            // Determine the set of users who are adding this
                            // package for the first time vs. those who are seeing
                            // an update.
                            int[] firstUsers;
                            int[] updateUsers = new int[0];
                            if (res.origUsers == null || res.origUsers.length == 0) {
                                firstUsers = res.newUsers;
                            } else {
                                firstUsers = new int[0];
                                for (int i=0; i AVAILABLE");
                                    }
                                    int[] uidArray = new int[] { res.pkg.applicationInfo.uid };
                                    ArrayList pkgList = new ArrayList(1);
                                    pkgList.add(packageName);
                                    sendResourcesChangedBroadcast(true, true,
                                            pkgList,uidArray, null);
                                }
                            }
                            if (res.removedInfo.args != null) {
                                // Remove the replaced package's older resources safely now
                                deleteOld = true;
                            }

                            // If this app is a browser and it's newly-installed for some
                            // users, clear any default-browser state in those users
                            if (firstUsers.length > 0) {
                                // the app's nature doesn't depend on the user, so we can just
                                // check its browser nature in any user and generalize.
                                if (packageIsBrowser(packageName, firstUsers[0])) {
                                    synchronized (mPackages) {
                                        for (int userId : firstUsers) {
                                            mSettings.setDefaultBrowserPackageNameLPw(null, userId);
                                        }
                                    }
                                }
                            }
                            // Log current value of "unknown sources" setting
                            EventLog.writeEvent(EventLogTags.UNKNOWN_SOURCES_ENABLED,
                                getUnknownSourcesSettings());
                        }
                        // Force a gc to clear up things
                        Runtime.getRuntime().gc();
                        // We delete after a gc for applications  on sdcard.
                        if (deleteOld) {
                            synchronized (mInstallLock) {
                                res.removedInfo.args.doPostDeleteLI(true);
                            }
                        }
                        if (args.observer != null) {
                            try {
                                Bundle extras = extrasForInstallResult(res);
                                args.observer.onPackageInstalled(res.name, res.returnCode,
                                        res.returnMsg, extras);
                            } catch (RemoteException e) {
                                Slog.i(TAG, "Observer no longer exists.");
                            }
                        }
                    } else {
                        Slog.e(TAG, "Bogus post-install token " + msg.arg1);
                    }
                } break;
我們來看下這個函數,這個函數當mSettings和mPackages已經有這個pkg了,那就代表這個應用已經安裝過了,直接調用PackageInstalledInfo的setError,這個函數會把returnCode變為INSTALL_FAILED_ALREADY_EXISTS,這樣在processPendingInstall函數在調用完installPackageLI之後再調用args.doPostInstall的時候會把apk的臨時文件刪除。然後繼續這裡調用了scanPackageLI(注意這個參數是Package的那個函數,後面在掃描目錄的時候再介紹),最後還是沒有安裝成功會在deletePackageLI刪除目錄,以及PKMS各個成員變量的信息。
    private void installNewPackageLI(PackageParser.Package pkg, int parseFlags, int scanFlags,
            UserHandle user, String installerPackageName, String volumeUuid,
            PackageInstalledInfo res) {
        // Remember this for later, in case we need to rollback this install
        String pkgName = pkg.packageName;

        final boolean dataDirExists = Environment
                .getDataUserPackageDirectory(volumeUuid, UserHandle.USER_OWNER, pkgName).exists();
        synchronized(mPackages) {
            if (mSettings.mRenamedPackages.containsKey(pkgName)) {
                res.setError(INSTALL_FAILED_ALREADY_EXISTS, "Attempt to re-install " + pkgName
                        + " without first uninstalling package running as "
                        + mSettings.mRenamedPackages.get(pkgName));
                return;
            }
            if (mPackages.containsKey(pkgName)) {
                res.setError(INSTALL_FAILED_ALREADY_EXISTS, "Attempt to re-install " + pkgName
                        + " without first uninstalling.");
                return;
            }
        }

        try {
            PackageParser.Package newPackage = scanPackageLI(pkg, parseFlags, scanFlags,
                    System.currentTimeMillis(), user);

            updateSettingsLI(newPackage, installerPackageName, volumeUuid, null, null, res, user);
            if (res.returnCode != PackageManager.INSTALL_SUCCEEDED) {
                deletePackageLI(pkgName, UserHandle.ALL, false, null, null,
                        dataDirExists ? PackageManager.DELETE_KEEP_DATA : 0,
                                res.removedInfo, true);
            }

        } catch (PackageManagerException e) {
            res.setError("Package couldn't be installed in " + pkg.codePath, e);
        }
    }
我們知道在PKMS啟動的時候會掃描system/app data/app等目錄,如果其中有apk文件會完成apk安裝
我們先來看掃描目錄的函數scanDirLI,大致就是遍歷各個文件調用scanPackageLI函數,但是不會掃描子目錄。
    private void scanDirLI(File dir, int parseFlags, int scanFlags, long currentTime) {
        final File[] files = dir.listFiles();
        if (ArrayUtils.isEmpty(files)) {
            Log.d(TAG, "No files in app dir " + dir);
            return;
        }

        if (DEBUG_PACKAGE_SCANNING) {
            Log.d(TAG, "Scanning app dir " + dir + " scanFlags=" + scanFlags
                    + " flags=0x" + Integer.toHexString(parseFlags));
        }

        for (File file : files) {
            final boolean isPackage = (isApkFile(file) || file.isDirectory())
                    && !PackageInstallerService.isStageName(file.getName());
            if (!isPackage) {
                // Ignore entries which are not packages
                continue;
            }
            try {
                scanPackageLI(file, parseFlags | PackageParser.PARSE_MUST_BE_APK,
                        scanFlags, currentTime, null);
            } catch (PackageManagerException e) {
                Slog.w(TAG, "Failed to parse " + file + ": " + e.getMessage());

                // Delete invalid userdata apps
                if ((parseFlags & PackageParser.PARSE_IS_SYSTEM) == 0 &&
                        e.error == PackageManager.INSTALL_FAILED_INVALID_APK) {
                    logCriticalInfo(Log.WARN, "Deleting invalid package at " + file);
                    if (file.isDirectory()) {
                        mInstaller.rmPackageDir(file.getAbsolutePath());
                    } else {
                        file.delete();
                    }
                }
            }
        }
    }
scanPackageLI函數,先是解析apk文件,然後處理升級包,掃描文件簽名、應用包沖突、應用代碼路徑資源路徑,設置應用相關路勁等,最後調用了scanPackageLI(注意這個參數是Package)繼續。
   private PackageParser.Package scanPackageLI(File scanFile, int parseFlags, int scanFlags,
            long currentTime, UserHandle user) throws PackageManagerException {
        if (DEBUG_INSTALL) Slog.d(TAG, "Parsing: " + scanFile);
        parseFlags |= mDefParseFlags;
        PackageParser pp = new PackageParser();
        pp.setSeparateProcesses(mSeparateProcesses);
        pp.setOnlyCoreApps(mOnlyCore);
        pp.setDisplayMetrics(mMetrics);

        if ((scanFlags & SCAN_TRUSTED_OVERLAY) != 0) {
            parseFlags |= PackageParser.PARSE_TRUSTED_OVERLAY;
        }

        final PackageParser.Package pkg;
        try {
            pkg = pp.parsePackage(scanFile, parseFlags);//解析
        } catch (PackageParserException e) {
            throw PackageManagerException.from(e);
        }

        ......

        // Set application objects path explicitly.
        pkg.applicationInfo.volumeUuid = pkg.volumeUuid;
        pkg.applicationInfo.setCodePath(pkg.codePath);//設置各種路徑
        pkg.applicationInfo.setBaseCodePath(pkg.baseCodePath);
        pkg.applicationInfo.setSplitCodePaths(pkg.splitCodePaths);
        pkg.applicationInfo.setResourcePath(resourcePath);
        pkg.applicationInfo.setBaseResourcePath(baseResourcePath);
        pkg.applicationInfo.setSplitResourcePaths(pkg.splitCodePaths);

        PackageParser.Package scannedPkg = scanPackageLI(pkg, parseFlags, scanFlags
                | SCAN_UPDATE_SIGNATURE, currentTime, user);

        ......

        return scannedPkg;
    }
scanPackageLI就是調用scanPackageDirtyLI函數,出錯了再刪除相關目錄。
    private PackageParser.Package scanPackageLI(PackageParser.Package pkg, int parseFlags,
            int scanFlags, long currentTime, UserHandle user) throws PackageManagerException {
        boolean success = false;
        try {
            final PackageParser.Package res = scanPackageDirtyLI(pkg, parseFlags, scanFlags,
                    currentTime, user);
            success = true;
            return res;
        } finally {
            if (!success && (scanFlags & SCAN_DELETE_DATA_ON_FAILURES) != 0) {
                removeDataDirsLI(pkg.volumeUuid, pkg.packageName);
            }
        }
    }
這個函數之前博客分析過了,這裡我們說下幾點:
1. 安裝應用中的動態庫,如果應用自帶了本地動態庫,安裝在data/data/
我們來看下墨跡天氣的lib目錄:
********:/data/data/com.moji.mjweather/lib # ls
libedittextutil.so
libgetuiext.so
libskinEncrypt.so
libuninstall.so
libusedes.so
2. 重新優化dex,會調用performDexOptLI函數
3. 最後會把應用的Activity、Service、Provider、Receiver、Permission、PermissionGroup信息都提取出來放在如下變量中。
    final ActivityIntentResolver mActivities =
            new ActivityIntentResolver();

    final ActivityIntentResolver mReceivers =
            new ActivityIntentResolver();

    final ServiceIntentResolver mServices = new ServiceIntentResolver();

    final ProviderIntentResolver mProviders = new ProviderIntentResolver();
PKMS的performDexOpt函數,最終會調用PackageDexOptimizer的performDexOpt函數,代碼如下,看是否需要持鎖。然後調用performDexOptLI函數。
    int performDexOpt(PackageParser.Package pkg, String[] instructionSets,
            boolean forceDex, boolean defer, boolean inclDependencies, boolean bootComplete) {
        ArraySet done;
        if (inclDependencies && (pkg.usesLibraries != null || pkg.usesOptionalLibraries != null)) {
            done = new ArraySet();
            done.add(pkg.packageName);
        } else {
            done = null;
        }
        synchronized (mPackageManagerService.mInstallLock) {
            final boolean useLock = mSystemReady;
            if (useLock) {
                mDexoptWakeLock.setWorkSource(new WorkSource(pkg.applicationInfo.uid));
                mDexoptWakeLock.acquire();
            }
            try {
                return performDexOptLI(pkg, instructionSets, forceDex, defer, bootComplete, done);
            } finally {
                if (useLock) {
                    mDexoptWakeLock.release();
                }
            }
        }
    }
performDexOptLI函數,先看有沒有lib需要dex。最後調用了PKMS的mInstaller.dexopt函數來優化。最後就到Installd中執行。
    private int performDexOptLI(PackageParser.Package pkg, String[] targetInstructionSets,
            boolean forceDex, boolean defer, boolean bootComplete, ArraySet done) {
        final String[] instructionSets = targetInstructionSets != null ?
                targetInstructionSets : getAppDexInstructionSets(pkg.applicationInfo);

        if (done != null) {
            done.add(pkg.packageName);
            if (pkg.usesLibraries != null) {
                performDexOptLibsLI(pkg.usesLibraries, instructionSets, forceDex, defer,
                        bootComplete, done);
            }
            if (pkg.usesOptionalLibraries != null) {
                performDexOptLibsLI(pkg.usesOptionalLibraries, instructionSets, forceDex, defer,
                        bootComplete, done);
            }
        }

        if ((pkg.applicationInfo.flags & ApplicationInfo.FLAG_HAS_CODE) == 0) {
            return DEX_OPT_SKIPPED;
        }

        final boolean vmSafeMode = (pkg.applicationInfo.flags & ApplicationInfo.FLAG_VM_SAFE_MODE) != 0;
        final boolean debuggable = (pkg.applicationInfo.flags & ApplicationInfo.FLAG_DEBUGGABLE) != 0;

        final List paths = pkg.getAllCodePathsExcludingResourceOnly();
        boolean performedDexOpt = false;
        final String[] dexCodeInstructionSets = getDexCodeInstructionSets(instructionSets);
        for (String dexCodeInstructionSet : dexCodeInstructionSets) {
            if (!forceDex && pkg.mDexOptPerformed.contains(dexCodeInstructionSet)) {
                continue;
            }

            for (String path : paths) {
                final int dexoptNeeded;
                if (forceDex) {
                    dexoptNeeded = DexFile.DEX2OAT_NEEDED;
                } else {
                    try {
                        dexoptNeeded = DexFile.getDexOptNeeded(path, pkg.packageName,
                                dexCodeInstructionSet, defer);
                    } catch (IOException ioe) {
                        Slog.w(TAG, "IOException reading apk: " + path, ioe);
                        return DEX_OPT_FAILED;
                    }
                }

                if (!forceDex && defer && dexoptNeeded != DexFile.NO_DEXOPT_NEEDED) {
                    // We're deciding to defer a needed dexopt. Don't bother dexopting for other
                    // paths and instruction sets. We'll deal with them all together when we process
                    // our list of deferred dexopts.
                    addPackageForDeferredDexopt(pkg);
                    return DEX_OPT_DEFERRED;
                }

                if (dexoptNeeded != DexFile.NO_DEXOPT_NEEDED) {
                    final String dexoptType;
                    String oatDir = null;
                    if (dexoptNeeded == DexFile.DEX2OAT_NEEDED) {
                        dexoptType = "dex2oat";
                        try {
                            oatDir = createOatDirIfSupported(pkg, dexCodeInstructionSet);
                        } catch (IOException ioe) {
                            Slog.w(TAG, "Unable to create oatDir for package: " + pkg.packageName);
                            return DEX_OPT_FAILED;
                        }
                    } else if (dexoptNeeded == DexFile.PATCHOAT_NEEDED) {
                        dexoptType = "patchoat";
                    } else if (dexoptNeeded == DexFile.SELF_PATCHOAT_NEEDED) {
                        dexoptType = "self patchoat";
                    } else {
                        throw new IllegalStateException("Invalid dexopt needed: " + dexoptNeeded);
                    }

                    final int sharedGid = UserHandle.getSharedAppGid(pkg.applicationInfo.uid);
                    final int ret = mPackageManagerService.mInstaller.dexopt(path, sharedGid,
                            !pkg.isForwardLocked(), pkg.packageName, dexCodeInstructionSet,
                            dexoptNeeded, vmSafeMode, debuggable, oatDir, bootComplete);

                    if (ret == 0) {
                        performedDexOpt = true;
                    }
                }
            }
            ......
這裡我們需要注意下oatDir這個參數,是通過下面函數獲取的。
oatDir = createOatDirIfSupported(pkg, dexCodeInstructionSet);
我們來看createOatDirIfSupported,如果codePath是一個目錄就返回一個oatDir,否則就是空。
    private String createOatDirIfSupported(PackageParser.Package pkg, String dexInstructionSet)
            throws IOException {
        if (!pkg.canHaveOatDir()) {
            return null;
        }
        File codePath = new File(pkg.codePath);
        if (codePath.isDirectory()) {
            File oatDir = getOatDir(codePath);
            mPackageManagerService.mInstaller.createOatDir(oatDir.getAbsolutePath(),
                    dexInstructionSet);
            return oatDir.getAbsolutePath();
        }
        return null;
    }
傳到Installd中,是空的話,默認會在data/dalvik-cache下面,我們來看下,這個是arm目錄,如果是64為是在arm64目錄下:
*******:/data/dalvik-cache/arm # ls
data@[email protected]@classes.dex
data@[email protected]@classes.dex
system@app@[email protected]@classes.dex
system@app@[email protected]@classes.dex
system@app@[email protected]@classes.dex
system@app@[email protected]@classes.dex
system@app@[email protected]@classes.dex
system@app@[email protected]@classes.dex
system@app@[email protected]@classes.dex
system@[email protected]@classes.dex
system@[email protected]@classes.dex
system@[email protected]@classes.dex
system@[email protected]@classes.dex
system@[email protected]@classes.dex
system@[email protected]
system@[email protected]
system@[email protected]@classes.dex
system@[email protected]@classes.dex
system@[email protected]@classes.dex
system@[email protected]@classes.dex
system@[email protected]@classes.dex
system@[email protected][email protected]
system@[email protected]@classes.dex
system@[email protected]@classes.dex
system@[email protected]@classes.dex
system@[email protected]@classes.dex
普通的應用就在其oat/arm目錄下
******:/data/app/com.moji.mjweather-1/oat/arm # ls
base.odex
 Android源代碼倉庫及其管理工具Repo分析
軟件工程由於需要不斷迭代開發,因此要對源代碼進行版本管理。Android源代碼工程(AOSP)也不例外,它采用Git來進行版本管理。AOSP作為一個大型開放源代碼工程,由
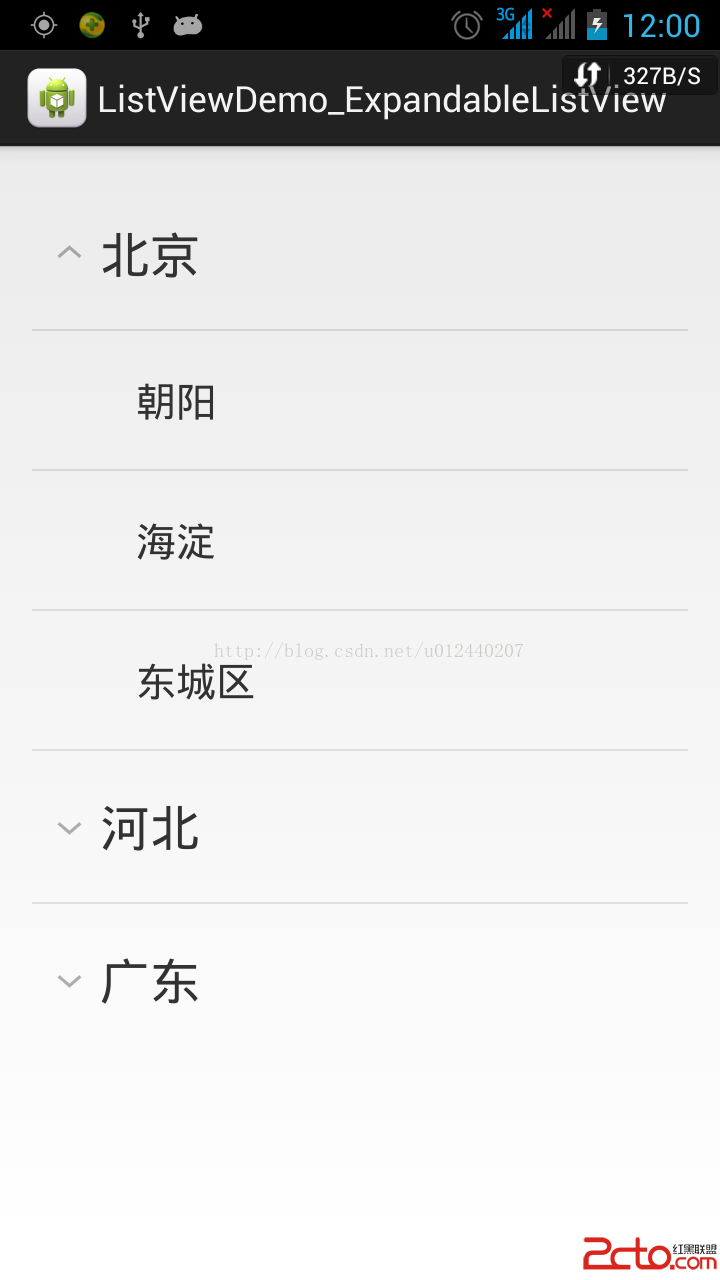 Android ExpandableListView實例Demo
前幾篇文章介紹了Listview,但在實際開發中也經常會用到多層的Listview來展示數據,比如qq中的好友展示,所以這張來了解一下ExpandableListview
 Android繪制一條寬度逐漸變大的路徑
1.介紹先看一下效果圖用過電腦版印象筆記演示功能的應該知道這個效果,現在想在手機上實現一下,當然這個是最終的目標,這篇只是介紹實現過程中的一步 —&mdash
 Android XListView下拉刷新和上拉加載更多
市面上有好多的類比ListView刷新數據的開源框架,如:v4包自帶的SwipeRefreshLayout ,以及集ListView、GridView甚至WebView於
 Android,底部導航+viewpager+fragment+drawerlayout+toolbar+recyclerview
將自己的編程經歷寫出來是個好習慣先來效果圖:項目結構:1、底部導航底部導