編輯:關於Android編程
啦啦啦在上一個項目中有用到BLE低功耗藍牙開發,當時baidu google了很多資料,但大多數都是千篇一律,英文文檔我這種渣渣又看不懂。。。總之剛開始查的很痛苦。所以要把自己的踩坑之路寫下來記錄下,,,或許能幫到後來人呢?
這是低功耗藍牙的官方文檔,英文好的同學可以直接看看這個:https://developer.android.google.cn/guide/topics/connectivity/bluetooth-le.html

低功耗藍牙是android4.3(API level18)之後才支持的.
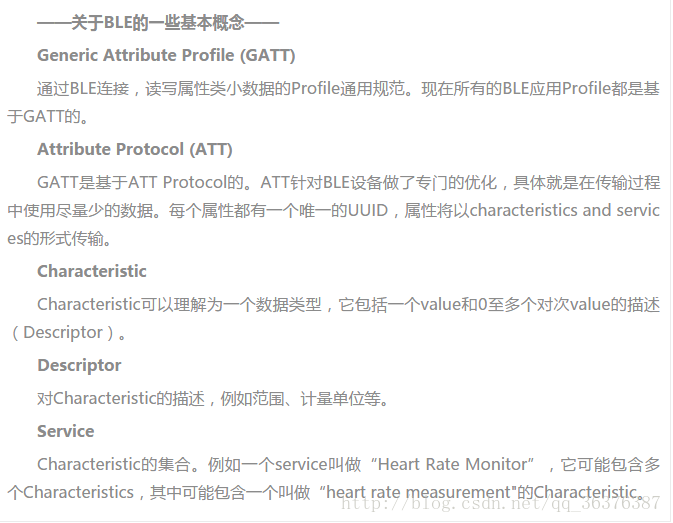
一個低功耗藍牙終端包含多個Service,而Service中又包含多個Characteristic,一個Characteristic又包含一個Value和多個Descriptor.Characteristic是手機和BLE終端交換數據的關鍵.
這三部分都是通過UUID來獲取,UUID是他們的唯一標識.
掃描的部分我們就不多說了,參考官方Demo寫的很詳細.主要說一說鏈接及發送消息等.
參考官方Demo,所有的鏈接等操作都是放在一個service中進行的,通過在service中發送廣播來通知activity來處理相關的數據.很簡單呦!我們先來看看service中都做了什麼~
這是初始化藍牙適配器的方法,在開啟服務時調用.
/**
     * Initializes a reference to the local Bluetooth adapter.
     * 初始化一個藍牙適配器   裡面會判斷系統版本,如果低於18則返回false(低於18不支持低功耗藍牙)
     *
     * @return Return true if the initialization is successful.
     * 返回true表示初始化成功
     */
    public boolean initialize() {
        // For API level 18 and above, get a reference to BluetoothAdapter through
        // BluetoothManager.
        if (mBluetoothManager == null) {
            mBluetoothManager = (BluetoothManager) getSystemService(Context.BLUETOOTH_SERVICE);
            if (mBluetoothManager == null) {
                //無法初始化藍牙管理器
                Log.e(TAG, "Unable to initialize BluetoothManager.");
                return false;
            }
        }

        mBluetoothAdapter = mBluetoothManager.getAdapter();
        if (mBluetoothAdapter == null) {
            //無法獲取藍牙適配器
            Log.e(TAG, "Unable to obtain a BluetoothAdapter.");
            return false;
        }

        return true;
    }
這是連接藍牙設備的方法,address就是藍牙設備的MAC地址,如果是掃描的則可以通過device.getAddress()來獲取到這個address.
/**
     * Connects to the GATT server hosted on the Bluetooth LE device.
     *
     * 連接成功返回true 異步返回
     *
     * @param address The device address of the destination device.
     *
     * @return Return true if the connection is initiated successfully. The connection result
     *         is reported asynchronously through the
     *         {@code BluetoothGattCallback#onConnectionStateChange(android.bluetooth.BluetoothGatt, int, int)}
     *         callback.
     */
    public boolean connect(final String address) {
        if (mBluetoothAdapter == null || address == null) {
            //還沒有初始化或者指定地址
            Log.w(TAG, "BluetoothAdapter not initialized or unspecified address.");
            return false;
        }

        // Previously connected device.  Try to reconnect.  以前連接的設備   嘗試重新連接
        if (mBluetoothDeviceAddress != null && address.equals(mBluetoothDeviceAddress)
                && mBluetoothGatt != null) {
            Log.d(TAG, "Trying to use an existing mBluetoothGatt for connection.");
            if (mBluetoothGatt.connect()) {
                mConnectionState = STATE_CONNECTING;
                return true;
            } else {
                return false;
            }
        }

        //根據mac地址獲取設備
        final BluetoothDevice device = mBluetoothAdapter.getRemoteDevice(address);
        //如果設備為null則表示未獲取到設備
        if (device == null) {
            Log.w(TAG, "Device not found.  Unable to connect.");
            return false;
        }
        // We want to directly connect to the device, so we are setting the autoConnect
        //我們要直接連接到設備,所以我們設置自動連接
        // parameter to false.
        mBluetoothGatt = device.connectGatt(this, false, mGattCallback);
        //試圖創建一個新的連接
        Log.d(TAG, "Trying to create a new connection.");
        mBluetoothDeviceAddress = address;
        mConnectionState = STATE_CONNECTING;
        return true;
    }
在調用connectGatt(context,autoConnect,callback)方法進行連接時,我們需要傳入一個context,一個boolean值,該參數表示以後是否需要自動連接到該設備,最後一個是藍牙連接的監聽回調對象BluetoothGattCallback,我們需要new 出來這個對象,重寫他的幾個方法,如下:
藍牙連接狀態改變的回調:在連接成功之後需要調用discoverServices方法來找服務,只有找到了服務才算是真正的連接成功.
 @Override
        public void onConnectionStateChange(BluetoothGatt gatt, int status, int newState) {
            super.onConnectionStateChange(gatt, status, newState);
            if (newState == BluetoothProfile.STATE_CONNECTED) {
                mConnectionState = STATE_CONNECTING;
                //開始找服務,只有找到服務才算是真正的連接上了
                mBluetoothGatt.discoverServices();
            } else if (newState == BluetoothProfile.STATE_DISCONNECTED) {
                //發送廣播通知activity連接已斷開
                broadcastUpdate(ACTION_GATT_DISCONNECTED);
                mConnectionState = STATE_DISCONNECTED;
            } else {
                //發送廣播通知activity連接已斷開
                broadcastUpdate(ACTION_GATT_DISCONNECTED);
                mConnectionState = STATE_DISCONNECTED;
            }
        }
發現服務的回調:
在找到服務之後就是真正的連接成功了,我在這裡設置了對返回數據的監聽,後面具體說
@Override
        public void onServicesDiscovered(BluetoothGatt gatt, int status) {
            super.onServicesDiscovered(gatt, status);
            if (status == BluetoothGatt.GATT_SUCCESS) {
                //找到了服務,此時才是真正的連接上了設備
                mConnectionState = STATE_CONNECTED;
                //設置監聽返回數據
                enableTXNotification();
                //發送廣播通知activity連接成功了
                broadcastUpdate(ACTION_GATT_CONNECTED);
            } else {
                broadcastUpdate(ACTION_GATT_DISCONNECTED);
                mConnectionState = STATE_DISCONNECTED;
            }
        }
Characteristic寫操作的結果回調:
這個監聽在分包發送的時候需要用到,在裡面判斷的發送結果是否成功,成功的話則發送下一條數據,這樣可以保證分包發送的順序不會錯誤.
        @Override
        public void onCharacteristicWrite(BluetoothGatt gatt, BluetoothGattCharacteristic characteristic, int status) {
            super.onCharacteristicWrite(gatt, characteristic, status);
            if (status == BluetoothGatt.GATT_SUCCESS) {
               //發送下一條數據
            }
        }
Characteristic狀態改變的回調:
這個方法挺重要的,藍牙廣播(是指藍牙設備本身發出的數據)出來的數據在這裡獲取,發送指令後藍牙的回應也是在這裡獲取.當然要走這個回調必須先設置相關的characteristic的監聽.
        @Override
        public void onCharacteristicChanged(BluetoothGatt gatt, BluetoothGattCharacteristic characteristic) {
            super.onCharacteristicChanged(gatt, characteristic);
            //藍牙狀態   發送廣播
            byte[] value = characteristic.getValue();
            broadcastUpdate(ACTION_GATT_UPDATE, value);
        }
以上就是BluetoothGattCallback對象中要重寫的幾個方法,下面我們說一說characteristic的監聽設置
     /**
     * 設置特征監聽
     */
    public void enableTXNotification() {

        BluetoothGattService RxService = mBluetoothGatt.getService(SERVICE_UUID);
        if (RxService == null) {
            L.e("未找到藍牙中的對應服務");
            return;
        }
        BluetoothGattCharacteristic RxChar = RxService.getCharacteristic(RX_UUID);
        if (RxChar == null) {
            L.e("未找到藍牙中的對應特征");
            return;
        }
        //設置true為啟用通知,false反之
        mBluetoothGatt.setCharacteristicNotification(RxChar, true);

        //下面為開啟藍牙notify功能,向CCCD中寫入值1
        BluetoothGattDescriptor descriptor = RxChar.getDescriptor(CCCD);
        descriptor.setValue(BluetoothGattDescriptor.ENABLE_NOTIFICATION_VALUE);
        mBluetoothGatt.writeDescriptor(descriptor);

        List descriptors = RxChar.getDescriptors();
        for (BluetoothGattDescriptor dp : descriptors) {
            dp.setValue(BluetoothGattDescriptor.ENABLE_NOTIFICATION_VALUE);
            mBluetoothGatt.writeDescriptor(dp);
        }
    }
先通過Service的UUID找到對應的Service對象,再通過我們想要設置監聽的Characteristic的UUID找到相應的Characteristic對象,UUID都是藍牙設備廠商在文檔中提供的.找到相應的特征後調用setCharacteristicNotification方法開啟監聽,就可以在該特征狀態發生改變後走到onCharacteristicChanged方法中.
而藍牙的notify功能需要向CCCD中寫入值1才能開啟,CCCD值為:`public static final UUID CCCD = UUID.fromString("00002902-0000-1000-8000-00805f9b34fb");`
往Characteristic中寫入數據:
我們知道低功耗藍牙的特點就是快速連接,超低功耗保持連接和傳輸數據,其缺點是傳輸速率很低,每次最多向Characteristic中寫入20字節的內容.因此當我們需要寫入的數據過大時就要使用分包發送.
先來看看如何往Characteristic中寫入數據吧
    /**
     * 往Characteristic中寫入數據
     * @param value 寫入的數據
     */
    public void writeRXCharacteristic(byte[] value) {

        if (mBluetoothGatt == null) {
            return;
        }

        BluetoothGattService RxService = mBluetoothGatt
                .getService(SERVICE_UUID);
        if (RxService == null) {
//            broadcastUpdate(DEVICE_DOES_NOT_SUPPORT_UART);
            return;
        }
        BluetoothGattCharacteristic RxChar = RxService
                .getCharacteristic(TX_UUID);
        if (RxChar == null) {
//            broadcastUpdate(DEVICE_DOES_NOT_SUPPORT_UART);
            return;
        }
        RxChar.setValue(value);
        mBluetoothGatt.writeCharacteristic(RxChar);
    }
還是要先獲取到Characteristic對象,然後調用setValue方法設置我們需要寫入的數據,該方法接受byte[]和String,我們一般都是寫入byte[].基本都要求是十六進制byte[],很多同學會在這裡糾結十六進制的轉換、數組中有些數據超出byte取值范圍了等問題,這些你其實完全不用考慮…不用非要寫成0x00這樣的形式,因為對於計算機來說都是一樣的,超出byte取值范圍也不用擔心,沒有什麼影響的.不過如果可以的話最好還是能和你們的硬件工程師溝通一下.
分包發送的話還是需要與硬件工程師溝通具體的分包方法,寫入數據是延時多少毫秒,然後在上面onCharacteristicWrite方法中判斷寫入狀態,成功的話則寫入下一條數據,這樣來保證分包數據的順序不會錯亂.
 刷機大師刷安卓手機方法
手機用一段時間特別卡,就要去刷機,但是又不想去售後,只有自己在網上找刷機大師刷了。那刷機大師怎麼刷機呢,現在告訴大家刷機大師刷機方法。前提准備1、下載安裝刷
 Dex文件格式詳解
什麼是dex文件他是Android系統的可執行文件,包含應用程序的全部操作指令以及運行時數據。由於dalvik是一種針對嵌入式設備而特殊設計的java虛擬機,所以dex文
 Android從系統Gallery獲取圖片具體實現
前言 在Android應用中,經常有場景會需要使用到設備上存儲的圖片,而直接從路徑中獲取無疑是非常不便利的。所以一般推薦調用系統的Gallery應用,選擇圖片,然後使用
 java/android 設計模式學習筆記(3)---工廠方法模式
這篇來介紹一下工廠方法模式(Factory Method Pattern),在實際開發過程中我們都習慣於直接使用 new 關鍵字用來創建一個對象,可是有時候對象的創造需要