編輯:關於Android編程
開發環境:android4.1.1
實驗功能:
在第一個Hello World!為標簽的activity中顯示good,該界面中有一個名為Next的按鈕。點擊Next按鈕進入到第二個activity中去,第二個界面中只有1個Close按鈕。當然,據網上有人將要比較安全的實現關閉程序的功能也不是挺簡單的,因為android有專門的退出鍵返回鍵等。所以該Close按鈕暫時沒去實現它。
我的第1個activity為HelloworldActivity,第2個activity為NextActivity.
實驗說明:
1. 要實現從1個activity跳到另一個activity,這需要通過intent來實現。當然我們需要在Next按鈕上綁定一個按鈕按下的監聽器(這些好像是java中的知識,可我從沒學過java,只能用到哪個地方再去學了),一旦該按鈕監聽到有按鍵按下,則通過intent將指定的第2個activity觸發,這樣就完成了本次試驗的功能。
2.在工程中,每一個activity都對應一個xml文件,xml文件主要是控制各控件的位置和屬性的.
3. asserts目錄下可以存放任何文件,res目錄下也可以存放任意文件,且res下的文件會在gen目錄下的R.java文件中自動生成一個全局id。
4. res目錄下的values目下的strings.xml中的控件也是每個控件都在R.jar中對應一個id號。當然layout下的main.xml文件也是一樣的。
5. AndroidManifest.xml是整個應用程序的配置文件。
6. android.jar是該程序應用的所有android類的來源。
7. view是android中所有控件的父類。
8. Activity可以理解為人機交互的界面,也可以理解為一個控件的容器。
9. eclipse中用crtl+shift+c注釋選中區域,同時也是用ctrl+shift+c取消選中區域,這裡的注釋為雙斜桿//.
如果用/**/來注釋的話,就是用ctrl+shift+/來注釋選中區域,用ctrl+shift+\來取消選中區域的注釋。
10. 用alt+/是增加單詞函數等補全功能的提示。
11. ctrl+shift+o可以自動添加eclipse中檢測到需要導入的包文件。
12. setText裡面不能采用資源引用,資源引用顯示文本應該是在xml中的。
13. xml的注釋不能出現在屬性值代碼中,不能出現在標記中。且注釋格式為<!--注釋內容-->
14. xml語句結束後並不需要結束符號,比如說分號。
試驗結果(在模擬器中運行的):
啟動程序後: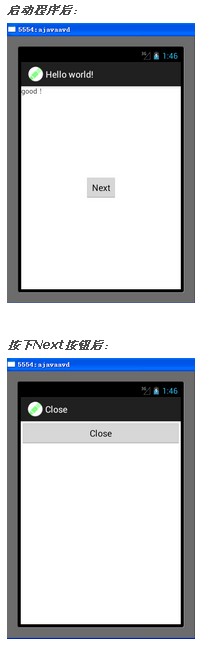
實驗主要部分代碼及注釋:
復制代碼 代碼如下:
HelloworldActivity.java:
package com.example.helloworld;
import android.app.Activity;
import android.content.Intent;
import android.view.View;//注意view的大小寫
import android.view.View.OnClickListener;
import android.os.Bundle;
import android.widget.Button;
public class HelloworldActivity extends Activity {
private Button my_button = null;
@Override
public void onCreate(Bundle savedInstanceState) {
super.onCreate(savedInstanceState);
setContentView(R.layout.activity_helloworld);
my_button = (Button)findViewById(R.id.my_button);
my_button.setText( "Next" );
my_button.setOnClickListener(new MyButtonListener());
}
class MyButtonListener implements OnClickListener{
public void onClick(View v) {
// TODO Auto-generated method stub
Intent intent = new Intent();
intent.setClass(HelloworldActivity.this, NextActivity.class);
HelloworldActivity.this.startActivity(intent);
}
}
/**
* 如果下面的語句不要,那麼系統運行的時候會直接進入本程序中,而不是先進入主菜單
* 再進入選擇應用程序界面進入本程序
* 為了方便調試,這裡就不進入主菜單界面了*/
/*@Override
public boolean onCreateOptionsMenu(Menu menu) {
getMenuInflater().inflate(R.menu.activity_helloworld, menu);
return true;
}*/
}
NextActivity.java:
package com.example.helloworld;
import android.app.Activity;
import android.os.Bundle;
import android.widget.Button;
public class NextActivity extends Activity{
private Button my_button2 = null;
@Override
protected void onCreate(Bundle savedInstanceState) {
// TODO Auto-generated method stub
super.onCreate(savedInstanceState);
setContentView(R.layout.activity_next);
my_button2 = (Button)findViewById(R.id.my_button2);
// my_button2.setText("@string/close"); //setText裡面不能采用資源引用
//資源引用顯示文本應該是在xml中的
my_button2.setText("Close");
}
}
activity_helloworld.xml:
復制代碼 代碼如下:
<!-- android:text="@string/wuwei" -->
<RelativeLayout xmlns:android="http://schemas.android.com/apk/res/android"
xmlns:tools="http://schemas.android.com/tools"
android:layout_width="match_parent"
android:layout_height="match_parent" >
<TextView
android:layout_width="wrap_content"
android:layout_height="wrap_content"
android:layout_alignParentLeft="true"
android:layout_alignParentRight="false"
android:layout_alignParentTop="true"
android:layout_centerHorizontal="true"
android:text="@string/wuwei"
tools:context=".HelloworldActivity" />
<Button
android:layout_width="wrap_content"
android:layout_height="wrap_content"
android:id="@+id/my_button"
android:layout_centerHorizontal="true"
android:layout_centerVertical="true"
/>
</RelativeLayout>
activity_next.xml:
<?xml version="1.0" encoding="utf-8"?>
<LinearLayout xmlns:android="http://schemas.android.com/apk/res/android"
android:layout_width="match_parent"
android:layout_height="match_parent"
android:orientation="vertical" >
<Button
android:id="@+id/my_button2"
android:layout_width="fill_parent"
android:layout_height="wrap_content"
/>
</LinearLayout>
AndroidManifest.xml:
復制代碼 代碼如下:
<manifest xmlns:android="http://schemas.android.com/apk/res/android"
package="com.example.helloworld"
android:versionCode="1"
android:versionName="1.0" >
<uses-sdk
android:minSdkVersion="16"
android:targetSdkVersion="15" />
<application
android:icon="@drawable/ic_launcher"
android:label="@string/app_name"
android:theme="@style/AppTheme" >
<activity
android:name=".HelloworldActivity"
android:label="@string/hello_world" >
<intent-filter>
<action android:name="android.intent.action.MAIN" />
<category android:name="android.intent.category.LAUNCHER" />
</intent-filter>
</activity>
<activity android:name=".NextActivity" android:label="@string/close">
</activity>
</application>
</manifest>
實驗總結:
對android開發工程下的幾個目錄的主要功能和任務有了個大致的了解,對android的開發流程大概熟悉了一遍,由於不懂java和xml語法,所以未來的學習進度可能會稍慢,還好,我主要不是弄這方向的,只是實驗室有這方面的項目,不得不弄一下。
作者:tornadomeet
 安卓之ViewFlipper實現漸變視差導航頁
前言以前的導航頁總是使用viewPager配套fragment來實現的,某天一個妹子說其實導航頁也可以使用ViewFilpper 來實現,哈哈確實不錯,前段時間就用Vie
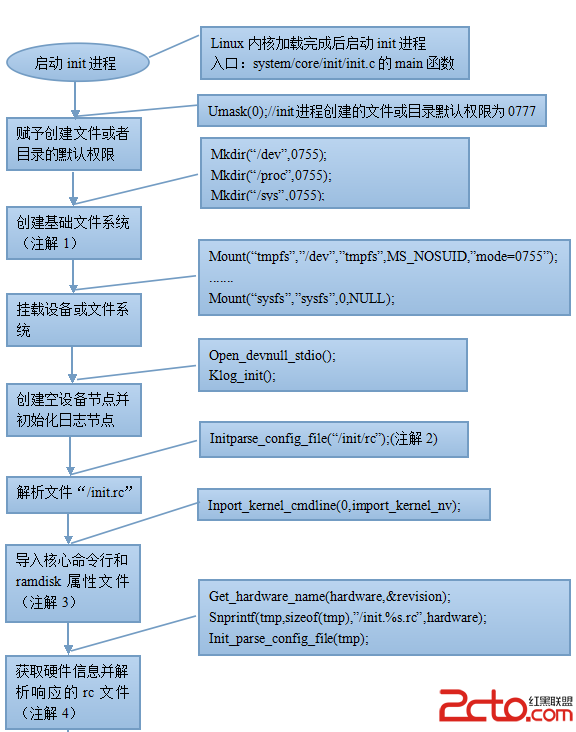 Android核心服務解析篇(一)——Android系統的啟動
從大的方面來說,Android系統的啟動可以分為兩個部分:第一部分是Linux核心的啟動,第二部分是Android系統的啟動。第一部分主要包括系統引導,核心和驅動程序等,
 Android多媒體系統的業務
Android 多媒體應用的主要業務 Music Player Video Player Camera Sound Recorder VideoCamera
 Android開發之自定義CheckBox
要實現的效果如下考慮到關鍵是動畫效果,所以直接繼承View。不過CheckBox的超類CompoundButton實現了Checkable接口,這一點值得借鑒。下面記錄一