編輯:關於Android編程
1.設計思路,使用VersionCode定義為版本升級參數。
android為我們定義版本提供了2個屬性:
復制代碼 代碼如下:
<manifest package="com.cnblogs.tianxia.subway"
android:versionCode="1" <!--Integer類型,系統不顯示給用戶-->
android:versionName="1.0"<!--String類型,系統顯示用戶-->
></manifest>
谷歌建議我們使用versionCode自增來表明版本升級,無論是大的改動還是小的改動,而versionName是顯示用戶看的軟件版本,作為顯示使用。所以我們選擇了VersionCode作為我們定義版本升級的參數。
2.工程目錄
為了對真實項目或者企業運用有實戰指導作用,我模擬一個獨立的項目,工程目錄設置的合理嚴謹一些,而不是僅僅一個demo。
假設我們以上海地鐵為項目,命名為"Subway",工程結構如下,
3.版本初始化和版本號的對比。
首先定義在全局文件Global.java中定義變量localVersion和serverVersion分別存放本地版本號和服務器版本號。
復制代碼 代碼如下:
public class Global {
//版本信息
public static int localVersion = 0;
public static int serverVersion = 0;
public static String downloadDir = "app/download/";
}
因為本文只是重點說明升級更新,為了防止其他太多無關代碼冗余其中,我直接在SubwayApplication中定義方法initGlobal()方法。
復制代碼 代碼如下:
/**
* 初始化全局變量
* 實際工作中這個方法中serverVersion從服務器端獲取,最好在啟動畫面的activity中執行
*/
public void initGlobal(){
try{
Global.localVersion = getPackageManager().getPackageInfo(getPackageName(),0).versionCode; //設置本地版本號
Global.serverVersion = 1;//假定服務器版本為2,本地版本默認是1
}catch (Exception ex){
ex.printStackTrace();
}
}
如果檢測到新版本發布,提示用戶是否更新,我在SubwayActivity中定義了checkVersion()方法:
復制代碼 代碼如下:
/**
* 檢查更新版本
*/
public void checkVersion(){
if(Global.localVersion < Global.serverVersion){
//發現新版本,提示用戶更新
AlertDialog.Builder alert = new AlertDialog.Builder(this);
alert.setTitle("軟件升級")
.setMessage("發現新版本,建議立即更新使用.")
.setPositiveButton("更新", new DialogInterface.OnClickListener() {
public void onClick(DialogInterface dialog, int which) {
//開啟更新服務UpdateService
//這裡為了把update更好模塊化,可以傳一些updateService依賴的值
//如布局ID,資源ID,動態獲取的標題,這裡以app_name為例
Intent updateIntent =new Intent(SubwayActivity.this, UpdateService.class);
updateIntent.putExtra("titleId",R.string.app_name);
startService(updateIntent);
}
})
.setNegativeButton("取消",new DialogInterface.OnClickListener(){
public void onClick(DialogInterface dialog, int which) {
dialog.dismiss();
}
});
alert.create().show();
}else{
//清理工作,略去
//cheanUpdateFile(),文章後面我會附上代碼
}
}
好,我們現在把這些東西串一下:
第一步在SubwayApplication的onCreate()方法中執行initGlobal()初始化版本變量。
復制代碼 代碼如下:
public void onCreate() {
super.onCreate();
initGlobal();
}
第二步在SubwayActivity的onCreate()方法中檢測版本更新checkVersion()。
復制代碼 代碼如下:
public void onCreate(Bundle savedInstanceState) {
super.onCreate(savedInstanceState);
setContentView(R.layout.main);
checkVersion();
現在入口已經打開,在checkVersion方法的第18行代碼中看出,當用戶點擊更新,我們開啟更新服務,從服務器上下載最新版本。
4.使用Service在後台從服務器端下載,完成後提示用戶下載完成,並關閉服務。
定義一個服務UpdateService.java,首先定義與下載和通知相關的變量:
復制代碼 代碼如下:
//標題
private int titleId = 0;
//文件存儲
private File updateDir = null;
private File updateFile = null;
//通知欄
private NotificationManager updateNotificationManager = null;
private Notification updateNotification = null;
//通知欄跳轉Intent
private Intent updateIntent = null;
private PendingIntent updatePendingIntent = null;
在onStartCommand()方法中准備相關的下載工作:
復制代碼 代碼如下:
@Override
public int onStartCommand(Intent intent, int flags, int startId) {
//獲取傳值
titleId = intent.getIntExtra("titleId",0);
//創建文件
if(android.os.Environment.MEDIA_MOUNTED.equals(android.os.Environment.getExternalStorageState())){
updateDir = new File(Environment.getExternalStorageDirectory(),Global.downloadDir);
updateFile = new File(updateDir.getPath(),getResources().getString(titleId)+".apk");
}
this.updateNotificationManager = (NotificationManager)getSystemService(NOTIFICATION_SERVICE);
this.updateNotification = new Notification();
//設置下載過程中,點擊通知欄,回到主界面
updateIntent = new Intent(this, SubwayActivity.class);
updatePendingIntent = PendingIntent.getActivity(this,0,updateIntent,0);
//設置通知欄顯示內容
updateNotification.icon = R.drawable.arrow_down_float;
updateNotification.tickerText = "開始下載";
updateNotification.setLatestEventInfo(this,"上海地鐵","0%",updatePendingIntent);
//發出通知
updateNotificationManager.notify(0,updateNotification);
//開啟一個新的線程下載,如果使用Service同步下載,會導致ANR問題,Service本身也會阻塞
new Thread(new updateRunnable()).start();//這個是下載的重點,是下載的過程
return super.onStartCommand(intent, flags, startId);
}
上面都是准備工作
從代碼中可以看出來,updateRunnable類才是真正下載的類,出於用戶體驗的考慮,這個類是我們單獨一個線程後台去執行的。
下載的過程有兩個工作:1.從服務器上下載數據;2.通知用戶下載的進度。
線程通知,我們先定義一個空的updateHandler。
[/code]
private Handler updateHandler = new Handler(){
@Override
public void handleMessage(Message msg) {
}
};
[/code]
再來創建updateRunnable類的真正實現:
復制代碼 代碼如下:
class updateRunnable implements Runnable {
Message message = updateHandler.obtainMessage();
public void run() {
message.what = DOWNLOAD_COMPLETE;
try{
//增加權限<uses-permission android:name="android.permission.WRITE_EXTERNAL_STORAGE">;
if(!updateDir.exists()){
updateDir.mkdirs();
}
if(!updateFile.exists()){
updateFile.createNewFile();
}
//下載函數,以QQ為例子
//增加權限<uses-permission android:name="android.permission.INTERNET">;
long downloadSize = downloadUpdateFile("http://softfile.3g.qq.com:8080/msoft/179/1105/10753/MobileQQ1.0(Android)_Build0198.apk",updateFile);
if(downloadSize>0){
//下載成功
updateHandler.sendMessage(message);
}
}catch(Exception ex){
ex.printStackTrace();
message.what = DOWNLOAD_FAIL;
//下載失敗
updateHandler.sendMessage(message);
}
}
}
</uses-permission></uses-permission>
下載函數的實現有很多,我這裡把代碼貼出來,而且我們要在下載的時候通知用戶下載進度:
復制代碼 代碼如下:
public long downloadUpdateFile(String downloadUrl, File saveFile) throws Exception {
//這樣的下載代碼很多,我就不做過多的說明
int downloadCount = 0;
int currentSize = 0;
long totalSize = 0;
int updateTotalSize = 0;
HttpURLConnection httpConnection = null;
InputStream is = null;
FileOutputStream fos = null;
try {
URL url = new URL(downloadUrl);
httpConnection = (HttpURLConnection)url.openConnection();
httpConnection.setRequestProperty("User-Agent", "PacificHttpClient");
if(currentSize > 0) {
httpConnection.setRequestProperty("RANGE", "bytes=" + currentSize + "-");
}
httpConnection.setConnectTimeout(10000);
httpConnection.setReadTimeout(20000);
updateTotalSize = httpConnection.getContentLength();
if (httpConnection.getResponseCode() == 404) {
throw new Exception("fail!");
}
is = httpConnection.getInputStream();
fos = new FileOutputStream(saveFile, false);
byte buffer[] = new byte[4096];
int readsize = 0;
while((readsize = is.read(buffer)) > 0){
fos.write(buffer, 0, readsize);
totalSize += readsize;
//為了防止頻繁的通知導致應用吃緊,百分比增加10才通知一次
if((downloadCount == 0)||(int) (totalSize*100/updateTotalSize)-10>downloadCount){
downloadCount += 10;
updateNotification.setLatestEventInfo(UpdateService.this, "正在下載", (int)totalSize*100/updateTotalSize+"%", updatePendingIntent);
updateNotificationManager.notify(0, updateNotification);
}
}
} finally {
if(httpConnection != null) {
httpConnection.disconnect();
}
if(is != null) {
is.close();
}
if(fos != null) {
fos.close();
}
}
return totalSize;
}
下載完成後,我們提示用戶下載完成,並且可以點擊安裝,那麼我們來補全前面的Handler吧。
先在UpdateService.java定義2個常量來表示下載狀態:
復制代碼 代碼如下:
//下載狀態
private final static int DOWNLOAD_COMPLETE = 0;
private final static int DOWNLOAD_FAIL = 1;
根據下載狀態處理主線程:
復制代碼 代碼如下:
private Handler updateHandler = new Handler(){
@Override
public void handleMessage(Message msg) {
switch(msg.what){
case DOWNLOAD_COMPLETE:
//點擊安裝PendingIntent
Uri uri = Uri.fromFile(updateFile);
Intent installIntent = new Intent(Intent.ACTION_VIEW);
installIntent.setDataAndType(uri, "application/vnd.android.package-archive");
updatePendingIntent = PendingIntent.getActivity(UpdateService.this, 0, installIntent, 0);
updateNotification.defaults = Notification.DEFAULT_SOUND;//鈴聲提醒
updateNotification.setLatestEventInfo(UpdateService.this, "上海地鐵", "下載完成,點擊安裝。", updatePendingIntent);
updateNotificationManager.notify(0, updateNotification);
//停止服務
stopService(updateIntent);
case DOWNLOAD_FAIL:
//下載失敗
updateNotification.setLatestEventInfo(UpdateService.this, "上海地鐵", "下載完成,點擊安裝。", updatePendingIntent);
updateNotificationManager.notify(0, updateNotification);
default:
stopService(updateIntent);
}
}
};
至此,文件下載並且在通知欄通知進度。
發現本人廢話很多,其實幾句話的事情,來來回回寫了這麼多,啰嗦了,後面博文我會朝著精簡方面努力。
PS:前面說要附上cheanUpdateFile()的代碼
復制代碼 代碼如下:
File updateFile = new File(Global.downloadDir,getResources().getString(R.string.app_name)+".apk");
if(updateFile.exists()){
//當不需要的時候,清除之前的下載文件,避免浪費用戶空間
updateFile.delete();
}
 Android IPC機制(四)用ContentProvider進行進程間通信
ContentProvider為存儲和獲取數據提供統一的接口,它可以在不同的應用程序之間共享數據,本身就是適合進程間通信的。ContentProvider底層實現也是Bi
 Android自定義下拉刷新控件RefreshableView
這是在了解下拉刷新功能原理下的產物,下拉刷新可以說是國產APP裡面必有的功能,連Google都為此出了SwipeRefreshLayout,一種MD風格的下拉刷新。 不過
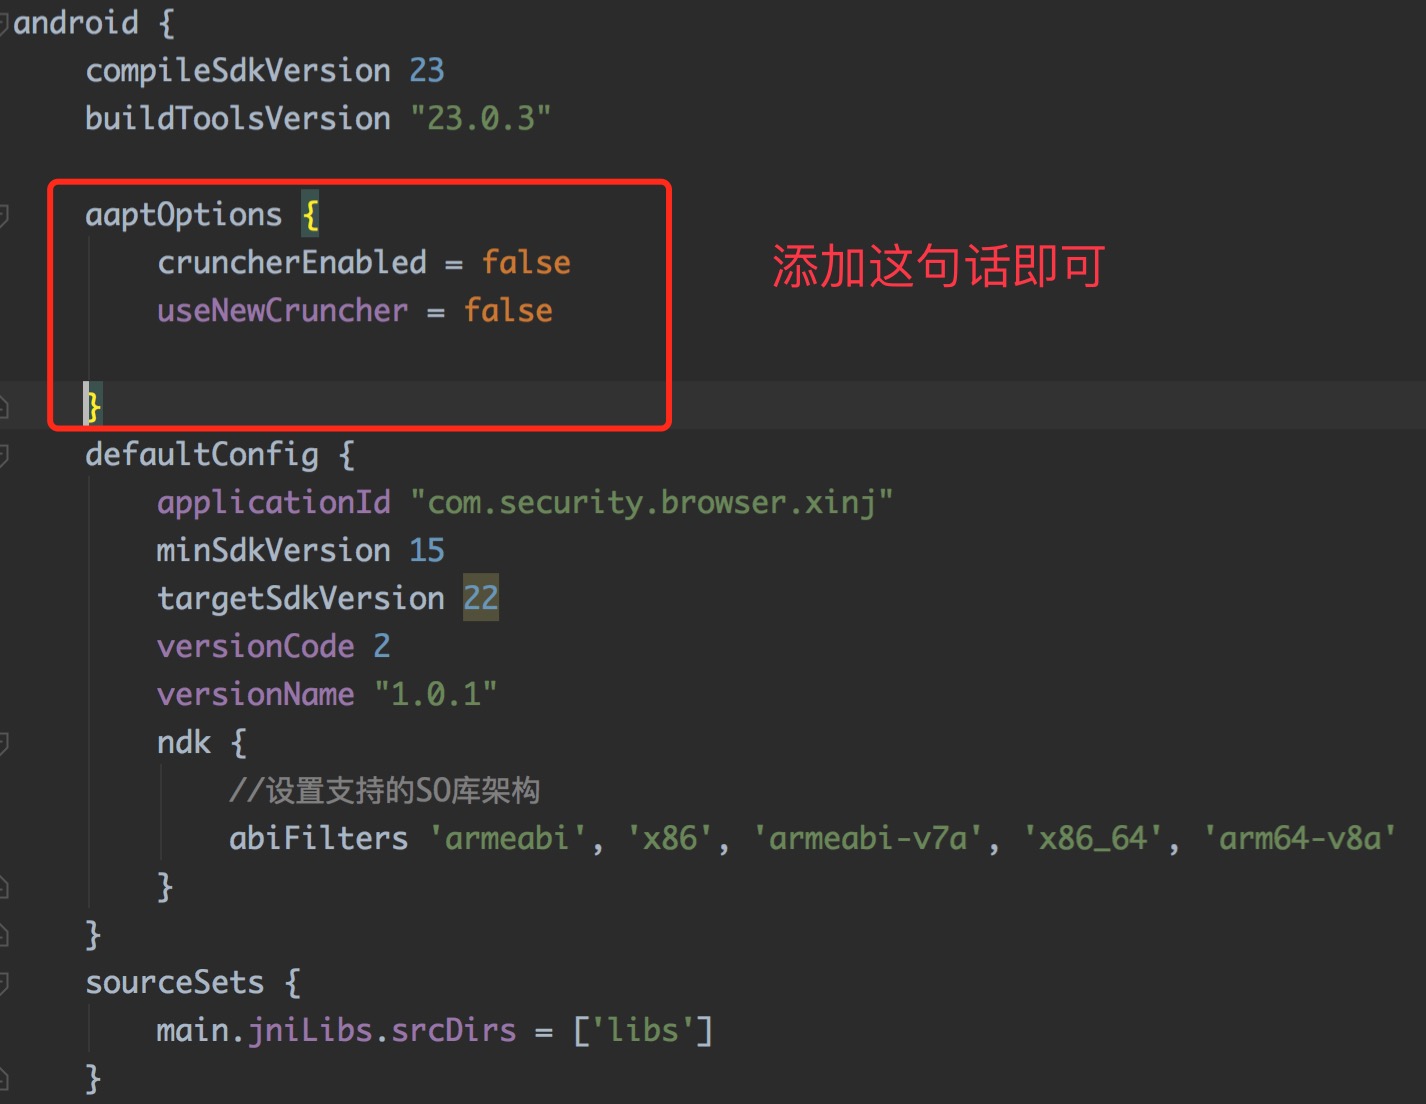 Android Gradle Build Error:Some file crunching failed, see logs for details的快速解決方法
錯誤日志:Error:java.lang.RuntimeException: Some file crunching failed, see logs for detai
 Android自定義組件ListView
下面代碼設計了異步任務、JSon解析、自定義組件、IO流、文件下載、適配器原理等知識點。 代碼實現從服務器上讀取Json字符串。 Json字符串如下。 {object:{