編輯:關於Android編程
本文實例講述了Android實現模仿UCweb菜單效果的方法。分享給大家供大家參考。具體如下:
UCWeb的菜單看起來不錯,自己模仿做一個,思路實現如下:
1、保留menu按鍵作用
2、用popupwindow作為菜單顯示容器
3、用GridView顯示所有子菜單
代碼如下:
1、布局文件:
popupwindow.xml:
<?xml version="1.0" encoding="utf-8"?>
<LinearLayout
 xmlns:android="http://schemas.android.com/apk/res/android"
 android:layout_width="fill_parent"
 android:background="#50000000"
 android:layout_height="fill_parent"
 android:gravity="bottom|center_horizontal">
 <LinearLayout
  xmlns:android="http://schemas.android.com/apk/res/android"
  android:layout_width="320dip"
  android:background="@drawable/bkg2"
  android:id="@+id/popdialog"
  android:layout_height="250dip"
  android:gravity="center_vertical|center_horizontal"
  >
  <GridView
   android:id="@+id/gridview"
   android:layout_width="fill_parent"
   android:layout_height="fill_parent"
   android:numColumns="4"
   android:verticalSpacing="10dip"
   android:horizontalSpacing="10dip"
   android:stretchMode="columnWidth"
   android:gravity="center"
   />
 </LinearLayout>
</LinearLayout>
item_menu.xml:
<?xml version="1.0" encoding="utf-8"?>
<RelativeLayout xmlns:android="http://schemas.android.com/apk/res/android"
 android:id="@+id/RelativeLayout_Item"
 android:layout_width="fill_parent" android:layout_height="wrap_content"
 android:paddingBottom="5dip">
 <ImageView android:id="@+id/item_image"
  android:layout_centerHorizontal="true"
  android:layout_width="40dip"
  android:layout_height="40dip">
  </ImageView>
 <TextView android:layout_below="@id/item_image"
  android:id="@+id/item_text"
  android:layout_centerHorizontal="true"
  android:layout_width="wrap_content"
  android:layout_height="wrap_content"

  android:text="選項"></TextView>
</RelativeLayout>
2、用popupwindow作為菜單顯示容器:
View view = this.getLayoutInflater().inflate(R.layout.popwindowdemo, null);
pop = new PopupWindow(view,320,450);//大小設置為全屏幕,這裡硬編碼的,可修改
pop.setOutsideTouchable(false);
pop.setBackgroundDrawable(new BitmapDrawable());
pop.setFocusable(true);//如果不加這個,Grid不會響應ItemClick
pop.setTouchInterceptor(new OnTouchListener() {
public boolean onTouch(View v, MotionEvent event) {
 // TODO Auto-generated method stub
 if (event.getY()<240){ //這裡處理,當點擊gridview以外區域的時候,菜單關閉
  if (pop.isShowing())
   pop.dismiss();
 }
 Log.d("Demo", "popupWindow::onTouch >>> view: "
   + v + ", event: " + event);
 return false;
}
});
3、初始化gridview:
/** 菜單圖片 **/
int[] menu_image_array = { R.drawable.menu_search,
   R.drawable.menu_filemanager, R.drawable.menu_downmanager,
   R.drawable.menu_fullscreen, R.drawable.menu_inputurl,
   R.drawable.menu_bookmark, R.drawable.menu_bookmark_sync_import,
   R.drawable.menu_sharepage, R.drawable.menu_quit,
   R.drawable.menu_nightmode, R.drawable.menu_refresh,
   R.drawable.menu_more };
/** 菜單文字 **/
String[] menu_name_array = { "搜索", "文件管理", "下載管理", "全屏", "網址", "書簽",
 "加入書簽", "分享頁面", "退出", "夜間模式", "刷新", "更多" };
/**
* 構造菜單Adapter
*
* @param menuNameArray
*   名稱
* @param imageResourceArray
*   圖片
* @return SimpleAdapter
*/
private SimpleAdapter getMenuAdapter(String[] menuNameArray,
int[] imageResourceArray) {
 ArrayList<HashMap<String, Object>> data = new ArrayList<HashMap<String, Object>>();
 for (int i = 0; i < menuNameArray.length; i++) {
  HashMap<String, Object> map = new HashMap<String, Object>();
  map.put("itemImage", imageResourceArray[i]);
  map.put("itemText", menuNameArray[i]);
  data.add(map);
 }
 SimpleAdapter simperAdapter = new SimpleAdapter(this, data,
  R.layout.item_menu, new String[] { "itemImage", "itemText" },
  new int[] { R.id.item_image, R.id.item_text });
  return simperAdapter;
}
menuGrid = (GridView) view.findViewById(R.id.gridview);
menuGrid.setAdapter(getMenuAdapter(menu_name_array, menu_image_array));
4、注冊Menu彈起事件:
@Override
public boolean onCreateOptionsMenu(Menu menu) {
 // TODO Auto-generated method stub
 pop.showAtLocation(findViewById(R.id.mainfrm), Gravity.CENTER|Gravity.BOTTOM, 0, 0);
 return false;//super.onCreateOptionsMenu(menu);
}
5、注冊menu子菜單單擊事件:
menuGrid.setOnItemClickListener(new OnItemClickListener() {
 public void onItemClick(AdapterView<?> arg0, View arg1, int arg2,
   long arg3) {
  Log.v("Demo", "menuGrid.setOnItemClickListener: "+arg2+" "+arg3);
  Toast.makeText(UIMenu.this, "Click"+arg2, Toast.LENGTH_SHORT).show();
  if (pop.isShowing()) //關閉菜單
   pop.dismiss();
 }
});
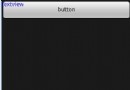
6、界面截圖:

希望本文所述對大家的Android程序設計有所幫助。
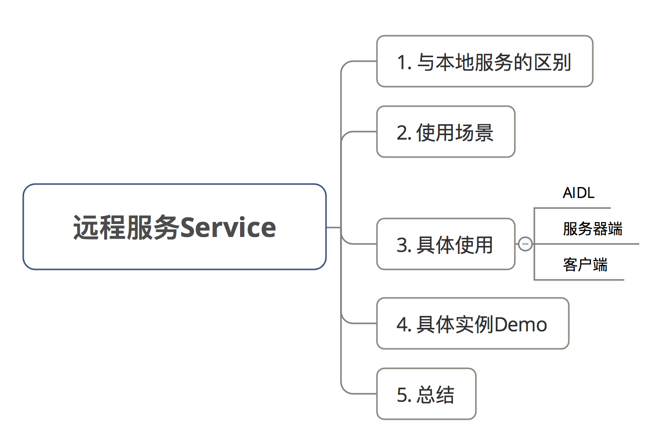 Android:遠程服務Service(含AIDL & IPC講解)
前言Service作為Android四大組件之一,應用非常廣泛 本文將介紹Service其中一種常見用法:遠程Service目錄1. 遠程服務與本地服務的區別遠程服務與本
 android上line-height的問題
關於line-height大家應該非常熟悉了吧,就是用來做垂直居中的,屢試不爽,基本上沒有什麼問題,但是最近一個項目,測試提了一個bug,看圖吧。從別處竊的圖,這個問題只
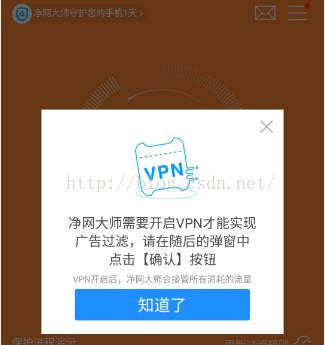 Android 破解視頻App去除廣告功能詳解及解決辦法總結
Android 破解視頻App去除廣告功能作為一個屌絲程序猿也有追劇的時候,但是當打開視頻app的時候,那些超長的廣告已經讓我這個屌絲無法忍受了,作為一個程序猿看視頻還要
 Android 02 Started Service--之被啟動的服務
正文 1 Started Service介紹 Started Service,即被啟動的服務。它是2種常見服務之一,另一種是Bo