編輯:關於Android編程
本文實例講述了Android編程之Animation動畫用法。分享給大家供大家參考,具體如下:
Animations
一、Animations介紹
Animations是一個實現android UI界面動畫效果的API,Animations提供了一系列的動畫效果,可以進行旋轉、縮放、淡入淡出等,這些效果可以應用在絕大多數的控件中。
二、Animations的分類
Animations從總體上可以分為兩大類:
1.Tweened Animations:該類Animations提供了旋轉、移動、伸展和淡出等效果。Alpha——淡入淡出,Scale——縮放效果,Rotate——旋轉,Translate——移動效果。
2.Frame-by-frame Animations:這一類Animations可以創建一個Drawable序列,這些Drawable可以按照指定的時間間歇一個一個的顯示。
三、Animations的使用方法(代碼中使用)
Animations extends Object implements Cloneable
使用TweenedAnimations的步驟:
1.創建一個AnimationSet對象(Animation子類);
2.增加需要創建相應的Animation對象;
3.更加項目的需求,為Animation對象設置相應的數據;
4.將Animatin對象添加到AnimationSet對象當中;
5.使用控件對象開始執行AnimationSet。
Tweened Animations的分類
1、Alpha:淡入淡出效果
2、Scale:縮放效果
3、Rotate:旋轉效果
4、Translate:移動效果
Animation的四個子類:
AlphaAnimation、TranslateAnimation、ScaleAnimation、RotateAnimation
四、具體實現
1、main.xml
<?xml version="1.0" encoding="utf-8"?>
<LinearLayout xmlns:android="http://schemas.android.com/apk/res/android"
  android:layout_width="fill_parent"
  android:layout_height="fill_parent"
  android:orientation="vertical" >
  <LinearLayout
    android:layout_width="wrap_content"
    android:layout_height="wrap_content"
    android:orientation="horizontal" >
     <Button
      android:id="@+id/rotateButton"
      android:layout_width="wrap_content"
      android:layout_height="wrap_content"
      android:text="旋轉" />
     <Button
      android:id="@+id/scaleButton"
      android:layout_width="wrap_content"
      android:layout_height="wrap_content"
      android:text="縮放" />
     <Button
      android:id="@+id/alphaButton"
      android:layout_width="wrap_content"
      android:layout_height="wrap_content"
      android:text="淡入淡出" />
     <Button
      android:id="@+id/translateButton"
      android:layout_width="wrap_content"
      android:layout_height="wrap_content"
      android:text="移動" />
  </LinearLayout>
   <LinearLayout
    android:layout_width="fill_parent"
    android:layout_height="fill_parent"
    android:orientation="vertical" >
     <ImageView
      android:id="@+id/image"
      android:layout_width="wrap_content"
      android:layout_height="wrap_content"
      android:layout_centerInParent="true"
      android:src="@drawable/an" />
  </LinearLayout>
 </LinearLayout>
2、.java文件
importandroid.app.Activity;
importandroid.os.Bundle;
importandroid.view.View;
importandroid.view.View.OnClickListener;
import android.view.animation.AlphaAnimation;
import android.view.animation.Animation;
importandroid.view.animation.AnimationSet;
importandroid.view.animation.RotateAnimation;
importandroid.view.animation.ScaleAnimation;
import android.view.animation.TranslateAnimation;
importandroid.widget.Button;
importandroid.widget.ImageView;
public class Animation1Activity extends Activity {
  private Button rotateButton = null;
  private Button scaleButton = null;
  private Button alphaButton = null;
  private Button translateButton = null;
  private ImageView image = null;
  @Override
  public void onCreate(Bundle savedInstanceState) {
    super.onCreate(savedInstanceState);
    setContentView(R.layout.main);
    rotateButton = (Button)findViewById(R.id.rotateButton);
    scaleButton = (Button)findViewById(R.id.scaleButton);
    alphaButton = (Button)findViewById(R.id.alphaButton);
    translateButton = (Button)findViewById(R.id.translateButton);
    image = (ImageView)findViewById(R.id.image);
    rotateButton.setOnClickListener(newRotateButtonListener());
    scaleButton.setOnClickListener(newScaleButtonListener());
    alphaButton.setOnClickListener(newAlphaButtonListener());
    translateButton.setOnClickListener(
      new TranslateButtonListener());
  }
  class AlphaButtonListener implementsOnClickListener{
    public void onClick(View v) {
      //創建一個AnimationSet對象,參數為Boolean型,
      //true表示使用Animation的interpolator,false則是使用自己的
      AnimationSet animationSet = new AnimationSet(true);
      //創建一個AlphaAnimation對象,參數從完全的透明度,到完全的不透明
      AlphaAnimation alphaAnimation = new AlphaAnimation(1, 0);
      //設置動畫執行的時間
      alphaAnimation.setDuration(500);
      //將alphaAnimation對象添加到AnimationSet當中
      animationSet.addAnimation(alphaAnimation);
      //使用ImageView的startAnimation方法執行動畫
      image.startAnimation(animationSet);
    }
  }
  class RotateButtonListener implementsOnClickListener{
    public void onClick(View v) {
      AnimationSet animationSet = new AnimationSet(true);
      //參數1:從哪個旋轉角度開始
      //參數2:轉到什麼角度
      //後4個參數用於設置圍繞著旋轉的圓的圓心在哪裡
      //參數3:確定x軸坐標的類型,有ABSOLUT絕對坐標、RELATIVE_TO_SELF相對於自身坐標、RELATIVE_TO_PARENT相對於父控件的坐標
      //參數4:x軸的值,0.5f表明是以自身這個控件的一半長度為x軸
      //參數5:確定y軸坐標的類型
      //參數6:y軸的值,0.5f表明是以自身這個控件的一半長度為x軸
      RotateAnimation rotateAnimation = new RotateAnimation(0, 360,
         Animation.RELATIVE_TO_SELF,0.5f,
         Animation.RELATIVE_TO_SELF,0.5f);
      rotateAnimation.setDuration(1000);
      animationSet.addAnimation(rotateAnimation);
      image.startAnimation(animationSet);
    }
  }
  class ScaleButtonListener implementsOnClickListener{
    public void onClick(View v) {
      AnimationSet animationSet = new AnimationSet(true);
      //參數1:x軸的初始值
      //參數2:x軸收縮後的值
      //參數3:y軸的初始值
      //參數4:y軸收縮後的值
      //參數5:確定x軸坐標的類型
      //參數6:x軸的值,0.5f表明是以自身這個控件的一半長度為x軸
      //參數7:確定y軸坐標的類型
      //參數8:y軸的值,0.5f表明是以自身這個控件的一半長度為x軸
      ScaleAnimation scaleAnimation = new ScaleAnimation(
         0, 0.1f,0,0.1f,
         Animation.RELATIVE_TO_SELF,0.5f,
         Animation.RELATIVE_TO_SELF,0.5f);
      scaleAnimation.setDuration(1000);
      animationSet.addAnimation(scaleAnimation);
      image.startAnimation(animationSet);
    }
  }
  class TranslateButtonListener implementsOnClickListener{
    public void onClick(View v) {
      AnimationSet animationSet = new AnimationSet(true);
      //參數1~2:x軸的開始位置
      //參數3~4:y軸的開始位置
      //參數5~6:x軸的結束位置
      //參數7~8:x軸的結束位置
      TranslateAnimation translateAnimation =
       new TranslateAnimation(
         Animation.RELATIVE_TO_SELF,0f,
         Animation.RELATIVE_TO_SELF,0.5f,
         Animation.RELATIVE_TO_SELF,0f,
         Animation.RELATIVE_TO_SELF,0.5f);
      translateAnimation.setDuration(1000);
      animationSet.addAnimation(translateAnimation);
      image.startAnimation(animationSet);
    }
  }
}
Tween Animations的通用方法
1、setDuration(long durationMills)
設置動畫持續時間(單位:毫秒)
2、setFillAfter(Boolean fillAfter)
如果fillAfter的值為true,則動畫執行後,控件將停留在執行結束的狀態
3、setFillBefore(Boolean fillBefore)
如果fillBefore的值為true,則動畫執行後,控件將回到動畫執行之前的狀態
4、setStartOffSet(long startOffSet)
設置動畫執行之前的等待時間
5、setRepeatCount(int repeatCount)
設置動畫重復執行的次數
在代碼中使用Animations可以很方便的調試、運行,但是代碼的可重用性差,重復代碼多。同樣可以在xml文件中配置Animations,這樣做可維護性變高了,只不過不容易進行調試。
一、在xml中使用Animations步驟
1.在res文件夾下建立一個anim文件夾;
2.創建xml文件,並首先加入set標簽,更改標簽如下:
<?xml version="1.0" encoding="utf-8"?>
<set xmlns:android="http://schemas.android.com/apk/res/android"
android:interpolator="@android:anim/accelerate_interpolator">
</set>
3.在該標簽當中加入rotate,alpha,scale或者translate標簽;
<alpha
    android:fromAlpha="1.0"
    android:toAlpha="0.0"
    android:startOffset="500"
    android:duration="500"/>
4.在代碼當中使用AnimationUtils當中裝載xml文件,並生成Animation對象。因為Animation是AnimationSet的子類,所以向上轉型,用Animation對象接收。
Animation animation = AnimationUtils.loadAnimation(
 Animation1Activity.this, R.anim.alpha);
// 啟動動畫
image.startAnimation(animation);
二、具體實現
1、 alpha.xml
<?xml version="1.0" encoding="utf-8"?>
<set xmlns:android="http://schemas.android.com/apk/res/android"
  android:interpolator="@android:anim/accelerate_interpolator">
  <!-- fromAlpha和toAlpha是起始透明度和結束時透明度 -->
  <alpha
    android:fromAlpha="1.0"
    android:toAlpha="0.0"
    android:startOffset="500"
    android:duration="500"/>
</set>
2、 rotate.xml
<?xml version="1.0" encoding="utf-8"?>
<set xmlns:android="http://schemas.android.com/apk/res/android"
  android:interpolator="@android:anim/accelerate_interpolator">
  <!--
    fromDegrees:開始的角度
    toDegrees:結束的角度,+表示是正的
    pivotX:用於設置旋轉時的x軸坐標
    例
      1)當值為"50",表示使用絕對位置定位
      2)當值為"50%",表示使用相對於控件本身定位
      3)當值為"50%p",表示使用相對於控件的父控件定位
    pivotY:用於設置旋轉時的y軸坐標
   -->
  <rotate
    android:fromDegrees="0"
    android:toDegrees="+360"
    android:pivotX="50%"
    android:pivotY="50%"
    android:duration="1000"/>
</set>
3、 scale.xml
<?xml version="1.0" encoding="utf-8"?>
<set xmlns:android="http://schemas.android.com/apk/res/android"
  android:interpolator="@android:anim/accelerate_interpolator">
  <!--
    起始x軸坐標
      止x軸坐標
      始y軸坐標
      止y軸坐標
      軸的坐標
      軸的坐標
   -->
  <scale
    android:fromXScale="1.0"
    android:toXScale="0.0"
    android:fromYScale="1.0"
    android:toYScale="0.0"
    android:pivotX="50%"
    android:pivotY="50%"
    android:duration="1000"/>
</set>
4、 translate.xml
<?xml version="1.0" encoding="utf-8"?>
<set xmlns:android="http://schemas.android.com/apk/res/android"
  android:interpolator="@android:anim/accelerate_interpolator">
  <!--
      始x軸坐標
      止x軸坐標
      始y軸坐標
      止y軸坐標
   -->
  <translate
    android:fromXDelta="0%"
    android:toXDelta="100%"
    android:fromYDelta="0%"
    android:toYDelta="100%"
    android:duration="2000"/>
</set>
5、 .java文件
importandroid.app.Activity;
importandroid.os.Bundle;
importandroid.view.View;
importandroid.view.View.OnClickListener;
import android.view.animation.Animation;
importandroid.view.animation.AnimationUtils;
import android.widget.Button;
import android.widget.ImageView;
public class Animation1Activity extends Activity {
  private Button rotateButton = null;
  private Button scaleButton = null;
  private Button alphaButton = null;
  private Button translateButton = null;
  private ImageView image = null;
  @Override
  public void onCreate(Bundle savedInstanceState) {
    super.onCreate(savedInstanceState);
    setContentView(R.layout.main);
    rotateButton = (Button) findViewById(R.id.rotateButton);
    scaleButton = (Button) findViewById(R.id.scaleButton);
    alphaButton = (Button) findViewById(R.id.alphaButton);
    translateButton = (Button) findViewById(R.id.translateButton);
    image = (ImageView) findViewById(R.id.image);
    rotateButton.setOnClickListener(newRotateButtonListener());
    scaleButton.setOnClickListener(newScaleButtonListener());
    alphaButton.setOnClickListener(newAlphaButtonListener());
    translateButton.setOnClickListener(newTranslateButtonListener());
  }
  class AlphaButtonListener implementsOnClickListener {
    public void onClick(View v) {
      // 使用AnimationUtils裝載動畫配置文件
      Animation animation = AnimationUtils.loadAnimation(
         Animation1Activity.this, R.anim.alpha);
      // 啟動動畫
      image.startAnimation(animation);
    }
  }
  class RotateButtonListener implementsOnClickListener {
    public void onClick(View v) {
      Animation animation = AnimationUtils.loadAnimation(
         Animation1Activity.this, R.anim.rotate);
      image.startAnimation(animation);
    }
  }
  class ScaleButtonListener implementsOnClickListener {
    public void onClick(View v) {
      Animation animation = AnimationUtils.loadAnimation(
         Animation1Activity.this, R.anim.scale);
      image.startAnimation(animation);
    }
  }
  class TranslateButtonListener implementsOnClickListener {
    public void onClick(View v) {
      Animation animation = AnimationUtils.loadAnimation(Animation1Activity.this, R.anim.translate);
      image.startAnimation(animation);
    }
  }
}
AnimationSet的具體使用方法
1.AnimationSet是Animation的子類;
2.一個AnimationSet包含了一系列的Animation;
3.針對AnimationSet設置一些Animation的常見屬性(如startOffset,duration等),可以被包含在AnimationSet當中的Animation集成;
例:一個AnimationSet中有兩個Animation,效果疊加
第一種方法:
doubleani.xml
<?xml version="1.0" encoding="utf-8"?>
<set xmlns:android="http://schemas.android.com/apk/res/android"
  android:interpolator="@android:anim/accelerate_interpolator"
  android:shareInterpolator="true">
  <!-- fromAlpha和toAlpha是起始透明度和結束時透明度 -->
  <alpha
    android:fromAlpha="1.0"
    android:toAlpha="0.0"
    android:startOffset="500"
    android:duration="500"/>
  <translate
    android:fromXDelta="0%"
    android:toXDelta="100%"
    android:fromYDelta="0%"
    android:toYDelta="100%"
    android:duration="2000"/>
</set>
.java文件中
classDoubleButtonListener implements OnClickListener {
    public void onClick(View v) {
      // 使用AnimationUtils裝載動畫配置文件
      Animation animation = AnimationUtils.loadAnimation(
         Animation2Activity.this, R.anim. doubleani);
      // 啟動動畫
      image.startAnimation(animation);
    }
  }
第二種方法:
.java文件中
classDoubleButtonListener implements OnClickListener {
    public void onClick(View v) {
      AnimationSet animationSet = new AnimationSet(true);
      AlphaAnimation alphaAnimation = new AlphaAnimation(1, 0);
      RotateAnimation rotateAnimation = new RotateAnimation(0, 360,
         Animation.RELATIVE_TO_SELF,0.5f,
         Animation.RELATIVE_TO_SELF,0.5f);
      rotateAnimation.setDuration(1000);
      animationSet.addAnimation(rotateAnimation);
      animationSet.addAnimation(alphaAnimation);
      image.startAnimation(animationSet);
    }
  }
Interpolator的具體使用方法
Interpolator定義了動畫變化的速率,在Animations框架當中定義了以下幾種Interpolator
? AccelerateDecelerateInterpolator:在動畫開始與結束的地方速率改變比較慢,在中間的時候速率快。
? AccelerateInterpolator:在動畫開始的地方速率改變比較慢,然後開始加速
? CycleInterpolator:動畫循環播放特定的次數,速率改變沿著正弦曲線
? DecelerateInterpolator:在動畫開始的地方速率改變比較慢,然後開始減速
? LinearInterpolator:動畫以均勻的速率改變
分為以下幾種情況:
1、在set標簽中
<set xmlns:android="http://schemas.android.com/apk/res/android"
android:interpolator="@android:anim/accelerate_interpolator"/>
2、如果在一個set標簽中包含多個動畫效果,如果想讓這些動畫效果共享一個Interpolator。
復制代碼 代碼如下:android:shareInterpolator="true"
3、如果不想共享一個interpolator,則設置android:shareInterpolator="true",並且需要在每一個動畫效果處添加interpolator。
<alpha
    android:interpolator="@android:anim/accelerate_decelerate_interpolator"
    android:fromAlpha="1.0"
    android:toAlpha="0.0"
    android:startOffset="500"
    android:duration="500"/>
4、如果是在代碼上設置共享一個interpolator,則可以在AnimationSet設置interpolator。
AnimationSet animationSet = newAnimationSet(true);
animationSet.setInterpolator(new AccelerateInterpolator());
5、如果不設置共享一個interpolator則可以在每一個Animation對象上面設置interpolator。
AnimationSet animationSet = newAnimationSet(false);
alphaAnimation.setInterpolator(new AccelerateInterpolator());
rotateAnimation.setInterpolator(new DecelerateInterpolator());
Frame-By-Frame Animations的使用方法
Frame-By-Frame Animations是一幀一幀的格式顯示動畫效果。類似於電影膠片拍攝的手法。
main.xml
<?xml version="1.0" encoding="utf-8"?>
<LinearLayout xmlns:android="http://schemas.android.com/apk/res/android"
  android:orientation="vertical"
  android:layout_width="fill_parent"
  android:layout_height="fill_parent">
  <LinearLayout
    android:orientation="horizontal"
    android:layout_height="wrap_content"
    android:layout_width="wrap_content">
    <Button
      android:id="@+id/button"
        android:layout_width="wrap_content"
        android:layout_height="wrap_content"
        android:text="運動"/>
  </LinearLayout>
  <LinearLayout
    android:orientation="vertical"
    android:layout_width="fill_parent"
    android:layout_height="fill_parent">
    <ImageView
      android:id="@+id/image"
      android:layout_width="wrap_content"
      android:layout_height="wrap_content"
      android:layout_centerInParent="true"/>
  </LinearLayout>
</LinearLayout>
3、anim.xml
<?xml version="1.0" encoding="utf-8"?>
<animation-list xmlns:android="http://schemas.android.com/apk/res/android"
  android:oneshot="false">
  <item android:drawable="@drawable/a_01" android:duration="50"/>
  <item android:drawable="@drawable/a_02" android:duration="50"/>
  <item android:drawable="@drawable/a_03" android:duration="50"/>
  <item android:drawable="@drawable/a_04" android:duration="50"/>
  <item android:drawable="@drawable/a_05" android:duration="50"/>
  <item android:drawable="@drawable/a_06" android:duration="50"/>
</animation-list>
4、.java文件
importandroid.app.Activity;
importandroid.graphics.drawable.AnimationDrawable;
importandroid.os.Bundle;
importandroid.view.View;
importandroid.view.View.OnClickListener;
importandroid.widget.Button;
importandroid.widget.ImageView;
public class AnimationsActivity extends Activity {
  private Button button = null;
  private ImageView imageView = null;
  @Override
  public void onCreate(Bundle savedInstanceState) {
    super.onCreate(savedInstanceState);
    setContentView(R.layout.main);
    button = (Button)findViewById(R.id.button);
    imageView = (ImageView)findViewById(R.id.image);
    button.setOnClickListener(newButtonListener());
  }
  class ButtonListener implementsOnClickListener{
    public void onClick(View v) {
      imageView.setBackgroundResource(R.anim.anim);
      AnimationDrawable animationDrawable = (AnimationDrawable)
       imageView.getBackground();
      animationDrawable.start();
    }
  }
}
LayoutAnimationsController
1、什麼是LayoutAnimationsController
LayoutAnimationsController可以用於實現使多個控件按順序一個一個的顯示。
1)LayoutAnimationsController用於為一個layout裡面的控件,或者是一個ViewGroup裡面的控件設置統一的動畫效果。
2)每一個控件都有相同的動畫效果。
3)控件的動畫效果可以在不同的時間顯示出來。
4)LayoutAnimationsController可以在xml文件當中設置,以可以在代碼當中進行設置。
2、在xml當中使用LayoutAnimationController
1)在res/anim文件夾下創建一個名為list_anim_layout.xml文件:
android:delay - 動畫間隔時間;子類動畫時間間隔 (延遲) 70% 也可以是一個浮點數 如“1.2”等
android:animationOrder - 動畫執行的循序(normal:順序,random:隨機,reverse:反向顯示)
android:animation – 引用動畫效果文件
<layoutAnimation
  xmlns:android="http://schemas.android.com/apk/res/android"
  android:delay="0.5"
  android:animationOrder="normal"
  android:animation="@anim/list_anim"/>
2)創建list_anim.xml文件,設置動畫效果
<?xml version="1.0" encoding="utf-8"?>
<set xmlns:android="http://schemas.android.com/apk/res/android"
  android:interpolator="@android:anim/accelerate_interpolator"
  android:shareInterpolator="true">
  <alpha
    android:fromAlpha="0.0"
    android:toAlpha="1.0"
    android:duration="1000"/>
</set>
3)在布局文件main.xml當中為ListVIew添加如下配置
<ListView
    android:id="@id/android:list"
    android:layout_width="fill_parent"
    android:layout_height="wrap_content"
    android:scrollbars="vertical"
    android:layoutAnimation="@anim/list_anim_layout"/>
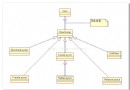
4)程序結構

5)list_anim_layout.xml
<layoutAnimation
xmlns:android="http://schemas.android.com/apk/res/android"
  android:delay="0.5"
  android:animationOrder="normal"
  android:animation="@anim/list_anim"/>
6)list_anim.xml
<?xml version="1.0" encoding="utf-8"?>
<set xmlns:android="http://schemas.android.com/apk/res/android"
  android:interpolator="@android:anim/accelerate_interpolator"
  android:shareInterpolator="true">
  <alpha
    android:fromAlpha="0.0"
    android:toAlpha="1.0"
    android:duration="1000"/>
</set>
7)main.xml
<?xml version="1.0" encoding="utf-8"?>
<LinearLayout xmlns:android="http://schemas.android.com/apk/res/android"
  android:orientation="vertical"
  android:layout_width="fill_parent"
  android:layout_height="fill_parent"
  >
  <ListView
    android:id="@id/android:list"
    android:layout_width="fill_parent"
    android:layout_height="wrap_content"
    android:scrollbars="vertical"
    android:layoutAnimation="@anim/list_anim_layout"/>
  <Button
    android:id="@+id/button"
    android:layout_width="fill_parent"
    android:layout_height="wrap_content"
    android:text="測試"/>
</LinearLayout>
8)item.xml
<?xml version="1.0" encoding="utf-8"?>
<LinearLayout xmlns:android="http://schemas.android.com/apk/res/android"
  android:layout_width="fill_parent"
  android:layout_height="fill_parent"
  android:orientation="horizontal"
  android:paddingLeft="10dip"
  android:paddingRight="10dip"
  android:paddingTop="1dip"
  android:paddingBottom="1dip">
  <TextView android:id="@+id/name"
    android:layout_width="180dip"
    android:layout_height="30dip"
    android:textSize="5pt"
    android:singleLine="true" />
  <TextView android:id="@+id/sex"
    android:layout_width="fill_parent"
    android:layout_height="fill_parent"
    android:textSize="5pt"
    android:singleLine="true"/>
</LinearLayout>
9)java文件
public class Animation2Activity extendsListActivity {
  private Button button = null;
  private ListView listView = null;
  @Override
  public void onCreate(Bundle savedInstanceState) {
    super.onCreate(savedInstanceState);
    setContentView(R.layout.main);
    listView = getListView();
    button = (Button)findViewById(R.id.button);
    button.setOnClickListener(newButtonListener());
  }
  private ListAdapter createListAdapter() {
    List<HashMap<String,String>> list =
      new ArrayList<HashMap<String,String>>();
    HashMap<String,String> m1 = new HashMap<String,String>();
    m1.put("name", "bauble");
    m1.put("sex", "male");
    HashMap<String,String> m2 = new HashMap<String,String>();
    m2.put("name", "Allorry");
    m2.put("sex", "male");
    HashMap<String,String> m3 = new HashMap<String,String>();
    m3.put("name", "Allotory");
    m3.put("sex", "male");
    HashMap<String,String> m4 = new HashMap<String,String>();
    m4.put("name", "boolbe");
    m4.put("sex", "male");
    list.add(m1);
    list.add(m2);
    list.add(m3);
    list.add(m4);
    SimpleAdapter simpleAdapter = new SimpleAdapter(
       this,list,R.layout.item,new String[]{"name","sex"},
       new int[]{R.id.name,R.id.sex});
    return simpleAdapter;
  }
  private class ButtonListener implementsOnClickListener{
    public void onClick(View v) {
      listView.setAdapter(createListAdapter());
    }
  }
}
備注:要將整個動畫效果設置到LinerLayout中,可以這樣設置:
<LinearLayoutxmlns:android="http://schemas.android.com/apk/res/android"
  android:orientation="vertical"
  android:layout_width="fill_parent"
  android:layout_height="fill_parent"
  android:layoutAnimation="@anim/list_anim_layout"
>
3、在代碼當中使用LayoutAnimationController
1)去掉main.xml中的android:layoutAnimation="@anim/list_anim_layout"/>
2)創建一個Animation對象:可以通過裝載xml文件,或者是直接使用Animation的構造方法創建Animation對象;
Animation animation = (Animation) AnimationUtils.loadAnimation(
 Animation2Activity.this, R.anim.list_anim);
3)創建LayoutAnimationController對象:
復制代碼 代碼如下:LayoutAnimationController controller = new LayoutAnimationController(animation);
4)設置控件的顯示順序以及延遲時間
controller.setOrder(LayoutAnimationController.ORDER_NORMAL);
controller.setDelay(0.5f);
5)為ListView設置LayoutAnimationController屬性:
復制代碼 代碼如下:listView.setLayoutAnimation(controller);
完整代碼:
private class ButtonListener implementsOnClickListener {
    public void onClick(View v) {
      listView.setAdapter(createListAdapter());
      Animation animation = (Animation) AnimationUtils.loadAnimation(
         Animation2Activity.this, R.anim.list_anim);
      LayoutAnimationController controller = new LayoutAnimationController(animation);
      controller.setOrder(LayoutAnimationController.ORDER_NORMAL);
      controller.setDelay(0.5f);
      listView.setLayoutAnimation(controller);
    }
  }
AnimationListener
1、什麼是AnimationListener
1).AnimationListener是一個監聽器,該監聽器在動畫執行的各個階段會得到通知,從而調用相應的方法;
2).AnimationListener主要包括如下三個方法:
① onAnimationEnd(Animation animation) - 當動畫結束時調用
② onAnimationRepeat(Animation animation) - 當動畫重復時調用
③ onAniamtionStart(Animation animation) - 當動畫啟動時調用
2、具體實現
1)main.xml
<?xml version="1.0" encoding="utf-8"?>
<RelativeLayout xmlns:android="http://schemas.android.com/apk/res/android"
  android:id="@+id/layout"
  android:orientation="vertical"
  android:layout_width="fill_parent"
  android:layout_height="fill_parent">
  <Button android:id="@+id/addButton"
    android:layout_width="fill_parent"
    android:layout_height="wrap_content"
    android:layout_alignParentBottom="true"
    android:text="添加圖片" />
  <Button android:id="@+id/deleteButton"
    android:layout_width="fill_parent"
    android:layout_height="wrap_content"
    android:layout_above="@id/addButton"
    android:text="刪除圖片" />
  <ImageView android:id="@+id/image"
    android:layout_width="wrap_content"
    android:layout_height="wrap_content"
    android:layout_centerInParent="true"
    android:layout_marginTop="100dip"
    android:src="@drawable/an" />
</RelativeLayout>
2).java文件
public class Animation2Activity extends Activity {
  private Button addButton = null;
  private Button deleteButton = null;
  private ImageView imageView = null;
  private ViewGroup viewGroup = null;
  @Override
  public void onCreate(Bundle savedInstanceState) {
    super.onCreate(savedInstanceState);
    setContentView(R.layout.main);
    addButton = (Button)findViewById(R.id.addButton);
    deleteButton = (Button)findViewById(R.id.deleteButton);
    imageView = (ImageView)findViewById(R.id.image);
    //LinearLayout下的一組控件
    viewGroup = (ViewGroup)findViewById(R.id.layout);
    addButton.setOnClickListener(newAddButtonListener());
    deleteButton.setOnClickListener(newDeleteButtonListener());
  }
  private class AddButtonListener implements OnClickListener{
    public void onClick(View v) {
      //淡入
      AlphaAnimation animation = new AlphaAnimation(0.0f, 1.0f);
      animation.setDuration(1000);
      animation.setStartOffset(500);
      //創建一個新的ImageView
      ImageView newImageView = new ImageView(
       Animation2Activity.this);
      newImageView.setImageResource(R.drawable.an);
      viewGroup.addView(newImageView,
       new LayoutParams(
         LayoutParams.FILL_PARENT,
         LayoutParams.WRAP_CONTENT));
      newImageView.startAnimation(animation);
    }
  }
  private class DeleteButtonListener implements OnClickListener{
    public void onClick(View v) {
      //淡出
      AlphaAnimation animation = new AlphaAnimation(1.0f, 0.0f);
      animation.setDuration(1000);
      animation.setStartOffset(500);
      //為Aniamtion對象設置監聽器
      animation.setAnimationListener(
       new RemoveAnimationListener());
      imageView.startAnimation(animation);
    }
  }
  private class RemoveAnimationListener implements AnimationListener{
    //動畫效果執行完時remove
    public void onAnimationEnd(Animation animation) {
      System.out.println("onAnimationEnd");
      viewGroup.removeView(imageView);
    }
    public void onAnimationRepeat(Animation animation) {
      System.out.println("onAnimationRepeat");
    }
    public void onAnimationStart(Animation animation) {
      System.out.println("onAnimationStart");
    }
  }
}
3、總結一下
可以在Activity中動態添加和刪除控件,方法是:
1)取到那個Layout
復制代碼 代碼如下:viewGroup = (ViewGroup)findViewById(R.id.layout);
2)添加時,先創建對象,然後添加
ImageView newImageView = new ImageView(
  Animation2Activity.this);
newImageView.setImageResource(R.drawable.an);
viewGroup.addView(newImageView,
       new LayoutParams(
         LayoutParams.FILL_PARENT,
         LayoutParams.WRAP_CONTENT));
3)刪除時,直接刪除。
復制代碼 代碼如下:viewGroup.removeView(imageView);
希望本文所述對大家Android程序設計有所幫助。
 Android 界面編程 探險(一)
Android應用大部分UI組件都放在android.widget包及其子包、android.view包及其子包中,所有UI組件都繼承了View類,Android采用&l
 Android基礎布局之六大布局
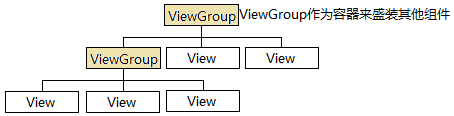
布局管理器都是以ViewGroup為基類派生出來的; 使用布局管理器可以適配不同手機屏幕的分辨率,尺寸大小; 如何使用XML文件定義視圖:
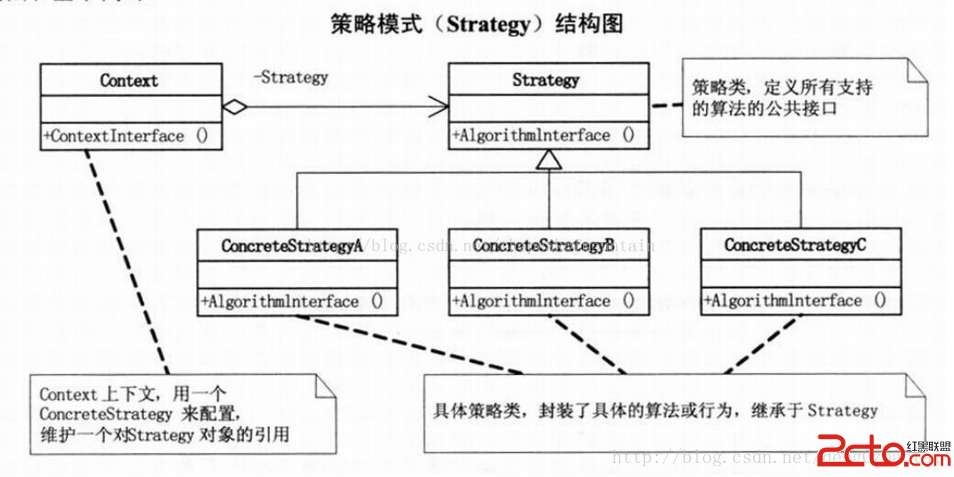 Android 設計模式之策略模式
策略模式的定義:定義算法族,分別封裝起來,讓它們之間可以互相替換,此模式讓算法的變化獨立於使用算法的客戶。本質:分離算法,選擇實現 面向對象設計原則: 封裝變化 多用組合
 android中view手勢滑動沖突的解決方法
Android手勢事件的沖突跟點擊事件的分發過程息息相關,由三個重要的方法來共同完成,分別是:dispatchTouchEvent、onInterceptTouchEve