編輯:關於Android編程
本文實例講述了Android編程設置TextView顏色setTextColor用法。分享給大家供大家參考,具體如下:
android中設置TextView的顏色有方法setTextColor,這個方法被重載了,可以傳入兩種參數。
public void setTextColor(int color) {
 mTextColor = ColorStateList.valueOf(color);
 updateTextColors();
}
public void setTextColor(ColorStateList colors) {
 if (colors == null) {
  throw new NullPointerException();
 }
 mTextColor = colors;
 updateTextColors();
}
下邊就分別寫出怎麼使用這兩個方法設置TextView的顏色:
TextView tv = new TextView(this);
tv.setText("Test set TextView's color.");
//方案一:代碼中通過argb值的方式
tv.setTextColor(Color.rgb(255, 255, 255));
這種方法也就是傳入int color值,這個int不是R文件中自動分配的int值,所以要注意。這是Color類中的靜態方法構造出來的顏色int值。
Resources resource = (Resources) getBaseContext().getResources();
ColorStateList csl = (ColorStateList) resource.getColorStateList(R.color.my_color);
if (csl != null) {
 tv.setTextColor(csl);
}
這種方法是通過ColorStateList得到xml中的配置的顏色的。好多需要xml中配置的都要類似這樣的映射xml文件。
還有種方法:
XmlResourceParser xrp = getResources().getXml(R.color.my_color);
try {
 ColorStateList csl = ColorStateList.createFromXml(getResources(), xrp);
 tv.setTextColor(csl);
} catch (Exception e) {
}
全部代碼:
package com.txlong;
import android.app.Activity;
import android.graphics.Color;
import android.os.Bundle;
import android.widget.TextView;
public class ListViewDemoActivity extends Activity {
 // private ListView listView;
 /** Called when the activity is first created. */
 @Override
 public void onCreate(Bundle savedInstanceState) {
  super.onCreate(savedInstanceState);
  TextView tv = new TextView(this);
  tv.setText("Test set TextView's color.");
  //方案一:通過ARGB值的方式
  /**
   * set the TextView color as the 0~255's ARGB,These component values
   * should be [0..255], but there is no range check performed, so if they
   * are out of range, the returned color is undefined
   */
//  tv.setTextColor(Color.rgb(255, 255, 255));
  /**
   * set the TextView color as the #RRGGBB #AARRGGBB 'red', 'blue',
   * 'green', 'black', 'white', 'gray', 'cyan', 'magenta', 'yellow',
   * 'lightgray', 'darkgray'
   */
  tv.setTextColor(Color.parseColor("#FFFFFF"));
  /** 原來不知道有上邊的方法,就用這個笨笨方法了 */
//  String StrColor = null;
//  StrColor = "FFFFFFFF";
//  int length = StrColor.length();
//  if (length == 6) {
//   tv.setTextColor(Color.rgb(
//     Integer.valueOf(StrColor.substring(0, 2), 16),
//     Integer.valueOf(StrColor.substring(2, 4), 16),
//     Integer.valueOf(StrColor.substring(4, 6), 16)));
//  } else if (length == 8) {
//   tv.setTextColor(Color.argb(
//     Integer.valueOf(StrColor.substring(0, 2), 16),
//     Integer.valueOf(StrColor.substring(2, 4), 16),
//     Integer.valueOf(StrColor.substring(4, 6), 16),
//     Integer.valueOf(StrColor.substring(6, 8), 16)));
//  }
  //方案二:通過資源引用
//  tv.setTextColor(getResources().getColor(R.color.my_color));
  //方案三:通過資源文件寫在String.xml中
//  Resources resource = (Resources) getBaseContext().getResources();
//  ColorStateList csl = (ColorStateList) resource.getColorStateList(R.color.my_color);
//  if (csl != null) {
//   tv.setTextColor(csl);
//  }
  //方案四:通過xml文件,如/res/text_color.xml
//  XmlPullParser xrp = getResources().getXml(R.color.text_color);
//  try {
//   ColorStateList csl = ColorStateList.createFromXml(getResources(), xrp);
//   tv.setTextColor(csl);
//  } catch (Exception e) {
//  }
  // listView = new ListView(this);
  //
  // Cursor cursor = getContentResolver().query(
  // Uri.parse("content://contacts/people"), null, null, null, null);
  //
  // startManagingCursor(cursor);
  //
  // ListAdapter listAdapter = new SimpleCursorAdapter(this,
  // android.R.layout.simple_expandable_list_item_2, cursor,
  // new String[] { "name", "name" }, new int[] {
  // android.R.id.text1, android.R.id.text2 });
  //
  // listView.setAdapter(listAdapter);
  // setContentView(listView);
  setContentView(tv);
 }
}
String.xml文件為:
<?xml version="1.0" encoding="utf-8"?>
<resources>
 <string name="hello">Hello World, ListViewDemoActivity!</string>
 <string name="app_name">ListViewDemo</string>
 <color name="my_color">#FFFFFF</color>
</resources>
/res/color/text_color.xml
<?xml version="1.0" encoding="utf-8"?>
<selector xmlns:android="http://schemas.android.com/apk/res/android">
  <item android:state_pressed="true" android:color="#FF111111"/>
  <!-- pressed -->
  <item android:state_focused="true" android:color="#FF222222"/>
  <!-- focused -->
  <item android:state_selected="true" android:color="#FF333333"/>
  <!-- selected -->
  <item android:state_active="true" android:color="#FF444444"/>
  <!-- active -->
  <item android:state_checkable="true" android:color="#FF555555"/>
  <!-- checkable -->
  <item android:state_checked="true" android:color="#FF666666"/>
  <!-- checked -->
  <item android:state_enabled="true" android:color="#FF777777"/>
  <!-- enabled -->
  <item android:state_window_focused="true" android:color="#FF888888"/>
  <!-- window_focused -->
</selector>
希望本文所述對大家Android程序設計有所幫助。
 AndroidHttpClient詳解及調用示例
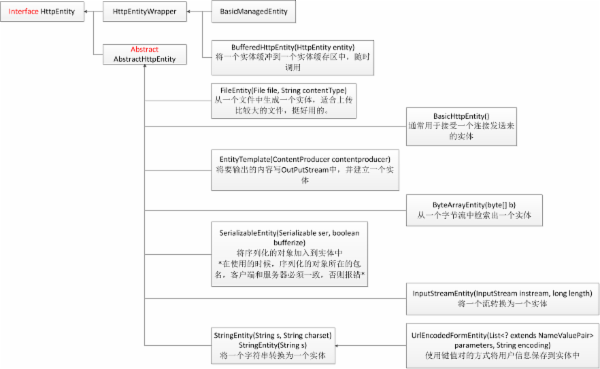
下面給大家展示了AndroidHttpClient結構:public final classAndroidHttpClientextends Objectimplemen
 詳解Android/IOS平台下抓包工具使用以及如何模仿一個app
抓包(Packet Capture),實際上就是對網絡請求(包括發送與接收)的數據包進行截獲、重發、編輯、轉存等操作,在Android下,也經常被用來進行數據截取等。學會
 ConstraintLayout
android studio升級到stable 2.2之後,發現還有了個ConstraintLayout。看名字就是約束布局,用各種約束來確定widget的展示。該Con
 Android啟動屏實現左右滑動切換查看功能
本文介紹一個app最常見的特性,就是新功能屬性介紹和啟動屏,一般會怎麼實現呢,這不就打算告訴大家了麼。先說邏輯 先判斷是否第一次啟動app,如果是,則進入功能使用導航(