編輯:關於Android編程
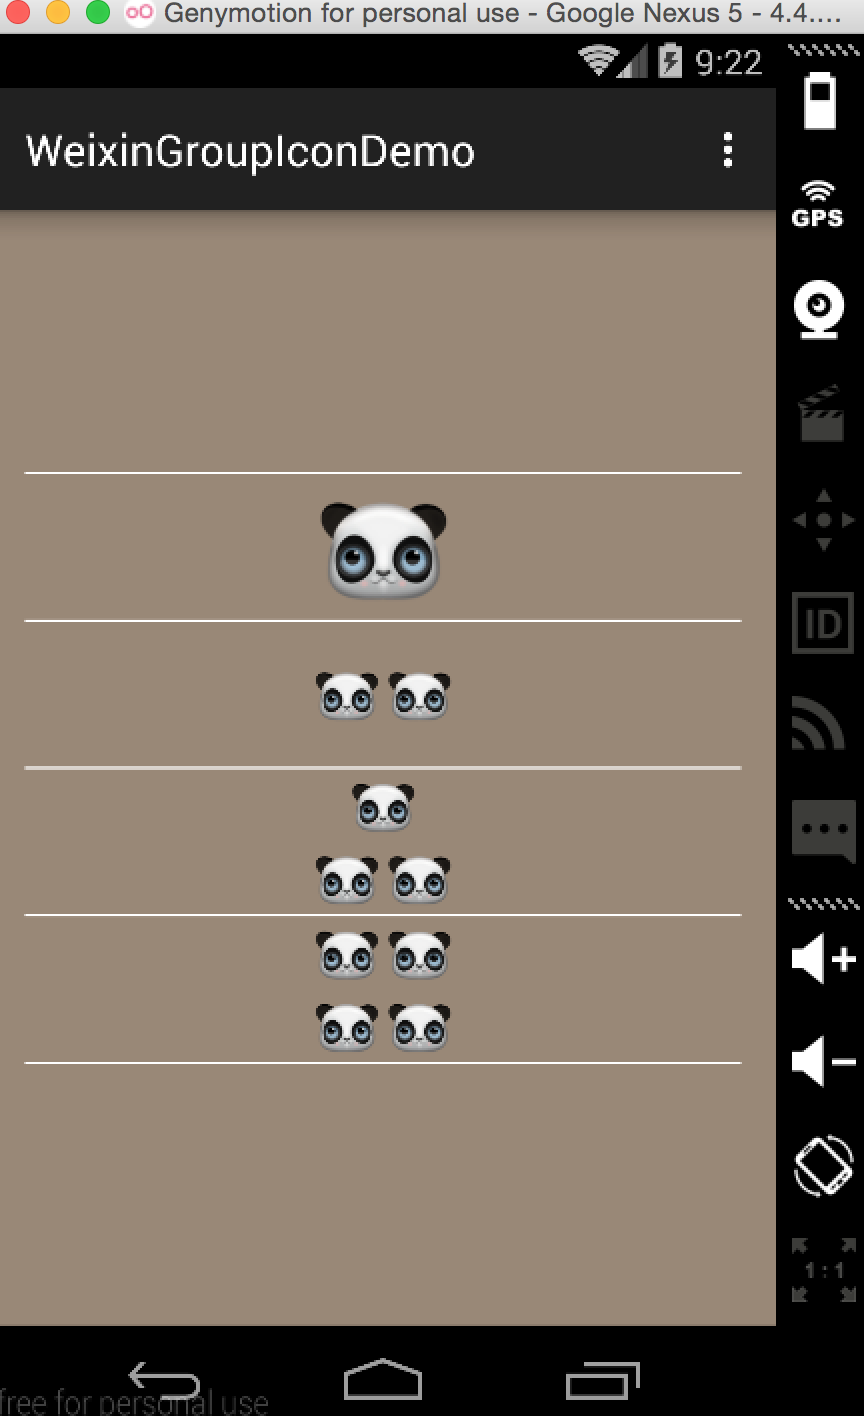
工作中需要實現仿釘釘群頭像的一個功能,就是個人的頭像拼到一起顯示,看了一下市場上的APP好像微信的群聊頭像是組合的,QQ的頭像不是,別的好像也沒有了。
給大家分享一下怎麼實現的吧。首先我們先看一下效果圖:
好了,下面說一下具體怎麼實現的:
實現思路
很簡單,本地圖片需要我們從本地讀取,如果是網絡圖片我們也可以根據URL來獲取bitmap進行組合
具體實現過程
1.布局文件:
<LinearLayout xmlns:android="http://schemas.android.com/apk/res/android"
  xmlns:tools="http://schemas.android.com/tools" android:layout_width="match_parent"
  android:layout_height="match_parent" android:paddingLeft="@dimen/activity_horizontal_margin"
  android:paddingRight="@dimen/activity_horizontal_margin"
  android:paddingTop="@dimen/activity_vertical_margin"
  android:gravity="center"
  android:orientation="vertical"
  android:background="#987"
  android:paddingBottom="@dimen/activity_vertical_margin" tools:context=".MainActivity">
  <TextView
    android:background="#fff"
    android:layout_width="match_parent"
    android:layout_height="1dp"/>
  <ImageView
    android:src="@drawable/j"
    android:id="@+id/iv1"
    android:layout_width="wrap_content"
    android:layout_height="wrap_content" />
  <TextView
    android:background="#fff"
    android:layout_width="match_parent"
    android:layout_height="1dp"/>
  <ImageView
    android:src="@drawable/j"
    android:id="@+id/iv2"
    android:layout_width="wrap_content"
    android:layout_height="wrap_content" />
  <TextView
    android:background="#fff"
    android:layout_width="match_parent"
    android:layout_height="1dp"/>
  <ImageView
    android:src="@drawable/j"
    android:id="@+id/iv3"
    android:layout_width="wrap_content"
    android:layout_height="wrap_content" />
  <TextView
    android:background="#fff"
    android:layout_width="match_parent"
    android:layout_height="1dp"/>
  <ImageView
    android:src="@drawable/j"
    android:id="@+id/iv4"
    android:layout_width="wrap_content"
    android:layout_height="wrap_content" />
  <TextView
    android:background="#fff"
    android:layout_width="match_parent"
    android:layout_height="1dp"/>

</LinearLayout>
四個ImageView控件,用來顯示圖片不說了
2.獲取Bitmap,設定圖片的屬性
/**
   * 獲取圖片數組實體
   * @param count
   * @return
   */
  private List<BitmapBean> getBitmapEntitys(int count) {
    List<BitmapBean> mList = new ArrayList<>();
    String value = PropertiesUtil.readData(this, String.valueOf(count),
        R.raw.data);
    String[] arr1 = value.split(";");
    int length = arr1.length;
    for (int i = 0; i < length; i++) {
      String content = arr1[i];
      String[] arr2 = content.split(",");
      BitmapBean entity = null;
      for (int j = 0; j < arr2.length; j++) {
        entity = new BitmapBean();
        entity.setX(Float.valueOf(arr2[0]));
        entity.setY(Float.valueOf(arr2[1]));
        entity.setWidth(Float.valueOf(arr2[2]));
        entity.setHeight(Float.valueOf(arr2[3]));
      }
      mList.add(entity);
    }
    return mList;
  }
3.創建壓縮圖片,這裡我們用到了ThumbnailUtils中的extractThumbnail()方法,參數為bitmap,width,height
/**
   * 初始化數據
   */
  private void initData(){
    /*獲取四個圖片數組*/
    bitmapBeans1 = getBitmapEntitys(1);
    bitmapBeans2 = getBitmapEntitys(2);
    bitmapBeans3 = getBitmapEntitys(3);
    bitmapBeans4 = getBitmapEntitys(4);
    /*bitmap縮略圖*/
    Bitmap[] bitmaps1 = {
        ThumbnailUtils.extractThumbnail(BitmapUtils.getScaleBitmap(
        getResources(), R.drawable.j), (int) bitmapBeans1
        .get(0).getWidth(), (int) bitmapBeans1.get(0).getWidth())};
    Bitmap[] bitmaps2 = {
        ThumbnailUtils.extractThumbnail(BitmapUtils.getScaleBitmap(
        getResources(), R.drawable.j), (int) bitmapBeans2
        .get(0).getWidth(), (int) bitmapBeans2.get(0).getWidth()),
        ThumbnailUtils.extractThumbnail(BitmapUtils.getScaleBitmap(
        getResources(), R.drawable.j), (int) bitmapBeans2
        .get(0).getWidth(), (int) bitmapBeans2.get(0).getWidth())};
    Bitmap[] bitmaps3 = {
        ThumbnailUtils.extractThumbnail(BitmapUtils.getScaleBitmap(
        getResources(), R.drawable.j), (int) bitmapBeans3
        .get(0).getWidth(), (int) bitmapBeans3.get(0).getWidth()),
        ThumbnailUtils.extractThumbnail(BitmapUtils.getScaleBitmap(
        getResources(), R.drawable.j), (int) bitmapBeans3
        .get(0).getWidth(), (int) bitmapBeans3.get(0).getWidth()),
        ThumbnailUtils.extractThumbnail(BitmapUtils.getScaleBitmap(
            getResources(), R.drawable.j), (int) bitmapBeans3
            .get(0).getWidth(), (int) bitmapBeans3.get(0).getWidth())};
    Bitmap[] bitmaps4 = {
        ThumbnailUtils.extractThumbnail(BitmapUtils.getScaleBitmap(
            getResources(), R.drawable.j), (int) bitmapBeans4
            .get(0).getWidth(), (int) bitmapBeans4.get(0).getWidth()),
        ThumbnailUtils.extractThumbnail(BitmapUtils.getScaleBitmap(
            getResources(), R.drawable.j), (int) bitmapBeans4
            .get(0).getWidth(), (int) bitmapBeans4.get(0).getWidth()),
        ThumbnailUtils.extractThumbnail(BitmapUtils.getScaleBitmap(
            getResources(), R.drawable.j), (int) bitmapBeans4
            .get(0).getWidth(), (int) bitmapBeans4.get(0).getWidth()),
        ThumbnailUtils.extractThumbnail(BitmapUtils.getScaleBitmap(
            getResources(), R.drawable.j), (int) bitmapBeans4
            .get(0).getWidth(), (int) bitmapBeans4.get(0).getWidth())};
 }
4.組合bitmap圖片(也就是將我們的圖片用Canvas畫到一起)
/**
   * 獲得合在一起的bitmap
   * @param mEntityList
   * @param bitmaps
   * @return
   */
  public static Bitmap getCombineBitmaps(List<BitmapBean> mEntityList,
                      Bitmap... bitmaps) {
    Bitmap newBitmap = Bitmap.createBitmap(200, 200, Bitmap.Config.ARGB_8888);
    for (int i = 0; i < mEntityList.size(); i++) {
      bitmaps[i] = GetRoundedCornerBitmap(bitmaps[i]);
      newBitmap = mixtureBitmap(newBitmap, bitmaps[i], new PointF(
          mEntityList.get(i).getX(), mEntityList.get(i).getY()));
    }
    return newBitmap;
  }
這裡我為了好看將圖片設置成圓形的了
/**
   * 獲取圓形的bitmap
   * @param bitmap
   * @return
   */
  public static Bitmap GetRoundedCornerBitmap(Bitmap bitmap) {
    try {
      Bitmap output = Bitmap.createBitmap(bitmap.getWidth(),
          bitmap.getHeight(), Bitmap.Config.ARGB_8888);
      Canvas canvas = new Canvas(output);
      final Paint paint = new Paint();
      final Rect rect = new Rect(0, 0, bitmap.getWidth(),
          bitmap.getHeight());
      final RectF rectF = new RectF(new Rect(0, 0, bitmap.getWidth(),
          bitmap.getHeight()));
      final float roundPx = 50;
      paint.setAntiAlias(true);
      canvas.drawARGB(0, 0, 0, 0);
      paint.setColor(Color.BLACK);
      canvas.drawRoundRect(rectF, roundPx, roundPx, paint);
      paint.setXfermode(new PorterDuffXfermode(PorterDuff.Mode.SRC_IN));

      final Rect src = new Rect(0, 0, bitmap.getWidth(),
          bitmap.getHeight());

      canvas.drawBitmap(bitmap, src, rect, paint);
      return output;
    } catch (Exception e) {
      return bitmap;
    }
  }
最後開畫
 /**
   * 畫bitmap
   * @param first
   * @param second
   * @param fromPoint
   * @return
   */
  public static Bitmap mixtureBitmap(Bitmap first, Bitmap second,
                    PointF fromPoint) {
    if (first == null || second == null || fromPoint == null) {
      return null;
    }
    Bitmap newBitmap = Bitmap.createBitmap(first.getWidth(),
        first.getHeight(), Bitmap.Config.ARGB_8888);
    Canvas cv = new Canvas(newBitmap);
    cv.drawBitmap(first, 0, 0, null);
    cv.drawBitmap(second, fromPoint.x, fromPoint.y, null);
    cv.save(Canvas.ALL_SAVE_FLAG); //保存全部圖層
    cv.restore();
    return newBitmap;
  }
這樣就簡單的實現了微信群聊頭像的效果,當然需要對圖片做一些處理,已防止OOM,你也可以將它自定義成一個View組件,小編有時間的話會實現這個的。
最後再給大家看一下小編項目上實現的效果吧,沒啥區別,只不多數據源不一樣了,是從網絡上獲取的。
這裡寫圖片描述:

以上就是本文的全部內容,希望對大家的學習有所幫助。
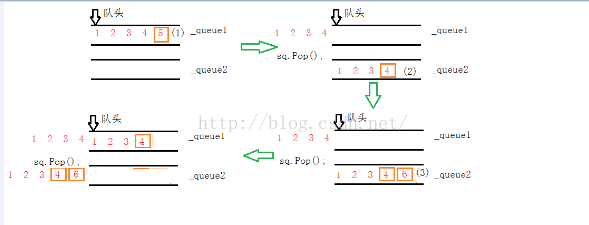 棧的應用之兩個隊列實現一個棧
兩個隊列實現一個棧在之前我曾經實現了兩個棧實現一個隊列的面試題,其實思路也很簡單就是充分利用棧的特性-後進先出,將輸入的數據先輸入棧1,將該棧1再輸出到棧2,最後將棧2的
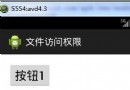 Android 訪問文件權限的四種模式介紹
Linux文件的訪問權限* 在Android中,每一個應用是一個獨立的用戶* drwxrwxrwx* 第1位:d表示文件夾,-表示文件* 第2-4位:rwx,表示這個文件
 Android產品研發(二十四)--)內存洩露場景與檢測
上一篇文章中本文我們講解了一個Android產品研發中可能會碰到的一個問題:如何在App中保存靜態秘鑰以及保證其安全性。許多的移動app需要在app端保存一些靜態字符串常
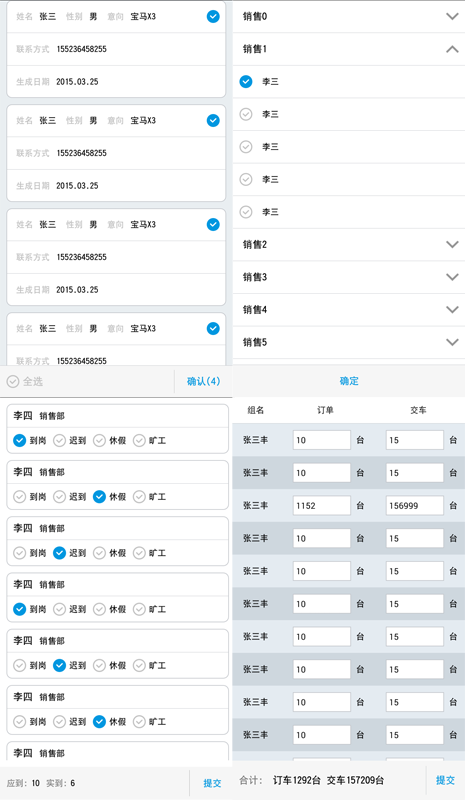 android listview ExpandableListView實現多選,單選,全選,edittext實現批量輸入
最近在項目開發中,由於項目的需求要實現一些列表的單選,多選,全選,批量輸入之類的功能,其實功能的實現倒不是很復雜,需求中也沒有涉及到復雜的動畫什麼之類,主要是解決列表數據