-2、從資源中獲得bitmap
Resources res=getResources();
Bitmap bmp=BitmapFactory.decodeResource(res, R.drawable.pic);
或者
Bitmap bmp = ((BitmapDrawable)getResources().getDrawable(R.drawable.show)).getBitmap();
/**
* 以最省內存的方式讀取本地資源的圖片
*
* @param context
* @param resId
* @return
*/
public Bitmap readBitMap(int resId) {
BitmapFactory.Options opt = new BitmapFactory.Options();
opt.inPreferredConfig = Bitmap.Config.RGB_565;
opt.inPurgeable = true;
opt.inInputShareable = true;
// 獲取資源圖片
InputStream is = getResources().openRawResource(resId);
return BitmapFactory.decodeStream(is, null, opt);
}
-1、Drawable 轉 Bitmap
public static Bitmap drawableToBitmap(Drawable drawable) {
Bitmap bitmap = Bitmap.createBitmap(drawable.getIntrinsicWidth(),
drawable.getIntrinsicHeight(),
drawable.getOpacity() != PixelFormat.OPAQUE ?
Bitmap.Config.ARGB_8888 : Bitmap.Config.RGB_565);
Canvas canvas = new Canvas(bitmap);
//canvas.setBitmap(bitmap);
drawable.setBounds(0, 0, drawable.getIntrinsicWidth(), drawable.getIntrinsicHeight());
drawable.draw(canvas);
return bitmap;
}
0、讀取一個bitmap
/**
* 節省內存
*
* @Description:
* @param filePath
* @param outWidth
* @param outHeight
* @return
* @see:
* @since:
* @author: zhuanggy
* @date:2013-3-12
*/
public static Bitmap readBitmapAutoSize(String filePath, int outWidth, int outHeight) {
// outWidth和outHeight是目標圖片的最大寬度和高度,用作限制
FileInputStream fs = null;
BufferedInputStream bs = null;
try {
fs = new FileInputStream(filePath);
bs = new BufferedInputStream(fs);
BitmapFactory.Options options = setBitmapOption(filePath, outWidth, outHeight);
return BitmapFactory.decodeStream(bs, null, options);
} catch (Exception e) {
e.printStackTrace();
} finally {
try {
bs.close();
fs.close();
} catch (Exception e) {
e.printStackTrace();
}
}
return null;
}
private static BitmapFactory.Options setBitmapOption(String file, int width, int height) {
BitmapFactory.Options opt = new BitmapFactory.Options();
opt.inJustDecodeBounds = true;
// 設置只是解碼圖片的邊距,此操作目的是度量圖片的實際寬度和高度
BitmapFactory.decodeFile(file, opt);
int outWidth = opt.outWidth; // 獲得圖片的實際高和寬
int outHeight = opt.outHeight;
opt.inDither = false;
opt.inPreferredConfig = Bitmap.Config.RGB_565;
// 設置加載圖片的顏色數為16bit,默認是RGB_8888,表示24bit顏色和透明通道,但一般用不上
opt.inSampleSize = 1;
// 設置縮放比,1表示原比例,2表示原來的四分之一....
// 計算縮放比
if (outWidth != 0 && outHeight != 0 && width != 0 && height != 0) {
int sampleSize = (outWidth / width + outHeight / height) / 2;
opt.inSampleSize = sampleSize;
}
opt.inJustDecodeBounds = false;// 最後把標志復原
return opt;
}
1、透明度處理
/**
* 圖片透明度處理
*
* @param sourceImg
* 原始圖片
* @param number
* 透明度
* @return
*/
public static Bitmap setAlpha(Bitmap sourceImg, int number) {
int[] argb = new int[sourceImg.getWidth() * sourceImg.getHeight()];
sourceImg.getPixels(argb, 0, sourceImg.getWidth(), 0, 0,sourceImg.getWidth(), sourceImg.getHeight());// 獲得圖片的ARGB值
number = number * 255 / 100;
for (int i = 0; i < argb.length; i++) {
argb[i] = (number << 24) | (argb & 0×00FFFFFF);// [/i][i]修改最高2[/i][i]位的值
}
sourceImg = Bitmap.createBitmap(argb, sourceImg.getWidth(), sourceImg.getHeight(), Config.ARGB_8888);
return sourceImg;
}
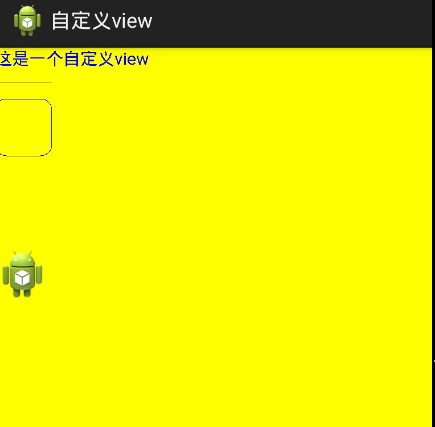
2、獲得圓角bitmap
/**
* 獲得圓角圖片
*
* @Description:
* @param bitmap
* @param roundPx
* @return
* @see:
* @since:
* @author: zhuanggy
* @date:2013-3-14
*/
public static Bitmap getRoundedCornerBitmap(Bitmap bitmap) {
int w = bitmap.getWidth();
int h = bitmap.getHeight();
Bitmap output = Bitmap.createBitmap(w, h, Config.ARGB_8888);
Canvas canvas = new Canvas(output);
final int color = 0xff424242;
final Paint paint = new Paint();
final Rect rect = new Rect(0, 0, w, h);
final RectF rectF = new RectF(rect);
paint.setAntiAlias(true);
canvas.drawARGB(0, 0, 0, 0);
paint.setColor(color);
canvas.drawRoundRect(rectF, 10, 10, paint);// 圓角平滑度為10
paint.setXfermode(new PorterDuffXfermode(Mode.SRC_IN));
canvas.drawBitmap(bitmap, rect, rect, paint);
return output;
}
3、截取 Bitmap 的部分區域
mBitmap = Bitmap.createBitmap(bmp, 100, 100, 120, 120);
4、縮放一個 Bitmap
可以用 Bitmap.createScaledBitmap() 方 法根據給定的 Bitmap 創建 一個新的,縮放後的 Bitmap 。
Bitmap mBitmap = Bitmap.createScaledBitmap(bmp, mScreenWidth, mScreenHeight, true);
其中 mScreenWidth 和 mScreenHeight 是屏幕的寬度和高度,這裡就將 bmp 拉伸到整個屏幕。
每次 createBitmap ,都會分配新的內存,帶來資源的 消耗,所以用 Bitmap 的 createBitmap 雖然簡單方便,但是不是最優方 法。介紹一個比較好點的方法,不用創建新的 Bitmap ,用 Canvas 在畫的時候直接縮放或者剪切
canvas.drawBitmap(mBitmap, null, new Rect(0, 0, 200, 200), null);
這裡的 Rect 對象表示一個矩形區域,從 (0,0) 到 (200,200) 之間的矩形區域。這段代碼將把 mBitmap 縮放並繪制到屏幕上的(0,0) 到 (200,200) 之間的區域。這個方法還有第二個參數我給的是 null ,其實這個參數也是個 Rect 對象,表示源 Rect 。把圖片的某個區域拿出來畫到屏幕的指定區域,
canvas.drawBitmap(mBitmap, new Rect(100, 100, 300, 300), new Rect(100, 100, 200, 200), null);
這裡將 mBitmap 的 (100,100) 到 (300,300) 區域拿出來,自動縮放並畫到屏幕的 (100,100) 到 (200,200) 區域。
5、圖片平均分割方法,將大圖平均分割為N行N列,方便用戶使用
/***
* 圖片分割
*
* @param g
* :畫布
* @param paint
* :畫筆
* @param imgBit
* :圖片
* @param x
* :X軸起點坐標
* @param y
* :Y軸起點坐標
* @param w
* :單一圖片的寬度
* @param h
* :單一圖片的高度
* @param line
* :第幾列
* @param row
* :第幾行
*/
public final void cuteImage(Canvas g, Paint paint, Bitmap imgBit, int x,
int y, int w, int h, int line, int row) {
g.clipRect(x, y, x + w, h + y);
g.drawBitmap(imgBit, x – line * w, y – row * h, paint);
g.restore();
}
6、 圖片縮放,對當前圖片進行縮放處理
public Bitmap zoomImage(Bitmap bgimage, int newWidth, int newHeight) {
// 獲取這個圖片的寬和高
int width = bgimage.getWidth();
int height = bgimage.getHeight();
// 創建操作圖片用的matrix對象
Matrix matrix = new Matrix();
// 計算縮放率,新尺寸除原始尺寸
float scaleWidth = ((float) newWidth) / width;
float scaleHeight = ((float) newHeight) / height;
// 縮放圖片動作
matrix.postScale(scaleWidth, scaleHeight);
Bitmap bitmap = Bitmap.createBitmap(bgimage, 0, 0, width, height,
matrix, true);
return bitmap;
}
7、繪制帶有邊框的文字,一般在游戲中起文字的美化作用
/***
* 繪制帶有邊框的文字
*
* @param strMsg
* :繪制內容
* @param g
* :畫布
* @param paint
* :畫筆
* @param setx
* ::X軸起始坐標
* @param sety
* :Y軸的起始坐標
* @param fg
* :前景色
* @param bg
* :背景色
*/
public void drawText(String strMsg, Canvas g, Paint paint, int setx,
int sety, int fg, int bg) {
paint.setColor(bg);
g.drawText(strMsg, setx + 1, sety, paint);
g.drawText(strMsg, setx, sety – 1, paint);
g.drawText(strMsg, setx, sety + 1, paint);
g.drawText(strMsg, setx – 1, sety, paint);
paint.setColor(fg);
g.drawText(strMsg, setx, sety, paint);
g.restore();
}
8、圖片翻轉
Resources res = this.getContext().getResources();
img = BitmapFactory.decodeResource(res, R.drawable.slogo);
Matrix matrix = new Matrix();
matrix.postRotate(90);
/*翻轉90度*/
int width = img.getWidth();
int height = img.getHeight();
r_img = Bitmap.createBitmap(img, 0, 0, width, height, matrix, true);
9、帶倒影的效果
//獲得帶倒影的圖片方法
public static Bitmap createReflectionImageWithOrigin(Bitmap bitmap){
final int reflectionGap = 4;
int width = bitmap.getWidth();
int height = bitmap.getHeight();
Matrix matrix = new Matrix();
matrix.preScale(1, -1);
Bitmap reflectionImage = Bitmap.createBitmap(bitmap,0, height/2, width, height/2, matrix, false);
Bitmap bitmapWithReflection = Bitmap.createBitmap(width, (height + height/2), Config.ARGB_8888);
Canvas canvas = new Canvas(bitmapWithReflection);
canvas.drawBitmap(bitmap, 0, 0, null);
Paint deafalutPaint = new Paint();
canvas.drawRect(0, height,width,height + reflectionGap,
deafalutPaint);
canvas.drawBitmap(reflectionImage, 0, height + reflectionGap, null);
Paint paint = new Paint();
LinearGradient shader = new LinearGradient(0,
bitmap.getHeight(), 0, bitmapWithReflection.getHeight() + reflectionGap, 0x70ffffff, 0x00ffffff, TileMode.CLAMP);
paint.setShader(shader);
// Set the Transfer mode to be porter duff and destination in
paint.setXfermode(new PorterDuffXfermode(Mode.DST_IN));
// Draw a rectangle using the paint with our linear gradient
canvas.drawRect(0, height, width, bitmapWithReflection.getHeight() + reflectionGap, paint);
return bitmapWithReflection;
}
另外,decodeStream直接拿的圖片來讀取字節碼了, 不會根據機器的各種分辨率來自動適應, 使用了decodeStream之後,需要在hdpi和mdpi,ldpi中配置相應的圖片資源, 否則在不同分辨率機器上都是同樣大小(像素點數量),顯示出來的大小就不對了。 可參考下面的代碼
BitmapFactory.Options opts = new BitmapFactory.Options();
//設置圖片的DPI為當前手機的屏幕dpi
opts.inTargetDensity = ctx.getResources().getDisplayMetrics().densityDpi;
opts.inScaled = true;
另外,圖片的bitmap對象為大對象,不用了要注意主動回收,
if(!bmp.isRecycle() ){
bmp.recycle() //回收圖片所占的內存
system.gc() //提醒系統及時回收
}
【我的應用】:
/**
* 讀取本地圖片的bitmap
*
* @Description:
* @param filePath
* @param outWidth
* @param outHeight
* @return
* @see:
* @since:
* @author: zhuanggy
* @date:2013-3-12
*/
public static Bitmap readBitmapAutoSize(String filePath, int outWidth, int outHeight) {
// outWidth和outHeight是目標圖片的最大寬度和高度,用作限制
FileInputStream fs = null;
BufferedInputStream bs = null;
try {
fs = new FileInputStream(filePath);
bs = new BufferedInputStream(fs);
BitmapFactory.Options options = setBitmapOption(filePath, outWidth, outHeight);
return BitmapFactory.decodeStream(bs, null, options);
} catch (Exception e) {
e.printStackTrace();
} finally {
try {
bs.close();
fs.close();
} catch (Exception e) {
e.printStackTrace();
}
}
return null;
}
private static BitmapFactory.Options setBitmapOption(String file, int width, int height) {
BitmapFactory.Options opt = new BitmapFactory.Options();
opt.inJustDecodeBounds = true;
// 設置只是解碼圖片的邊距,此操作目的是度量圖片的實際寬度和高度
BitmapFactory.decodeFile(file, opt);
int outWidth = opt.outWidth; // 獲得圖片的實際高和寬
int outHeight = opt.outHeight;
GoOutDebug.e(TAG, "outWidth=" + outWidth + " outHeight=" + outHeight);
opt.inDither = false;
opt.inPreferredConfig = Bitmap.Config.RGB_565;
// 設置加載圖片的顏色數為16bit,默認是RGB_8888,表示24bit顏色和透明通道,但一般用不上
opt.inSampleSize = 1;
// 設置縮放比,1表示原比例,2表示原來的四分之一....
if (outWidth != 0 && outHeight != 0 && width != 0 && height != 0) {
int sampleSize = (outWidth / width + outHeight / height) / 2;
opt.inSampleSize = sampleSize;
}
opt.inJustDecodeBounds = false;// 最後把標志復原
return opt;
}
/**
* 獲得圓角圖片
*
* @Description:
* @param bitmap
* @param roundPx
* @return
* @see:
* @since:
* @author: zhuanggy
* @date:2013-3-14
*/
public static Bitmap getRoundedCornerBitmap(Bitmap bitmap, int width, int height) {
int w = bitmap.getWidth();
int h = bitmap.getHeight();
// 若讀取圖片的寬度或高度小於ImageView的寬度或高度,則對圖片進行放大
if (w < width || h < height) {
Matrix matrix = new Matrix();
matrix.postScale((float) width / w, (float) height / h); // 長和寬放大縮小的比例
bitmap = Bitmap.createBitmap(bitmap, 0, 0, bitmap.getWidth(), bitmap.getHeight(), matrix, true);
}
// GoOutDebug.e(TAG, "w = " + output.getWidth() + " h = " + output.getHeight());
// 創建一個新的bitmap,然後在bitmap裡創建一個圓角畫布,將之前的圖片畫在裡面。
Bitmap output = Bitmap.createBitmap(width, height, Config.ARGB_8888);
Canvas canvas = new Canvas(output);
final int color = 0xff424242;
final Paint paint = new Paint();
final Rect rect = new Rect(0, 0, width, height);
final RectF rectF = new RectF(rect);
paint.setAntiAlias(true);
canvas.drawARGB(0, 0, 0, 0);
paint.setColor(color);
canvas.drawRoundRect(rectF, 10, 10, paint);// 圓角平滑度
paint.setXfermode(new PorterDuffXfermode(Mode.SRC_IN));
canvas.drawBitmap(bitmap, rect, rect, paint);
return output;
}
 Android Studio使用教程(四):Gradle基礎
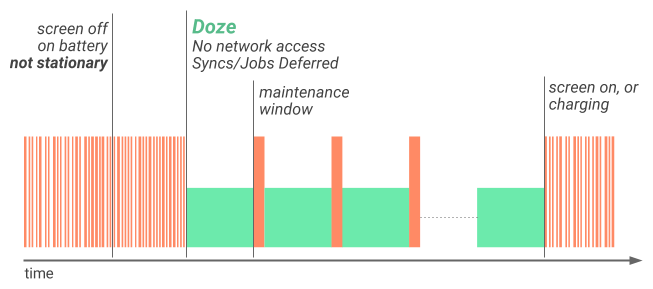 Android N 對Doze(打盹)模式優化
 Android popupwindow簡單使用方法介紹
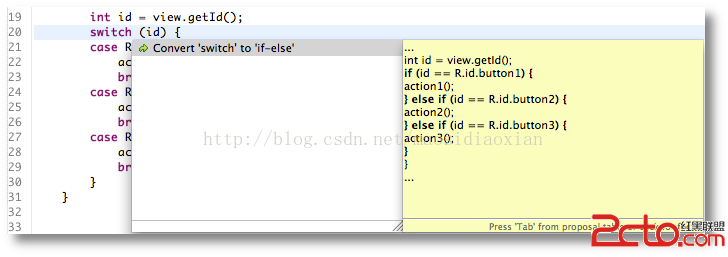 android官方技術文檔翻譯——Case 標簽中的常量字段