編輯:關於Android編程
表格布局的標簽是TableLayout,TableLayout繼承了LinearLayout。所以它依然是一個線性布局。
前言:
1、TableLayout簡介
2、TableLayout行列數的確定
3、TableLayout可設置的屬性詳解
4、一個包含4個TableLayout布局的實例及效果圖
<?xml version="1.0" encoding="utf-8"?>
<LinearLayout xmlns:android="http://schemas.android.com/apk/res/android"
android:orientation="vertical"
android:layout_width="fill_parent"
android:layout_height="fill_parent"
android:padding="3dip"
>
<!-- 第1個TableLayout,用於描述表中的列屬性。第0列可伸展,第1列可收縮 ,第2列被隱藏-->
<TextView
android:text="數字鍵盤"
android:layout_height="wrap_content"
android:layout_width="wrap_content"
android:textSize="20sp"
android:background="#7f00ffff"/>
<TableLayout
android:id="@+id/table2"
android:layout_width="fill_parent"
android:layout_height="wrap_content"
android:padding="1dip">
<TableRow>
<Button android:text="0"/>
<Button android:text="1"/>
<Button android:text="2"/>
<Button android:text="+"/>
<Button android:text="="/>
</TableRow>
<TableRow>
<Button android:text="3"/>
<Button android:text="4"/>
<Button android:text="5"/>
<Button android:text="-"/>
<Button android:text="*"/>
</TableRow>
<TableRow>
<Button android:text="6"/>
<Button android:text="7"/>
<Button android:text="8"/>
<Button android:text="9"/>
<Button android:text="/"/>
</TableRow>
</TableLayout>
</LinearLayout>
一、Tablelayout簡介
Tablelayout類以行和列的形式對控件進行管理,每一行為一個TableRow對象,或一個View控件。
當為TableRow對象時,可在TableRow下添加子控件,默認情況下,每個子控件占據一列。
當為View時,該View將獨占一行。
二、TableLayout行列數的確定
TableLayout的行數由開發人員直接指定,即有多少個TableRow對象(或View控件),就有多少行。
TableLayout的列數等於含有最多子控件的TableRow的列數。如第一TableRow含2個子控件,第二個TableRow含3個,第三個TableRow含4個,那麼該TableLayout的列數為4.
三、TableLayout可設置的屬性詳解
TableLayout可設置的屬性包括全局屬性及單元格屬性。
1、全局屬性也即列屬性,有以下3個參數:
android:stretchColumns 設置可伸展的列。該列可以向行方向伸展,最多可占據一整行。
android:shrinkColumns 設置可收縮的列。當該列子控件的內容太多,已經擠滿所在行,那麼該子控件的內容將往列方向顯示。
android:collapseColumns 設置要隱藏的列。
示例:
android:stretchColumns="0" 第0列可伸展
android:shrinkColumns="1,2" 第1,2列皆可收縮
android:collapseColumns="*" 隱藏所有行
說明:列可以同時具備stretchColumns及shrinkColumns屬性,若此,那麼當該列的內容N多時,將“多行”顯示其內容。(這裡不是真正的多行,而是系統根據需要自動調節該行的layout_height)
2、單元格屬性,有以下2個參數:
android:layout_column 指定該單元格在第幾列顯示
android:layout_span 指定該單元格占據的列數(未指定時,為1)
示例:
android:layout_column="1" 該控件顯示在第1列
android:layout_span="2" 該控件占據2列
說明:一個控件也可以同時具備這兩個特性。
<?xml version="1.0" encoding="utf-8"?>
<LinearLayout xmlns:android="http://schemas.android.com/apk/res/android"
android:orientation="vertical"
android:layout_width="fill_parent"
android:layout_height="fill_parent"
android:padding="3dip"
>
<!-- 第1個TableLayout,用於描述表中的列屬性。第0列可伸展,第1列可收縮 ,第2列被隱藏-->
<TextView
android:text="表1:全局設置:列屬性設置"
android:layout_height="wrap_content"
android:layout_width="wrap_content"
android:textSize="15sp"
android:background="#7f00ffff"/>
<TableLayout
android:id="@+id/table1"
android:layout_width="fill_parent"
android:layout_height="wrap_content"
android:stretchColumns="0"
android:shrinkColumns="1"
android:collapseColumns="2"
android:padding="3dip">
<TableRow>
<Button android:text="該列可伸展"/>
<Button android:text="該列可收縮"/>
<Button android:text="我被隱藏了"/>
</TableRow>
<TableRow>
<TextView android:text="我向行方向伸展,我可以很長 "/>
<TextView android:text="我向列方向收縮,我可以很深"/>
</TableRow>
</TableLayout>
<!-- 第2個TableLayout,用於描述表中單元格的屬性,包括:android:layout_column 及android:layout_span-->
<TextView
android:text="表2:單元格設置:指定單元格屬性設置"
android:layout_height="wrap_content"
android:layout_width="wrap_content"
android:textSize="15sp"
android:background="#7f00ffff"/>
<TableLayout
android:id="@+id/table2"
android:layout_width="fill_parent"
android:layout_height="wrap_content"
android:padding="3dip">
<TableRow>
<Button android:text="第0列"/>
<Button android:text="第1列"/>
<Button android:text="第2列"/>
</TableRow>
<TableRow>
<TextView android:text="我被指定在第2列" android:layout_column="2"/>
</TableRow>
<TableRow>
<TextView
android:text="我跨1到2列,不信你看!"
android:layout_column="1"
android:layout_span="2"
/>
</TableRow>
</TableLayout>
<!-- 第3個TableLayout,使用可伸展特性布局-->
<TextView
android:text="表3:應用一,非均勻布局"
android:layout_height="wrap_content"
android:layout_width="wrap_content"
android:textSize="15sp"
android:background="#7f00ffff"/>
<TableLayout
android:id="@+id/table3"
android:layout_width="fill_parent"
android:layout_height="wrap_content"
android:stretchColumns="*"
android:padding="3dip"
>
<TableRow>
<Button android:text="一" ></Button>
<Button android:text="兩字"></Button>
<Button android:text="三個字" ></Button>
</TableRow>
</TableLayout>
<!-- 第4個TableLayout,使用可伸展特性,並指定每個控件寬度一致,如1dip-->
<TextView
android:text="表4:應用二,均勻布局"
android:layout_height="wrap_content"
android:layout_width="wrap_content"
android:textSize="15sp"
android:background="#7f00ffff"/>
<TableLayout
android:id="@+id/table4"
android:layout_width="fill_parent"
android:layout_height="wrap_content"
android:stretchColumns="*"
android:padding="3dip"
>
<TableRow>
<Button android:text="一" android:layout_width="1dip"></Button>
<Button android:text="兩字" android:layout_width="1dip"></Button>
<Button android:text="三個字" android:layout_width="1dip"></Button>
</TableRow>
</TableLayout>
<TextView
android:text="表5:應用三,均勻布局"
android:layout_height="wrap_content"
android:layout_width="wrap_content"
android:textSize="15sp"
android:background="#7f00ffff"/>
<TableLayout
android:id="@+id/table5"
android:layout_width="fill_parent"
android:layout_height="wrap_content"
android:stretchColumns="*"
android:padding="6dip"
>
<TableRow>
<Button android:text="一" android:layout_width="1dip"></Button>
<Button android:text="兩字" android:layout_width="1dip"></Button>
<Button android:text="三個字" android:layout_width="1dip"></Button>
<Button android:text="四個個字" android:layout_width="1dip"></Button>
<Button

android:layout_width="1dip"
android:layout_height="wrap_content"
android:text="New Button"
android:id="@+id/button" />
</TableRow>
</TableLayout>
</LinearLayout>
以上內容是小逼給大家介紹的Android TableLayout表格布局,希望對大家有所幫助!
 SEAndroid 介紹及其基本實現原理
1. 什麼是SEAndroid SEAndroid(Security-Enhanced Android)是有美國國家安全局(NSA)開發的開源安全項目,是在
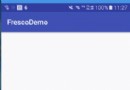 Android使用開源框架Fresco處理圖片
關於Fresco的優點大家自行谷歌吧,它太強大太優秀了,我這一片小博文容納不下啊羨慕,今天主要給大家簡單介紹下Fresco的使用以及一些屬性的介紹。 Fresc
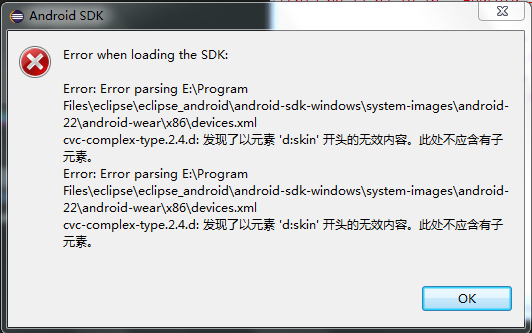 Eclipse打開時“發現了以元素d:skin”開頭的無效內容。此處不應含有子元素的解決方法
本文實例講述了Android使用Eclipse 打開時“發現了以元素d:skin”開頭的無效內容。此處不應含有子元素的解決方法。分享給大家供大家參考,具體如下:今天打開
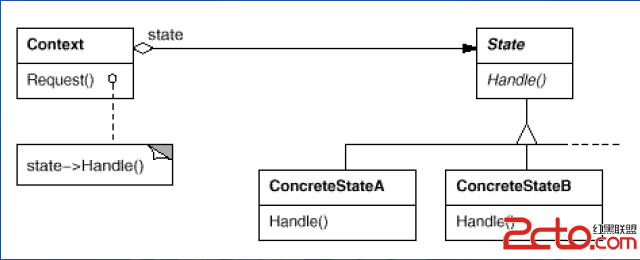 Android中的設計模式-狀態模式
狀態模式說明“狀態模式允許一個對象在其內部狀態改變的時候改變其行為。這個對象看上去就像是改變了它的類一樣。” –《JAVA與模式》管理