編輯:關於Android編程
在Android3.0上開始引入了一個新概念叫Fragment。它有自己的布局文件,可以作為組件排布,也可以相互組合去實現不同的布局顯示。使用Fragment可以重復利用代碼,並且可以滿足不同設備尺寸的需求。Fragment不能單獨存在,只能存在於Activity中,而一個Activity可以擁有多個Fragment。很重要的一點是,Fragment可以和Activity中的其它組件一起使用,無需重寫所有Activity的接口。所以使用Fragment就可以這樣來完成上例中“主界面—詳細界面”的APP需求。
在手機上是這樣顯示的:

而在平板上是這樣的:
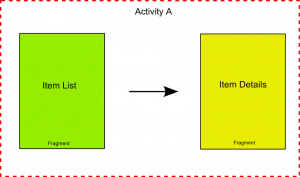
在一個小屏幕的設備上,一個activity通常占據了整個屏幕,同時顯示各種UI視圖組件。Activity實際上就是視圖的容器。然後,當一個activity被顯示在一個大屏幕的設備上,例如平板電腦,總會顯得有些不適應。因為屏幕太大了,activity中的所有UI組件要充滿整個屏幕,這樣一來,視圖的層次結構就很復雜了。一個更好的辦法是使用一種“輕量級”的activity,每個“輕量級”activity包含自己的視圖,互不干擾。在運行期間,根據屏幕的方向和尺寸,一個activity可以包含一個或多個“輕量級”activity。在Android3.0以上的版本,這種“輕量級”的activity叫做Fragment.
怎麼創建一個Fragment
現在我們了解了Fragment的生命周期了,接著我們就需要知道怎麼創建一個Fragment並綁定到Activity中,第一件要做的事就是繼承android.app.Fragment來寫一個Fragment,假設我們的Fragment叫做Fragment1,創建和定義如下:
public class Fragment1 extends Fragment {
...
}
就像我們上面說的,Fragment只能存在於Activity中,所以我們必須要在某處定義它,有兩種方式:
- 直接在xml布局文件中定義;
- 在xml布局文件中定義一個占位符,然後動態地在Activity中操作Fragment;
我們定義Fragment的方式會影響它的生命周期,因為在上述第一種情況下onInflate方法會被調用,而第二種情況下它的生命周期是從onAttach方法開始的。
如果我們在XML文件中定義Fragment的話,我們需要:
<fragment android:id="@+id/f1"
            class="com.survivingwithandroid.fragment.Fragment1"
       android:layout_width="match_parent"
       android:layout_height="20dp"/>
然而如果我們在XML中用占位符的話,需要再做一些工作。
布局框架和Fragment
如果我們在XML布局文件中定義Fragment的話,就不能自由、動態修改Fragment了,還有別的方法可以讓我們可以更靈活地操作:使用時需要在XML文件中定義:
<FrameLayout android:id="@+id/fl1"
       android:layout_width="match_parent"
       android:layout_height="200dp"/>
在Activity裡面還需要做一點工作,因為我們必須手動初始化Fragment,然後把它“插入”到FrameLayout中。
public class MainActivity extends Activity {

@Override
protected void onCreate(Bundle savedInstanceState) {
  super.onCreate(savedInstanceState);
  setContentView(R.layout.activity_main);

  Fragment2 f2 = new Fragment2();
  FragmentTransaction ft = getFragmentManager().beginTransaction();
  ft.replace(R.id.fl1, f2);
  ft.commit();
}
例子
可以把Fragment想象成Activity的另外一種形式。你創建fragments去包含UI組件,就像創建activities那樣。但是,Fragment總是被嵌在Activity中。
下面來通過一個例子看一下流程:
1.創建一個名為Fragments的工程。
2.在res/layout文件夾下,新建一個叫fragment1.xml的文件。
<?xml version="1.0" encoding="utf-8"?>
<LinearLayout xmlns:android="http://schemas.android.com/apk/res/android"
  android:layout_width="fill_parent"
  android:layout_height="fill_parent"
  android:background="#00FF00"
  android:orientation="vertical" >

  <TextView
    android:id="@+id/lblFragment1"
    android:layout_width="fill_parent"
    android:layout_height="wrap_content"
    android:text="This is fragment #1"
    android:textColor="#000000"
    android:textSize="25sp" />

</LinearLayout>
3.在res/layout文件夾下,新建一個叫fragment2.xml的文件。
<?xml version="1.0" encoding="utf-8"?>
<LinearLayout xmlns:android="http://schemas.android.com/apk/res/android"
  android:layout_width="fill_parent"
  android:layout_height="fill_parent"
  android:background="#FFFE00"
  android:orientation="vertical" >

  <TextView
    android:layout_width="fill_parent"
    android:layout_height="wrap_content"
    android:text="This is fragment #2"
    android:textColor="#000000"
    android:textSize="25sp" />

  <Button
    android:id="@+id/btnGetText"
    android:layout_width="wrap_content"
    android:layout_height="wrap_content"
    android:onClick="onClick"
    android:text="Get text in Fragment #1"
    android:textColor="#000000" />

</LinearLayout>
4.main.xml中的代碼。
<?xml version="1.0" encoding="utf-8"?>
<LinearLayout xmlns:android="http://schemas.android.com/apk/res/android"
  android:layout_width="fill_parent"
  android:layout_height="fill_parent"
  android:orientation="horizontal" >

  <fragment
    android:id="@+id/fragment1"
    android:name="net.learn2develop.Fragments.Fragment1"
    android:layout_width="0px"
    android:layout_height="match_parent"
    android:layout_weight="1" />

  <fragment
    android:id="@+id/fragment2"
    android:name="net.learn2develop.Fragments.Fragment2"
    android:layout_width="0px"
    android:layout_height="match_parent"
    android:layout_weight="1" />

</LinearLayout>
5.新建兩個類:Fragment1.java和Fragment2.java。
6.Fragment1.java中的代碼。
package net.learn2develop.Fragments;

import android.app.Activity;
import android.app.Fragment;
import android.os.Bundle;
import android.util.Log;
import android.view.LayoutInflater;
import android.view.View;
import android.view.ViewGroup;

public class Fragment1 extends Fragment {
  @Override
  public View onCreateView(LayoutInflater inflater, ViewGroup container,
      Bundle savedInstanceState) {

    Log.d("Fragment 1", "onCreateView");

    // ---Inflate the layout for this fragment---
    return inflater.inflate(R.layout.fragment1, container, false);
  }
}
7.Fragment2.java中的代碼。
package net.learn2develop.Fragments;

import android.app.Fragment;
import android.os.Bundle;
import android.view.LayoutInflater;
import android.view.View;
import android.view.ViewGroup;
import android.widget.Button;
import android.widget.TextView;
import android.widget.Toast;

public class Fragment2 extends Fragment {
  @Override
  public View onCreateView(LayoutInflater inflater, ViewGroup container,
      Bundle savedInstanceState) {
    // ---Inflate the layout for this fragment---
    return inflater.inflate(R.layout.fragment2, container, false);
  }
}
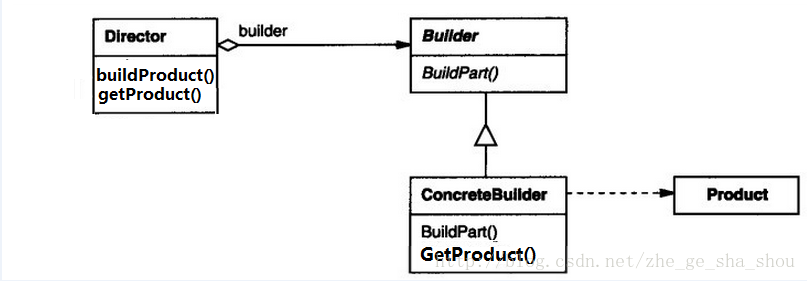 Android Builder模式詳解
經典Builder模式1) 定義:將一個復雜對象的構建與它的表示分離,使得同樣的構建過程可以創建不同的表示。2) 經典的Builder模式有四個參與者Product:被構
 Android基礎入門教程——10.4 Vibrator(振動器)
本節引言: 本節我們介紹的是Vibrator(振動器),是手機自帶的振動器,別去百度直接搜針振動器,因為 你的搜索結果可能是如圖所示的神秘的道具,或者其他神秘
 Android反編譯和二次打包實戰
作為Android開發者,工作中少不了要反編譯別人的apk,當然主要目的還是為了學習到更多,取彼之長,補己之短。今天就來總結一下Android反編譯和二次打包的一些知識。
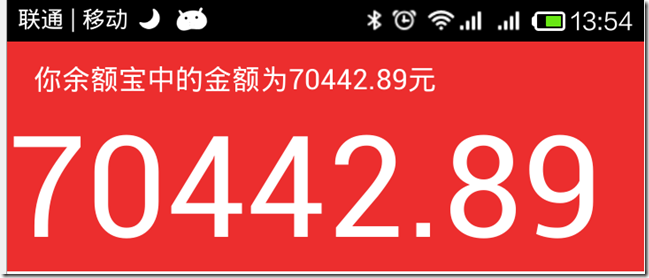 android編程實現類似於支付寶余額快速閃動效果的方法
本文實例講述了android編程實現類似於支付寶余額快速閃動效果的方法。分享給大家供大家參考,具體如下:效果如下:此圖片不會動,但實際上是會快速跳動的。之前看到有支付寶的