編輯:關於Android編程
實現zip/tar的壓縮與解壓
java中實際是提供了對 zip等壓縮格式的支持,但是為什麼這裡會用到ant呢?
原因主要有兩個:
1. java提供的類對於包括有中文字符的路徑,文件名支持不夠好,你用其它第三方軟件解壓的時候就會存在亂碼。而ant.jar就支持文件名或者路徑包括中文字符。
2. ant.jar提供了強大的工具類,更加方便於我們對壓縮與解壓的操作。
注意事項:
1. 首先說明一下,關於皮膚或者類似於皮膚的Zip包,實際上公司可能會根據自己的規定或需求,自定義壓縮包文件的結尾,實際上大多還是Zip包的格式. 具體部分的處理大致上是一樣的,因此不再復述, 本文給出的例子已經有Zip包和Tar包的解壓縮.
2. 還有要注意的是,此處為提升理解,因此加入zip/tar壓縮,解壓的界面,實際應用中此部分無需單獨的界面展示(解壓縮需要一定時間的話,則為加強用戶體驗,加入提示框與進度條),請自行編寫解壓縮管理類進行邏輯判斷分別處理.
3. 測試時需要講要解壓縮的包導入sdcard目錄下(若為其他目錄,請修改代碼中路徑)
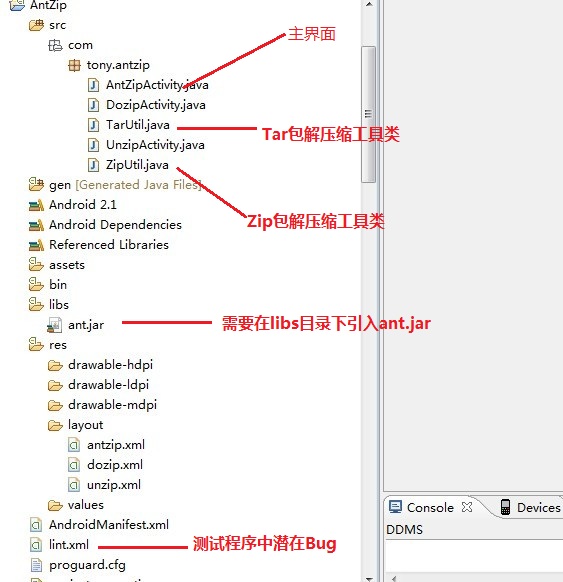
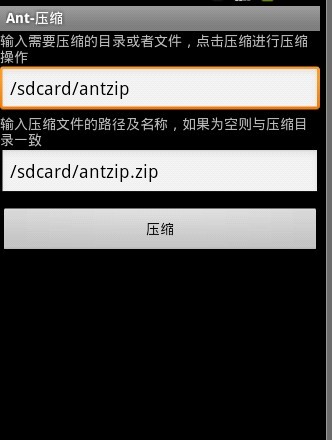
程序主界面及解壓縮的界面:

接下來是解壓縮核心的代碼:
布局文件: antzip.xml:
<?xml version="1.0" encoding="utf-8"?>
<RelativeLayout xmlns:android="http://schemas.android.com/apk/res/android"
  android:layout_width="fill_parent"
  android:layout_height="fill_parent">


  <LinearLayout
    android:orientation="vertical" android:layout_width="fill_parent"
    android:layout_height="wrap_content"
    android:gravity="center"
    android:padding="20dip"
    android:layout_centerInParent="true">

    <RadioGroup
      android:layout_width="wrap_content"
      android:layout_height="wrap_content"
      android:orientation="horizontal">
      <RadioButton android:layout_width="wrap_content"
        android:layout_height="wrap_content"
        android:id="@+id/radioZip"
        android:checked="true"
        android:text="ZIP"/>

      <RadioButton android:layout_width="wrap_content"
        android:layout_height="wrap_content"
        android:id="@+id/radioTar"
        android:text="TAR"
        android:layout_marginLeft="10dip"/>
    </RadioGroup>

    <Button android:text="壓縮" android:id="@+id/button1"
      android:layout_width="fill_parent" android:layout_height="wrap_content"
      android:paddingLeft="30dip" android:paddingRight="30dip"></Button>
    <Button android:text="解壓" android:id="@+id/button2"
      android:layout_width="fill_parent" android:layout_height="wrap_content"
      android:paddingLeft="30dip" android:paddingRight="30dip"
      android:layout_marginTop="20dip"></Button>
  </LinearLayout>


</RelativeLayout>
AntZipActivity:
public class AntZipActivity extends Activity {
  public static final String TYPE = "type";
  public static final int   TYPE_ZIP = -1;
  public static final int   TYPE_TAR = 1;

  public static final String SUFFIX_ZIP = ".zip";
  public static final String SUFFIX_TAR = ".tar";
  /** Called when the activity is first created. */
  private Button   btnDoCompress;
  private Button   btnDecompress;

  private RadioButton radioZip;
  private RadioButton radioTar;

  private boolean isZip = true;
  @Override
  public void onCreate(Bundle savedInstanceState) {
    super.onCreate(savedInstanceState);
    setContentView(R.layout.antzip);
    radioZip = (RadioButton)findViewById(R.id.radioZip);
    isZip = true;
    radioZip.setChecked(true);
    radioZip.setOnCheckedChangeListener(new OnCheckedChangeListener() {

      @Override
      public void onCheckedChanged(CompoundButton buttonView, boolean isChecked) {
        System.out.println("radioZip:"+isChecked);
        if(isChecked)
        {
          isZip = true;
        }
      }
    });
    radioTar = (RadioButton)findViewById(R.id.radioTar);
    radioTar.setOnCheckedChangeListener(new OnCheckedChangeListener() {

      @Override
      public void onCheckedChanged(CompoundButton buttonView, boolean isChecked) {
        System.out.println("radioTar:"+isChecked);
        if(isChecked)
        {
          isZip = false;
        }
      }
    });
    btnDoCompress = (Button)findViewById(R.id.button1);
    btnDoCompress.setOnClickListener(new OnClickListener() {

      @Override
      public void onClick(View v) {
        //進入壓縮界面
        Intent i = new Intent(AntZipActivity.this,DozipActivity.class);
        i.putExtra(TYPE, isZip?TYPE_ZIP:TYPE_TAR);
        AntZipActivity.this.startActivity(i);
      }
    });
    btnDecompress = (Button)findViewById(R.id.button2);
    btnDecompress.setOnClickListener(new OnClickListener() {

      @Override
      public void onClick(View v) {
        //進入解壓界面
        Intent i = new Intent(AntZipActivity.this,UnzipActivity.class);
        i.putExtra(TYPE, isZip?TYPE_ZIP:TYPE_TAR);
        AntZipActivity.this.startActivity(i);
      }
    });
  }
}
DozipActivity:
public class DozipActivity extends Activity implements OnClickListener{
  private EditText etPath;
  private EditText etDest;
  private Button btnDozip;
  private TextView  tvTip;

  private String srcPath;
  private String zipDest;

  private int   type;
  private String suffix;
  @Override
  public void onCreate(Bundle savedInstanceState) {
    super.onCreate(savedInstanceState);
    setTitle("Ant-壓縮");
    type = getIntent().getIntExtra(AntZipActivity.TYPE, AntZipActivity.TYPE_ZIP);
    suffix = type==AntZipActivity.TYPE_ZIP ? AntZipActivity.SUFFIX_ZIP:AntZipActivity.SUFFIX_TAR;
    setContentView(R.layout.dozip);
    //
    etPath = (EditText)findViewById(R.id.editText1);
    etDest = (EditText)findViewById(R.id.editText2);
    //設置一些默認的函數
    etPath.setText("/sdcard/antzip");
    etDest.setText("/sdcard/antzip"+suffix);
    btnDozip = (Button)findViewById(R.id.button);
    tvTip  = (TextView)findViewById(R.id.tv_tip);
    btnDozip.setOnClickListener(this);
  }
  @Override
  public void onClick(View v) {
    srcPath = etPath.getEditableText().toString();
    if(TextUtils.isEmpty(srcPath))
    {
      Toast.makeText(this, "請指定一個路徑", Toast.LENGTH_SHORT).show();
      return;
    }
    File srcFile = new File(srcPath);
    if(!srcFile.exists())
    {
      Toast.makeText(this, "指定的壓縮包不存在", Toast.LENGTH_SHORT).show();
      return;
    }
    zipDest = etDest.getEditableText().toString();
    if(TextUtils.isEmpty(zipDest))
    {
      //如果用戶沒有輸入目標文件,則生成一個默認的
      zipDest = srcFile.getParent();
    }
    System.out.println("zip name:"+zipDest);
    //如果是以/結尾的,則證明用戶輸入的是一個目錄 ,需要在後面加上文件名
    if(zipDest.endsWith(File.separator))
    {
      zipDest+=srcFile.getName()+suffix;
    }
    else
    {
      //如果壓縮文件名不是以zip/tar結尾,則加上後綴後
      if(!zipDest.endsWith(suffix))
      {
        zipDest +=suffix;
      }
    }
    //如果用戶選擇的是zip,則用 zipUtil進行壓縮
    if(type == AntZipActivity.TYPE_ZIP)
    {

      ZipUtil zipp = new ZipUtil();
      zipp.doZip(srcPath, zipDest);
    }
    //如果用戶選擇的是tar,則用 tarUtil進行壓縮
    else
    {
      TarUtil tarr = new TarUtil();
      tarr.doTar(srcPath, zipDest);
    }
    //壓縮完成後還是提示用戶
    tvTip.setText("壓縮文件路徑:"+zipDest);
    Toast.makeText(this, "壓縮完成", Toast.LENGTH_SHORT).show();
  }
}
解壓縮工具類ZipUtil:
public class ZipUtil {
  private ZipFile     zipFile;
  private ZipOutputStream zipOut;   //壓縮Zip
  private int      bufSize;  //size of bytes
  private byte[]     buf;

  public ZipUtil(){
    //要構造函數中去初始化我們的緩沖區
    this.bufSize = 1024*4;
    this.buf = new byte[this.bufSize];
  }

  /**
   * 對傳入的目錄或者是文件進行壓縮
   * @param srcFile 需要 壓縮的目錄或者文件
   * @param destFile 壓縮文件的路徑
   */
  public void doZip(String srcFile, String destFile) {// zipDirectoryPath:需要壓縮的文件夾名
    File zipFile = new File(srcFile);
    try {
      //生成ZipOutputStream,會把壓縮的內容全都通過這個輸出流輸出,最後寫到壓縮文件中去
      this.zipOut = new ZipOutputStream(new BufferedOutputStream(
          new FileOutputStream(destFile)));
      //設置壓縮的注釋
      zipOut.setComment("comment");
      //設置壓縮的編碼,如果要壓縮的路徑中有中文,就用下面的編碼
      zipOut.setEncoding("GBK");
      //啟用壓縮
      zipOut.setMethod(ZipOutputStream.DEFLATED);

      //壓縮級別為最強壓縮,但時間要花得多一點
      zipOut.setLevel(Deflater.BEST_COMPRESSION);

      handleFile(zipFile, this.zipOut,"");
      //處理完成後關閉我們的輸出流
      this.zipOut.close();
    } catch (IOException ioe) {
      ioe.printStackTrace();
    }
  }

  /**
   * 由doZip調用,遞歸完成目錄文件讀取
   * @param zipFile
   * @param zipOut
   * @param dirName 這個主要是用來記錄壓縮文件的一個目錄層次結構的
   * @throws IOException
   */
  private void handleFile(File zipFile, ZipOutputStream zipOut,String dirName) throws IOException {
    System.out.println("遍歷文件:"+zipFile.getName());
    //如果是一個目錄,則遍歷
    if(zipFile.isDirectory())
    {
      File[] files = zipFile.listFiles();

      if (files.length == 0) {// 如果目錄為空,則單獨創建之.
        //只是放入了空目錄的名字
        this.zipOut.putNextEntry(new ZipEntry(dirName+zipFile.getName()+File.separator));
        this.zipOut.closeEntry();
      } else {// 如果目錄不為空,則進入遞歸,處理下一級文件
        for (File file : files) {
          // 進入遞歸,處理下一級的文件
          handleFile(file, zipOut, dirName+zipFile.getName()+File.separator);
        }
      }
    }
    //如果是文件,則直接壓縮
    else
    {
      FileInputStream fileIn = new FileInputStream(zipFile);
      //放入一個ZipEntry
      this.zipOut.putNextEntry(new ZipEntry(dirName+zipFile.getName()));
      int length = 0;
      //放入壓縮文件的流
      while ((length = fileIn.read(this.buf)) > 0) {
        this.zipOut.write(this.buf, 0, length);
      }
      //關閉ZipEntry,完成一個文件的壓縮
      this.zipOut.closeEntry();
    }

  }

  /**
   * 解壓指定zip文件
   * @param unZipfile 壓縮文件的路徑
   * @param destFile   解壓到的目錄
   */
  public void unZip(String unZipfile, String destFile) {// unZipfileName需要解壓的zip文件名
    FileOutputStream fileOut;
    File file;
    InputStream inputStream;

    try {
      //生成一個zip的文件
      this.zipFile = new ZipFile(unZipfile);
      //遍歷zipFile中所有的實體,並把他們解壓出來
      for (@SuppressWarnings("unchecked")
      Enumeration<ZipEntry> entries = this.zipFile.getEntries(); entries
          .hasMoreElements();) {
        ZipEntry entry = entries.nextElement();
        //生成他們解壓後的一個文件
        file = new File(destFile+File.separator+entry.getName());

        if (entry.isDirectory()) {
          file.mkdirs();
        } else {
          // 如果指定文件的目錄不存在,則創建之.
          File parent = file.getParentFile();
          if (!parent.exists()) {
            parent.mkdirs();
          }
          //獲取出該壓縮實體的輸入流
          inputStream = zipFile.getInputStream(entry);

          fileOut = new FileOutputStream(file);
          int length = 0;
          //將實體寫到本地文件中去
          while ((length = inputStream.read(this.buf)) > 0) {
            fileOut.write(this.buf, 0, length);
          }
          fileOut.close();
          inputStream.close();
        }
      }
      this.zipFile.close();
    } catch (IOException ioe) {
      ioe.printStackTrace();
    }
  }
}
Ant 實現批量打包Android應用
由於公司運維需要以及應用中需要加上應用推廣的統計,往往要對應二三十個渠道,按照正常方法一個一個的去生成不同渠道包的應用,不僅浪費了時間,而且大大降低了效率.
上一篇講到使用Ant進行Zip/Tar包的解壓縮,實際上Ant工具不僅僅具有此類功能,它更強大的地方在於自動化調用程序完成項目的編譯,打包,測試等. 類似於C語言中的make腳本完成這些工作的批處理任務. 不同於MakeFile的是,Ant是純Java編寫的,因此具有很好的跨平台性.
在此我主要講下如何自動構建工具Ant, 對應用進行批量打包, 生成對應不同市場的應用:
首先分別看一下用於打包的Java工程AntTest和需要被打包進行發布的Android工程結構:
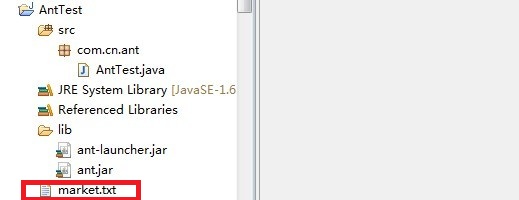
market.txt裡保存需要打包的市場標識,如:
youmeng
gfan
.......
此文件裡自行根據需求添加渠道名稱.
然後看一下實現批量打包AntTest類中的內容:
注意:紅色標注部分需要進行修改:
package com.cn.ant;

import java.io.BufferedReader;
import java.io.BufferedWriter;
import java.io.File;
import java.io.FileReader;
import java.io.FileWriter;
import java.io.IOException;
import java.text.SimpleDateFormat;
import java.util.Calendar;

import org.apache.tools.ant.DefaultLogger;
import org.apache.tools.ant.Project;
import org.apache.tools.ant.ProjectHelper;

public class AntTest {
  private Project project;

  public void init(String _buildFile, String _baseDir) throws Exception {
    project = new Project();

    project.init();

    DefaultLogger consoleLogger = new DefaultLogger();
    consoleLogger.setErrorPrintStream(System.err);
    consoleLogger.setOutputPrintStream(System.out);
    consoleLogger.setMessageOutputLevel(Project.MSG_INFO);
    project.addBuildListener(consoleLogger);

    // Set the base directory. If none is given, "." is used.
    if (_baseDir == null)
      _baseDir = new String(".");

    project.setBasedir(_baseDir);

    if (_buildFile == null)
      _buildFile = new String(projectBasePath + File.separator
          + "build.xml");

    // ProjectHelper.getProjectHelper().parse(project, new
    // File(_buildFile));
    <span >// 關鍵代碼</span>
    ProjectHelper.configureProject(project, new File(_buildFile));
  }

  public void runTarget(String _target) throws Exception {
    // Test if the project exists
    if (project == null)
      throw new Exception(
          "No target can be launched because the project has not been initialized. Please call the 'init' method first !");
    // If no target is specified, run the default one.
    if (_target == null)
      _target = project.getDefaultTarget();

    // Run the target
    project.executeTarget(_target);

  }

  <span >private final static String projectBasePath = "D:\\android\\workspace3\\XXX";//要打包的項目根目錄
  private final static String copyApkPath = "D:\\android\\apktest";//保存打包apk的根目錄
  private final static String signApk = "XXX-release.apk";//這裡的文件名必須是准確的項目名!
  private final static String reNameApk = "XXX_";//重命名的項目名稱前綴(地圖項目不用改)
  private final static String placeHolder = "@market@";//需要修改manifest文件的地方(占位符)
</span>
  public static void main(String args[]) {
    long startTime = 0L;
    long endTime = 0L;
    long totalTime = 0L;
    Calendar date = Calendar.getInstance();
    SimpleDateFormat sdf = new SimpleDateFormat("yyyy-MM-dd:HH:mm:ss");
    try {
      System.out.println("---------ant批量自動化打包開始----------");
      startTime = System.currentTimeMillis();
      date.setTimeInMillis(startTime);
      System.out.println("開始時間為:" + sdf.format(date.getTime()));

      BufferedReader br = new BufferedReader(new FileReader("market.txt"));
      String flag = null;
      while ((flag = br.readLine()) != null) {

        // 先修改manifest文件:讀取臨時文件中的@market@修改為市場標識,然後寫入manifest.xml中
        String tempFilePath = projectBasePath + File.separator
            + "AndroidManifest.xml.temp";
        String filePath = projectBasePath + File.separator
            + "AndroidManifest.xml";
        write(filePath, read(tempFilePath, flag.trim()));
        // 執行打包命令
        AntTest mytest = new AntTest();
        mytest.init(projectBasePath + File.separator + "build.xml",
            projectBasePath);
        mytest.runTarget("clean");
        mytest.runTarget("release");
        // 打完包後執行重命名加拷貝操作
        File file = new File(projectBasePath + File.separator + "bin"
            + File.separator + signApk);// bin目錄下簽名的apk文件

        File renameFile = new File(copyApkPath + File.separator + reNameApk
            + flag + ".apk");
        boolean renametag = file.renameTo(renameFile);
        System.out.println("rename------>"+renametag);
        System.out.println("file ------>"+file.getAbsolutePath());
        System.out.println("rename------>"+renameFile.getAbsolutePath());
      }
      System.out.println("---------ant批量自動化打包結束----------");
      endTime = System.currentTimeMillis();
      date.setTimeInMillis(endTime);
      System.out.println("結束時間為:" + sdf.format(date.getTime()));
      totalTime = endTime - startTime;
      System.out.println("耗費時間為:" + getBeapartDate(totalTime));

    } catch (Exception e) {
      e.printStackTrace();
      System.out.println("---------ant批量自動化打包中發生異常----------");
      endTime = System.currentTimeMillis();
      date.setTimeInMillis(endTime);
      System.out.println("發生異常時間為:" + sdf.format(date.getTime()));
      totalTime = endTime - startTime;
      System.out.println("耗費時間為:" + getBeapartDate(totalTime));
    }
  }

  /**
   * 根據所秒數,計算相差的時間並以**時**分**秒返回
   *
   * @param d1
   * @param d2
   * @return
   */
  public static String getBeapartDate(long m) {
    m = m / 1000;
    String beapartdate = "";
    int nDay = (int) m / (24 * 60 * 60);
    int nHour = (int) (m - nDay * 24 * 60 * 60) / (60 * 60);
    int nMinute = (int) (m - nDay * 24 * 60 * 60 - nHour * 60 * 60) / 60;
    int nSecond = (int) m - nDay * 24 * 60 * 60 - nHour * 60 * 60 - nMinute
        * 60;
    beapartdate = nDay + "天" + nHour + "小時" + nMinute + "分" + nSecond + "秒";

    return beapartdate;
  }

  public static String read(String filePath, String replaceStr) {
    BufferedReader br = null;
    String line = null;
    StringBuffer buf = new StringBuffer();

    try {
      // 根據文件路徑創建緩沖輸入流
      br = new BufferedReader(new FileReader(filePath));

      // 循環讀取文件的每一行, 對需要修改的行進行修改, 放入緩沖對象中
      while ((line = br.readLine()) != null) {
        // 此處根據實際需要修改某些行的內容
        if (line.contains(placeHolder)) {
          line = line.replace(placeHolder, replaceStr);
          buf.append(line);
        } else {
          buf.append(line);
        }
        buf.append(System.getProperty("line.separator"));
      }
    } catch (Exception e) {
      e.printStackTrace();
    } finally {
      // 關閉流
      if (br != null) {
        try {
          br.close();
        } catch (IOException e) {
          br = null;
        }
      }
    }

    return buf.toString();
  }

  /**
   * 將內容回寫到文件中
   *
   * @param filePath
   * @param content
   */
  public static void write(String filePath, String content) {
    BufferedWriter bw = null;

    try {
      // 根據文件路徑創建緩沖輸出流
      bw = new BufferedWriter(new FileWriter(filePath));
      // 將內容寫入文件中
      bw.write(content);
    } catch (Exception e) {
      e.printStackTrace();
    } finally {
      // 關閉流
      if (bw != null) {
        try {
          bw.close();
        } catch (IOException e) {
          bw = null;
        }
      }
    }
  }
}
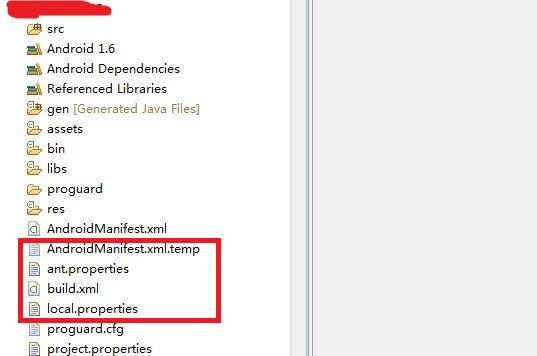
然後是Android工程中需要進行修改的部分:
1. 修改local.properties中的sdk根目錄:
sdk.dir=D:\\android\\android-sdk-windows-r17\\android-sdk-windows-r17
2. 修改ant.properties中簽名文件的路徑和密碼(如果需要)
  key.store=D:\\android\\mykeystore
  key.store.password=123456
  key.alias=mykey
  key.alias.password=123456
3. 修改AndroidManifest.xml.temp
拷貝AndroidManifest.xml一份,命名為AndroidManifest.xml.temp
將需要替換的地方改為占位符,需與打包工程AntTest中的placeHolder常量一致
如: <meta-data android:value="@market@" android:name="UMENG_CHANNEL"/>
4. Build.xml中:
<project name="XXX" default="help">,XXX必須為Android工程名稱.
如果機器沒有配置過Ant環境變量,可根據如下步驟進行配置:
ANT環境變量設置:
Windows下ANT用到的環境變量主要有2個,ANT_HOME 、PATH。
設置ANT_HOME指向ant的安裝目錄。
設置方法:
ANT_HOME = D:/apache_ant_1.7.0
將%ANT_HOME%/bin; %ANT_HOME%/lib添加到環境變量的path中。
設置方法:
PATH = %ANT_HOME%/bin; %ANT_HOME%/lib
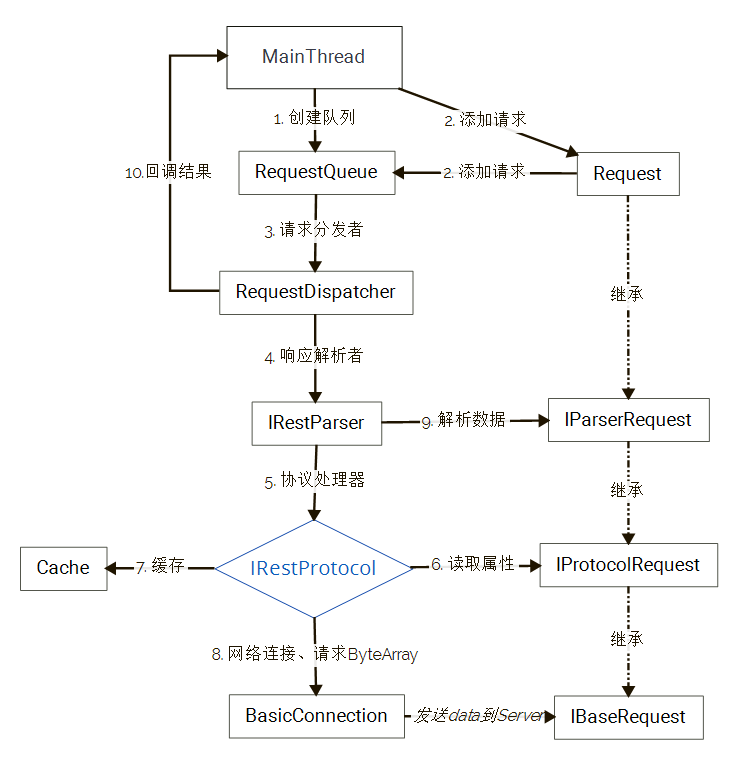 Android NoHttp 框架作者帶你看源碼(一)
現在市場的Http框架很多,比如我們熟知的NoHttp、Retrofit、Volley、android-async-http等上層框架,HttpURLConnection
 Android模擬登錄評論CSDN
有時候作為非官方開發的APP集成了官方的所有信息,但是現在需要實現另一個功能那就是登錄發表評論到官方的網站,而非官方的APP並不知道官方網站是怎麼實現登錄與評論的,而且越
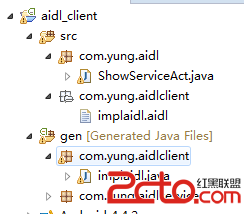 安卓最簡單的aidl用兩個程序模擬進程通信
最近要面試了 沒 時間玩了.看了下安卓icp ,說實話一直沒過aidl這東東 發現網上帖子好多 下載的卻好少 .好吧自己玩了一個 留下做個備注吧. 服務端輸入文
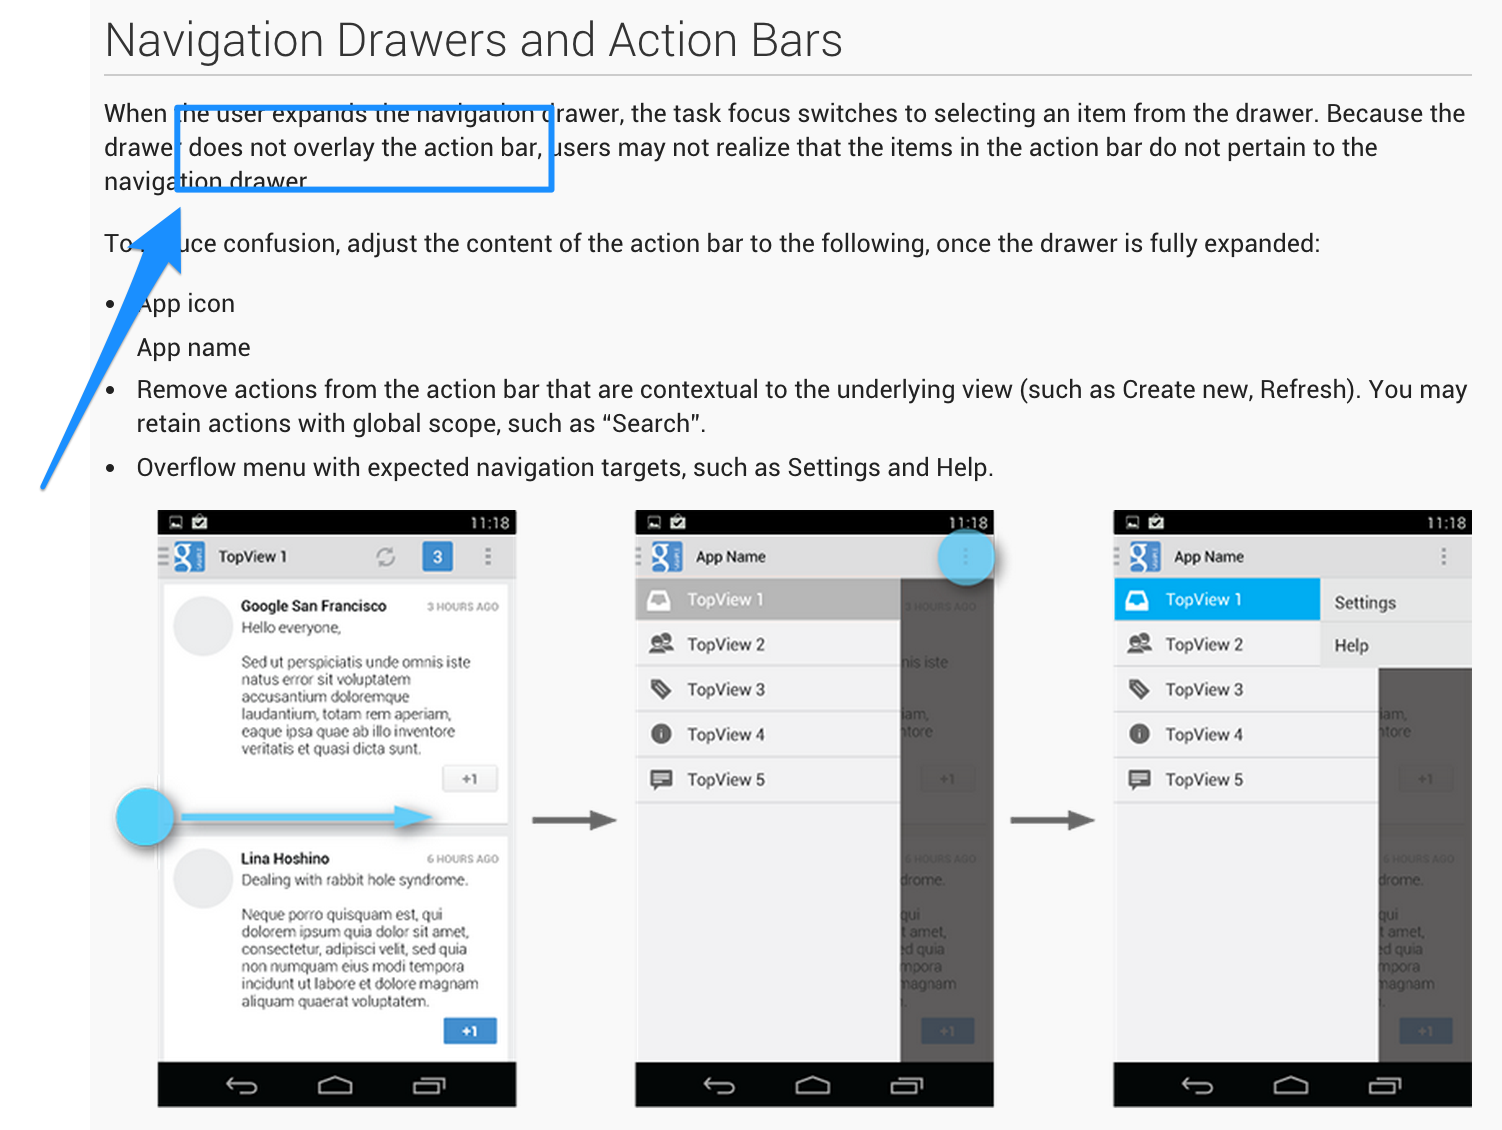 Android 滑動導航菜單的快速構建(二) Material Design
上一篇介紹了幾個滑動導航菜單效果的快速構建,這篇文章來總結“當下”如何按照Android的設計標准去設計滑動導航菜單,我為什麼說的“當