編輯:關於Android編程
Android提供alert、prompt、pick-list,單選、多選,progress、time-picker和date-picker對話框,並提供自定義的dialog。在Android 3.0後,dialog基於fragment,並對之前版本提供兼容支持庫,也就是說對於開發者而言,dialog是基於DialogFragment的,但此時需要在應用中加入相關的兼容庫。
和Windows或者網頁JS的Dialog不同,Android的dialog是異步的,而不是同步的。對於同步的dialog,顯示dialog後,下一行代碼會等到dialog結束,即下一行代碼可以知道dialog的輸入以及用戶點擊的button。而對於異步的dialog,dialog顯示後,下一行代碼繼續執行,而不是等dialog消失,通過callback來處理dialog的事件。異步的dialog也意味著應用的代碼也可以關閉dialog。
使用DialogFragment來管理對話框,當旋轉屏幕和按下後退鍵時可以更好的管理其聲明周期,它和Fragment有著基本一致的聲明周期。且DialogFragment也允許開發者把Dialog作為內嵌的組件進行重用,類似Fragment(可以在大屏幕和小屏幕顯示出不同的效果)。上面會通過例子展示這些好處~
使用DialogFragment至少需要實現onCreateView或者onCreateDIalog方法。onCreateView即使用定義的xml布局文件展示Dialog。onCreateDialog即利用AlertDialog或者Dialog創建出Dialog。
下面我們就來看一個使用DialogFragment編寫對話框的例子:
1.重寫onCreateView創建Dialog
a)布局文件,我們創建一個設置名稱的布局文件:
<?xml version="1.0" encoding="utf-8"?>
<RelativeLayout xmlns:android="http://schemas.android.com/apk/res/android"
  android:layout_width="wrap_content"
  android:layout_height="wrap_content" >

  <TextView
    android:id="@+id/id_label_your_name"
    android:layout_width="wrap_content"
    android:layout_height="32dp"
    android:gravity="center_vertical"
    android:text="Your name:" />

  <EditText
    android:id="@+id/id_txt_your_name"
    android:layout_width="match_parent"
    android:layout_height="wrap_content"
    android:layout_toRightOf="@id/id_label_your_name"
    android:imeOptions="actionDone"
    android:inputType="text" />

  <Button
    android:id="@+id/id_sure_edit_name"
    android:layout_width="wrap_content"
    android:layout_height="wrap_content"
    android:layout_alignParentRight="true"
    android:layout_below="@id/id_txt_your_name"
    android:text="ok" />

</RelativeLayout>
b)繼承DialogFragment,重寫onCreateView方法
package com.example.zhy_dialogfragment;

import android.app.DialogFragment;
import android.os.Bundle;
import android.view.LayoutInflater;
import android.view.View;
import android.view.ViewGroup;

public class EditNameDialogFragment extends DialogFragment
{


  @Override
  public View onCreateView(LayoutInflater inflater, ViewGroup container,
      Bundle savedInstanceState)
  {
    View view = inflater.inflate(R.layout.fragment_edit_name, container);
    return view;
  }

}
c)測試運行:
Main方法中調用:
public void showEditDialog(View view)
  {
    EditNameDialogFragment editNameDialog = new EditNameDialogFragment();
    editNameDialog.show(getFragmentManager(), "EditNameDialog");
  }
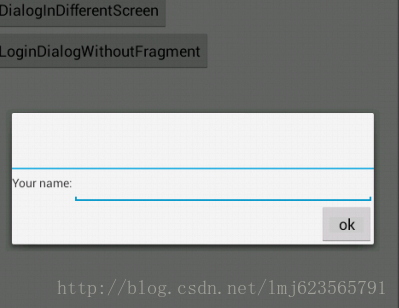
效果圖:
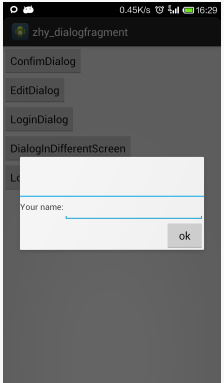
可以看到,對話框成功創建並顯示出來,不過默認對話框有個討厭的標題,我們怎麼去掉呢:可以在onCreateView中調用getDialog().requestWindowFeature(Window.FEATURE_NO_TITLE);即可去掉。即:
public class EditNameDialogFragment extends DialogFragment
{

  @Override
  public View onCreateView(LayoutInflater inflater, ViewGroup container,
      Bundle savedInstanceState)
  {
    getDialog().requestWindowFeature(Window.FEATURE_NO_TITLE);
    View view = inflater.inflate(R.layout.fragment_edit_name, container);
    return view;
  }

}
效果圖:
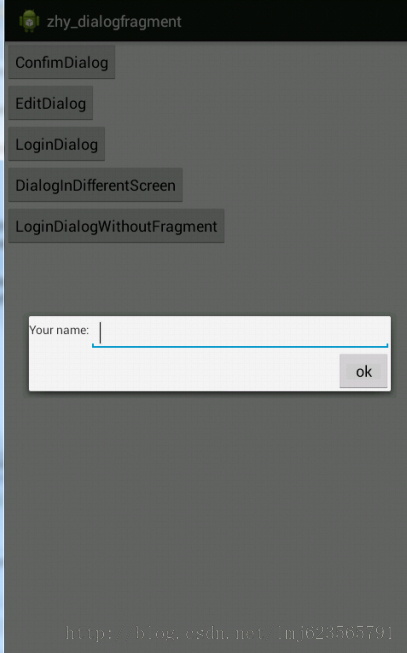
很完美的去掉了討厭的標題。
2.重寫onCreateDialog創建Dialog
在onCreateDialog中一般可以使用AlertDialog或者Dialog創建對話框,不過既然google不推薦直接使用Dialog,我們就使用AlertDialog來創建一個登錄的對話框。
a)布局文件
<?xml version="1.0" encoding="utf-8"?>
<LinearLayout xmlns:android="http://schemas.android.com/apk/res/android"
  android:layout_width="wrap_content"
  android:layout_height="wrap_content"
  android:orientation="vertical" >

  <ImageView
    android:layout_width="match_parent"
    android:layout_height="64dp"
    android:background="#FFFFBB33"
    android:contentDescription="@string/app_name"
    android:scaleType="center"
    android:src="@drawable/title" />

  <EditText
    android:id="@+id/id_txt_username"
    android:layout_width="match_parent"
    android:layout_height="wrap_content"
    android:layout_marginBottom="4dp"
    android:layout_marginLeft="4dp"
    android:layout_marginRight="4dp"
    android:layout_marginTop="16dp"
    android:hint="input username"
    android:inputType="textEmailAddress" />

  <EditText
    android:id="@+id/id_txt_password"
    android:layout_width="match_parent"
    android:layout_height="wrap_content"
    android:layout_marginBottom="16dp"
    android:layout_marginLeft="4dp"
    android:layout_marginRight="4dp"
    android:layout_marginTop="4dp"
    android:fontFamily="sans-serif"
    android:hint="input password"
    android:inputType="textPassword" />

</LinearLayout>
b)繼承DialogFragment重寫onCreateDialog方法
package com.example.zhy_dialogfragment;

import android.app.AlertDialog;
import android.app.Dialog;
import android.app.DialogFragment;
import android.content.DialogInterface;
import android.os.Bundle;
import android.view.LayoutInflater;
import android.view.View;
import android.view.ViewGroup;
import android.widget.EditText;

public class LoginDialogFragment extends DialogFragment
{

  @Override
  public Dialog onCreateDialog(Bundle savedInstanceState)
  {
    AlertDialog.Builder builder = new AlertDialog.Builder(getActivity());
    // Get the layout inflater
    LayoutInflater inflater = getActivity().getLayoutInflater();
    View view = inflater.inflate(R.layout.fragment_login_dialog, null);
    // Inflate and set the layout for the dialog
    // Pass null as the parent view because its going in the dialog layout
    builder.setView(view)
        // Add action buttons
        .setPositiveButton("Sign in",
            new DialogInterface.OnClickListener()
            {
              @Override
              public void onClick(DialogInterface dialog, int id)
              {
              }
            }).setNegativeButton("Cancel", null);
    return builder.create();
  }
}
c)調用
public void showLoginDialog(View view)
  {
    LoginDialogFragment dialog = new LoginDialogFragment();
    dialog.show(getFragmentManager(), "loginDialog");
  }
效果圖:
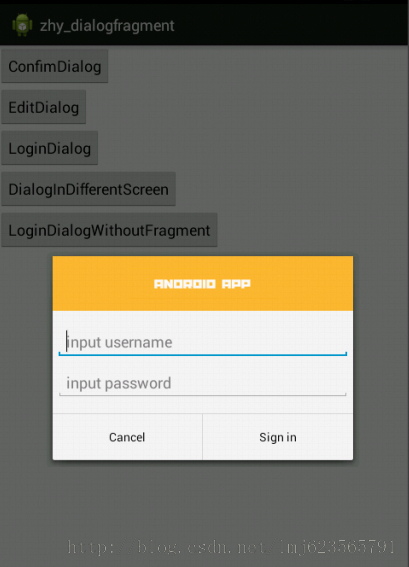
可以看到通過重寫onCreateDialog同樣可以實現創建對話框,效果還是很nice的。
3.傳遞數據給Activity
從dialog傳遞數據給Activity,可以使用“fragment interface pattern”的方式,下面通過一個改造上面的登錄框來展示這種模式。
改動比較小,直接貼代碼了:
package com.example.zhy_dialogfragment;

import android.app.AlertDialog;
import android.app.Dialog;
import android.app.DialogFragment;
import android.content.DialogInterface;
import android.os.Bundle;
import android.view.LayoutInflater;
import android.view.View;
import android.view.ViewGroup;
import android.widget.EditText;

public class LoginDialogFragment extends DialogFragment
{
  private EditText mUsername;
  private EditText mPassword;

  public interface LoginInputListener
  {
    void onLoginInputComplete(String username, String password);
  }

  @Override
  public Dialog onCreateDialog(Bundle savedInstanceState)
  {
    AlertDialog.Builder builder = new AlertDialog.Builder(getActivity());
    // Get the layout inflater
    LayoutInflater inflater = getActivity().getLayoutInflater();
    View view = inflater.inflate(R.layout.fragment_login_dialog, null);
    mUsername = (EditText) view.findViewById(R.id.id_txt_username);
    mPassword = (EditText) view.findViewById(R.id.id_txt_password);
    // Inflate and set the layout for the dialog
    // Pass null as the parent view because its going in the dialog layout
    builder.setView(view)
        // Add action buttons
        .setPositiveButton("Sign in",
            new DialogInterface.OnClickListener()
            {
              @Override
              public void onClick(DialogInterface dialog, int id)
              {
                LoginInputListener listener = (LoginInputListener) getActivity();
                listener.onLoginInputComplete(mUsername
                    .getText().toString(), mPassword
                    .getText().toString());
              }
            }).setNegativeButton("Cancel", null);
    return builder.create();
  }
}
拿到username和password的引用,在點擊登錄的時候,把activity強轉為我們自定義的接口:LoginInputListener,然後將用戶輸入的數據返回。
MainActivity中需要實現我們的接口LoginInputListener,實現我們的方法,就可以實現當用戶點擊登陸時,獲得我們的帳號密碼了:
c) MainActivity
package com.example.zhy_dialogfragment;

import com.example.zhy_dialogfragment.LoginDialogFragment.LoginInputListener;

import android.app.Activity;
import android.app.AlertDialog;
import android.content.DialogInterface;
import android.os.Bundle;
import android.view.LayoutInflater;
import android.view.View;
import android.widget.Toast;

public class MainActivity extends Activity implements LoginInputListener
{

  @Override
  protected void onCreate(Bundle savedInstanceState)
  {
    super.onCreate(savedInstanceState);
    setContentView(R.layout.activity_main);
  }


  public void showLoginDialog(View view)
  {
    LoginDialogFragment dialog = new LoginDialogFragment();
    dialog.show(getFragmentManager(), "loginDialog");

  }

  @Override
  public void onLoginInputComplete(String username, String password)
  {
    Toast.makeText(this, "帳號:" + username + ", 密碼 :" + password,
        Toast.LENGTH_SHORT).show();
  }

}
效果:
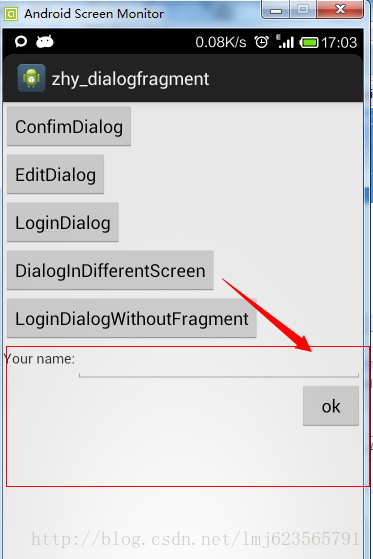
4.DialogFragment做屏幕適配
我們希望,一個對話框在大屏幕上以對話框的形式展示,而小屏幕上則直接嵌入當前的Actvity中。這種效果的對話框,只能通過重寫onCreateView實現。下面我們利用上面的EditNameDialogFragment來顯示。
EditNameDialogFragment我們已經編寫好了,直接在MainActivity中寫調用
public void showDialogInDifferentScreen(View view)
  {
    FragmentManager fragmentManager = getFragmentManager();
    EditNameDialogFragment newFragment = new EditNameDialogFragment();

    boolean mIsLargeLayout = getResources().getBoolean(R.bool.large_layout) ;
    Log.e("TAG", mIsLargeLayout+"");
    if (mIsLargeLayout )
    {
      // The device is using a large layout, so show the fragment as a
      // dialog
      newFragment.show(fragmentManager, "dialog");
    } else
    {
      // The device is smaller, so show the fragment fullscreen
      FragmentTransaction transaction = fragmentManager
          .beginTransaction();
      // For a little polish, specify a transition animation
      transaction
          .setTransition(FragmentTransaction.TRANSIT_FRAGMENT_OPEN);
      // To make it fullscreen, use the 'content' root view as the
      // container
      // for the fragment, which is always the root view for the activity
      transaction.replace(R.id.id_ly, newFragment)
          .commit();
    }
  }
可以看到,我們通過讀取R.bool.large_layout,然後根據得到的布爾值,如果是大屏幕則直接以對話框顯示,如果是小屏幕則嵌入我們的Activity布局中
這個R.bool.large_layout是我們定義的資源文件:
在默認的values下新建一個bools.xml
<?xml version="1.0" encoding="utf-8"?>
<resources>

  <bool name="large_layout">false</bool>

</resources>
然後在res下新建一個values-large,在values-large下再新建一個bools.xml
<?xml version="1.0" encoding="utf-8"?>
<resources>

  <bool name="large_layout">true</bool>

</resources>
最後測試:
左邊為模擬器,右邊為我的手機~~~~~
5.屏幕旋轉
當用戶輸入帳號密碼時,忽然旋轉了一下屏幕,帳號密碼不見了~~~是不是會抓狂
傳統的new AlertDialog在屏幕旋轉時,第一不會保存用戶輸入的值,第二還會報異常,因為Activity銷毀前不允許對話框未關閉。而通過DialogFragment實現的對話框則可以完全不必考慮旋轉的問題。
我們直接把上面登錄使用AlertDialog創建的登錄框,拷貝到MainActivity中直接調用:
public void showLoginDialogWithoutFragment(View view)
  {
    AlertDialog.Builder builder = new AlertDialog.Builder(this);
    // Get the layout inflater
    LayoutInflater inflater = this.getLayoutInflater();

    // Inflate and set the layout for the dialog
    // Pass null as the parent view because its going in the dialog layout
    builder.setView(inflater.inflate(R.layout.fragment_login_dialog, null))
        // Add action buttons
        .setPositiveButton("Sign in",
            new DialogInterface.OnClickListener()
            {
              @Override
              public void onClick(DialogInterface dialog, int id)
              {
                // sign in the user ...
              }
            }).setNegativeButton("Cancel", null).show();
  }
下面我分別點擊兩種方式創建的登錄框,看效果圖:
可以看到,傳統的Dialog旋轉屏幕時就消失了,且後台log會報異常~~~使用DialogFragment則不受影響。
PS:再談fragment管理器
通過fragment管理器或者fragment transaction,我們可以對dialog fragment進行具體地控制。show()就是在管理器中加入fragment,dismiss()就是從管理器中去掉fragment。我們不能先進行add(),然後在進行show(),因此一個fragment對象只能加入管理器一次。如果fragment被dismiss(),將從管理器中刪除,我們不能再通過管理器獲取該fragment的信息。因此,如果我們想保留被dismiss的dialog的一些狀態或信息,需要在dialog外進行保存,例如利用activity。
總結:
編程思想:封裝接口
在小例子中,fragment會調用activity的onDialogDone()來顯示Toast等信息。在真正項目中,fragment的編寫並不需要了解activity的各類方法,好的編程風格是將fragment所涉及的方法以接口的方式封裝起來,如下:
public interface OnMyDialogClickListener {
  public void onDialogDone(String tag, boolean cancelled, CharSequence message);
}
在activity中,增加接口的實現,如下:
public class MainActivity extends Activity implements OnMyDialogClickListener{
  ......
  public void onDialogDone(String tag, boolean cancelled, CharSequence message) {
    String s = tag + " responds with: " + message;
    if(cancelled)
      s = tag + " was cancelled by the user";
    Toast.makeText(this, s, Toast.LENGTH_LONG).show();
    showInfo(s);
  }
}
相應地,在fragment中,對該方法的調用,可以寫為:
OnMyDialogClickListener act = (OnMyDialogClickListener)getActivity();
act.onDialogDone(……);
對於一些大型項目,如果我們無法確定activity是否真的實現了接口,可以在fragment的早期,即剛關聯activity的階段進行檢測,如下:
@Override
public void onAttach(Activity activity) {
  //onAttach()是合適的早期階段進行檢查MyActivity是否真的實現了接口。
  //采用接口的方式,dialog無需詳細了解MyActivity,只需了解其所需的接口函數,這是真正項目中應采用的方式。
  try{
    OnMyDialogClickListener act = (OnMyDialogClickListener)activity;
  }catch(ClassCastException e){
    …... activity並不真正支持接口的異常處理......
  }
  super.onAttach(activity);
}
fragment和activity以其他fragment之間的通信:
小例子演示了通過getActivity()獲取接口對象或者直接獲取activity的對象,實現兩者之間的通信。此外fragment也可以通過fragment管理器,通過tag,獲取其他fragment實例,從而進行fragment之間的通信。當然從編程思想的角度看,fragment之間的過多進行交叉調用,不利於程序的管控。
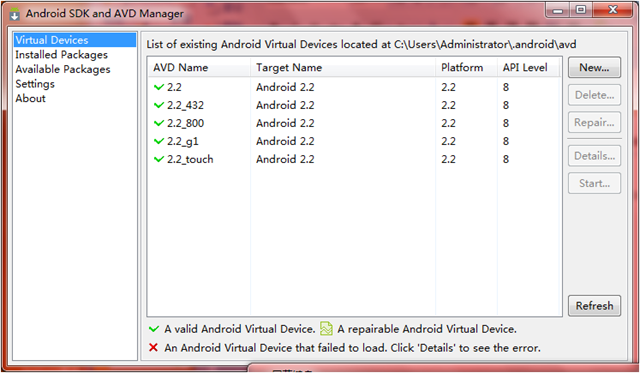 Android 模擬器的使用詳細介紹
讓我們一起學習一下模擬器的使用。本文內容如下: 模擬器和真機的比較 創建Android模擬器(emulator) 運行Android模擬器 設置簡體中文語言界面
 Android開發之基於Service的音樂播放器
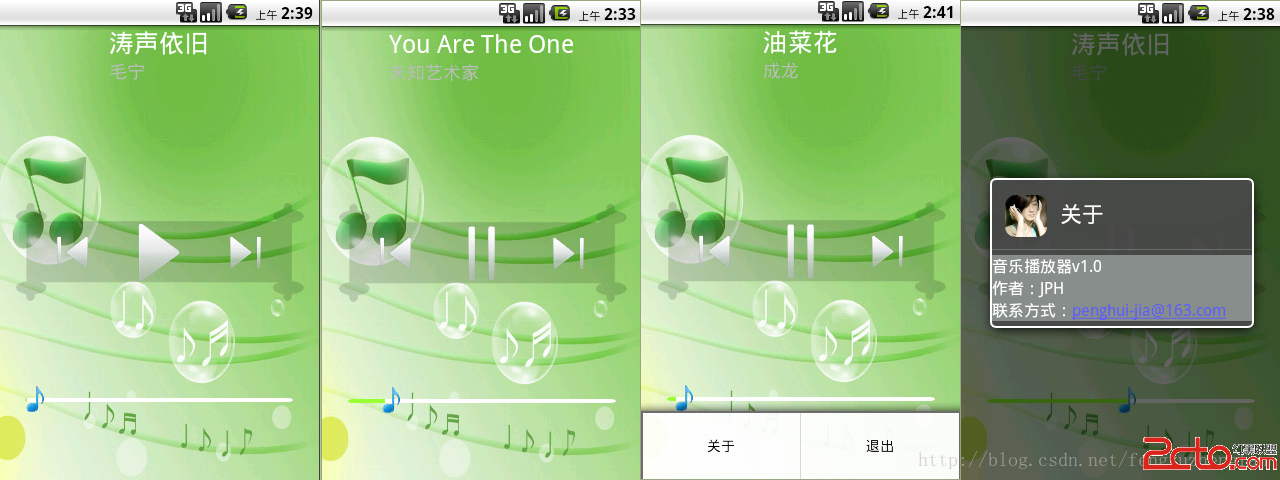
這是一個基於Service組件的音樂播放器,程序的音樂將會由後台的Service組件負責播放,當後台的播放狀態改變時,程序將會通過發送廣播通知前台Activity更新界面
 Toast 自定義布局 完成圖片上傳提示
功能實現 : Activiyt : package com.lvche.lvchedingdang.activity.api_calling;impo
 Android中使用sax解析xml文件的方法
SAX是一個解析速度快並且占用內存少的xml解析器,非常適合用於Android等移動設備。 SAX解析XML文件采用的是事件驅動,也就是說,它並不需要解析完整個文檔,在按