編輯:關於Android編程
很多時候Android常用的控件不能滿足我們的需求,那麼我們就需要自定義一個控件了。今天做了一個自定義控件的實例,來分享下。
首先定義一個layout實現按鈕內部布局:
<?xmlversion="1.0"encoding="utf-8"?>
 <LinearLayoutxmlns:android="http://schemas.android.com/apk/res/android"
 android:layout_width="fill_parent"
 android:layout_height="fill_parent"
 android:orientation="horizontal">

 <ImageView
 android:id="@+id/imageView1"
 android:layout_width="wrap_content"
 android:layout_height="wrap_content"
 android:layout_gravity="center_vertical"
 android:paddingBottom="5dip"
 android:paddingLeft="40dip"
 android:paddingTop="5dip"
 android:src="@drawable/right_icon"/>

 <TextView
 android:id="@+id/textView1"
 android:layout_width="wrap_content"
 android:layout_height="wrap_content"
 android:layout_gravity="center_vertical"
 android:layout_marginLeft="8dip"
 android:text="確定"
 android:textColor="#000000"/>

 </LinearLayout>
接下來寫一個類繼承LinearLayout,導入剛剛的布局,並且設置需要的方法,從而使的能在代碼中控制這個自定義控件內容的顯示。
 public class ImageBtn extendsLinearLayout {

 privateImageView imageView;
 privateTextView textView;

 publicImageBtn(Context context) {
 super(context);
 // TODO Auto-generated constructor stub
 }
 publicImageBtn(Context context, AttributeSet attrs) {
 super(context, attrs);
 // TODO Auto-generated constructor stub
 LayoutInflater inflater=(LayoutInflater) context.getSystemService(Context.LAYOUT_INFLATER_SERVICE);
 inflater.inflate(R.layout.imagebtn,this);
 imageView=(ImageView) findViewById(R.id.imageView1);
 textView=(TextView)findViewById(R.id.textView1);
 }

 /**
 * 設置圖片資源
 */
 publicvoidsetImageResource(intresId) {
 imageView.setImageResource(resId);
 }

 /**
 * 設置顯示的文字
 */
 publicvoidsetTextViewText(String text) {
 textView.setText(text);
 }

 }
在需要使用這個自定義控件的layout中加入這控件,只需要在xml中加入即可。
 <?xmlversion="1.0"encoding="utf-8"?>
 <LinearLayoutxmlns:android="http://schemas.android.com/apk/res/android"
 android:layout_width="fill_parent"
 android:layout_height="fill_parent"
 android:orientation="horizontal">

 <cn.com.karl.view.ImageBtn
 android:id="@+id/btn_right"
 android:layout_height="wrap_content"
 android:layout_width="wrap_content"
 android:background="@drawable/btn"
 />

 <cn.com.karl.view.ImageBtn
 android:id="@+id/btn_error"
 android:layout_marginLeft="5dp"
 android:layout_height="wrap_content"
 android:layout_width="wrap_content"
 android:background="@drawable/btn"
 />

 </LinearLayout>
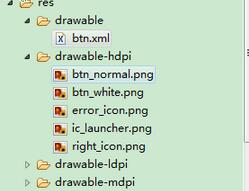
這裡用到了背景圖片 在drawable/btn.xml
 <?xmlversion="1.0"encoding="utf-8"?>
 <selectorxmlns:android="http://schemas.android.com/apk/res/android">

 <itemandroid:state_focused="true"android:state_pressed="false"android:drawable="@drawable/btn_normal"></item>
 <itemandroid:state_pressed="true"android:drawable="@drawable/btn_white"></item>
 <itemandroid:state_checked="true"android:drawable="@drawable/btn_white"></item>
 <itemandroid:state_focused="false"android:state_pressed="false"android:drawable="@drawable/btn_normal"></item>

 </selector>
最後在activity中設置該控件,和其他控件差不多:
 public class IdentifyButtonActivity extendsActivity {
 privateImageBtn imageBtn1;
 privateImageBtn imageBtn2;
 @Override
 protectedvoidonCreate(Bundle savedInstanceState) {
 // TODO Auto-generated method stub
 super.onCreate(savedInstanceState);
 setContentView(R.layout.identifybutton);

 imageBtn1=(ImageBtn)this.findViewById(R.id.btn_right);
 imageBtn2=(ImageBtn)this.findViewById(R.id.btn_error);
 imageBtn1.setTextViewText("確定");
 imageBtn2.setTextViewText("取消");
 imageBtn1.setImageResource(R.drawable.right_icon);
 imageBtn2.setImageResource(R.drawable.error_icon);

 imageBtn1.setOnClickListener(newView.OnClickListener() {

 publicvoidonClick(View v) {
 // TODO Auto-generated method stub
 Toast.makeText(getApplicationContext(),"點擊的正確按鈕",1).show();
 }
 });

 imageBtn2.setOnClickListener(newView.OnClickListener() {

 publicvoidonClick(View v) {
 // TODO Auto-generated method stub
 Toast.makeText(getApplicationContext(),"點擊的錯誤按鈕",1).show();
 }
 });
 }
 }
最後看看我們自定義控件的效果吧!
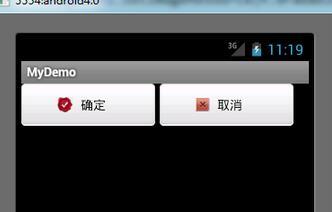
以上就是本文的全部內容,希望對大家的學習有所幫助,也希望大家多多支持本站。
 一起學android之自定義控件顯示點贊用戶並通過用戶名稱進入該用戶主頁的功能
效果圖:以上效果類似於顯示點贊用戶的界面,我們可以通過點擊不同的昵稱進入每個人的個人主頁。 關於公共控件,請點擊文章下方的git地址。 第一步:我們為
 Android自定義View之用觀察者模式寫自定義監聽事件以及常用豎直型字母索引欄的寫法
概述:目前,豎直索引欄還是很流行的,微信、美團、手機通訊錄等各種常用軟件都要用到它。Demo寫一個自定義View,利用觀察者模式,自定義其中的點擊事件。public cl
 Android仿ViVO X6 極速閃充動畫效果
一直都在看自定義View,經過一個星期的堅持,基本上能夠寫出一些比較實用的控件效果了,今天天氣太熱,就待在家裡玩手機,然後手機沒電了,在充電的時候,看到了手機的充電動畫,
 Android中View自定義組合控件的基本編寫方法
有很多情況下,我們只要運用好Android給我提供好的控件,經過布局巧妙的結合在一起,就是一個新的控件,我稱之為“自定義組合控件”。那麼,這種自定義組合控件在什麼情況下用