編輯:關於Android編程
ViewStub可以在運行時動態的添加布局。幫助文檔給定的定義是:
"A ViewStub is an invisible, zero-sized View that can be used to lazily inflate layout resources at runtime. When a ViewStub is made visible, or when inflate() is invoked, the layout resource is inflated. The ViewStub then replaces itself in its parent with the inflated View or Views. Therefore, the ViewStub exists in the view hierarchy until setVisibility(int) or inflate() is invoked. The inflated View is added to the ViewStub's parent with the ViewStub's layout parameters. Similarly, you can define/override the inflate View's id by using the ViewStub's inflatedId property.”
總之是:ViewStub可以給其他的view事先占據好位置,當需要的時候調用inflater()或者是setVisible()方法顯示這些View組件。
layout.xml:
<LinearLayout xmlns:android="http://schemas.android.com/apk/res/android"
  xmlns:tools="http://schemas.android.com/tools"
  android:layout_width="match_parent"
  android:layout_height="match_parent"
  android:orientation="vertical"
  tools:context=".MainActivity" >

  <LinearLayout
    android:layout_width="match_parent"
    android:layout_height="wrap_content"
    android:orientation="horizontal" >

    <Button
      android:id="@+id/showBtn"
      android:layout_width="match_parent"
      android:layout_height="50dip"
      android:layout_weight="1"
      android:text="show" />

    <Button
      android:id="@+id/deleteBtn"
      android:layout_width="match_parent"
      android:layout_height="50dip"
      android:layout_weight="1"
      android:text="delete" />
  </LinearLayout>

  <LinearLayout
    android:layout_width="wrap_content"
    android:layout_height="wrap_content" >

    <ViewStub
      android:id="@+id/viewstub"
      android:layout_width="wrap_content"
      android:layout_height="wrap_content"
      android:layout="@layout/next" />

  </LinearLayout>

</LinearLayout>
next.xml:
<?xml version="1.0" encoding="utf-8"?>
<LinearLayout xmlns:android="http://schemas.android.com/apk/res/android"
  android:layout_width="match_parent"
  android:layout_height="match_parent"
  android:orientation="vertical" >

  <ProgressBar
    android:id="@+id/progressBar1"

    android:layout_width="wrap_content"
    android:layout_height="wrap_content" />

</LinearLayout>
Main.java:
package com.example.android_viewstub1;

import android.os.Bundle;
import android.annotation.SuppressLint;
import android.app.Activity;
import android.view.Menu;
import android.view.View;
import android.view.View.OnClickListener;
import android.view.ViewStub;
import android.widget.Button;

public class MainActivity extends Activity {

  Button btn1, btn2;
  ViewStub viewStub;

  @Override
  protected void onCreate(Bundle savedInstanceState) {
    super.onCreate(savedInstanceState);
    setContentView(R.layout.activity_main);

    btn1 = (Button) this.findViewById(R.id.showBtn);
    btn2 = (Button) this.findViewById(R.id.deleteBtn);
    viewStub = (ViewStub) this.findViewById(R.id.viewstub);
    btn1.setOnClickListener(new OnClickListener() {
      @SuppressLint("NewApi")
      @Override
      public void onClick(View arg0) {
        viewStub.setVisibility(View.VISIBLE);
      }

    });
    btn2.setOnClickListener(new OnClickListener() {
      @SuppressLint("NewApi")
      @Override
      public void onClick(View arg0) {
        viewStub.setVisibility(View.INVISIBLE);
      }

    });

  }

}
效果:

以上就是本文的全部內容,希望對大家的學習有所幫助,也希望大家多多支持本站。
 開發隨筆:時間控件、數據庫、字符串及相關邏輯
開發隨筆,小結項目開發中的得與失,要點如下:進展-推薦功能及相關頁面:1.相關控件的使用:TimePicker、RadioGroup、RadioButton、Button
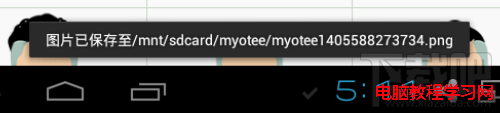 臉萌Myotee的照片(頭像)保存在哪裡
好不容易用臉萌做了一個萌萌的卡通頭像,點擊“存儲”按鈕之後卻不知道剛才制作的卡通頭像文件保存到哪裡去了?難道要白做了啊?當然不是的,
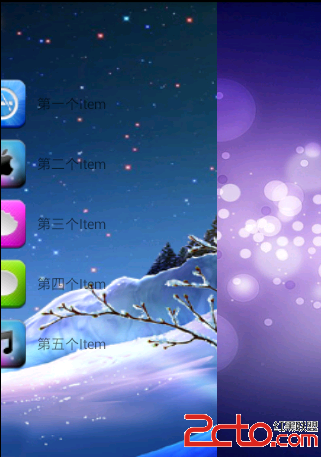 自定義android側滑菜單
這裡實現兩種側滑菜單效果,第一種拖拽內容部分,菜單像是被拖出來的感覺的這種效果,第二種是拖拽內容部分,菜單在內容後面不動,感覺有一種層次感的效果,如下 packa
 Android控件PopupWindow模仿ios底部彈窗
前言在H5火熱的時代,許多框架都出了底部彈窗的控件,在H5被稱為彈出菜單ActionSheet,今天我們也來模仿一個ios的底部彈窗,取材於蘋果QQ的選擇頭像功能。正文廢