編輯:關於Android編程
需求:Activity(fragment)跳轉的時候當前界面裂開,上下各自拉出手機屏幕,之後跳轉到相對應的Activity.整體效果圖如下
思路:1,在當前Activity中截取當前手機的屏幕獲取到bitmap,然後根據具體位置(比如這裡是掃碼圖標中間裂開)計算獲取到,中間裂開距離手機上和下的距離,在傳遞給跳轉後的Activity
(跳轉前的Activity做兩件事情,1,截取屏幕獲取bitmap2,計算出具體裂開位置距離屏幕上下的距離,傳遞給第二個activity方便來切割真個截圖)
2,跳轉後的Activity執行動畫即可
(,(我上面分析的沒有帶上我截圖中自帶兩個view風別跟著上下圖已啟動的如果需要的話可以私密我))

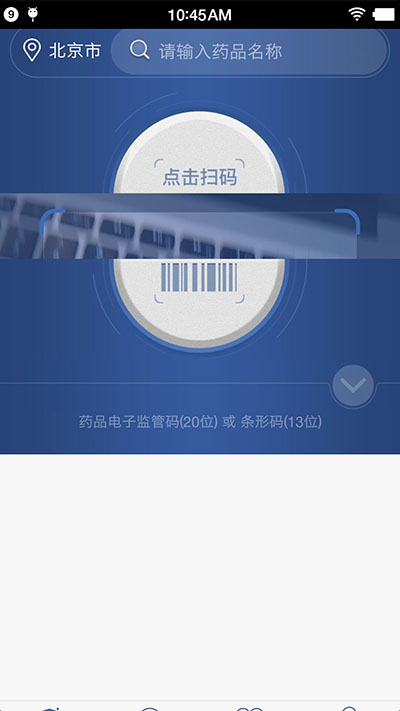

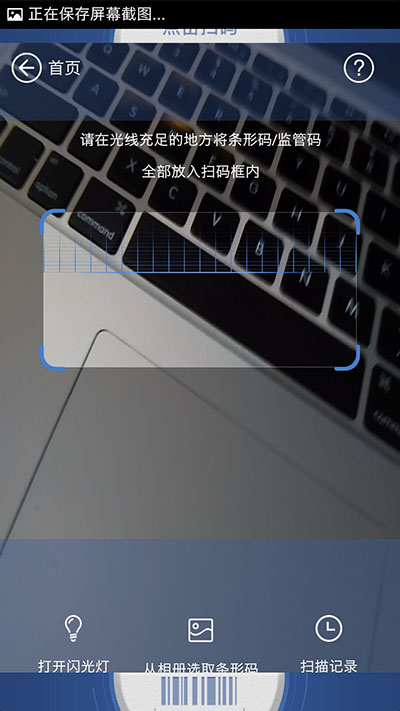
整體的效果就如上圖,1,點擊掃碼 2,中間裂開執行上線拉伸動畫,(這個時候是可以看見需要跳轉的Activity的)3,動畫結束
具體實現
一:跳轉前activity的截屏獲取bitmap,並且獲取到裂開位置的數值,傳遞給第二個activity,方便之後的切割
//這個bitmap我是用public static Bitmap bitmap;接受的方便第二個activity直接獲取
bitmap = ScreenShot.takeScreenShot(getActivity());
**//這個是工具類直接調用就可以獲取到手機屏幕了
package com.lzyc.ybtappcal.util;
import android.app.Activity;
import android.graphics.Bitmap;
import android.graphics.Rect;
import android.view.View;
import com.lzyc.ybtappcal.activity.LoaddingSleepActivity;
import java.io.FileNotFoundException;
import java.io.FileOutputStream;
import java.io.IOException;
import java.util.ArrayList;
import java.util.List;
/**
* Created by lovelin on 2016/7/20.
*/
public class ScreenShot {
private static int mHiddenViewMeasureHeight; //中間切割的高度
private static int screenHeightPixels; //屏幕高度
// 獲取指定Activity的截屏,保存到png文件
public static Bitmap takeScreenShot(Activity activity) {
// View是你需要截圖的View
View view = activity.getWindow().getDecorView();
view.setDrawingCacheEnabled(true);
view.buildDrawingCache();
Bitmap b1 = view.getDrawingCache();
// 獲取狀態欄高度
Rect frame = new Rect();
activity.getWindow().getDecorView().getWindowVisibleDisplayFrame(frame);
int statusBarHeight = frame.top;
LogUtil.e("TAG", "" + statusBarHeight);
// 獲取屏幕長和高
int width = activity.getWindowManager().getDefaultDisplay().getWidth();
int height = activity.getWindowManager().getDefaultDisplay()
.getHeight();
// 去掉標題欄
// Bitmap b = Bitmap.createBitmap(b1, 0, 25, 320, 455);
Bitmap b = Bitmap.createBitmap(b1, 0, statusBarHeight, width, height
- statusBarHeight);
view.destroyDrawingCache();
return b;
}
// 保存到sdcard
private static void savePic(Bitmap b, String strFileName) {
FileOutputStream fos = null;
try {
fos = new FileOutputStream(strFileName);
if (null != fos) {
b.compress(Bitmap.CompressFormat.PNG, 90, fos);
fos.flush();
fos.close();
}
} catch (FileNotFoundException e) {
e.printStackTrace();
} catch (IOException e) {
e.printStackTrace();
}
}
// 程序入口
public static void shoot(Activity a) {
// ScreenShot.savePic(ScreenShot.takeScreenShot(a), "sdcard/xx.png");
}
}
1,獲取當前掃描按鈕中間的距離,
private void getMessureHeight() {
v.id_linea_top.getViewTreeObserver().addOnGlobalLayoutListener(new ViewTreeObserver.OnGlobalLayoutListener() {
@TargetApi(Build.VERSION_CODES.JELLY_BEAN)
@Override
public void onGlobalLayout() {
int imageHanlfHeight = (v.iv_fg_top.getBottom() - v.iv_fg_top.getTop()) / 2; //image 的一半高度
int bottom = v.iv_fg_top.getBottom();
/**
*imageview掃描按鈕底部距離 - 按鈕本身一半的距離 = 距離手機頂部的距離(就是播放動畫需要截取的上半圖片的高度)
*/
midData = bottom - imageHanlfHeight;
v.id_linea_top.getViewTreeObserver().removeOnGlobalLayoutListener(this);
}
});
}
2,*緊接著界面跳轉傳遞參數midData 即可
Bundle mBundle = new Bundle();
mBundle.putInt(Contants.KEY_PAGE_SEARCH, Contants.VAL_PAGE_SEARCH_TOP);
mBundle.putInt("midData", midData);
mBundle.putInt("h", h);
mBundle.putInt("topSplitHeight", topSplitHeight);
openActivityNoAnim(CaptureActivity.class, mBundle);
3,*跳轉取消系統動畫
public void openActivityNoAnim(Class<? extends Activity> ActivityClass, Bundle b) {
Intent intent = new Intent(mContext, ActivityClass);
intent.setFlags(Intent.FLAG_ACTIVITY_NO_ANIMATION);
intent.putExtras(b);
startActivity(intent);
}
二:代碼截取上一個activity(fragment)的bitmap分成兩個執行動畫的bitmap
private void cutting() {
// 切割第一個圖
bitmapTop = Bitmap.createBitmap(TopFragment.bitmap, 0, 0, TopFragment.bitmap.getWidth(), this.midData);
//且第二個圖
bitmapBottom = Bitmap.createBitmap(TopFragment.bitmap, 0, this.midData, TopFragment.bitmap.getWidth(), TopFragment.bitmap.getHeight() - midData);
}
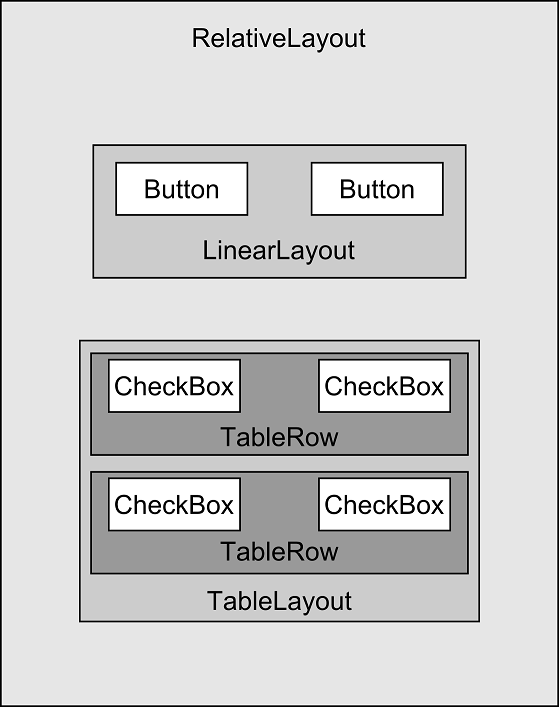
1,在第二個Activity最外層先一個相對布局蓋在上面用來執行動畫我閒的布局如下(這裡我只貼出在外層的布局,裡面需要顯示的布局就不寫了)
<最外層有一個相對布局,這裡就不寫了只寫一個播放動畫的布局>
<LinearLayout
android:layout_width="match_parent"
android:layout_height="match_parent"
android:orientation="vertical">
<LinearLayout
android:id="@+id/id_linear_capture_top"
android:layout_width="match_parent"
android:layout_height="wrap_content"
android:orientation="vertical">
<ImageView
android:id="@+id/loading_iv_top"
android:layout_width="wrap_content"
android:layout_height="wrap_content" />
</LinearLayout>
<LinearLayout
android:id="@+id/id_linear_capture_under"
android:layout_width="match_parent"
android:layout_height="match_parent"
android:orientation="vertical">
<ImageView
android:id="@+id/loading_iv_bottm"
android:layout_width="wrap_content"
android:layout_height="wrap_content" />
</LinearLayout>
</LinearLayout>
2,找到view,設置他們上下需要執行動畫的bitmap
/**
* 播放動畫
*/
private void startAnima() {
cutting();
final ImageView loading_iv_top = (ImageView) findViewById(R.id.loading_iv_top);
final ImageView loading_iv_bottm = (ImageView) findViewById(R.id.loading_iv_bottm);
id_linear_capture_top = (LinearLayout) findViewById(R.id.id_linear_capture_top);
id_linear_capture_under = (LinearLayout) findViewById(R.id.id_linear_capture_under);
final RelativeLayout id_relative_capture = (RelativeLayout) findViewById(R.id.id_relative_capture);
//設置上下播放拉伸圖片
loading_iv_top.setImageBitmap(this.bitmapTop);
loading_iv_bottm.setImageBitmap(this.bitmapBottom);
id_relative_capture.getViewTreeObserver().addOnGlobalLayoutListener(new ViewTreeObserver.OnGlobalLayoutListener() {
@TargetApi(Build.VERSION_CODES.JELLY_BEAN)
@Override
public void onGlobalLayout() {
//設置了圖片所以在這裡獲取他們兩個的高,就是執行動畫的距離
topHeight = loading_iv_top.getHeight(); //id_linear_capture_top id_linear_capture_under
bottonHeight = loading_iv_bottm.getHeight();
ObjectAnimator animator = ObjectAnimator.ofFloat(id_linear_capture_top, "translationY", 0, -topHeight);
ObjectAnimator animator1 = ObjectAnimator.ofFloat(id_linear_capture_under, "translationY", 0, bottonHeight);
AnimatorSet animSet = new AnimatorSet();
animSet.play(animator).with(animator1);
animSet.setDuration(400);
animSet.start();
id_relative_capture.getViewTreeObserver().removeOnGlobalLayoutListener(this);
}
});
}
3,到此動畫打開操作完畢,(我上面分析的沒有帶上我截圖中自帶兩個view風別跟著上下圖已啟動的如果需要的話可以私密我)
最後總結:1,當前截屏獲取bitmap2,第二個activity剪切上線需要執行動畫的bitma3,在執行動畫(這裡只寫打開的動畫關閉的同理也就是一個動畫而已)
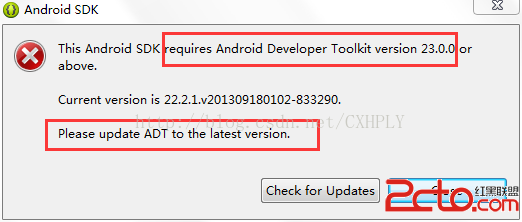 Android初學者Eclispe環境啟動遇This Android SDK requires Android Developer Toolkit version 23.0.0 or above
當我們進行Android開發,配置安裝環境Eclispe&SDK&ADT過程中,在SDK在線安裝後,重新登錄Eclispe,會出現警告框:This And
 Android性能優化典范之多線程篇
本文涉及的內容有:多線程並發的性能問題,介紹了 AsyncTask,HandlerThread,IntentService 與 ThreadPool 分別適合的使用場景
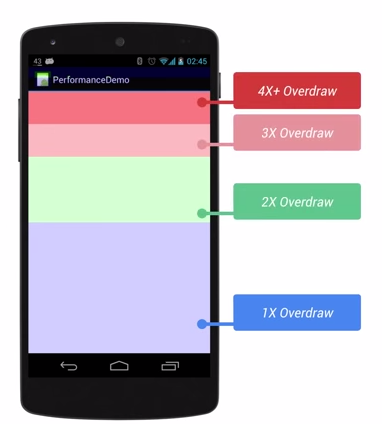 Android 性能優化 UI優化
前言:本篇文章主要學習UI性能優化。1. 應用UI卡頓的原理1.1 原理用戶感覺到卡頓的原理就是在渲染時出現了掉幀。Android系統要求 1s內渲染60幀,即渲染1幀必
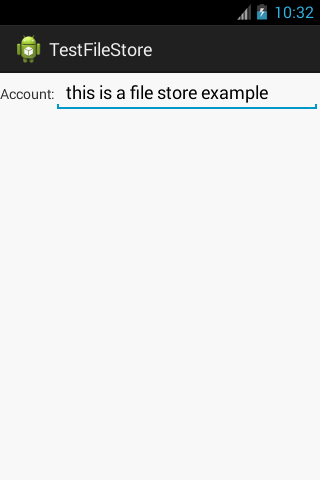 Android持久化技術之文件的讀取與寫入實例詳解
本文實例分析了Android持久化技術之文件的讀取與寫入操作。分享給大家供大家參考,具體如下:1、文件存儲(1)在Android的持久化技術中,文件存儲是最基本的一種數據