編輯:關於Android編程
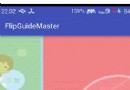
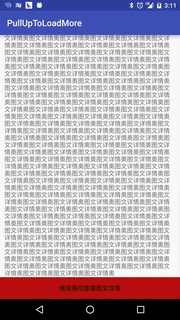
一、淘寶商品詳情頁效果
我們的效果
二、實現思路
使用兩個scrollView,兩個scrollView 豎直排列,通過自定義viewGroup來控制兩個scrollView的豎直排列,以及滑動事件的處理。如下圖
三、具體實現
1、繼承viewGroup自定義布局View 重寫onMeasure()和onLayout方法,在onLayout方法中完成對兩個子ScrollView的豎直排列布局,代碼如下:
布局文件:
<RelativeLayout xmlns:android="http://schemas.android.com/apk/res/android"
 xmlns:tools="http://schemas.android.com/tools"
 android:layout_width="match_parent"
 android:layout_height="match_parent"
 tools:context="com.baoyunlong.view.pulluptoloadmore.MainActivity">
 <com.baoyunlong.view.pulluptoloadmore.PullUpToLoadMore
  android:layout_width="match_parent"
  android:layout_height="match_parent"
  android:orientation="vertical">
  <com.baoyunlong.view.pulluptoloadmore.MyScrollView
   android:layout_width="match_parent"
   android:layout_height="match_parent"
   android:fillViewport="true">
   <LinearLayout
    android:layout_width="match_parent"
    android:layout_height="match_parent"
    android:orientation="vertical">
    <ImageView
     android:scaleType="fitXY"
     android:src="@drawable/a1"
     android:layout_width="match_parent"
     android:layout_height="180dp" />
    <TextView
     android:text="這裡是標題"
     android:textSize="18dp"
     android:layout_marginRight="10dp"
     android:layout_marginLeft="10dp"
     android:layout_marginTop="10dp"
     android:layout_width="match_parent"
     android:layout_height="wrap_content" />
    <TextView
     android:layout_marginTop="10dp"
     android:text="子標題"
     android:layout_marginLeft="10dp"
     android:layout_marginRight="10dp"
     android:textSize="18dp"
     android:layout_width="match_parent"
     android:layout_height="wrap_content" />
    ..............
    <LinearLayout
     android:layout_height="0dp"
     android:layout_weight="1"
     android:gravity="bottom"
     android:layout_width="match_parent">
     <TextView
      android:layout_width="match_parent"
      android:layout_height="wrap_content"
      android:height="50dp"
      android:background="#b11"
      android:gravity="center"
      android:text="繼續拖動查看圖文詳情"
      android:textColor="#000" />
    </LinearLayout>
   </LinearLayout>
  </com.baoyunlong.view.pulluptoloadmore.MyScrollView>
  <com.baoyunlong.view.pulluptoloadmore.MyScrollView
   android:layout_width="match_parent"
   android:layout_height="match_parent"
   android:fillViewport="true">
   <LinearLayout
    android:layout_width="match_parent"
    android:layout_height="match_parent"
    android:gravity="center"
    android:orientation="vertical">
    <ImageView
     android:layout_width="wrap_content"
     android:layout_height="wrap_content"
     android:src="@drawable/a1" />
    <ImageView
     android:layout_width="wrap_content"
     android:layout_height="wrap_content"
     android:src="@drawable/a3" />
    .........
   </LinearLayout>
</com.baoyunlong.view.pulluptoloadmore.MyScrollView> </com.baoyunlong.view.pulluptoloadmore.PullUpToLoadMore>
</RelativeLayout>
代碼:
public class PullUpToLoadMore extends ViewGroup {
 public PullUpToLoadMore(Context context) {
  super(context);
 }
 public PullUpToLoadMore(Context context, AttributeSet attrs) {
  super(context, attrs);
 }
 public PullUpToLoadMore(Context context, AttributeSet attrs, int defStyleAttr) {
  super(context, attrs, defStyleAttr);
 }
 @Override
 protected void onMeasure(int widthMeasureSpec, int heightMeasureSpec) {
  super.onMeasure(widthMeasureSpec, heightMeasureSpec);
  measureChildren(widthMeasureSpec, heightMeasureSpec);
 }
 @Override
 protected void onLayout(boolean changed, int l, int t, int r, int b) {
  int childCount = getChildCount();
  int childTop = t;
  for (int i = 0; i < childCount; i++) {
   View child = getChildAt(i);
   child.layout(l, childTop, r, childTop + child.getMeasuredHeight());
   childTop += child.getMeasuredHeight();
  }
 }
}
2、處理滑動事件
規則如下 :
(1)、當處於第一屏時 第一個ScrollView已經滑動到底部並且滑動方向是往上滑動,這個時候滑動事件應該交給父view處理也就是攔截事件讓onInterceptTouchEvent返回true.然後父view通過scrollBy()方法滾動,顯示出第二個scrollView。
(2)、當處於第二屏時 第二個ScrollView已經滑動到頂部並且滑動方向是往下滑動,這個時候滑動事件交給父view處理,根據滑動事件顯示出第一個ScrollView。
(3)、當手指離開屏幕時,根據滑動速度來決定是回彈到第一個ScrollView還是第二個ScrollView,通過VelocityTracker來獲取滑動速度。
3、一些細節的處理
(1)、如果仔細看觀察淘寶的實現效果你會發現,當你滑動到剛剛看到 “繼續拖動,查看圖文詳情”的時候,手指抬起,然後再按下重新向上拖動你會發現,第二頁並不會劃出來,而是停留在了“繼續拖動,查看圖文詳情”的底部,京東的效果也是一樣。這樣用戶體驗不太好,我們來優化一下。其實通過查看ScrollView的源碼可以看出來,這是因為ScrollView類的onTouchEvent方法的默認實現,調用了parent.requestDisallowInterceptTouchEvent(true)方法 阻止了我們攔截事件,導致我們父view的onInterceptTouchEvent方法無法執行,也就攔截不到事件,攔截不到事件我們的onTouchEvent就無法執行,onTouchEvent無法執行,我們寫在onTouchEvent裡面的滾動邏輯就執行不到了,導致了上面我們看到的劃不動的效果。解決方法就是,我們需要重寫dispatchTouchEvent()方法,防止子view干擾我們,這樣我們滑動的時候就可以一氣呵成了。代碼如下:
@Override
 public boolean dispatchTouchEvent(MotionEvent ev) {
  //防止子View禁止父view攔截事件
  this.requestDisallowInterceptTouchEvent(false);
  return super.dispatchTouchEvent(ev);
 }
(2)、監聽ScrollView滑動事件的問題
ScrollView沒有提供滾動事件的監聽方法,也就沒法判斷是否滾動到了頂部,或者底部,這裡我們繼承ScrollView 自己實現滾動事件監聽。
/**
 * Created by baoyunlong on 16/6/8.
 */
public class MyScrollView extends ScrollView {
 private static String TAG=MyScrollView.class.getName();
 public void setScrollListener(ScrollListener scrollListener) {
  this.mScrollListener = scrollListener;
 }
 private ScrollListener mScrollListener;
 public MyScrollView(Context context) {
  super(context);
 }
 public MyScrollView(Context context, AttributeSet attrs) {
  super(context, attrs);
 }
 public MyScrollView(Context context, AttributeSet attrs, int defStyleAttr) {
  super(context, attrs, defStyleAttr);
 }
 @Override
 public boolean onTouchEvent(MotionEvent ev) {
  switch (ev.getAction()){
   case MotionEvent.ACTION_MOVE:
    if(mScrollListener!=null){
     int contentHeight=getChildAt(0).getHeight();
     int scrollHeight=getHeight();
     int scrollY=getScrollY();
     mScrollListener.onScroll(scrollY);
     if(scrollY+scrollHeight>=contentHeight||contentHeight<=scrollHeight){
      mScrollListener.onScrollToBottom();
     }else {
      mScrollListener.notBottom();
     }
     if(scrollY==0){
      mScrollListener.onScrollToTop();
     }
    }
    break;
  }
  boolean result=super.onTouchEvent(ev);
  requestDisallowInterceptTouchEvent(false);
  return result;
 }
 public interface ScrollListener{
  void onScrollToBottom();
  void onScrollToTop();
  void onScroll(int scrollY);
  void notBottom();
 }
4、完整代碼如下
/**
 * Created by baoyunlong on 16/6/8.
 */
public class PullUpToLoadMore extends ViewGroup {
 public static String TAG = PullUpToLoadMore.class.getName();
 MyScrollView topScrollView, bottomScrollView;
 VelocityTracker velocityTracker = VelocityTracker.obtain();
 Scroller scroller = new Scroller(getContext());
 int currPosition = 0;
 int position1Y;
 int lastY;
 public int scaledTouchSlop;//最小滑動距離
 int speed = 200;
 boolean isIntercept;
 public boolean bottomScrollVIewIsInTop = false;
 public boolean topScrollViewIsBottom = false;
 public PullUpToLoadMore(Context context) {
  super(context);
  init();
 }
 public PullUpToLoadMore(Context context, AttributeSet attrs) {
  super(context, attrs);
  init();
 }
 public PullUpToLoadMore(Context context, AttributeSet attrs, int defStyleAttr) {
  super(context, attrs, defStyleAttr);
  init();
 }
 private void init() {
  post(new Runnable() {
   @Override
   public void run() {
    topScrollView = (MyScrollView) getChildAt(0);
    bottomScrollView = (MyScrollView) getChildAt(1);
    topScrollView.setScrollListener(new MyScrollView.ScrollListener() {
     @Override
     public void onScrollToBottom() {
      topScrollViewIsBottom = true;
     }
     @Override
     public void onScrollToTop() {
     }
     @Override
     public void onScroll(int scrollY) {
     }
     @Override
     public void notBottom() {
      topScrollViewIsBottom = false;
     }
    });
    bottomScrollView.setScrollListener(new MyScrollView.ScrollListener() {
     @Override
     public void onScrollToBottom() {
     }
     @Override
     public void onScrollToTop() {
     }
     @Override
     public void onScroll(int scrollY) {
      if (scrollY == 0) {
       bottomScrollVIewIsInTop = true;
      } else {
       bottomScrollVIewIsInTop = false;
      }
     }
     @Override
     public void notBottom() {
     }
    });
    position1Y = topScrollView.getBottom();
    scaledTouchSlop = ViewConfiguration.get(getContext()).getScaledTouchSlop();
   }
  });
 }
 @Override
 public boolean dispatchTouchEvent(MotionEvent ev) {
  //防止子View禁止父view攔截事件
  this.requestDisallowInterceptTouchEvent(false);
  return super.dispatchTouchEvent(ev);
 }
 @Override
 public boolean onInterceptTouchEvent(MotionEvent ev) {
  int y = (int) ev.getY();
  switch (ev.getAction()) {
   case MotionEvent.ACTION_DOWN:
    lastY = y;
    break;
   case MotionEvent.ACTION_MOVE:
    //判斷是否已經滾動到了底部
    if (topScrollViewIsBottom) {
     int dy = lastY - y;
     //判斷是否是向上滑動和是否在第一屏
     if (dy > 0 && currPosition == 0) {
      if (dy >= scaledTouchSlop) {
       isIntercept = true;//攔截事件
       lastY=y;
      }
     }
    }
    if (bottomScrollVIewIsInTop) {
     int dy = lastY - y;
     //判斷是否是向下滑動和是否在第二屏
     if (dy < 0 && currPosition == 1) {
      if (Math.abs(dy) >= scaledTouchSlop) {
       isIntercept = true;
      }
     }
    }
    break;
  }
  return isIntercept;
 }
 @Override
 public boolean onTouchEvent(MotionEvent event) {
  int y = (int) event.getY();
  velocityTracker.addMovement(event);
  switch (event.getAction()) {
   case MotionEvent.ACTION_MOVE:
    int dy = lastY - y;
    if (getScrollY() + dy < 0) {
     dy = getScrollY() + dy + Math.abs(getScrollY() + dy);
    }
    if (getScrollY() + dy + getHeight() > bottomScrollView.getBottom()) {
     dy = dy - (getScrollY() + dy - (bottomScrollView.getBottom() - getHeight()));
    }
    scrollBy(0, dy);
    break;
   case MotionEvent.ACTION_UP:
    isIntercept = false;
    velocityTracker.computeCurrentVelocity(1000);
    float yVelocity = velocityTracker.getYVelocity();
    if (currPosition == 0) {
     if (yVelocity < 0 && yVelocity < -speed) {
      smoothScroll(position1Y);
      currPosition = 1;
     } else {
      smoothScroll(0);
     }
    } else {
     if (yVelocity > 0 && yVelocity > speed) {
      smoothScroll(0);
      currPosition = 0;
     } else {
      smoothScroll(position1Y);
     }
    }
    break;
  }
  lastY = y;
  return true;
 }
 @Override
 protected void onMeasure(int widthMeasureSpec, int heightMeasureSpec) {
  super.onMeasure(widthMeasureSpec, heightMeasureSpec);
  measureChildren(widthMeasureSpec, heightMeasureSpec);
 }
 @Override
 protected void onLayout(boolean changed, int l, int t, int r, int b) {
  int childCount = getChildCount();
  int childTop = t;
  for (int i = 0; i < childCount; i++) {
   View child = getChildAt(i);
   child.layout(l, childTop, r, childTop + child.getMeasuredHeight());
   childTop += child.getMeasuredHeight();
  }
 }
 //通過Scroller實現彈性滑動
 private void smoothScroll(int tartY) {
  int dy = tartY - getScrollY();
  scroller.startScroll(getScrollX(), getScrollY(), 0, dy);
  invalidate();
 }
 @Override
 public void computeScroll() {
  if (scroller.computeScrollOffset()) {
   scrollTo(scroller.getCurrX(), scroller.getCurrY());
   postInvalidate();
  }
 }
}
源碼:
github地址
以上所述是小編給大家介紹的Android 仿淘寶、京東商品詳情頁向上拖動查看圖文詳情控件DEMO詳解,希望對大家有所幫助,如果大家有任何疑問請給我留言,小編會及時回復大家的。在此也非常感謝大家對本站網站的支持!
 Android Studio制作.so庫實踐
前言因為工作需要可能要用到JNI開發,本篇文章就分享一下我在這方面的實踐,以前我們使用Eclipse做NDK開發,非常麻煩,需要配cygwin的編譯環境,後面NDK功能完
 Android 仿網易新聞客戶端分類排序功能
先來看看網易新聞客戶端以及自己實現的效果圖,效果當然還是網易的好gridviewsort.gif如何實現拖拽一個Item用WindowManager添加一個ImageVi
 Android5.0(lollipop)新特性介紹(一)
今年6月的Google I/O大會上,Android L的初次見面我相信讓會讓很多android粉絲有些小激動和小期待,當然作為開發者的我來說,激動不言而喻,畢竟這是自0
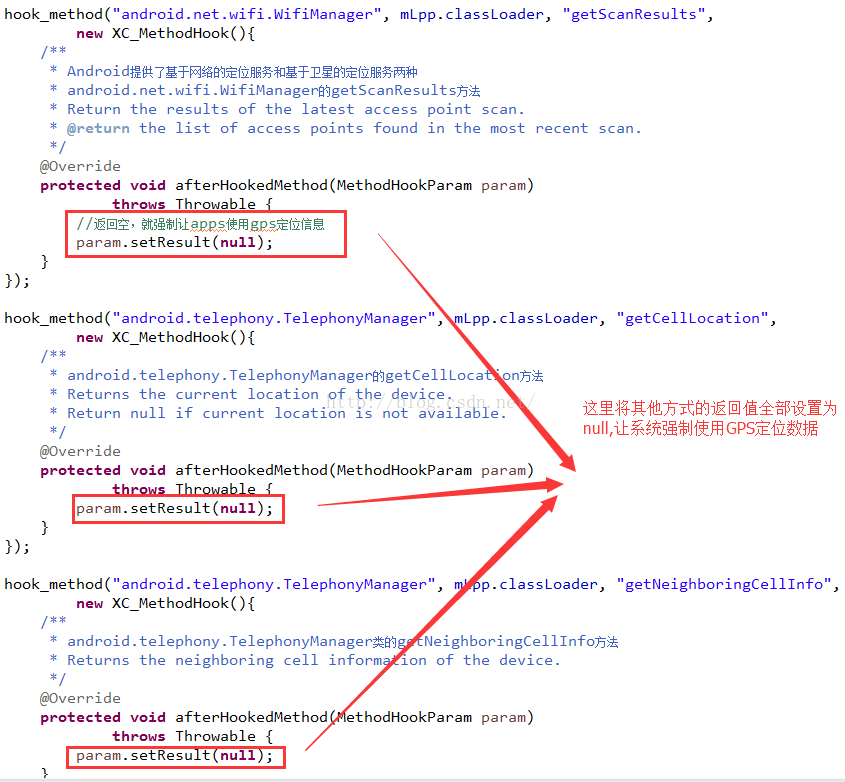 Android中Xposed框架篇---修改系統位置信息實現自身隱藏功能實例
一、前言本文主要來介紹一個實際案例就是如何通過這個框架來修改系統的地理位置信息來實現隱藏功能,在如今社交工具的發展特別是微信,他有一個實時位置共享功能,那麼對於那些不是單