編輯:關於Android編程
本篇文章講的是Android 自定義ViewGroup之實現標簽流式布局-FlowLayout,開發中我們會經常需要實現類似於熱門標簽等自動換行的流式布局的功能,網上也有很多這樣的FlowLayout,但不影響我對其的學習。和往常一樣,主要還是想總結一下自定義ViewGroup的開發過程以及一些需要注意的地方。
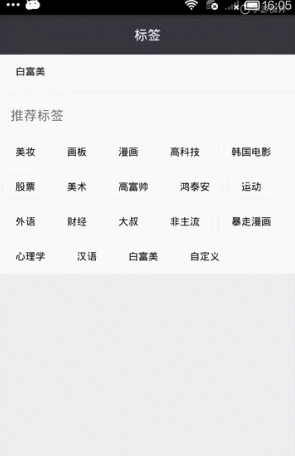
按照慣例,我們先來看看效果圖
一、寫代碼之前,有幾個是問題是我們先要弄清楚的:
1、什麼是ViewGroup:從名字上來看,它可以被翻譯為控件組,言外之意是ViewGroup內部包含了許多個控件,是一組View。在Android的設計中,ViewGroup也繼承了View,這就意味著View本身就可以是單個控件也可以是由多個控件組成的一組控件;
2、ViewGroup的種類:常見的有LinearLayout、RelativeLayout、FrameLayout、AbsoluteLayout、GirdLayout、TableLayout。其中LinearLayout和RelativeLayout使用的最多的兩種;
3、ViewGroup的職責:給childView計算出建議的寬和高和測量模式 ,然後決定childView的位置;
4、話說何為流式布局(FlowLayout):就是控件根據ViewGroup的寬,自動的從左往右添加。如果當前行還能放得這個子View,就放到當前行,如果當前行剩余的空間不足於容納這個子View,則自動添加到下一行的最左邊;
二、先總結下自定義ViewGroup的步驟:
1、自定義ViewGroup的屬性
2、在ViewGroup的構造方法中獲得我們自定義的屬性
3、重寫onMesure
4、重寫onLayout
三、ViewGroup的幾個構造函數:
1、public FlowLayout(Context context)
—>Java代碼直接new一個FlowLayout實例的時候,會調用這個只有一個參數的構造函數;
2、public FlowLayout(Context context, AttributeSet attrs)
—>在默認的XML布局文件中創建的時候調用這個有兩個參數的構造函數。AttributeSet類型的參數負責把XML布局文件中所自定義的屬性通過AttributeSet帶入到View內;
3、public FlowLayout(Context context, AttributeSet attrs, int defStyleAttr)
—>構造函數中第三個參數是默認的Style,這裡的默認的Style是指它在當前Application或者Activity所用的Theme中的默認Style,且只有在明確調用的時候才會調用
4、public FlowLayout(Context context, AttributeSet attrs, int defStyleAttr, int defStyleRes)
—>該構造函數是在API21的時候才添加上的
四、下面我們就開始來看看自定義ViewGroup的主要代碼啦
1、自定義ViewGroup的屬性,首先在res/values/ 下建立一個attr.xml , 在裡面定義我們的需要用到的屬性以及聲明相對應屬性的取值類型
<?xml version="1.0" encoding="utf-8"?>
<resources>
 <!--每個item縱向間距-->
 <attr name="verticalSpacing" format="dimension" />
 <!-- 每個item橫向間距-->
 <attr name="horizontalSpacing" format="dimension" />

 <declare-styleable name="FlowLayout">
 <attr name="verticalSpacing" />
 <attr name="horizontalSpacing" />
 </declare-styleable>

</resources>
我們定義了verticalSpacing以及horizontalSpacing2個屬性,分別表示每個標簽之間縱向間距和橫向間距,其中format是值該屬性的取值類型,format取值類型總共有10種,包括:string,color,demension,integer,enum,reference,float,boolean,fraction和flag。
2、然後在XML布局中聲明我們的自定義View
<?xml version="1.0" encoding="utf-8"?>
<LinearLayout xmlns:android="http://schemas.android.com/apk/res/android"
 xmlns:custom="http://schemas.android.com/apk/res-auto"
 android:layout_width="match_parent"
 android:layout_height="match_parent"
 android:orientation="vertical">

 <TextView
 android:layout_width="match_parent"
 android:layout_height="48dp"
 android:background="#38353D"
 android:gravity="center"
 android:text="標簽"
 android:textColor="@android:color/white"
 android:textSize="16dp" />

 <ScrollView
 android:layout_width="match_parent"
 android:layout_height="wrap_content">

 <LinearLayout
 android:layout_width="match_parent"
 android:layout_height="wrap_content"
 android:orientation="vertical">

 <TextView
 android:id="@+id/tv_remind"
 android:layout_width="match_parent"
 android:layout_height="46dp"
 android:background="@android:color/white"
 android:gravity="center_vertical"
 android:paddingLeft="15dp"
 android:text="我的標簽(最多5個) "
 android:textSize="16dp" />

 <com.per.flowlayoutdome.FlowLayout
 android:id="@+id/tcy_my_label"
 android:layout_width="match_parent"
 android:layout_height="wrap_content"
 android:background="@android:color/white"
 android:padding="5dp"
 android:visibility="gone"
 custom:horizontalSpacing="6dp"
 custom:verticalSpacing="12dp" />

 <View
 android:layout_width="match_parent"
 android:layout_height="10dp"
 android:background="#f6f6f6" />

 <RelativeLayout
 android:layout_width="match_parent"
 android:layout_height="46dp"
 android:background="@android:color/white">

 <TextView
  android:layout_width="match_parent"
  android:layout_height="wrap_content"
  android:layout_centerVertical="true"
  android:paddingLeft="15dp"
  android:text="推薦標簽 "
  android:textSize="16dp" />
 </RelativeLayout>

 <View
 android:layout_width="match_parent"
 android:layout_height="1dp"
 android:background="#f6f6f6" />

 <com.per.flowlayoutdome.FlowLayout
 android:id="@+id/tcy_hot_label"
 android:layout_width="match_parent"
 android:layout_height="wrap_content"
 android:background="@android:color/white"
 android:padding="5dp"
 custom:horizontalSpacing="6dp"
 custom:verticalSpacing="12dp" />
 </LinearLayout>
 </ScrollView>
</LinearLayout>
一定要引入xmlns:custom=”http://schemas.android.com/apk/res-auto”,Android Studio中我們可以使用res-atuo命名空間,就不用在添加自定義View全類名。
3、在View的構造方法中,獲得我們的自定義的樣式
/**
 * 每個item縱向間距
 */
 private int mVerticalSpacing;
 /**
 * 每個item橫向間距
 */
 private int mHorizontalSpacing;

 public FlowLayout(Context context) {
 this(context, null);
 }

 public FlowLayout(Context context, AttributeSet attrs) {
 this(context, attrs, 0);
 }

 public FlowLayout(Context context, AttributeSet attrs, int defStyle) {
 super(context, attrs, defStyle);
 /**
 * 獲得我們所定義的自定義樣式屬性
 */
 TypedArray a = context.getTheme().obtainStyledAttributes(attrs, R.styleable.FlowLayout, defStyle, 0);
 for (int i = 0; i < a.getIndexCount(); i++) {
 int attr = a.getIndex(i);
 switch (attr) {
 case R.styleable.FlowLayout_verticalSpacing:
  mVerticalSpacing = a.getDimensionPixelSize(R.styleable.FlowLayout_verticalSpacing, 5);
  break;
 case R.styleable.FlowLayout_horizontalSpacing:
  mHorizontalSpacing = a.getDimensionPixelSize(R.styleable.FlowLayout_horizontalSpacing, 10);
  break;
 }
 }
 a.recycle();
 }
我們重寫了3個構造方法,在上面的構造方法中說過默認的布局文件調用的是兩個參數的構造方法,所以記得讓所有的構造方法調用三個參數的構造方法,然後在三個參數的構造方法中獲得自定義屬性。
一開始一個參數的構造方法和兩個參數的構造方法是這樣的:
 public FlowLayout(Context context) {
 super(context);
 }

 public FlowLayout(Context context, AttributeSet attrs) {
 super(context, attrs);
 }
有一點要注意的是super應該改成this,然後讓一個參數的構造方法引用兩個參數的構造方法,兩個參數的構造方法引用三個參數的構造方法,代碼如下:
 public FlowLayout(Context context) {
 this(context, null);
 }

 public FlowLayout(Context context, AttributeSet attrs) {
 this(context, attrs, 0);
 }
4、重寫onMesure方法
/**
 * 負責設置子控件的測量模式和大小 根據所有子控件設置自己的寬和高
 */
 @Override
 protected void onMeasure(int widthMeasureSpec, int heightMeasureSpec) {
 /**
 * 獲得此ViewGroup上級容器為其推薦的寬和高,以及計算模式
 */
 int heighMode = MeasureSpec.getMode(heightMeasureSpec);
 int heighSize = MeasureSpec.getSize(heightMeasureSpec);
 int widthSize = MeasureSpec.getSize(widthMeasureSpec);
 /**
 * 高
 */
 int height = 0;
 /**
 * 每一行的高度,累加至height
 */
 int lineHeight = 0;
 /**
 * 在warp_content情況下,記錄當前childView的左邊的一個位置
 */
 int childLeft = getPaddingLeft();
 /**
 * 在warp_content情況下,記錄當前childView的上邊的一個位置
 */
 int childTop = getPaddingTop();
 // getChildCount得到子view的數目,遍歷循環出每個子View
 for (int i = 0; i < getChildCount(); i++) {
 //拿到index上的子view
 View childView = getChildAt(i);
 // 測量每一個child的寬和高
 measureChild(childView, widthMeasureSpec, heightMeasureSpec);
 //當前子空間實際占據的高度
 int childHeight = childView.getMeasuredHeight();
 //當前子空間實際占據的寬度
 int childWidth = childView.getMeasuredWidth();
 lineHeight = Math.max(childHeight, lineHeight);// 取最大值
 //如果加入當前childView,超出最大寬度,則將目前最大寬度給width,類加height 然後開啟新行
 if (childWidth + childLeft + getPaddingRight() > widthSize) {
 childLeft = getPaddingLeft();// 重新開啟新行,開始記錄childLeft
 childTop += mVerticalSpacing + childHeight;// 疊加當前的高度
 lineHeight = childHeight;// 開啟記錄下一行的高度
 }else{
 //否則累加當前childView的寬度
 childLeft += childWidth + mHorizontalSpacing;
 }
 }
 height += childTop + lineHeight + getPaddingBottom();
 setMeasuredDimension(widthSize, heighMode == MeasureSpec.EXACTLY ? heighSize : height);
 }
首先首先得到其父容器傳入的測量模式和寬高的計算值,然後遍歷所有的childView,使用measureChild方法對所有的childView進行測量。然後根據所有childView的測量得出的高得到該ViewGroup如果設置為wrap_content時的高。最後根據模式,如果是MeasureSpec.EXACTLY則直接使用父ViewGroup傳入的高,否則設置為自己計算的高,細心的朋友會問,那兒寬呢,在這裡我們默認寬為MeasureSpec.EXACTLY模式。
5、重寫onLayout方法
@Override
 protected void onLayout(boolean changed, int l, int t, int r, int b) {
 int width = r - l;
 int childLeft = getPaddingLeft();
 int childTop = getPaddingTop();
 int lineHeight = 0;
 //遍歷所有childView根據其寬和高,計算子控件應該出現的位置
 for (int i = 0; i < getChildCount(); i++) {
 final View childView = getChildAt(i);
 if (childView.getVisibility() == View.GONE) {
 continue;
 }
 int childWidth = childView.getMeasuredWidth();
 int childHeight = childView.getMeasuredHeight();
 lineHeight = Math.max(childHeight, lineHeight);
 // 如果已經需要換行
 if (childLeft + childWidth + getPaddingRight() > width) {
 childLeft = getPaddingLeft();
 childTop += mVerticalSpacing + lineHeight;
 lineHeight = childHeight;
 }
 childView.layout(childLeft, childTop, childLeft + childWidth, childTop + childHeight);
 childLeft += childWidth + mHorizontalSpacing;
 }
 }
onLayout中完成對所有childView的位置以及大小的指定
6、到此,我們對自定義ViewGroup的代碼已經寫完了,有幾點要注意的:
(1)getChildAt(int index):獲得index上的子view;
(2)getChildCount():得到所有子view的數目;
(3)measureChild(childView, widthMeasureSpec, heightMeasureSpec):使用子view自身的測量方法,測量每一個child的寬和高;
回歸到主題,現在我們把自定義ViewGroup,實現FlowLayout的部分完成了,接下來的就是一些邏輯代碼了
五、下面就是一些邏輯代碼啦
1、我把FlowLayout裡面完整的代碼貼出來:
package com.per.flowlayoutdome;

import android.content.Context;
import android.content.res.TypedArray;
import android.database.DataSetObserver;
import android.util.AttributeSet;
import android.view.View;
import android.view.ViewGroup;
import android.widget.BaseAdapter;

/**
 * @author: xiaolijuan
 * @description: 流式布局-標簽流容器
 * @projectName: FlowLayoutDome
 * @date: 2016-06-16
 * @time: 16:21
 */
public class FlowLayout extends ViewGroup{
 /**
 * 每個item縱向間距
 */
 private int mVerticalSpacing;
 /**
 * 每個item橫向間距
 */
 private int mHorizontalSpacing;
 private BaseAdapter mAdapter;
 private TagItemClickListener mListener;
 private DataChangeObserver mObserver;

 public FlowLayout(Context context) {
 this(context, null);
 }

 public FlowLayout(Context context, AttributeSet attrs) {
 this(context, attrs, 0);
 }

 public FlowLayout(Context context, AttributeSet attrs, int defStyle) {
 super(context, attrs, defStyle);
 /**
 * 獲得我們所定義的自定義樣式屬性
 */
 TypedArray a = context.getTheme().obtainStyledAttributes(attrs, R.styleable.FlowLayout, defStyle, 0);
 for (int i = 0; i < a.getIndexCount(); i++) {
 int attr = a.getIndex(i);
 switch (attr) {
 case R.styleable.FlowLayout_verticalSpacing:
  mVerticalSpacing = a.getDimensionPixelSize(R.styleable.FlowLayout_verticalSpacing, 5);
  break;
 case R.styleable.FlowLayout_horizontalSpacing:
  mHorizontalSpacing = a.getDimensionPixelSize(R.styleable.FlowLayout_horizontalSpacing, 10);
  break;
 }
 }
 a.recycle();
 }

 /**
 * 負責設置子控件的測量模式和大小 根據所有子控件設置自己的寬和高
 */
 @Override
 protected void onMeasure(int widthMeasureSpec, int heightMeasureSpec) {
 /**
 * 獲得此ViewGroup上級容器為其推薦的寬和高,以及計算模式
 */
 int heighMode = MeasureSpec.getMode(heightMeasureSpec);
 int heighSize = MeasureSpec.getSize(heightMeasureSpec);
 int widthSize = MeasureSpec.getSize(widthMeasureSpec);
 /**
 * 高
 */
 int height = 0;
 /**
 * 每一行的高度,累加至height
 */
 int lineHeight = 0;
 /**
 * 在warp_content情況下,記錄當前childView的左邊的一個位置
 */
 int childLeft = getPaddingLeft();
 /**
 * 在warp_content情況下,記錄當前childView的上邊的一個位置
 */
 int childTop = getPaddingTop();
 // getChildCount得到子view的數目,遍歷循環出每個子View
 for (int i = 0; i < getChildCount(); i++) {
 //拿到index上的子view
 View childView = getChildAt(i);
 // 測量每一個child的寬和高
 measureChild(childView, widthMeasureSpec, heightMeasureSpec);
 //當前子空間實際占據的高度
 int childHeight = childView.getMeasuredHeight();
 //當前子空間實際占據的寬度
 int childWidth = childView.getMeasuredWidth();
 lineHeight = Math.max(childHeight, lineHeight);// 取最大值
 //如果加入當前childView,超出最大寬度,則將目前最大寬度給width,類加height 然後開啟新行
 if (childWidth + childLeft + getPaddingRight() > widthSize) {
 childLeft = getPaddingLeft();// 重新開啟新行,開始記錄childLeft
 childTop += mVerticalSpacing + childHeight;// 疊加當前的高度
 lineHeight = childHeight;// 開啟記錄下一行的高度
 }else{
 //否則累加當前childView的寬度
 childLeft += childWidth + mHorizontalSpacing;
 }
 }
 height += childTop + lineHeight + getPaddingBottom();
 setMeasuredDimension(widthSize, heighMode == MeasureSpec.EXACTLY ? heighSize : height);
 }

 @Override
 protected void onLayout(boolean changed, int l, int t, int r, int b) {
 int width = r - l;
 int childLeft = getPaddingLeft();
 int childTop = getPaddingTop();
 int lineHeight = 0;
 //遍歷所有childView根據其寬和高,計算子控件應該出現的位置
 for (int i = 0; i < getChildCount(); i++) {
 final View childView = getChildAt(i);
 if (childView.getVisibility() == View.GONE) {
 continue;
 }
 int childWidth = childView.getMeasuredWidth();
 int childHeight = childView.getMeasuredHeight();
 lineHeight = Math.max(childHeight, lineHeight);
 // 如果已經需要換行
 if (childLeft + childWidth + getPaddingRight() > width) {
 childLeft = getPaddingLeft();
 childTop += mVerticalSpacing + lineHeight;
 lineHeight = childHeight;
 }
 childView.layout(childLeft, childTop, childLeft + childWidth, childTop + childHeight);
 childLeft += childWidth + mHorizontalSpacing;
 }
 }

 private void drawLayout() {
 if (mAdapter == null || mAdapter.getCount() == 0) {
 return;
 }
 removeAllViews();
 for (int i = 0; i < mAdapter.getCount(); i++) {
 View view = mAdapter.getView(i, null, null);
 final int position = i;
 view.setOnClickListener(new View.OnClickListener() {
 @Override
 public void onClick(View v) {
  if (mListener != null) {
  mListener.itemClick(position);
  }
 }
 });
 addView(view);
 }
 }

 public void setAdapter(BaseAdapter adapter) {
 if (mAdapter == null) {
 mAdapter = adapter;
 if (mObserver == null) {
 mObserver = new DataChangeObserver();
 mAdapter.registerDataSetObserver(mObserver);
 }
 drawLayout();
 }
 }

 public void setItemClickListener(TagItemClickListener mListener) {
 this.mListener = mListener;
 }

 public interface TagItemClickListener {
 void itemClick(int position);
 }

 class DataChangeObserver extends DataSetObserver {
 @Override
 public void onChanged() {
 drawLayout();
 }

 @Override
 public void onInvalidated() {
 super.onInvalidated();
 }
 }
}
2、FlowLayoutAdapter
package com.per.flowlayoutdome;

import android.content.Context;
import android.view.LayoutInflater;
import android.view.View;
import android.view.ViewGroup;
import android.widget.BaseAdapter;
import android.widget.Button;

import java.util.List;

/**
 * @author: adan
 * @description: 流式布局適配器
 * @projectName: FlowLayoutDome
 * @date: 2016-06-16
 * @time: 16:22
 */
public class FlowLayoutAdapter extends BaseAdapter {

 private Context mContext;
 private List<String> mList;

 public FlowLayoutAdapter(Context context, List<String> list) {
 mContext = context;
 mList = list;
 }

 @Override
 public int getCount() {
 return mList.size();
 }

 @Override
 public String getItem(int position) {
 return mList.get(position);
 }

 @Override
 public long getItemId(int position) {
 return position;
 }

 @Override
 public View getView(int position, View convertView, ViewGroup parent) {
 ViewHolder holder;
 if (convertView == null) {
 convertView = LayoutInflater.from(mContext).inflate(
  R.layout.item_tag, null);
 holder = new ViewHolder();
 holder.mBtnTag = (Button) convertView.findViewById(R.id.btn_tag);
 convertView.setTag(holder);
 } else {
 holder = (ViewHolder) convertView.getTag();
 }
 holder.mBtnTag.setText(getItem(position));
 return convertView;
 }

 static class ViewHolder {
 Button mBtnTag;
 }
}
3、MainActivity
package com.per.flowlayoutdome;

import android.app.Activity;
import android.content.Intent;
import android.os.Bundle;
import android.text.TextUtils;
import android.view.View;
import android.widget.TextView;
import android.widget.Toast;

import java.util.ArrayList;
import java.util.List;


public class MainActivity extends Activity {
 private TextView tv_remind;

 private FlowLayout tcy_my_label, tcy_hot_label;
 private FlowLayoutAdapter mMyLabelAdapter, mHotLabelAdapter;
 private List<String> MyLabelLists, HotLabelLists;

 private static int TAG_REQUESTCODE = 0x101;

 @Override
 protected void onCreate(Bundle savedInstanceState) {
 super.onCreate(savedInstanceState);
 setContentView(R.layout.activity_main);
 initView();
 initData();
 }

 private void initView() {
 tv_remind = (TextView) findViewById(R.id.tv_remind);
 tcy_my_label = (FlowLayout) findViewById(R.id.tcy_my_label);
 tcy_hot_label = (FlowLayout) findViewById(R.id.tcy_hot_label);
 }

 private void initData() {
 String[] date = getResources().getStringArray(R.array.tags);
 HotLabelLists = new ArrayList<>();
 for (int i = 0; i < date.length; i++) {
 HotLabelLists.add(date[i]);
 }
 mHotLabelAdapter = new FlowLayoutAdapter(this, HotLabelLists);
 tcy_hot_label.setAdapter(mHotLabelAdapter);
 tcy_hot_label.setItemClickListener(new TagCloudLayoutItemOnClick(1));

 MyLabelLists = new ArrayList<>();
 mMyLabelAdapter = new FlowLayoutAdapter(this, MyLabelLists);
 tcy_my_label.setAdapter(mMyLabelAdapter);
 tcy_my_label.setItemClickListener(new TagCloudLayoutItemOnClick(0));

 String labels = String.valueOf(getIntent().getStringExtra("labels"));
 if (!TextUtils.isEmpty(labels) && labels.length() > 0
 && !labels.equals("null")) {
 String[] temp = labels.split(",");
 for (int i = 0; i < temp.length; i++) {
 MyLabelLists.add(temp[i]);
 }
 ChangeMyLabels();
 }

 }

 /**
 * 刷新我的標簽數據
 */
 private void ChangeMyLabels() {
 tv_remind.setVisibility(MyLabelLists.size() > 0 ? View.GONE
 : View.VISIBLE);
 tcy_my_label.setVisibility(MyLabelLists.size() > 0 ? View.VISIBLE
 : View.GONE);
 mMyLabelAdapter.notifyDataSetChanged();
 }

 /**
 * 標簽的點擊事件
 *
 * @author lijuan
 */
 class TagCloudLayoutItemOnClick implements FlowLayout.TagItemClickListener {
 int index;

 public TagCloudLayoutItemOnClick(int index) {
 this.index = index;
 }

 @Override
 public void itemClick(int position) {
 switch (index) {
 case 0:
  MyLabelLists.remove(MyLabelLists.get(position));
  ChangeMyLabels();
  break;
 case 1:
  if (MyLabelLists.size() < 5) {
  if (HotLabelLists.get(position).equals("自定義")) {
  startActivityForResult(
   new Intent(MainActivity.this,
   AddTagActivity.class),
   TAG_REQUESTCODE);
  } else {
  Boolean isExits = isExist(MyLabelLists,
   HotLabelLists.get(position));
  if (isExits) {
  Toast.makeText(MainActivity.this, "此標簽已經添加啦", Toast.LENGTH_LONG).show();
  return;
  }
  MyLabelLists.add(HotLabelLists.get(position));
  ChangeMyLabels();
  }
  } else {
  Toast.makeText(MainActivity.this, "最多只能添加5個標簽", Toast.LENGTH_LONG).show();
  }
  break;
 default:
  break;
 }
 }
 }

 /**
 * 將數組裡面的字符串遍歷一遍,看是否存在相同標簽
 *
 * @param str
 * @param compareStr
 * @return
 */
 public static Boolean isExist(List<String> str, String compareStr) {
 Boolean isExist = false;//默認沒有相同標簽
 for (int i = 0; i < str.size(); i++) {
 if (compareStr.equals(str.get(i))) {
 isExist = true;
 }
 }
 return isExist;
 }

 /**
 * 回傳數據
 */
 @Override
 protected void onActivityResult(int requestCode, int resultCode, Intent data) {
 if (TAG_REQUESTCODE == requestCode) {
 if (resultCode == AddTagActivity.TAG_RESULTCODE) {
 String label = data.getStringExtra("tags");
 MyLabelLists.add(label);
 ChangeMyLabels();
 }
 }
 }
}
4、AddTagActivity
package com.per.flowlayoutdome;

import android.app.Activity;
import android.content.Intent;
import android.os.Bundle;
import android.text.Editable;
import android.text.TextUtils;
import android.text.TextWatcher;
import android.view.View;
import android.widget.Button;
import android.widget.EditText;
import android.widget.Toast;

/**
 * @author: xiaolijuan
 * @description: 添加自定義標簽
 * @date: 2016-06-10
 * @time: 14:37
 */
public class AddTagActivity extends Activity implements View.OnClickListener{

 private EditText mEtLabel;
 private Button mBtnSure;
 public final static int TAG_RESULTCODE = 0x102;

 @Override
 protected void onCreate(Bundle savedInstanceState) {
 super.onCreate(savedInstanceState);
 setContentView(R.layout.activity_add_tag);
 initView();
 initData();
 }

 private void initData() {
 // 根據輸入框輸入值的改變提示最大允許輸入的個數
 mEtLabel.addTextChangedListener(new TextWatcher_Enum());
 }

 private void initView() {
 mEtLabel = (EditText) findViewById(R.id.et_label);
 mBtnSure = (Button) findViewById(R.id.btn_sure);

 mBtnSure.setOnClickListener(this);
 }

 @Override
 public void onClick(View v) {
 switch (v.getId()) {
 case R.id.btn_sure:
 String label = mEtLabel.getText().toString();
 if (TextUtils.isEmpty(label)) {
  Toast.makeText(AddTagActivity.this,"自定義標簽不應為空",Toast.LENGTH_LONG).show();
  return;
 }
 Intent intent = getIntent();
 intent.putExtra("tags", label);
 setResult(TAG_RESULTCODE, intent);
 finish();
 break;
 }
 }

 /**
 * 根據輸入框輸入值的長度超過8個字符的時候,彈出輸入的標簽應控制在8個字
 *
 * @author lijuan
 *
 */
 class TextWatcher_Enum implements TextWatcher {
 @Override
 public void beforeTextChanged(CharSequence s, int start, int count,
   int after) {
 }

 @Override
 public void onTextChanged(CharSequence s, int start, int before,
   int count) {
 int lenght = mEtLabel.getText().toString().trim().length();
 if (lenght > 8) {
 Toast.makeText(AddTagActivity.this,"輸入的標簽應控制在8個字",Toast.LENGTH_LONG).show();
 }
 }

 @Override
 public void afterTextChanged(Editable s) {

 }
 }
}
5、activity_main.xml在上面已經貼出來了,在這裡就不重復了,我們創建了arrays.xml,在這裡定義了一寫熱門的標簽:
<?xml version="1.0" encoding="UTF-8"?>
<resources>

 <string-array name="tags">
 <item>美妝</item>
 <item>畫板</item>
 <item>漫畫</item>
 <item>高科技</item>
 <item>韓國電影</item>
 <item>股票</item>
 <item>美術</item>
 <item>高富帥</item>
 <item>鴻泰安</item>
 <item>運動</item>
 <item>外語</item>
 <item>財經</item>
 <item>大叔</item>
 <item>非主流</item>
 <item>暴走漫畫</item>
 <item>心理學</item>
 <item>漢語</item>
 <item>白富美</item>
 <item>自定義</item>
 </string-array>

</resources>
6、item_tag.xml
<?xml version="1.0" encoding="utf-8"?>
<Button xmlns:android="http://schemas.android.com/apk/res/android"
 android:id="@+id/btn_tag"
 android:layout_width="wrap_content"
 android:layout_height="wrap_content"
 android:background="@drawable/selector_btn_item"
 android:gravity="center"
 android:minHeight="30dp"
 android:minWidth="45dp"
 android:paddingLeft="16dp"
 android:paddingRight="16dp"
 android:textSize="12sp" />
6、activity_add_tag.xml
<?xml version="1.0" encoding="utf-8"?>
<LinearLayout xmlns:android="http://schemas.android.com/apk/res/android"
 android:layout_width="250dp"
 android:layout_height="wrap_content"
 android:background="@android:color/white"
 android:gravity="center_horizontal"
 android:orientation="vertical"
 android:padding="5dp" >

 <LinearLayout
 android:layout_width="match_parent"
 android:layout_height="wrap_content"
 android:orientation="vertical" >

 <TextView
 android:layout_width="wrap_content"
 android:layout_height="wrap_content"
 android:layout_marginLeft="5dp"
 android:text="請輸入想要添加的標簽"
 android:textColor="@android:color/black"
 android:textSize="16dp" />

 <EditText
 android:id="@+id/et_label"
 android:layout_width="match_parent"
 android:layout_height="80dp"
 android:layout_margin="5dp"
 android:background="@drawable/selector_btn_item"
 android:gravity="center_vertical|start"
 android:maxLength="8"
 android:paddingLeft="10dp"
 android:textColor="@android:color/black"
 android:textSize="16dp" />
 </LinearLayout>

 <Button
 android:id="@+id/btn_sure"
 android:layout_width="50dp"
 android:layout_height="32dp"
 android:layout_marginLeft="16dp"
 android:layout_marginRight="16dp"
 android:layout_marginTop="5dp"
 android:background="#38353D"
 android:gravity="center"
 android:text="確定"
 android:textColor="@android:color/white"
 android:textSize="14dp" />

</LinearLayout>
7、selector_btn_item.xml
<?xml version="1.0" encoding="utf-8"?>
<selector xmlns:android="http://schemas.android.com/apk/res/android">
 <item android:state_pressed="true">
 <shape>
 <solid android:color="#ff76787b" />
 <corners android:bottomLeftRadius="5dp" android:bottomRightRadius="5dp" android:topLeftRadius="5dp" android:topRightRadius="5dp" />
 <stroke android:width="1px" android:color="#ffd1d1d1" />
 </shape>
 </item>
 <item>
 <shape>
 <solid android:color="#ffffff" />
 <corners android:bottomLeftRadius="2.5dp" android:bottomRightRadius="2.5dp" android:topLeftRadius="2.5dp" android:topRightRadius="2.5dp" />
 <stroke android:width="0.5px" android:color="#ffd1d1d1" />
 </shape>
 </item>
</selector>
最後一點了吧,我們在AndroidManifest.xml中需要添加
<activity
 android:name=".AddTagActivity"
 android:theme="@style/dialogstyle" />
用於我們自定義標簽,彈出的一個類似於對話框的一個Activity,這裡我們引用了自定義一個樣式
<style name="dialogstyle">
 <!--設置dialog的背景-->
 <item name="android:windowBackground">@android:color/transparent</item>
 <!--設置Dialog的windowFrame框為無-->
 <item name="android:windowFrame">@null</item>
 <!--設置無標題-->
 <item name="android:windowNoTitle">true</item>
 <!--是否浮現在activity之上-->
 <item name="android:windowIsFloating">true</item>
 <!--是否半透明-->
 <item name="android:windowIsTranslucent">true</item>
 <!--設置窗口內容不覆蓋-->
 <item name="android:windowContentOverlay">@null</item>
 <!--設置動畫,在這裡使用讓它繼承系統的Animation.Dialog-->
 <item name="android:windowAnimationStyle">@android:style/Animation.Dialog</item>
 <!--背景是否模糊顯示-->
 <item name="android:backgroundDimEnabled">true</item>
 </style>
對於這個類似於對話框的一個Activity,有不明白的可以上我之前的一篇文章: Android中使用Dialog風格彈出框的Activity
源碼下載:http://xiazai.jb51.net/201609/yuanma/AndroidFlowLayout(jb51.net).rar
以上就是本文的全部內容,希望對大家的學習有所幫助,也希望大家多多支持本站。
 Android中編寫屬性動畫PropertyAnimation的進階實例
0、基礎回顧PropertyAnimation,屬性動畫,顧名思義就是利用對象的屬性變化形成動畫的效果。屬性動畫的類可以用Animator這個抽象類來表示,通常使用它的子
 android-----事件分發機制測試系列(三)
上一篇我們主要主要是從ViewGroup分發的角度測試了下事件分發機制,但沒有涉足多少View的事件分發,也就是說我們沒有為MyRelativeLayout、MyLine
 android eclipse 開發中遇到 Cannot connect to VM
Launching ???? has encountered a problem. Cannot connecto to VMSocket operatio
 Android實現snmp協議(一)
2015年一月初。接到華為一位老師的電話,讓我幫忙做一款他們在北京展會上要用到的App,該App能夠展示華為的網絡設備運行狀態並可以設置一些簡單的參數,包括AP、LSW、