編輯:關於Android編程
如下所示:
<?xml version="1.0" encoding="utf-8"?>
<LinearLayout xmlns:android="http://schemas.android.com/apk/res/android"
  android:orientation="vertical"
  android:layout_width="wrap_content"
  android:layout_height="wrap_content"
  >
<TextView
  android:id="@+id/textViewDateDisplay"
  android:layout_width="wrap_content"
  android:layout_height="wrap_content"
  />
<Button
  android:id="@+id/btnPickDate"
  android:layout_width="wrap_content"
  android:layout_height="wrap_content"
  android:text="Change the date"
  />
</LinearLayout>
package com.example.mars_2200_datepicker;

import java.util.Calendar;

import android.support.v7.app.ActionBarActivity;
import android.support.v7.app.ActionBar;
import android.support.v4.app.Fragment;
import android.app.DatePickerDialog;
import android.app.Dialog;
import android.os.Bundle;
import android.view.LayoutInflater;
import android.view.Menu;
import android.view.MenuItem;
import android.view.View;
import android.view.ViewGroup;
import android.widget.Button;
import android.widget.DatePicker;
import android.widget.TextView;
import android.os.Build;

public class MainActivity extends ActionBarActivity {
  private TextView textViewDateDisplay;
  private Button btnPickDate;
  private int mYear;
  private int mMonth;
  private int mDay;

  static final int DATE_DIALOG_ID = 0;

  @Override
  protected void onCreate(Bundle savedInstanceState) {
    super.onCreate(savedInstanceState);
    setContentView(R.layout.activity_main);

    textViewDateDisplay = (TextView) findViewById(R.id.textViewDateDisplay);
    btnPickDate = (Button) findViewById(R.id.btnPickDate);

    btnPickDate.setOnClickListener(new View.OnClickListener() {
      public void onClick(View v) {
        showDialog(DATE_DIALOG_ID);
      }
    });
    final Calendar c = Calendar.getInstance();
    mYear = c.get(Calendar.YEAR);
    mMonth = c.get(Calendar.MONTH);
    mDay = c.get(Calendar.DAY_OF_MONTH);

    updateDisplay();
  }

  @Override
  public boolean onCreateOptionsMenu(Menu menu) {

    // Inflate the menu; this adds items to the action bar if it is present.
    getMenuInflater().inflate(R.menu.main, menu);
    return true;
  }

  @Override
  public boolean onOptionsItemSelected(MenuItem item) {
    // Handle action bar item clicks here. The action bar will
    // automatically handle clicks on the Home/Up button, so long
    // as you specify a parent activity in AndroidManifest.xml.
    int id = item.getItemId();
    if (id == R.id.action_settings) {
      return true;
    }
    return super.onOptionsItemSelected(item);
  }

  /**
   * A placeholder fragment containing a simple view.
   */
  public static class PlaceholderFragment extends Fragment {

    public PlaceholderFragment() {
    }

    @Override
    public View onCreateView(LayoutInflater inflater, ViewGroup container,
        Bundle savedInstanceState) {
      View rootView = inflater.inflate(R.layout.fragment_main, container,
          false);
      return rootView;
    }
  }

  private void updateDisplay() {
    textViewDateDisplay.setText(new StringBuilder().append(mYear).append("-")
        .append(mMonth + 1).append("-").append(mDay).append(" "));
  }

  private DatePickerDialog.OnDateSetListener mDateSetListener = new DatePickerDialog.OnDateSetListener() {
    public void onDateSet(DatePicker view, int year, int monthOfYear,
        int dayOfMonth) {
      mYear = year;
      mMonth = monthOfYear;
      mDay = dayOfMonth;
      updateDisplay();
    }
  };

  protected Dialog onCreateDialog(int id) {
    switch (id) {
    case DATE_DIALOG_ID:
      return new DatePickerDialog(this, mDateSetListener, mYear, mMonth,
          mDay);
    }
    return null;
  }
}
以上就是小編為大家帶來的android之datepicker控件的用法的全部內容了,希望對大家有所幫助,多多支持本站~
 ListView詳解之二----XListView
本次分析的是github上一個用於下拉刷新上拉加載的控件XListView,這個開源的ListView相信大家在開發的過程中會經常用到。https://github.co
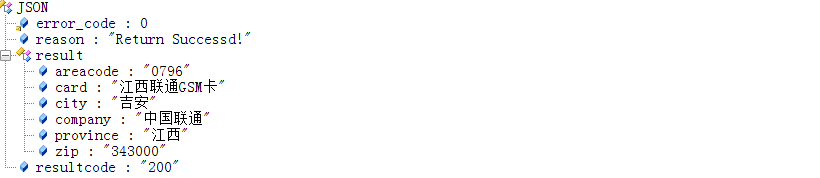 Android JSON原生解析的幾種思路,以號碼歸屬地,笑話大全,天氣預報為例演示
今天項目中要實現一個天氣的預覽,加載的信息很多,字段也很多,所以理清了一下思路,准備獨立出來寫一個總結,這樣對大家還是很有幫助的,老司機要開車了 涉及到網絡
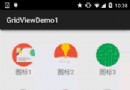 Android中使用GridView進行應用程序UI布局的教程
0.簡介GridView 和 ListView 有共同的父類:AbsListView,因此 GridView 和 ListView 具有一定 的相似性。GridView與
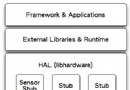 Ubuntu中為Android簡單介紹硬件抽象層(HAL)
Android的硬件抽象層,簡單來說,就是對Linux內核驅