編輯:關於Android編程
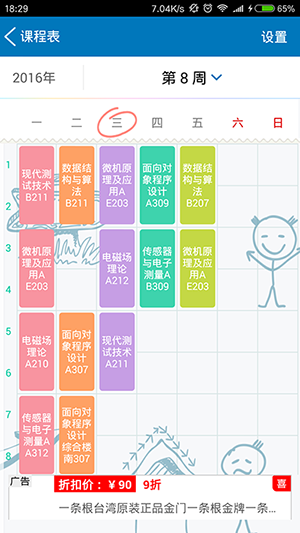
先說下這個demo,這是一個模仿課程表的布局文件,雖然我是個菜鳥,但我還是想留給學習的人一些例子,先看下效果
然後再來看一下我們學校的app
布局分析
先上一張劃分好了的布局圖
首先整個頁面放在一個LinearLayout布局下面,分為上面和下面兩個部分,下面一個是顯示課程表的詳細信息
1:這個沒什麼好講的,就是直接一個LinearLayout布局,然後將控件一個TextView用來顯示年份,一個View用來當作豎線,一個Spinner用來顯示選擇周數
2:這個是顯示星期幾的部件,是我自定義的View,自己重寫onDraw方法,然後畫出七個字,代碼如下:
public void onDraw(Canvas canvas)
{
//獲得當前View的寬度
int width = getWidth();
int offset = width / 8;
int currentPosition = offset;
//設置要繪制的字體
mPaint.setTypeface(Typeface.create(Typeface.DEFAULT_BOLD, Typeface.BOLD));
mPaint.setTextSize(30);
mPaint.setColor(Color.rgb(0, 134, 139));
for(int i = 0; i < 7 ; i++)
{
//圈出當前的日期
if( day == i)
{
System.out.println("畫出當前的日期!");
}
canvas.drawText(days[i], currentPosition, 30, mPaint);
currentPosition += offset;
}
//調用父類的繪圖方法
super.onDraw(canvas);
}
3:這個也是一個LinearLayout,直接手寫布局,將寫出來的,將LinearLayout的orientation 屬性設置為vertical 。
4:這是一個GridView ,然後自己繼承BaseAdapter 填充內容,下面放上布局的xml文件
<?xml version="1.0" encoding="utf-8"?>
<!--模仿課程表的界面-->
<LinearLayout xmlns:android="http://schemas.android.com/apk/res/android"
android:layout_width="match_parent"
android:layout_height="match_parent"
android:orientation="vertical">
<!--顯示時間-->
<LinearLayout
android:layout_width="match_parent"
android:layout_height="wrap_content"
android:background="@android:color/white">
<TextView
android:id="@+id/year"
android:layout_width="wrap_content"
android:layout_height="50dp"
android:layout_gravity="center"
android:gravity="center"
android:layout_marginLeft="20dp"
android:textSize="20dp"
android:text="2016年"/>
<!--豎線-->
<View
android:layout_width="1dp"
android:layout_height="match_parent"
android:layout_marginLeft="20dp"
android:layout_marginTop="10dp"
android:layout_marginBottom="10dp"
android:background="#00FFFF"
/>
<!--下拉方式選周數-->
<Spinner
android:id="@+id/switchWeek"
android:layout_width="match_parent"
android:layout_height="match_parent"
android:gravity="center"
android:layout_gravity="center"
/>
</LinearLayout>
<!--分隔線-->
<View
android:layout_width="match_parent"
android:layout_height="1dp"
android:background="#00FF7F"/>
<!--顯示星期-->
<LinearLayout
android:layout_width="match_parent"
android:layout_height="wrap_content"
android:gravity="center"
android:background="@android:color/white">
<cn.karent.demo.UI.WeekTitle
android:layout_width="match_parent"
android:layout_height="30dp"
android:layout_marginTop="10dp"/>
</LinearLayout>
<!--顯示課表詳細信息-->
<ScrollView
android:layout_width="match_parent"
android:layout_height="match_parent">
<LinearLayout
android:layout_width="match_parent"
android:layout_height="match_parent">
<!--顯示多少節課-->
<LinearLayout
android:layout_width="25dp"
android:layout_height="match_parent"
android:orientation="vertical"
android:gravity="center">
<TextView
android:layout_width="wrap_content"
android:layout_height="92dp"
android:text="一"
android:textSize="10dp"
android:gravity="center"/>
<TextView
android:layout_width="wrap_content"
android:layout_height="92dp"
android:textSize="12dp"
android:text="二"
android:gravity="center"/>
<TextView
android:layout_width="wrap_content"
android:layout_height="92dp"
android:textSize="12dp"
android:text="三"
android:gravity="center"/>
<TextView
android:layout_width="wrap_content"
android:layout_height="92dp"
android:textSize="12dp"
android:text="四"
android:gravity="center"/>
<TextView
android:layout_width="wrap_content"
android:layout_height="92dp"
android:textSize="12dp"
android:text="五"
android:gravity="center"/>
<TextView
android:layout_width="wrap_content"
android:layout_height="92dp"
android:textSize="12dp"
android:text="六"
android:gravity="center"/>
</LinearLayout>
<View
android:layout_width="1dp"
android:layout_height="match_parent"
android:background="#E5E5E5"/>
<GridView
android:id="@+id/courceDetail"
android:layout_width="match_parent"
android:layout_height="match_parent"
android:numColumns="7"
android:horizontalSpacing="1dp"
android:verticalSpacing="1dp"
android:stretchMode="columnWidth"
android:background="#E5E5E5">
</GridView>
</LinearLayout>
</ScrollView>
</LinearLayout>
下面是GridView的適配器代碼:
public class MyAdapter extends BaseAdapter {
private Context mContext;
//保存內容的內部數組
private List<String> content;
public MyAdapter(Context context, List<String> list) {
this.mContext = context;
this.content = list;
}
public int getCount() {
return content.size();
}
public Object getItem(int position) {
return content.get(position);
}
public long getItemId(int position) {
return position;
}
public View getView(int position, View convertView, ViewGroup parent) {
if( convertView == null) {
convertView = LayoutInflater.from(mContext).inflate(R.layout.grib_item, null);
}
TextView textView = (TextView)convertView.findViewById(R.id.text);
//如果有課,那麼添加數據
if( !getItem(position).equals("")) {
textView.setText((String)getItem(position));
textView.setTextColor(Color.WHITE);
//變換顏色
int rand = position % 7;
switch( rand ) {
case 0:
textView.setBackground(mContext.getResources().getDrawable(R.drawable.grid_item_bg));
break;
case 1:
textView.setBackground(mContext.getResources().getDrawable(R.drawable.bg_12));
break;
case 2:
textView.setBackground(mContext.getResources().getDrawable(R.drawable.bg_13));
break;
case 3:
textView.setBackground(mContext.getResources().getDrawable(R.drawable.bg_14));
break;
case 4:
textView.setBackground(mContext.getResources().getDrawable(R.drawable.bg_15));
break;
case 5:
textView.setBackground(mContext.getResources().getDrawable(R.drawable.bg_16));
break;
case 6:
textView.setBackground(mContext.getResources().getDrawable(R.drawable.bg_17));
break;
case 7:
textView.setBackground(mContext.getResources().getDrawable(R.drawable.bg_18));
break;
}
}
return convertView;
}
}
下面來慢慢解釋一下,首先,要自定義適配器必須要繼承一個Adapter,這裡我們從BaseAdapter繼承,繼承之後必須要重寫getCount(),getItem(int),getItemId(int),getView(int,View,ViewGroup) 這些方法必須要重寫,最主要的就是重寫getView() 這個方法,因為這個方法返回的是一個View,那麼就是GridView的每一個子item的布局。
convertView=LayoutInflater.from(mContext).inflate(R.layout.grib_item, null);
這一行代碼是加載布局文件並返回一個View
if( !getItem(position).equals("")) {
textView.setText((String)getItem(position));
textView.setTextColor(Color.WHITE);
//變換顏色
int rand = position % 7;
switch( rand ) {
case 0:
textView.setBackground(mContext.getResources().getDrawable(R.drawable.grid_item_bg));
break;
case 1:
textView.setBackground(mContext.getResources().getDrawable(R.drawable.bg_12));
break;
case 2:
textView.setBackground(mContext.getResources().getDrawable(R.drawable.bg_13));
break;
case 3:
textView.setBackground(mContext.getResources().getDrawable(R.drawable.bg_14));
break;
case 4:
textView.setBackground(mContext.getResources().getDrawable(R.drawable.bg_15));
break;
case 5:
textView.setBackground(mContext.getResources().getDrawable(R.drawable.bg_16));
break;
case 6:
textView.setBackground(mContext.getResources().getDrawable(R.drawable.bg_17));
break;
case 7:
textView.setBackground(mContext.getResources().getDrawable(R.drawable.bg_18));
break;
}
}
這裡的代碼是判斷每一列然後實現更改view的背景,其中背景的代碼如下:
<shape xmlns:android="http://schemas.android.com/apk/res/android" >
<solid android:color="#75B7A0" />
<corners android:radius="3dip" />
</shape>
其他的類似,還有就是item的布局文件:
<RelativeLayout xmlns:android="http://schemas.android.com/apk/res/android"
android:layout_width="match_parent"
android:layout_height="match_parent"
android:background="#F4FFF5EE">
<TextView
android:id="@+id/text"
android:layout_width="match_parent"
android:layout_height="80dp"
android:layout_marginLeft="3dp"
android:layout_marginRight="3dp"
android:layout_marginTop="4dp"
android:layout_marginBottom="4dp"
android:padding="2dp"
android:textSize="12dp"
android:gravity="center"/>
</RelativeLayout>
這個就是模仿課程表的布局,最後附上源碼Git地址:點我下載
以上所述是小編給大家介紹的android開發高仿課程表的布局實例詳解,希望對大家有所幫助,如果大家有任何疑問請給我留言,小編會及時回復大家的。在此也非常感謝大家對本站網站的支持!
 Android酷炫實用的開源框架(UI框架)
前言忙碌的工作終於可以停息一段時間了,最近突然有一個想法,就是自己寫一個app,所以找了一些合適開源控件,這樣更加省時,再此分享給大家,希望能對大家有幫助,此博文介紹的都
 Android編程實現TCP客戶端的方法
本文實例講述了Android編程實現TCP客戶端的方法。分享給大家供大家參考,具體如下:因為項目上需要實現一個TCP Client 端;在網上找好多例子基本上都是阻塞方式
 Android設置拍照或者上傳本地圖片的示例
前幾天,我們客戶端這邊收到了市場部的一個需求,需要在我們訂單成交後,我們的客戶端有一個上傳交易憑證的功能,那麼如何在Android實現上傳圖片的這個功能呢?在我進行編碼之
 實例詳解Android自定義ProgressDialog進度條對話框的實現
Android SDK已經提供有進度條組件ProgressDialog組件,但用的時候我們會發現可能風格與我們應用的整體風格不太搭配,而且ProgressDialog的可