編輯:關於Android編程
圓形頭像在我們的日常使用的app中很常見,因為圓形的頭像比較美觀.
使用圓形圖片的方法可能有我們直接將圖片裁剪成圓形再在app中使用,還有就是使用自定義View對我們設置的任何圖片自動裁剪成圓形。
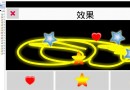
效果圖:
這裡使用github上CircleImageView
github:https://github.com/hdodenhof/CircleImageView
CardView顧名思義卡片式的View,CardView繼承的是FrameLayout,所以擺放內部控件的時候需要注意一下
可以設置陰影,圓角,等等
這裡的CircleImageView還可以為頭像設置描邊。
我們新建一個項目,選擇Navigation Drawer Activity自動生成初始布局。
修改nav_header_main,添加圓角頭像
<?xml version="1.0" encoding="utf-8"?>
<LinearLayout xmlns:android="http://schemas.android.com/apk/res/android"
android:layout_width="match_parent"
android:layout_height="@dimen/nav_header_height"
android:background="@drawable/side_nav_bar"
android:gravity="bottom"
android:orientation="vertical"
android:paddingBottom="@dimen/activity_vertical_margin"
android:paddingLeft="@dimen/activity_horizontal_margin"
android:paddingRight="@dimen/activity_horizontal_margin"
android:paddingTop="@dimen/activity_vertical_margin"
android:theme="@style/ThemeOverlay.AppCompat.Dark">
<de.hdodenhof.circleimageview.CircleImageView
xmlns:app="http://schemas.android.com/apk/res-auto"
android:id="@+id/profile_image"
android:layout_width="96dp"
android:layout_height="96dp"
android:src="@drawable/darth_vader"
app:civ_border_width="2dp"
/>
</LinearLayout>
再修改content_main,添加RecyclerView,記得導包
<?xml version="1.0" encoding="utf-8"?>
<RelativeLayout
xmlns:android="http://schemas.android.com/apk/res/android"
xmlns:app="http://schemas.android.com/apk/res-auto"
xmlns:tools="http://schemas.android.com/tools"
android:layout_width="match_parent"
android:layout_height="match_parent"
android:paddingBottom="@dimen/activity_vertical_margin"
android:paddingLeft="@dimen/activity_horizontal_margin"
android:paddingRight="@dimen/activity_horizontal_margin"
android:paddingTop="@dimen/activity_vertical_margin"
app:layout_behavior="@string/appbar_scrolling_view_behavior"
tools:context="com.example.xw.design2.MainActivity"
tools:showIn="@layout/app_bar_main">
<android.support.v7.widget.RecyclerView
android:id="@+id/rv"
android:layout_width="match_parent"
android:layout_height="match_parent"></android.support.v7.widget.RecyclerView>
</RelativeLayout>
添加item布局,CardView,記得導包
<?xml version="1.0" encoding="utf-8"?>
<android.support.v7.widget.CardView
android:layout_height="wrap_content"
android:layout_width="match_parent"
xmlns:card_view="http://schemas.android.com/apk/res-auto"
card_view:contentPadding="10dp"
card_view:cardBackgroundColor="#303069"
card_view:cardCornerRadius="10dp"
card_view:cardPreventCornerOverlap="true"
card_view:cardUseCompatPadding="true"
xmlns:android="http://schemas.android.com/apk/res/android">
<TextView
android:id="@+id/tv"
android:textColor="#fff"
android:layout_width="wrap_content"
android:layout_height="wrap_content"/>
</android.support.v7.widget.CardView>
接下來在MainActivity添加代碼,使用我們的CardView
1. 添加成員變量和數據源
private RecyclerView mRecyclerView;
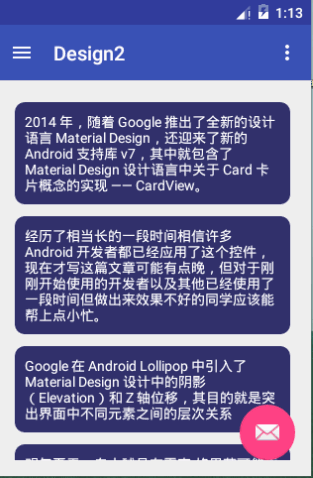
private String[] data={"2014 年,隨著 Google 推出了全新的設計語言 Material Design,還迎來了新的 Android 支持庫 v7,其中就包含了 Material Design 設計語言中關於 Card 卡片概念的實現 —— CardView。"
,"經歷了相當長的一段時間相信許多 Android 開發者都已經應用了這個控件,現在才寫這篇文章可能有點晚,但對於剛剛開始使用的開發者以及其他已經使用了一段時間但做出來效果不好的同學應該能幫上點小忙。"
,"Google 在 Android Lollipop 中引入了 Material Design 設計中的陰影(Elevation)和 Z 軸位移,其目的就是突出界面中不同元素之間的層次關系"
,"明年夏天,自由球員布雷克-格裡芬可能重返俄克拉何馬城與拉塞爾-威斯布魯克聯手。如果實現,雷霆隊能真正意義上地威脅勇士隊嗎?"};
2.創建ViewHolder
class MyHolder extends RecyclerView.ViewHolder{
private TextView mTextView;
public MyHolder(View itemView) {
super(itemView);
mTextView= (TextView) itemView.findViewById(R.id.tv);
}
}
3.創建Adapter
class MyAdapter extends RecyclerView.Adapter<MyHolder>{
@Override
public MyHolder onCreateViewHolder(ViewGroup parent, int viewType) {
LayoutInflater layoutInflater=LayoutInflater.from(getApplicationContext());
View v=layoutInflater.inflate(R.layout.item,parent,false);
MyHolder holder=new MyHolder(v);
return holder;
}
@Override
public void onBindViewHolder(MyHolder holder, int position) {
holder.mTextView.setText(data[position]);
}
@Override
public int getItemCount() {
return data.length;
}
}
4.oncreate()方法裡設置Adapter
mRecyclerView= (RecyclerView) findViewById(R.id.rv);
mRecyclerView.setLayoutManager(new LinearLayoutManager(this));
mRecyclerView.setAdapter(new MyAdapter());
以上所述是小編給大家介紹的Android中使用CircleImageView和Cardview制作圓形頭像的方法,希望對大家有所幫助,如果大家有任何疑問請給我留言,小編會及時回復大家的。在此也非常感謝大家對本站網站的支持!
 解析Android聲明和使用權限
Android定義了一種權限方案來保護設備上的資源和功能。例如,在默認情況下,應用程序無法訪問聯系人列表、撥打電話等。下面就以撥打電話為例介紹一下系統對權限的要求。一般在
 Android實現PopupWindow 彈窗效果 可用於提示信息等
效果圖如下:PopupWindow 是一個可以顯示在當前 Activity 之上的浮動容器,PopupWindow 彈出的位置是能夠改變的,按照有無偏移量,可以分為無偏移
 Android實現自定義view---繪制圖片
主要原理是:extends view重載onDrow(),需要一bitmap,重載view,在 canvas上畫臨時bmp,當按下確定的時候按下 畫到real_b
 安卓Android-X86 4.4休眠、關機常見問題解決
Q:安卓Android-x86 4.4 VMware虛擬機休眠後怎麼喚醒?按一下右Alt鍵旁邊的菜單鍵就可以喚醒系統了。Q:安卓Android-x86 4.