編輯:關於Android編程
數據庫是Android存儲方案的核心,在Andorid中SQLite非常輕量,而且執行sql語句甚至比MySQL還要快。
SQLiteDatabase 是 Android 中操作數據庫的核心類之一,使用SQLiteDatabase可以打開數據庫,也可以對數據庫進行操作,然而,為了數據庫升級以及使用更加方便,我們常用SQLiteOpenHelper的子類來完成創建,打開數據庫的操作。
SQLiteOpenHelper是一個抽象類,在該類中有下面兩個必須實現的方法:
public void onCreate(SQLiteDatabase db);// 該函數在數據庫第一次被建立時調用
public void onUpgrade(SQLiteDatabase db,int oldVersion,int newVersion);// 數據庫更新升級操作
我們新建一個類DBHelper extends SQLiteOpenHelper
import java.util.Random;

import android.R.bool;
import android.content.Context;
import android.database.Cursor;
import android.database.sqlite.SQLiteDatabase;
import android.database.sqlite.SQLiteDatabase.CursorFactory;
import android.database.sqlite.SQLiteOpenHelper;

public class DBHelper extends SQLiteOpenHelper {

 // 設置數據庫默認版本
 private static final int VERSON = 1;
 // 自定義數據庫名,可以隨便取名字
 private static final String DBNAME = "mydb";

 // 繼承SQLiteOpenHelper類的類必須有自己的構造函數
 // 該構造函數4個參數,直接調用父類的構造函數。其中第一個參數為該類本身;第二個參數為數據庫的名字;
 public DBHelper(Context context, String name, CursorFactory factory,
   int version) {
  super(context, name, factory, version);
 }

 // 該構造函數有3個參數,因為它把上面函數的第3個參數固定為null了
 public DBHelper(Context context, String name, int verson) {
  this(context, name, null, verson);
 }

 // 該構造函數只有2個參數,在上面函數 的基礎上將版本號固定了
 public DBHelper(Context context, String name) {
  this(context, name, VERSON);
 }

 // 該構造函數只有1個參數,固定默認數據庫,在這裡我們實現增刪改查為了方便,就用它了
 public DBHelper(Context context) {
  this(context, DBNAME, null, VERSON);
 }

 // 該函數在數據庫第一次被建立時調用
 public void onCreate(SQLiteDatabase db) {
  System.out.println("create a sqlite database");
  //建表語句(注意:因為在綁定數據時,Cursor對象返回的記錄集中必須包含一個"_id"字段,否則無法完成數據綁定
  String sql = "CREATE TABLE [test]("+
      "[_id] AUTOINC,"+
      "[name] varchar(20),"+
      "[age] varchar(20),"+
      "PRIMARY KEY ([_id]))";
  db.execSQL(sql);

  //向test表中插入10條數據
  for (int i = 1; i <= 10; i++) {
   String name = "Jepson";
   name+=i;
   String age = "age";
   age+=i;
   db.execSQL("insert into test(name,age) values(?,?)",new Object[]{name,age});
  }
 }

 // 數據庫更新操作
 public void onUpgrade(SQLiteDatabase arg0, int arg1, int arg2) {
  System.out.println("update a sqlite database");
 }

 //自定義query方法,用以執行查詢語句,返回Cursor對象
 public Cursor query(String sql,String[] args){
  //調用 getReadableDatabase方法時,如果數據庫文件不存在,會調用 onCreate方法
  SQLiteDatabase db = this.getReadableDatabase();
  Cursor cursor = db.rawQuery(sql, args);
  return cursor;
 }
}
這樣,我們的DBHelper 類寫好了,我們來實現一個查詢操作。
第一步,activity_main.xml添加 listview 展示控件
activity_main.xml
<LinearLayout xmlns:android="http://schemas.android.com/apk/res/android"
 xmlns:tools="http://schemas.android.com/tools"
 android:layout_width="match_parent"
 android:layout_height="match_parent"
 android:background="#FFFFFF"
 android:orientation="vertical"
 tools:context=".MainActivity" >

 <ListView
  android:id="@android:id/list"
  android:layout_width="fill_parent"
  android:layout_height="wrap_content"
  android:layout_weight="1"
  android:divider="#6b6f74"
  android:dividerHeight="1px" >
 </ListView>

</LinearLayout>
第二步,新建一個xml布局文件,用來作為列表項使用的布局資源
user_list_cell.xml
<?xml version="1.0" encoding="utf-8"?>
<LinearLayout xmlns:android="http://schemas.android.com/apk/res/android"
 android:layout_width="match_parent"
 android:layout_height="match_parent"
 android:orientation="vertical"
 android:background="#FFFFFF">
 <!-- 大字體TextView,用以展示 name姓名 -->
 <TextView
  android:id="@+id/tvName"
  android:layout_width="fill_parent"
  android:layout_height="wrap_content"
  android:text="Large"
  android:textColor="#000000"
  android:textSize="20dp" />

 <!-- 小字體TextView,用以展示 age年齡 -->
 <TextView
  android:id="@+id/tvAge"
  android:layout_width="fill_parent"
  android:layout_height="wrap_content"
  android:text="Small"
  android:textColor="#000000"
  android:textSize="14dp" />

</LinearLayout>
第三步,主Activity
import android.os.Bundle;
import android.app.Activity;
import android.app.ListActivity;
import android.database.Cursor;
import android.support.v4.widget.SimpleCursorAdapter;
import android.view.Menu;
import android.widget.Toast;

public class MainActivity extends ListActivity {

 protected void onCreate(Bundle savedInstanceState) {
  super.onCreate(savedInstanceState);
  setContentView(R.layout.activity_main);
  initView();
 }

 public void initView(){
  //調用只有1個參數的構造函數,實例化dbHelper
  DBHelper dbHelper = new DBHelper(this);
  //新建Cursor對象來保存query查詢方法返回的結果,查詢test表中所有記錄
  Cursor cursor = dbHelper.query("select * from test", null);
  //創建SimpleCursorAdapter對象,5個參數,
  //第一個是context,就寫當前this就行
  //第二個是布局文件,我這裡是自定義的布局文件user_list_cell.xml
  //第三個就是Cursor對象
  //第四個對應就是,cursor查詢後,需要顯示出來的字段名,比如我要顯示姓名name和年齡age
  //第五個就是對應列表項布局中的控件ID了
  SimpleCursorAdapter simpleCursorAdapter = new SimpleCursorAdapter(this,
    R.layout.user_list_cell, cursor,
    new String[] { "name", "age" }, new int[] { R.id.tvName,
      R.id.tvAge });
  setListAdapter(simpleCursorAdapter);
  Toast.makeText(this, "查詢成功", Toast.LENGTH_SHORT).show();
 }
}
執行一下看看,我們是不是查詢成功了?
操作SQLite數據庫應了解,對數據庫的增刪改查都有兩種方法,一種是前面的使用 rawQuery方法直接執行SQL語句,另一種就是使用SQLiteDatabase類的相應方法來操作,下面舉一個第二種的例子,比如我們要插入數據 name=11 age=22
import android.os.Bundle;
import android.app.Activity;
import android.app.ListActivity;
import android.database.Cursor;
import android.support.v4.widget.SimpleCursorAdapter;
import android.view.Menu;
import android.widget.Toast;

public class MainActivity extends ListActivity {

 protected void onCreate(Bundle savedInstanceState) {
  super.onCreate(savedInstanceState);
  setContentView(R.layout.activity_main);
  initView();
 }

 public void initView(){
  //執行添加操作
  DBHelper dbHelper = new DBHelper(this);
  //獲得寫入權限getWritableDatabase
  SQLiteDatabase db = dbHelper.getWritableDatabase();
  //新建contentvalues保存insert數據
  ContentValues cv = new ContentValues();
  cv.put("name", "11");
  cv.put("age", "22");
  db.insert("test", null, cv);
  Toast.makeText(this, "添加成功", Toast.LENGTH_SHORT).show();

  ////查詢操作
  ////調用只有1個參數的構造函數,實例化dbHelper
  //DBHelper dbHelper = new DBHelper(this);
  ////新建Cursor對象來保存query查詢方法返回的結果,查詢test表中所有記錄
  //Cursor cursor = dbHelper.query("select * from test", null);
  ////創建SimpleCursorAdapter對象,5個參數,
  ////第一個是context,就寫當前this就行
  ////第二個是布局文件,我這裡是自定義的布局文件user_list_cell.xml
  ////第三個就是Cursor對象
  ////第四個對應就是,cursor查詢後,需要顯示出來的字段名,比如我要顯示姓名name和年齡age
  ////第五個就是對應列表項布局中的控件ID了
  //SimpleCursorAdapter simpleCursorAdapter = new SimpleCursorAdapter(this,
  //  R.layout.user_list_cell, cursor,
  //  new String[] { "name", "age" }, new int[] { R.id.tvName,
  //    R.id.tvAge });
  //setListAdapter(simpleCursorAdapter);
  //Toast.makeText(this, "查詢成功", Toast.LENGTH_SHORT).show();
 }
}
執行插入成功以後,再將插入語句注釋,將查詢語句去掉注釋,重新啟動,會發現最後一多了一個item,添加成功。
另外查詢記錄獲得的Cursor對象,需要使用movetoFirst,moveToNext,movToPosition(position)等方法將指針移動相應的位置,來進行查詢結果的讀取。
import android.os.Bundle;
import android.app.Activity;
import android.app.ListActivity;
import android.database.Cursor;
import android.support.v4.widget.SimpleCursorAdapter;
import android.view.Menu;
import android.widget.Toast;

public class MainActivity extends ListActivity {

 protected void onCreate(Bundle savedInstanceState) {
  super.onCreate(savedInstanceState);
  setContentView(R.layout.activity_main);
  initView();
 }

 public void initView(){
  //解析Cursor對象的查詢操作
  DBHelper dbHelper = new DBHelper(this);
  SQLiteDatabase db = dbHelper.getWritableDatabase();
  Cursor cursor = db.query("test", null, null, null, null, null, null,
    null);
  //定義結果字符串
  String result = "";
  // 判斷cursor不為空 這個很重要
  if (cursor != null) {
   while (cursor.moveToNext()) {
    String name = cursor.getString(cursor.getColumnIndex("name"));// 獲取name列的值
    String age = cursor.getString(cursor.getColumnIndex("age"));// 獲取age列的值
    result += "姓名:" + name + ",年齡:" + age + "\n";
   }
  }
  cursor.close();
  db.close();
  System.out.println(result);
  Toast.makeText(this, result, Toast.LENGTH_SHORT).show();

  // //執行添加操作
  // DBHelper dbHelper = new DBHelper(this);
  // //獲得寫入權限getWritableDatabase
  // SQLiteDatabase db = dbHelper.getWritableDatabase();
  // //新建contentvalues保存insert數據
  // ContentValues cv = new ContentValues();
  // cv.put("name", "11");
  // cv.put("age", "22");
  // db.insert("test", null, cv);
  // Toast.makeText(this, "添加成功", Toast.LENGTH_SHORT).show();

  ////查詢操作
  ////調用只有1個參數的構造函數,實例化dbHelper
  //DBHelper dbHelper = new DBHelper(this);
  ////新建Cursor對象來保存query查詢方法返回的結果,查詢test表中所有記錄
  //Cursor cursor = dbHelper.query("select * from test", null);
  ////創建SimpleCursorAdapter對象,5個參數,
  ////第一個是context,就寫當前this就行
  ////第二個是布局文件,我這裡是自定義的布局文件user_list_cell.xml
  ////第三個就是Cursor對象
  ////第四個對應就是,cursor查詢後,需要顯示出來的字段名,比如我要顯示姓名name和年齡age
  ////第五個就是對應列表項布局中的控件ID了
  //SimpleCursorAdapter simpleCursorAdapter = new SimpleCursorAdapter(this,
  //  R.layout.user_list_cell, cursor,
  //  new String[] { "name", "age" }, new int[] { R.id.tvName,
  //    R.id.tvAge });
  //setListAdapter(simpleCursorAdapter);
  //Toast.makeText(this, "查詢成功", Toast.LENGTH_SHORT).show();
 }
}
執行以後,可以發現,name和age全都獲取到了,並顯示在了Toast和system.out中。是不是很有意思呢?
以上就是本文的全部內容,希望對大家的學習有所幫助,也希望大家多多支持本站。
 開發首屏廣告(Android)簡述
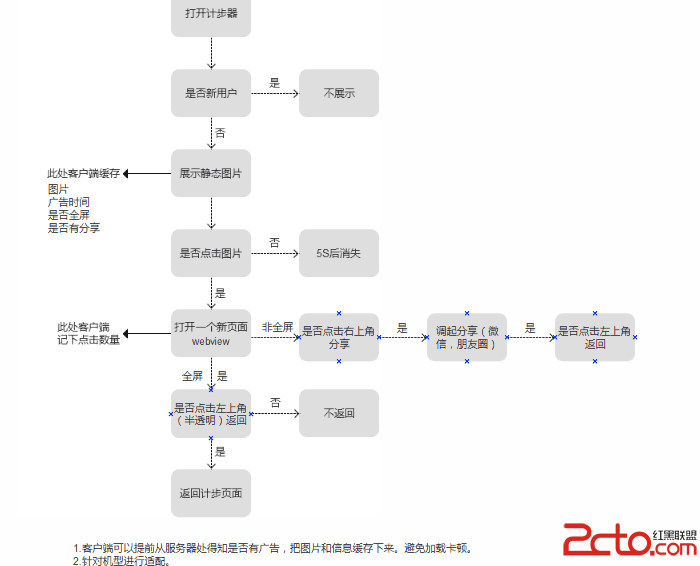
作為一個成熟的應用, 必須要有廣告. 那麼, 如何優雅地開發廣告呢? 需要注意一些細節.本文提供一個簡單的示例, 代碼僅供參考.需求:1. 下載廣告在歡迎頁面中, 啟動一
 UIPickerView的使用
UIPickerView功能與UIDatePicker類似初始化實例時,通常只需要設置原點坐標,不需要設置寬高(默認寬高為:frame = (0 0; 320 216))
 Android App中使用Pull解析XML格式數據的使用示例
Pull解析XML文件的方式與SAX解析XML文件的方式大致相同,他們都是基於事件驅動的。所以,利用pull解析XML文件需要下面幾個步驟: &nb
 Android的activity學習筆記
一、什麼是activity Activity 是用戶接口程序,原則上它會提供給用戶一個交互式的接口功能。它是 android 應用程